Add custom matchmaking menu - Game client integration - (Unity module)
What's on the menu
This tutorial shows how to prepare the menu used to perform matchmaking with the sample matchmaking backend service. The menu is available in the Resources section and consist of the following files:
CustomMatchmakingMenu_Starter: A C# class used to start matchmaking by initiating a WebSocket connection to the sample matchmaking backend service.- CS file:
Assets/Resources/Modules/CustomMatchmaking/Scripts/UI/CustomMatchmakingMenu_Starter.cs - Prefab file:
Assets/Resources/Modules/CustomMatchmaking/Prefabs/CustomMatchmakingMenu_Starter.prefab
- CS file:
Take a look at more details on how this menu is constructed.
Custom matchmaking menu
The custom matchmaking menu displays a single button. When clicked, the game starts matchmaking by initiating a WebSocket connection to the sample matchmaking backend service.
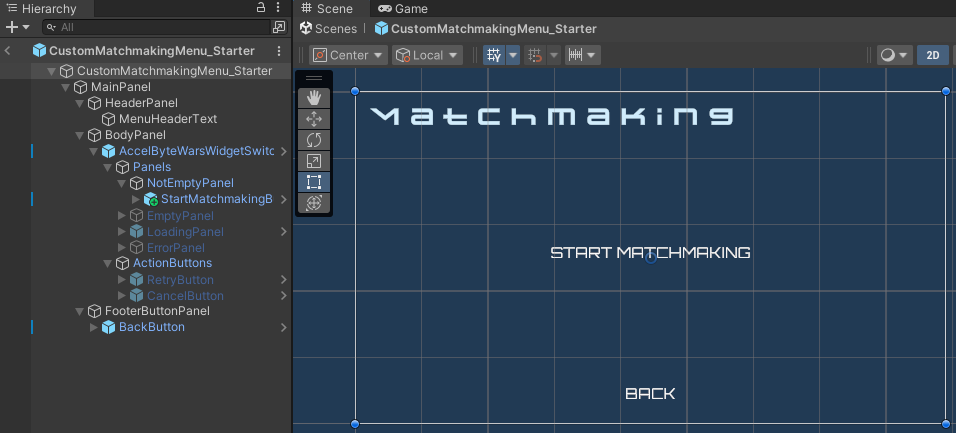
This menu has a custom component called AccelByteWarsWidgetSwitcher that is used to display message based on matchmaking state (e.g. loading and error message). The declarations of the UI components used in this menu are as below:
[SerializeField] private AccelByteWarsWidgetSwitcher widgetSwitcher;
[SerializeField] private Button startMatchmakingButton;
[SerializeField] private Button backButton;
Ready the UI
In this section, you learn how to prepare the custom matchmaking menu so you can follow along with the tutorial.
-
Open the
CustomMatchmakingMenu_Starterclass. Then, create a new function to start matchmaking. Later, you will implement a wrapper to open WebSocket connection to the sample matchmaking backend service. For now, add the code below to switch the menu state to the loading state with a message indicating the matchmaking is requested.private void StartMatchmaking()
{
widgetSwitcher.LoadingMessage = CustomMatchmakingModels.RequestMatchmakingMessage;
widgetSwitcher.EnableCancelButton(false);
widgetSwitcher.SetWidgetState(WidgetState.Loading);
} -
Next, create a new function to cancel the matchmaking. Later, you will implement a wrapper to close the WebSocket connection from the sample matchmaking backend service. For now, add the code below to switch the menu state to the loading state with a message indicating the matchmaking is canceled.
private void CancelMatchmaking()
{
    widgetSwitcher.LoadingMessage = CustomMatchmakingModels.CancelMatchmakingMessage;
    widgetSwitcher.EnableCancelButton(false);
    widgetSwitcher.SetWidgetState(WidgetState.Loading);
} -
When the matchmaking is in progress and not canceled, we should prevent the user from closing the menu. Thus, create a new helper function below to hide the back button if the menu state is in loading state.
private void OnSwitcherStateChanged(WidgetState state)
{
    backButton.gameObject.SetActive(state != WidgetState.Loading);
} -
Now, create the Unity's
OnEnable()function and add the code below to bind the functions you created earlier to the respective buttons and events when the custom matchmaking menu is displayed.private void OnEnable()
{
startMatchmakingButton.onClick.AddListener(StartMatchmaking);
backButton.onClick.AddListener(MenuManager.Instance.OnBackPressed);
widgetSwitcher.OnRetryButtonClicked += StartMatchmaking;
widgetSwitcher.OnCancelButtonClicked += CancelMatchmaking;
widgetSwitcher.OnStateChanged += OnSwitcherStateChanged;
widgetSwitcher.SetWidgetState(WidgetState.Not_Empty);
} -
Next, create the Unity's
OnDisable()function and add the code below to unbind the functions you created ealier when the custom matchmaking menu is closed.private void OnDisable()
{
startMatchmakingButton.onClick.RemoveAllListeners();
backButton.onClick.RemoveAllListeners();
widgetSwitcher.OnRetryButtonClicked -= StartMatchmaking;
widgetSwitcher.OnCancelButtonClicked -= CancelMatchmaking;
widgetSwitcher.OnStateChanged -= OnSwitcherStateChanged;
} -
Now, back to the Unity Editor, go to the
Assets/Resources/Modules/CustomMatchmaking, and open theCustomMatchmakingAssetConfig.asset. Then, make sure to activate the module in starter mode by ticking theIs Activecheckbox and theIs Starter Activecheckbox. This setting activates the custom matchmaking starter files, including the custom matchmaking menu you modified earlier. -
Finally, try to play the game in Unity Editor. You can navigate to Custom Matchmaking menu and if you click the Start Matchmaking button, the menu will transition to the loading state showing a message that the matchmaking is requested.
Resources
-
The files used in this tutorial section are available in the Unity Byte Wars GitHub repository.