Unity Peer-to-peer
Overview
:::sharedCloudWarning This topic applies to the AccelByte Gaming Services (AGS) Shared Cloud tier. :::
The AccelByte Gaming Services (AGS) Shared Cloud's Peer to Peer for Unity (P2P) allows players to establish peer-to-peer connection across private networks conveniently through the AccelByte Turn Server with AccelByteNetworkTransportManager as the main layer. It adopts the Unity.Netcode.NetworkTransport interface with some specific initialization to allow it to run using AccelByte service. After initialization, the usage is straightforward and follows the Unity Netcode for Game Object.
Prerequisites:
This tutorial assumes you are using the following:
- AGS Shared Cloud Unity SDK version 15.15.0
- AGS Shared Cloud P2P Unity version 0.2.5
- Unity Netcode version 1.0.0
The other versions may not be compatible or have different steps to implement with the current documentation.
Quick References
References
using AccelByte.Api;
using AccelByte.Core;
using AccelByte.Models;
using Unity.Netcode;
using Unity.WebRTC;
WebRTC Initialization
WebRTC.Initialize(type: WebRTC.HardwareEncoderSupport() ? EncoderType.Hardware : EncoderType.Software, limitTextureSize: true, enableNativeLog: true, nativeLoggingSeverity: NativeLoggingSeverity.LS_ERROR);
AccelByte API Client Initialization
var apiClient = AccelByteSDK.GetClientRegistry().GetApi();
AccelByte SDK Services (MultiRegistry) Initialization
user = apiClient.GetApi<User, UserApi>();
lobby = apiClient.GetApi<Lobby, LobbyApi>();
sessionBrowser = apiClient.GetApi<SessionBrowser, SessionBrowserApi>();
Network Transport Manager Initialization
AccelByteNetworkTransportManager transportManager;
transportManager.Initialize(apiClient);
Create Session
// configure session setting
SessionBrowserGameSetting setting = new SessionBrowserGameSetting();
setting.mode = "game_mode";
setting.map_name = "default_mapname";
setting.num_bot = 0;
setting.max_player = 1;
setting.max_internal_player = 1;
setting.current_player = 1;
setting.current_internal_player = 1;
setting.allow_join_in_progress = true;
setting.password = "session_password";
setting.settings = new JObject();

// create session
transportManager.SetSessionBrowserCreationRequest(setting, "host_username", "game_version");
transportManager.StartServer();
Find Session
// configure sessions' query filter
SessionBrowserQuerySessionFilter sessionFilter = new SessionBrowserQuerySessionFilter
{
    sessionType = SessionType.p2p,
    gameMode = gameMode
};

// get all sessions with SessionBrowser API
sessionBrowser.GetGameSessions(sessionFilter, result =>
{
    if (result.IsError || result.Value == null || result.Value.sessions == null || result.Value.sessions.Length == 0)
    {
        Debug.Log($"Get Game Sessions failed : {result.Error.Code}, Description : {result.Error.Message}");
    }
    else
    {
        Debug.Log("Get Game Sessions successful");
    }
});
Join Session
transportManager.SetTargetHostUserId(targetHostUserID);
transportManager.StartClient();
Leave Session
transportManager.Shutdown();
Send Data
byte[] decodedMessage = Encoding.ASCII.GetBytes(messageData);
transportManager.Send(clientId, new ArraySegment<byte>(decodedMessage), NetworkDelivery.Reliable);
Poll Event
while (transportManager != null && transportManager?.PollEvent(out clientId, out payload, out pollReceiveTime) != NetworkEvent.Nothing)
{
    string content = Encoding.ASCII.GetString(payload.Array);
}
Quick Start Guide
In this tutorial, you will learn how to set up Turn Server and implement P2P services.
Plugins Configuration
Make sure you have added the AccelByte Unity SDK and AccelByte Unity Networking in the Package Manager.
Configure the AccelByte Unity SDK. You can follow the Unity SDK guide for help.
To configure the Turn Server, open your Unity Editor, then select AccelByte > Edit Settings from the Menu
To configure the Turn Server, open your Unity Editor, then select AccelByte > Edit Settings from the Menu
Fill in the TURN-related values in the Settings.
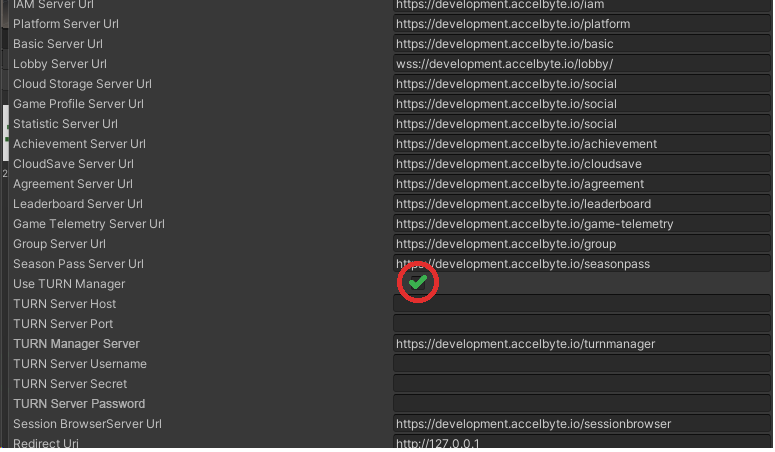
You can also set these values from AccelByteSDKConfig.json:
"UseTurnManager": true
P2P Main Functionalities
This guide assumes that you have already implemented the Authentication service to use P2P Functionalities.
Create a new script called CustomGameHandler.cs and add the following AccelByte libraries to the top of the script.
using AccelByte.Api;
using AccelByte.Core;
using AccelByte.Models;
using Unity.Netcode;
using Unity.WebRTC;
Initialize WebRTC library for the connection and call the destroy WebRTC function
OnApplicationQuit().void Start()
{
WebRTC.Initialize(type: WebRTC.HardwareEncoderSupport() ? EncoderType.Hardware : EncoderType.Software, limitTextureSize: true, enableNativeLog: true, nativeLoggingSeverity: NativeLoggingSeverity.LS_ERROR);
}
private void OnApplicationQuit()
{
WebRTC.Dispose();
}To be able to use the AccelByte's SDK and Unity Networking, we need to create an API Client and initialize the SDK's User, Lobby, and SessionBrowser API.
private ApiClient apiClient;
private Lobby lobby;
private SessionBrowser sessionBrowser;

private void Start()
{
    ...
    // configure API Client for player
    var apiClient = AccelByteSDK.GetClientRegistry().GetApi();
    var lobby = apiClient.GetLobby();
    var sessionBrowser = apiClient.GetSessionBrowser();
}
Prepare a local variable for AccelByteNetworkTransportManager and create a function to initialize the Transport Manager with AccelByte's API Client.
private AccelByteNetworkTransportManager transportManager;

private void InitializeNetworkManager()
{
    if (transportManager == null)
    {
        transportManager = gameObject.AddComponent<AccelByteNetworkTransportManager>();
    }
    transportManager.Initialize(apiClient);
}NOTEIf you have Unity Netcode NetworkManager in your scene's singleton, you can pass the reference of the component to the NetworkTransport selection.
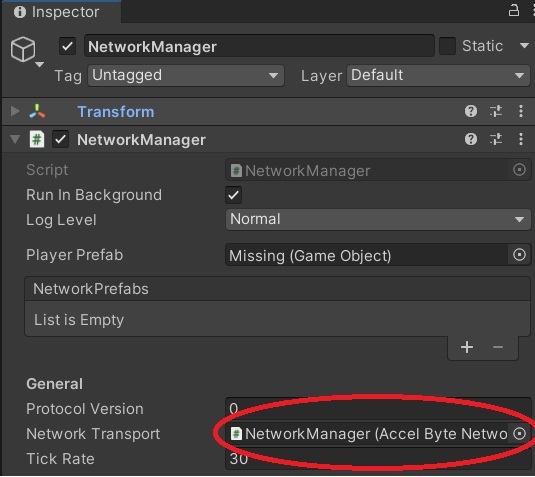
Create a function to implement the Lobby service, then call the
InitializeNetworkManager()function when the Lobby is connected by usinglobby.Connectednotification event. Call this function when the login attempt is successful from your Login IAM implementation.public void ConnectLobby()
{
lobby.Connected += () => InitializeNetworkManager();
if (!lobby.IsConnected)
{
lobby.Connect();
}
}Move to the P2P Session functionalities, create some new functions in the CustomGamesHandler.cs.
Create Session
As a host, you need to specify your session settings first using the
SetSessionBrowserCreationRequest()function, then call theStartHost()function to create the session and start the Server.public void CreateSession()
{
SessionBrowserGameSetting setting = new SessionBrowserGameSetting();
setting.mode = "gamemode_name";
setting.map_name = "default";
setting.max_player = 2;
setting.current_player = 1;
setting.allow_join_in_progress = true;
// create a session with SessionBrowser API
transportManager.SetSessionBrowserCreationRequest(setting, userSession.userName, gameVersion);
transportManager.StartServer();
}Required setting's properties to create a session:
- mode : game mode's name that will be used for the session
- map_name : map's name used for the session
- max_player : maximum number of active players in the session
- current_player : total number of the current player in the session
Other optional setting's properties for your session configuration:
- num_bot : total number of existing bots for the session
- max_internal_player : maximum number of internal/non-active players in the session
- current_internal_player : total number of the current internal/non-active players in the session
- password : the session's password
- settings : empty JsonObject for storing any custom data
NOTEIf you have a NetworkManager, you can directly call the
NetworkManager.Singleton.StartHost()that will start the host and server.Find Session
To get all available sessions as a client, you can use the SessionBrowser's
GetGameSessions()function. To use this function, create its query filter first that is needed as theGetGameSessions()function's parameter.public void FindSessions()
{
// set filter for the GetGameSessions query result
SessionBrowserQuerySessionFilter sessionFilter = new SessionBrowserQuerySessionFilter();
sessionFilter.sessionType = SessionType.p2p;
// get all sessions with SessionBrowser API
sessionBrowser.GetGameSessions(sessionFilter, result =>
{
if (result.IsError || result.Value.sessions == null)
{
Debug.Log($"Get Game Sessions failed");
}
else
{
// loop all available sessions
foreach (SessionBrowserData sessionData in result.Value.sessions)
{
Debug.Log($"Session host id: {sessionData.user_id}");
}
}
});
}Join Session
As a client, to join a session, you will need to set the host's user id that you can retrievet from the SessionBrowserData, then call the
StartClient()to join the connection.public void JoinSession(string targetHostUserID, string sessionId, string sessionPassword = "")
{
// join p2p connection to session's host
Debug.Log($"Connecting to: {targetHostUserID}");
transportManager.SetTargetHostUserId(targetHostUserID);
transportManager.StartClient();
}NOTEIf you have a NetworkManager, you can directly call the
NetworkManager.Singleton.StartClient()functionLeave Session
To leave the session, either as the host or client, you only need to call the Shutdown() function. This function automatically checks if the player is a host or client and acts accordingly as explained below:
- If the player is a host, close the connection and remove the session.
- If the player is a client, disconnect from the host
private void LeaveSession()
{
  transportManager.Shutdown();
}NOTEIf you have a NetworkManager, you can directly call the
NetworkManager.Singleton.Shutdown()function
To establish a communication between host and client, you can send data with the
Send()function. This function requires the targeted client id and the message data (string) that you want to send.public void SendData(ulong clientId, string messageData)
{
byte[] decodedMessage = Encoding.ASCII.GetBytes(messageData);
transportManager.Send(clientId, new ArraySegment<byte>(decodedMessage), NetworkDelivery.Reliable);
}IMPORTANTNote that due to the length limitation for ArraySegment<byte>, you can only send and receive a short message.
If you want to send more complex data, we recommend that you use Netcode's Custom Messaging instead.
To receive the data that the other client sent in real time, add the
PollEvent()function in theUpdate()function.void Update()
{
float pollReceiveTime = 0.0f;
ArraySegment<byte> payload = new ArraySegment<byte>();
ulong clientId = 0;
while (transportManager != null && transportManager?.PollEvent(out clientId, out payload, out pollReceiveTime) != NetworkEvent.Nothing)
{
string content = Encoding.ASCII.GetString(payload.Array);
Debug.Log($"[ReadyMatch] Received Data! {clientId} => {content}");
}
}Similar to Unity's
HandleRawTransportPoll()function, you will need to handle each type of the NetworkEvent and process the payload accordingly.If you want to be notified regarding the Network Transport's connection updates, you can define the TransportEventDelegate and subscribe to the OnTransportEvent that will invoke these NetworkEvent:
- Data : when the client receives any kind of data
- Connect : when any client is connected to the server
- Disconnect : when any client is disconnected from the server
- Nothing : not triggered, received when there's no new event
You can define this delegate any time after calling the transportManager.Initialize().
private void InitializeNetworkManager()
{
    ...

    // Initialize TransportEventDelegate
    NetworkTransport.TransportEventDelegate action = (NetworkEvent eventType, ulong clientId, ArraySegment<byte> payload, float receiveTime) =>
    {
        switch (eventType)
        {
            case NetworkEvent.Data:
                break;
            case NetworkEvent.Connect:
                Debug.Log($"Connection established with clientid: {clientId}");
                break;
            case NetworkEvent.Disconnect:
                Debug.Log($"Disconnected from clientid: {clientId}");
                break;
            case NetworkEvent.Nothing:
                break;
        };
    };
    transportManager.OnTransportEvent += action;
}IMPORTANTNote that the
clientIdreceived from theTransportEventDelegateis different from theclientIdfromNetworkManager.The
clientIdfromTransportEventDelegateis from theAccelByteUnityICEPeerIDwhile theNetworkManagerclientIdis generated by default fromNetworkManager.To get the current session id, you can use the following function from the host side.
transportManager.GetHostedSessionID();NOTEThe current session id will be added after the Creating Session process is finished, so you might need to wait a frame to get the session id.
To test your functions, you can call the P2P functions after connecting to the lobby. Make sure you have called the
ConnectLobby()function after the login attempt is successful.public void ConnectLobby()
{
...
// Call the P2P Session Functions here accordingly
CreateSession("session_name", "");
}When you press Play, you should now see that the functions have been executed. Once completed, please remove this debug check from your script.
Congratulations! You have learnt how to implement P2P Session Functionalities.
Continue on for a step-by-step example of the widget and code implementation.
Step by Step Guide
UI Implementation
Create an empty object (such as AccelByteHandler) to hold all of the script components of AccelByte services script handler.
For Custom Games Page, create a new panel or scene.
Since Custom Games Page have a lot things to display, we will divide the page into two sections:
Left Panel
Server List Scroll View, to list all the available sessions
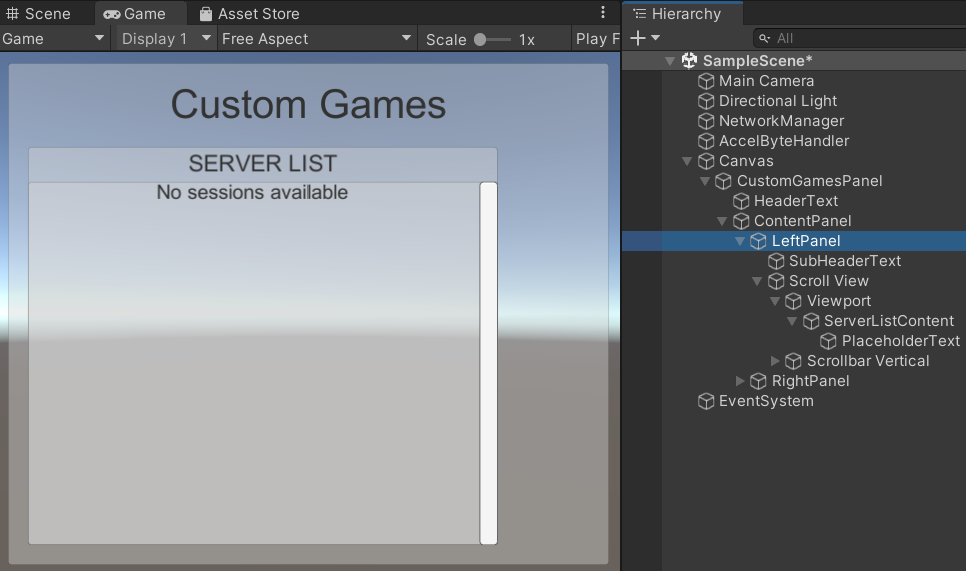
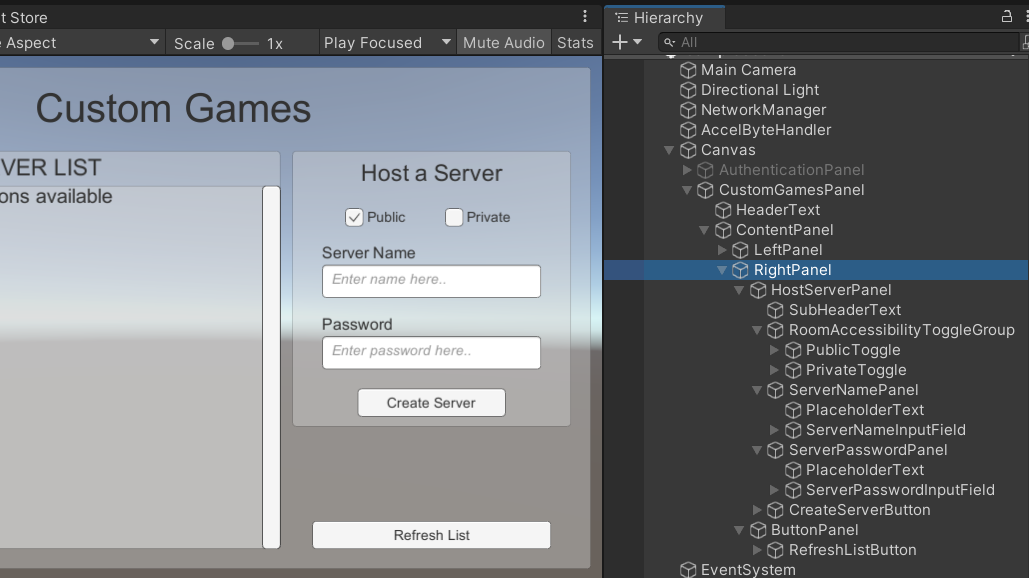
Right Panel
Server Name Input Field
Server Password Input Field
Create Server Button
Refresh List Button, to refresh the Server List
Also prepare a pop up to input session password by creating a panel that has these objects:
Join Password Input Field
Confirm Button
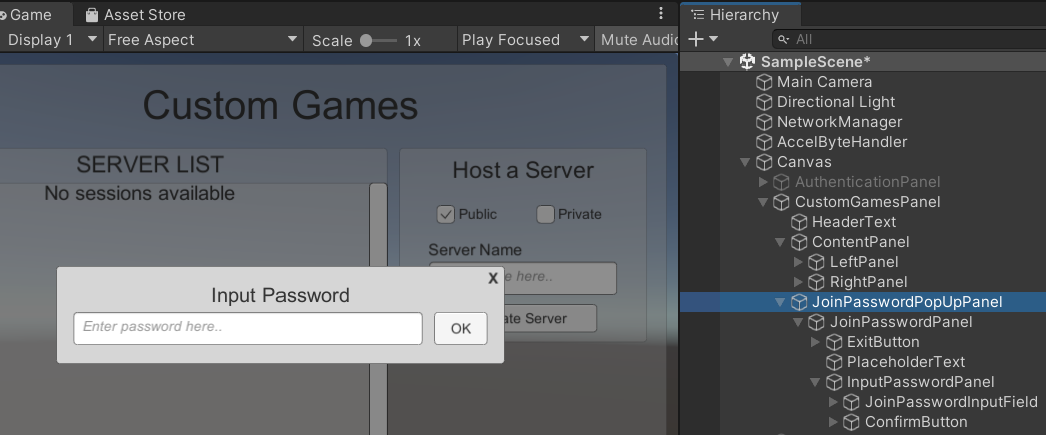
Prepare a prefab for Server Info Panel to handle displaying the session info by creating a new panel prefab that has these objects:
Server Name Text
Room Accessibility Text
Game Mode Text
Server Capacity Text
Join Button, to join the selected server

For Session Room Page, create a new panel and make sure it has these following objects:
Server Name Text
2 Team List Panel, to store each team A or team B players info
Ready Button, to confirm player's ready consent
Leave Button, to leave session
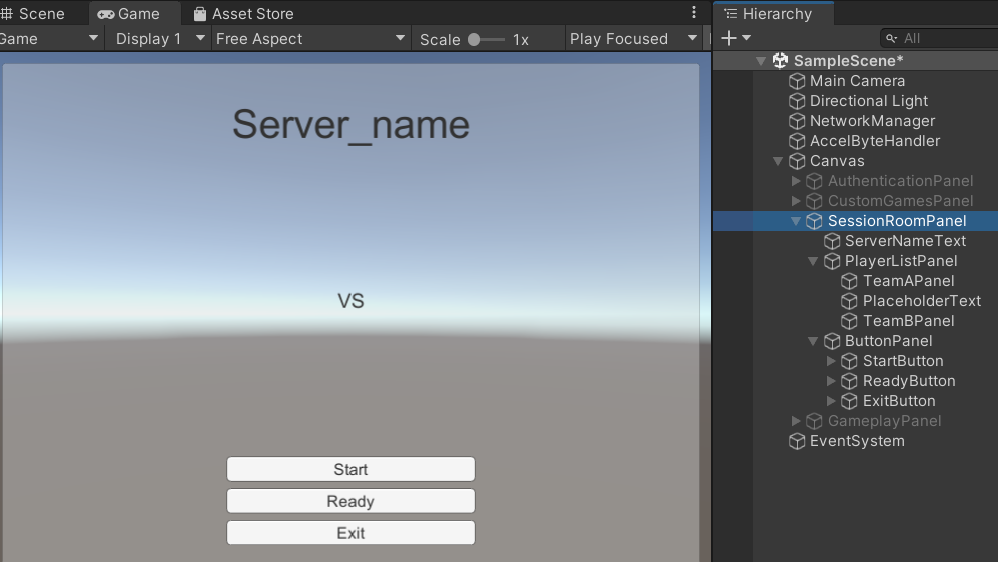
Prepare a prefab for Player Ready Panel to handle displaying player info and ready consent. Create a panel prefab that has these following objects:
Display Name Text
Ready Consent Toggle
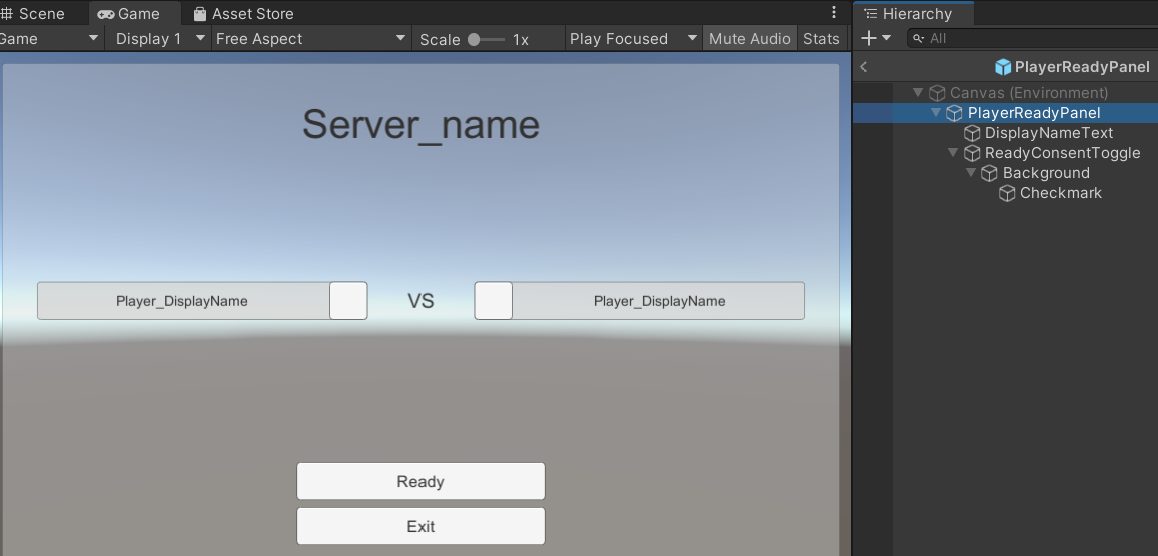
Code Implementation
You can follow this section to see how to implement the code based on the tutorial project. In this example, we will use Network Manager with AccelByteNetworkTransportManager.
You need to implement Login and Lobby services to continue with this section. We won't cover the Authentication implementation, but you still can see how we implement it inside the example project that you can access here.
Create Session Form
Make sure you have a game object called NetworkManager with NetworkManager script in the component along the AccelByteNetworkTransportManager as the NetworkTransport.
Open the CustomGamesHandler.cs and add the following libraries to the top of the script
using UnityEngine.UI;
using Newtonsoft.Json.Linq;
using System.Collections.Generic;
Add any Create Session's UI references in the CustomGamesHandler class. Since we are using NetworkManager, add the transportManager reference for easier access.
public GameObject CustomGamesWindow;

[Header("Host a Server")]
[SerializeField]
private GameObject sessionPasswordPanel;
[SerializeField]
private Toggle publicToggle;
[SerializeField]
private Toggle privateToggle;
[SerializeField]
private InputField sessionNameInputField;
[SerializeField]
private InputField sessionPasswordInputField;
[SerializeField]
private Button createServerButton;
Save and return to the editor. In the AccelByteHandler gameobject, add the CustomGamesHandler script as component and drag the corresponding objects into the exposed variables.
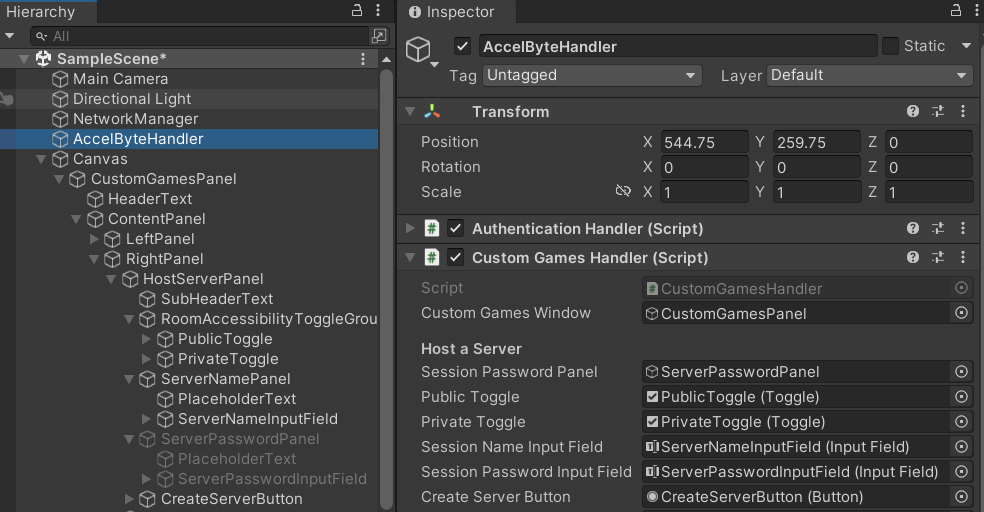
Go back to the CustomGamesHandler.cs, then add the following variable that stores necessary data for creating session and UI.
public PublicUserData userSession;

private const string gameVersion = "1.0.0";
private const string gameMode = "1vs1";
private string roomAccessibility = "public";

private static bool isInitialized = false;
Initialize the User API to get the user data later in CustomGamesHandler.cs
private User user;

private void Start()
{
    ...
    user = apiClient.GetApi<User, UserApi>();
}
Create a function to set up all the UI state and listener in CustomGamesHandler.cs.
public void Setup()
{
    CustomGamesWindow.SetActive(true);

    if (!isInitialized)
    {
        isInitialized = true;

        // setup HostServerPanel's UIs
        publicToggle.onValueChanged.AddListener((bool on) =>
        {
            sessionPasswordPanel.SetActive(false);
            roomAccessibility = "public";
        });
        privateToggle.onValueChanged.AddListener((bool on) =>
        {
            sessionPasswordPanel.SetActive(true);
            roomAccessibility = "private";
        });
        createServerButton.onClick.AddListener(() =>
        {
            CreateSession(sessionNameInputField.text, sessionPasswordInputField.text);

            // reset HostServerPanel's UIs
            sessionNameInputField.text = "";
            sessionPasswordInputField.text = "";
            publicToggle.isOn = true;
        });
}
Since we also need the current user data, add the following code inside the
Setup()function.public void Setup()
{
...
// get current user data
user.GetUserByUserId(user.Session.UserId, userResult =>
{
if (!userResult.IsError)
{
userSession = userResult.Value;
Debug.Log($"current userid: {userSession.userId}");
}
});
}Call the
Setup()function before connect to lobbypublic void ConnectLobby()
{
Setup();
...
}Now, let's modify the
CreateSession()function and store the session name, session password and room accessibility that the player has configured from the UI.public void CreateSession(string sessionName, string sessionPassword)
{
...
setting.mode = gameMode;
...
// set password if the room accessibility is private
if (roomAccessibility == "private")
{
setting.password = sessionPassword;
}
// store session name and room accessibility data to settings JSON Object
JObject settingJsonObject = new JObject();
settingJsonObject.Add("session_name", sessionName);
settingJsonObject.Add("room_accessibility", roomAccessibility);
setting.settings = settingJsonObject;
// create a session with SessionBrowser API
transportManager.SetSessionBrowserCreationRequest(setting, userSession.userName, gameVersion);
...
}
List All Available Session
To update the Server Info Panel prefab, create a script called ServerInfoPanel.cs and add the following libraries at the top of the script.
using AccelByte.Models;
using UnityEngine;
using UnityEngine.UI;
Add the Server Info Panel's UI references and some local variables to store session data in ServerInfoPanel.cs
[SerializeField]
private Text sessionNameText;
[SerializeField]
private Text roomAccessibilityText;
[SerializeField]
private Text gameModeText;
[SerializeField]
private Text serverCapacityText;

private string hostUserId;
private string roomAccessibility;
Create a new function in ServerInfoPanel.cs to update the Session Data to the UI.
public void Create(SessionBrowserData sessionData)
{
    Debug.Log("[ServerInfo] Updating Server Info data...");

    hostUserId = sessionData.user_id;
    roomAccessibility = sessionData.game_session_setting.settings.GetValue("room_accessibility").ToString();

    // update data to Text UIs
    sessionNameText.text = sessionData.game_session_setting.settings.GetValue("session_name").ToString();
    gameModeText.text = sessionData.game_session_setting.mode;
    roomAccessibilityText.text = roomAccessibility;

    int currentPlayers = sessionData.players.Length;
    int maxPlayers = sessionData.game_session_setting.max_player;
    string capacity = currentPlayers.ToString() + "/" + maxPlayers.ToString();
    serverCapacityText.text = capacity;
}
Save and open the editor, then add the ServerInfoPanel script as component in the prefab gameobject. Drag these objects as references to the exposed variables:
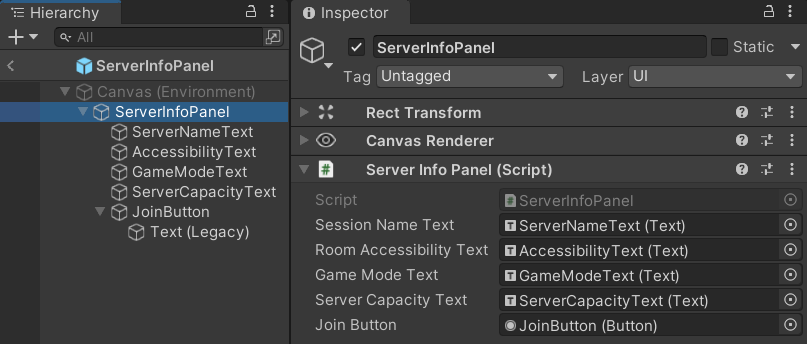
Back to the CustomGamesHandler.cs, create a function that will destroy all the children of the parent transform to reset the UI.
private void LoopThroughTransformAndDestroy(Transform parent, Transform doNotRemove = null)
{
    //Loop through all the children and add them to a List to then be deleted
    List<GameObject> toBeDeleted = new List<GameObject>();
    foreach (Transform t in parent)
    {
        //except the Do Not Remove transform if there is one
        if (t != doNotRemove)
        {
            toBeDeleted.Add(t.gameObject);
        }
    }
    //Loop through list and Delete all Children
    for (int i = 0; i < toBeDeleted.Count; i++)
    {
        Destroy(toBeDeleted[i]);
    }
}
Add all List Session's UI references in the CustomGamesHandler class.
[SerializeField]
private Button refreshListButton;
[SerializeField]
private Button backToLobbyButton;

[Header("Server List")]
[SerializeField]
private Transform serverListContent;
[SerializeField]
private Transform serverListPlaceholderText;
[SerializeField]
private GameObject serverInfoPrefab;
Now save and return to the editor. In the AccelByteHandler gameobject, drag these following objects to their exposed variables.
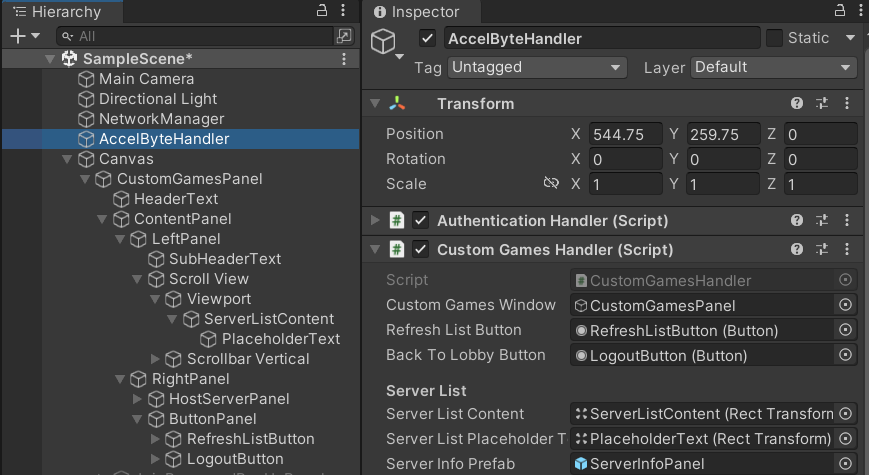
Go back to the CustomGamesHandler.cs. In the
Setup()function, set the List Session's UI state and listeners.public void Setup()
{
...
if (!isInitialized)
{
...
// setup ButtonPanel's UIs
refreshListButton.onClick.AddListener(() => FindSessions());
backToLobbyButton.onClick.AddListener(() =>
{
CustomGamesWindow.SetActive(false);
GetComponent<AuthenticationHandler>().OnLogoutClicked();
});
}
// refresh the server list on opening the Custom Games page
refreshListButton.onClick.Invoke();
...
}Modify the
FindSessions()function to instantiate prefab to display the session list data.public void FindSessions()
{
...
if (result.IsError || result.Value.sessions == null)
{
...
LoopThroughTransformAndDestroy(serverListContent, serverListPlaceholderText);
serverListPlaceholderText.gameObject.SetActive(true);
}
else
{
...
serverListPlaceholderText.gameObject.SetActive(false);
LoopThroughTransformAndDestroy(serverListContent, serverListPlaceholderText);
foreach (SessionBrowserData sessionData in result.Value.sessions)
{
Debug.Log($"[CustomGames] session name: {sessionData.game_session_setting.settings.GetValue("session_name")} || {sessionData.session_id}");
ServerInfoPanel infoPanel = Instantiate(serverInfoPrefab, serverListContent).GetComponent<ServerInfoPanel>();
infoPanel.Create(sessionData);
}
}
...
}
Join a Session
Create an instance in the CustomGamesHandler.cs, so the prefabs can access this class later.
/// Private Instance
static CustomGamesHandler _instance;
/// The Instance Getter
public static CustomGamesHandler Instance => _instance;

private void Awake()
{
    //Check if another Instance is already created, and if so delete this one, otherwise destroy the object
    if (_instance != null && _instance != this)
    {
        Destroy(this);
        return;
    }
    else
    {
        _instance = this;
    }
}
Add the Join Session's UI references in the CustomGamesHandler.cs
[Header("Join Session")]
[SerializeField]
private GameObject joinPasswordPopUpPanel;
[SerializeField]
private InputField joinPasswordInputField;
[SerializeField]
private Button confirmPasswordButton;
[SerializeField]
private Button exitButton;
Save the file, then go to the editor. In the AccelByteHandler gameobject, under the Custom Games Handler component, drag the corresponding objects to their variables as references.
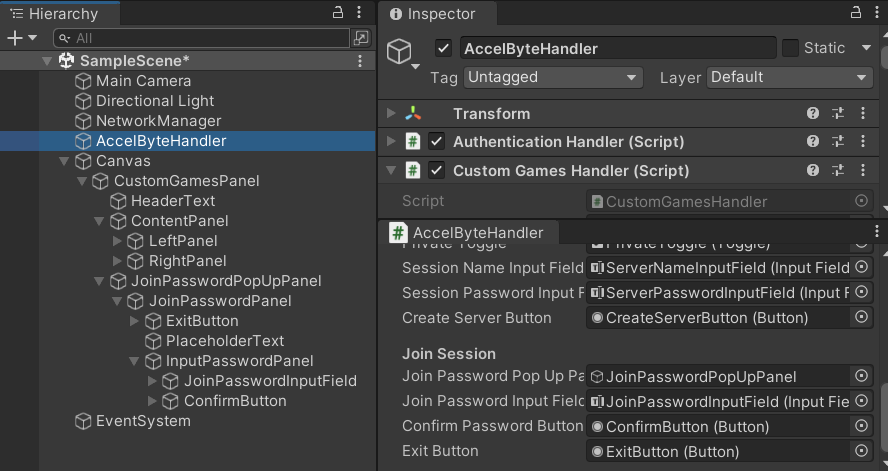
In the CustomGamesHandler.cs, set up the exitButton listener inside the
Setup()function.public void Setup()
{
...
if (!isInitialized)
{
...
// setup JoinPassword's UIs
exitButton.onClick.AddListener(() =>
{
joinPasswordPopUpPanel.SetActive(false);
});
...
}Create a new function to check if the session is private or public. If it's private, then display the Join Password Pop Up Panel to confirm the session's password.
public void CheckSessionPassword(string targetHostUserId, string sessionId, string roomAccessibility)
{
    if (roomAccessibility == "private")
    {
        // reset JoinPasswordPanel
        joinPasswordInputField.text = "";
        confirmPasswordButton.onClick.RemoveAllListeners();

        joinPasswordPopUpPanel.SetActive(true);

        Debug.Log("[CustomGames] Room session is private");
        confirmPasswordButton.onClick.AddListener(() =>
        {
            JoinSession(targetHostUserId, sessionId, joinPasswordInputField.text);
            joinPasswordPopUpPanel.SetActive(false);
        });
    }
    else
    {
        Debug.Log("[CustomGames] Room session is public");
        JoinSession(targetHostUserId, sessionId);
    }
}
Now let's prepare the Server Info Panel to be able to join the selected session. Open the ServerInfoPanel.cs and add the Join Button's UI reference.
[SerializeField]
private Button joinButton;
Modify the
Create()function in the ServerInfoPanel.cs to set up the Join Button's listener. Also, disable the button if the session is full based on the currentPlayers and maxPlayers variables value.public void Create(SessionBrowserData sessionData)
{
...
// add listener to button
joinButton.onClick.AddListener(() =>
{
CustomGamesHandler.Instance.CheckSessionPassword(hostUserId, sessionData.session_id, roomAccessibility);
});
// disable button if room session is full
if (currentPlayers == maxPlayers)
{
joinButton.interactable = false;
}
else
{
joinButton.interactable = true;
}
}
Get Current Session Id
Create a new script called SessionRoomHandler.cs and add the following libraries inside the script.
using AccelByte.Api;
using AccelByte.Core;
using System.Collections.Generic;
using Unity.Netcode;
using UnityEngine.UI;
Add the following UI references in the SessionRoomHandler.cs
public GameObject SessionRoomWindow;

[Header("Network Related")]
[SerializeField]
private AccelByteNetworkTransportManager transportManager;
Now save and return to the editor, then add the SessionRoomHandler script as component in AccelByteHandler gameobject. Also, drag these objects to their corresponding variables.
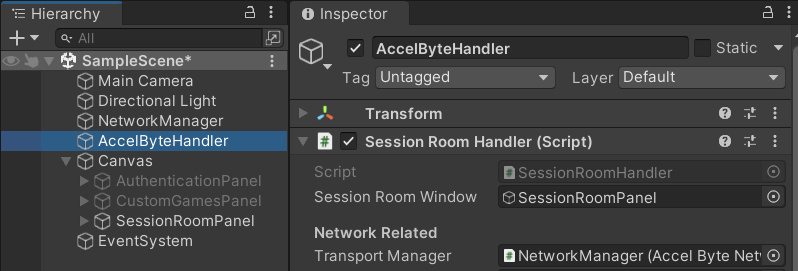
In the SessionRoomHandler.cs, define the SDK's API Client and Session Browser inside the
Start()function.private ApiClient apiClient;
private SessionBrowser sessionBrowser;
private void Start()
{
// configure API Client for player
var apiClient = AccelByteSDK.GetClientRegistry().GetApi();
var sessionBrowser = apiClient.GetSessionBrowser();
}Add these local variables to store the session id's related data in the SessionRoomHandler.cs
private string currentSessionId;
private static bool isEmptySessionId = false;
Create a new function in SessionRoomHandler.cs to set the session id from the client side.
public void SetSessionId(string sessionId)
{
    currentSessionId = sessionId;
}
Open the CustomGamesHandler.cs, call the
SetSessionId()function to set the session id from theJoinSession()result data after joining the session.public void JoinSession(string targetHostUserID, string sessionId, string sessionPassword = "")
{
...
if (!result.IsError)
{
...
NetworkManager.Singleton.StartClient();
// set the current session id from client side
GetComponent<SessionRoomHandler>().SetSessionId(sessionId);
...
}Back to SessionRoomHandler.cs, prepare a new function to verify if the currentSessionId is still empty or already has a valid session id, then get the session data if it exists. For now, we will set the
GetGameSession()to default and use it to update the UI later.private void GetGameSession()
{
// Avoid sending empty session id
if (string.IsNullOrEmpty(currentSessionId))
{
isEmptySessionId = true;
return;
}
sessionBrowser.GetGameSession(currentSessionId, result =>
{
if (!result.IsError)
{
Debug.Log($"[SessionRoom] Get game session success ||");
}
else
{
Debug.Log($"[SessionRoom] Get game session failed, Error: {result.Error.Code}, Description: {result.Error.Message}");
}
});
}Since AccelByteNetworkTransportManager's
GetHostedSessionID()function may still return empty if the Create Session process hasn't finished yet, do some checking to set the session id until theGetHostedSessionID()doesn't return empty anymore inside theFixedUpdate()function in SessionRoomHandler.cs.private void FixedUpdate()
{
if (isEmptySessionId && currentSessionId != transportManager.GetHostedSessionID())
{
isEmptySessionId = false;
// set current session id
currentSessionId = transportManager.GetHostedSessionID();
GetGameSession();
}
}Create a function to set up the SessionRoomPanel. For now, we will focus on getting the session id and set up the rest of UIs later.
public void Setup()
{
    if (NetworkManager.Singleton.IsHost)
    {
        currentSessionId = transportManager.GetHostedSessionID();
    }
    GetGameSession();
}
Display Session Data
To update the Player Ready Panel prefab, create a new script called PlayerReadyPanel.cs and add this library at the top of the script.
using UnityEngine.UI;Add all of the Player Ready Panel's UI references in the PlayerReadyPanel class.
[SerializeField]
private HorizontalLayoutGroup playerReadyHorizLayoutGroup;

[SerializeField]
private Text displayNameText;
[SerializeField]
private Toggle readyConsentToggle;
Create a function to update the UI based on the PlayerInfo data in PlayerReadyPanel.cs.
public void UpdatePlayerInfo(PlayerInfo playerInfo)
{
    displayNameText.text = playerInfo.displayName.ToString();
    readyConsentToggle.isOn = playerInfo.isReady;
}
Since there are 2 different teams with different arrangements, create a function to reverse the arrangement for the opposite teams in PlayerReadyPanel.cs.
public void SetReverseArrangementPanel(bool isReverse)
{
    playerReadyHorizLayoutGroup.reverseArrangement = isReverse;
}
Save the script and go to the editor. Add the PlayerReadyPanel script to the prefab gameobject and drag these objects to their corresponding exposed variables.
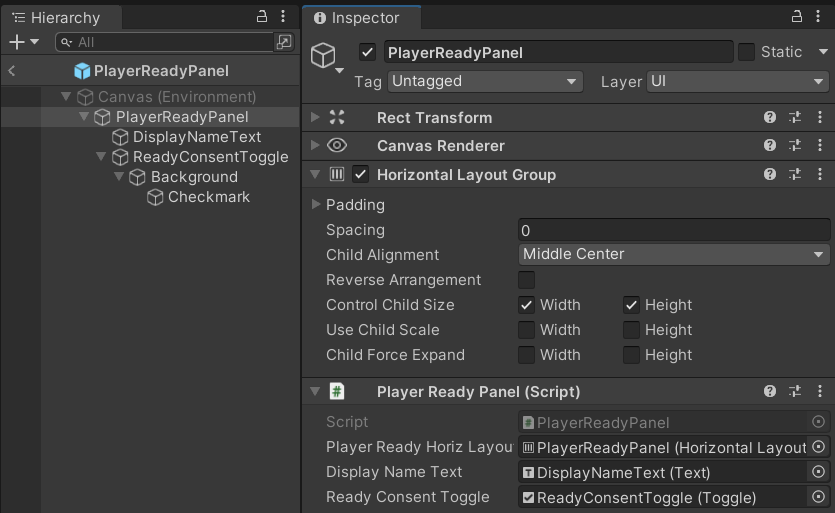
Back to SessionRoomHandler.cs, make sure the SessionRoomHandler class inherits NetworkBehaviour instead of MonoBehaviour. We will need this to share data between server and clients.
public class SessionRoomHandler : NetworkBehaviour
...
Add the rest of Session Room's UI references in the SessionRoomHandler.cs
[SerializeField]
private Text serverNameText;
[SerializeField]
private GameObject playerReadyPrefab;

[SerializeField]
private Transform teamAPanel;
[SerializeField]
private Transform teamBPanel;

[SerializeField]
private Button startButton;
[SerializeField]
private Button readyButton;
[SerializeField]
private Button leaveButton;
Save the script, then in the editor, in the AccelByteHandler gameobject, under the Session Room Handler component, drag these corresponding objects to their exposed variables.
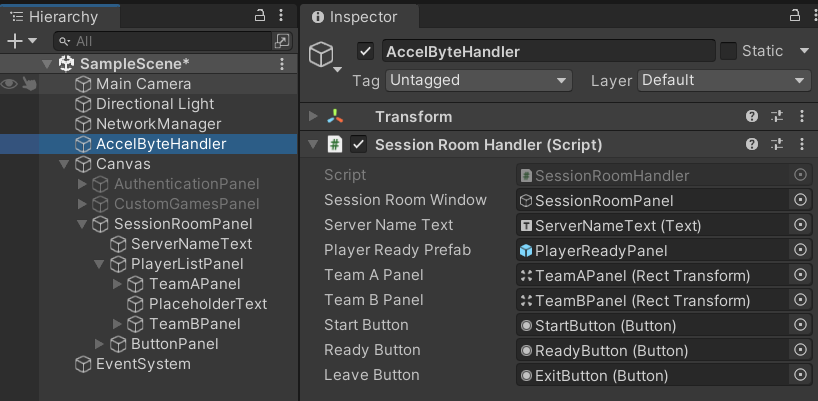
In SessionRoomHandler.cs, modify the
Setup()function to set up UI states.public void Setup()
{
SessionRoomWindow.SetActive(true);
if (NetworkManager.Singleton.IsHost)
{
startButton.gameObject.SetActive(true);
exitGameplayButton.gameObject.SetActive(true);
}
else
{
startButton.gameObject.SetActive(false);
exitGameplayButton.gameObject.SetActive(false);
}
readyButton.interactable = true;
// reset and display the session name
serverNameText.text = "";
...
}Prepare a struct called PlayerInfo to store the player's data. Make sure it inherits the INetworkSerializable and IEquatable<> interface classes so we can use this struct with NetworkList to share the list data.
[Serializable]
public struct PlayerInfo : INetworkSerializable, IEquatable<PlayerInfo>
{
    public ulong clientId;
    public FixedString64Bytes userId;
    public FixedString64Bytes displayName;
    public bool isReady;

    public PlayerInfo(ulong playerClientId, FixedString64Bytes playerUserId, FixedString64Bytes playerDisplayName, bool playerIsReady)
    {
        clientId = playerClientId;
        userId = playerUserId;
        displayName = playerDisplayName;
        isReady = playerIsReady;
    }

    public void NetworkSerialize<T>(BufferSerializer<T> serializer) where T : IReaderWriter
    {
        serializer.SerializeValue(ref clientId);
        serializer.SerializeValue(ref userId);
        serializer.SerializeValue(ref displayName);
        serializer.SerializeValue(ref isReady);
    }

    public bool Equals(PlayerInfo other)
    {
        return clientId == other.clientId && userId == other.userId && displayName == other.displayName && isReady == other.isReady;
    }
}
In SessionRoomHandler.cs, add a NetworkList to store the session's player data that is shared between server and clients, then initialize the list inside the
Start().private NetworkList<PlayerInfo> playerInfoList;
private void Start()
{
...
playerInfoList = new NetworkList<PlayerInfo>();
}The playerInfoList's data is added from the server side, so the client needs to send its player's data to the server when the client just connected. To do this, in CustomGamesHandler.cs, create a callback function to send a register request message to the server and change the view to SessionRoomPanel on the client connected.
private void OnClientConnected(ulong clientId)
{
    // if the local client is the client that just connected
    if (clientId == NetworkManager.Singleton.LocalClient.ClientId)
    {
        if (!NetworkManager.Singleton.IsHost)
        {
            // send data with MessageName "Register" using Custom Messaging
            string messageJson = userSession.userId + ":" + userSession.displayName;
            FastBufferWriter writer = new FastBufferWriter(1100, Unity.Collections.Allocator.Temp);
            writer.WriteValueSafe(messageJson);
            NetworkManager.Singleton.CustomMessagingManager.SendNamedMessage("Register", NetworkManager.ServerClientId, writer);
        }

        // move to SessionRoomPanel
        CustomGamesWindow.SetActive(false);
        GetComponent<SessionRoomHandler>().Setup();
    }
}
Define the NetworkManager's OnClientConnectedCallback to call the
OnClientConnected()when the event triggered inside theInitializeNetworkManager()function in CustomGamesHandler.cs.private void InitializeNetworkManager()
{
...
// Initialize NetworkManager Callback
NetworkManager.Singleton.OnClientConnectedCallback += OnClientConnected;
}Register the "Register" MessageName in SessionRoomHandler.cs and define its receiver handler to be able to receive the client's message. To make sure the server is ready to receive the message at any time, add the register process inside the NetworkBehaviour's
OnNetworkSpawn()override function.public override void OnNetworkSpawn()
{
// if received a message with MessageName = "Register", register player to session
NetworkManager.Singleton.CustomMessagingManager.RegisterNamedMessageHandler("Register", (senderId, messagePayload) =>
{
messagePayload.ReadValueSafe(out string receivedMessageContent);
// Get player data from string, format "userid:displayname"
if (receivedMessageContent.Split(':').Length > 1)
{
string senderUserId = receivedMessageContent.Split(':')[0];
string senderDisplayName = receivedMessageContent.Split(':')[1];
// Add client's player data to list, and register to session
playerInfoList.Add(new PlayerInfo(senderId, senderUserId, senderDisplayName, false));
RegisterPlayerToSession(currentSessionId, senderUserId);
}
});
}Because the server is also a host client, create a callback function that will add the host's player data to the player list on the server started in SessionRoomHandler.cs.
public void OnServerStarted()
{
    playerInfoList.Add(new PlayerInfo
        (
            NetworkManager.ServerClientId,
            GetComponent<CustomGamesHandler>().userSession.userId,
            GetComponent<CustomGamesHandler>().userSession.displayName,
            false
        ));
}
Create another callback function to display all the players data by instantiating the PlayerReadyPanel prefab. This function will be called on the PlayerInfoList value updated.
private const int maxPlayer = 2;

public void OnPlayerInfoListChanged(NetworkListEvent<PlayerInfo> playerInfoEvent)
{
    LoopThroughTransformAndDestroy(teamAPanel);
    LoopThroughTransformAndDestroy(teamBPanel);

    // current display list only for 1vs1 mode
    for (int i = 0; i < maxPlayer; i++)
    {
        if (playerInfoList.Count > i)
        {
            PlayerReadyPanel playerPanel = null;
            if (i == 0)
            {
                playerPanel = Instantiate(playerReadyPrefab, teamAPanel).GetComponent<PlayerReadyPanel>();
                playerPanel.SetReverseArrangementPanel(false);
            }
            else
            {
                playerPanel = Instantiate(playerReadyPrefab, teamBPanel).GetComponent<PlayerReadyPanel>();
                playerPanel.SetReverseArrangementPanel(true);
            }
            playerPanel.UpdatePlayerInfo(playerInfoList[i]);
        }
    }
}
Now, define all of the callback functions we created to subscribe to the PlayerInfoList's OnListChanged and NetworkManager's OnServerStarted callback events inside the
OnNetworkSpawn()override function.public override void OnNetworkSpawn()
{
...
if (NetworkManager.Singleton.IsClient)
{
playerInfoList.OnListChanged += OnPlayerInfoListChanged;
}
if (NetworkManager.Singleton.IsServer)
{
NetworkManager.Singleton.OnServerStarted += OnServerStarted;
}
}
Ready Consent
Since the PlayerInfo struct already has isReady bool property that we can use, we only need to update the player's isReady value from the playerInfoList. In the SessionRoomHandler.cs, create a new ServerRPC function that will be called if the server are requested to update the client's player ready consent.
[ServerRpc(RequireOwnership = false)]
private void ToggleReadyServerRpc(ServerRpcParams serverRpcParams = default)
{
    for (int i = 0; i < playerInfoList.Count; i++)
    {
        if (playerInfoList[i].clientId == serverRpcParams.Receive.SenderClientId)
        {
            playerInfoList[i] = new PlayerInfo(
                playerInfoList[i].clientId,
                playerInfoList[i].userId,
                playerInfoList[i].displayName,
                !playerInfoList[i].isReady
            );
        }
    }
}NOTEBy updating the playerInfoList, it will trigger the OnPlayerInfoListChanged callback event and update the UI by itself.
Modify the
Setup()function in SessionRoomHandler.cs and add the readyButton's listener to call theToggleReadyServerRpc()when the client confirms their ready consent. Also, add a variable that will help verify if the button listener is already added.private bool isInitialized = false;
...
public void Setup()
{
...
// Setup UI listeners
if (!isInitialized)
{
isInitialized = true;
readyButton.onClick.AddListener(() =>
{
readyButton.interactable = false;
ToggleReadyServerRpc();
});
}
}
Start Game
(Optional) In the SessionRoomHandler.cs, add the gameplay dummy UI references.
[Header("TEMPORARY (soon to be deleted)")]
public GameObject GameplayWindow;
public Button exitGameplayButton;
Also, in the editor, in AccelByteHandler gameobject, drag these objects to their exposed variables.
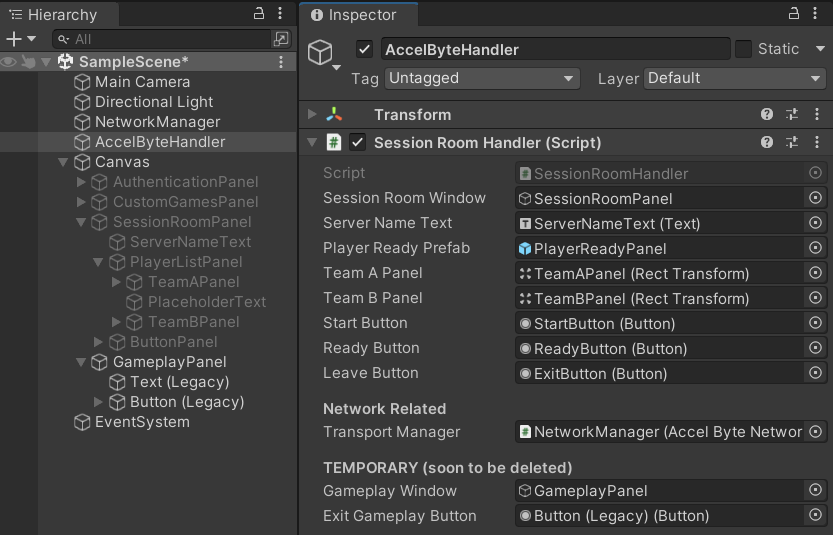
Add a NetworkVariable in SessionRoomHandler.cs to store the game status that will be used to verify if the game has already started or not.
private NetworkVariable<bool> isGameStarted;Create a ServerRPC function for the server to execute the Start Game process and change the isGameStarted's value to notify the other clients.
[ServerRpc(RequireOwnership = false)]
private void StartGameServerRpc(ServerRpcParams serverRpcParams = default)
{
    isGameStarted.Value = true;

    // Reset ready state for all player
    for (int i = 0; i < playerInfoList.Count; i++)
    {
        playerInfoList[i] = new PlayerInfo(
            playerInfoList[i].clientId,
            playerInfoList[i].userId,
            playerInfoList[i].displayName,
            false
        );
    }
}IMPORTANTIf you have a separate scene for the Gameplay, you can change all clients' scenes directly using the SceneManager provided by the NetworkManager.
To do that, you can add the following code inside the
StartGameServerRpc()function instead of changing the isGameStarted's value.NetworkManager.Singleton.SceneManager.LoadScene("<<GameSceneName>>", UnityEngine.SceneManagement.LoadSceneMode.Single);
Inside the
Setup()function, add the startButton's listener to call theStartGameServerRpc()function. In this example, since we use a dummy Gameplay Panel for the Game State, we initialize the GameplayPanel's UI listener in the SessionRoomHandler.cs as well.public void Setup()
{
...
// Setup UI listeners
if (!isInitialized)
{
...
startButton.onClick.AddListener(() =>
{
StartGameServerRpc();
});
// Setup GameplayPanel's Exit Button listener
exitGameplayButton.onClick.AddListener(() =>
{
isGameStarted.Value = false;
});
}
}Create a callback function in SessionRoomHandler.cs that will be called to change the client's current view if the isGameStarted's value is set to true.
public void OnIsGameStartedValueChanged(bool oldValue, bool newValue)
{
    if (newValue)
    {
        // move to next panel
        SessionRoomWindow.SetActive(false);
        GameplayWindow.SetActive(true);
    }
    else
    {
        // move to next panel
        GameplayWindow.SetActive(false);
        Setup();
    }
}
Inside the OnNetworkSpawn() override function in the SessionRoomHandler.cs, subscribe the
OnIsGameStartedValueChanged()to the isGameStarted's OnValueChanged callback event.public override void OnNetworkSpawn()
{
...
if (NetworkManager.Singleton.IsClient)
{
...
isGameStarted.OnValueChanged += OnIsGameStartedValueChanged;
}
...
Leave Session
Remove the
LeaveSession()function in the CustomGamesHandler.cs. In SessionRoomHandler.cs, create a newLeaveSession()and use the NetworkManager'sShutdown()instead to stop the server/host instance as well.private void LeaveSession()
{
// stop the client and disconnect from server
NetworkManager.Singleton.Shutdown();
// Clear player info list
playerInfoList.Clear();
// change view to CustomGamesPanel
SessionRoomWindow.SetActive(false);
GetComponent<CustomGamesHandler>().Setup();
}When a client leaves the session, the server needs to unregister the player from the session, so create a function in SessionRoomHandler.cs to handle unregister.
private void UnregisterPlayerFromSession(string sessionId, string userId)
{
    sessionBrowser.UnregisterPlayer(sessionId, userId, result =>
    {
        if (!result.IsError)
        {
            Debug.Log($"Unregister player {userId} to session success");
        }
        else
        {
            Debug.Log($"Failed to unregister player from session, Error: {result.Error.Code}, Description: {result.Error.Message}");
        }
    });
}
Create a callback function in SessionRoomHandler.cs that will handle unregistering the player from session and removing player data from the playerInfoList. In case the one who is disconnected is the host, the client needs to call the
LeaveSession()to stop the Client instance and disconnect from the server.public void OnClientDisconnected(ulong clientId)
{
// if the current player is also the server
if (IsServer)
{
// remove client's player data from player list
for (int i = 0; i < playerInfoList.Count; i++)
{
if (playerInfoList[i].clientId == clientId)
{
UnregisterPlayerFromSession(currentSessionId, playerInfoList[i].userId.ToString());
playerInfoList.RemoveAt(i);
break;
}
}
}
// if the current player is the client
if (IsClient)
{
// if the client who disconnected is the server/host
if (clientId == NetworkManager.ServerClientId)
{
LeaveSession();
}
}
}Define the OnClientDisconnectCallback's callback function inside the
OnNetworkSpawn()override function in theSessionRoomHandler.cspublic override void OnNetworkSpawn()
{
...
NetworkManager.Singleton.OnClientDisconnectCallback += OnClientDisconnected;
}Make sure to reset and unsubscribe all of the callback functions from their callback events on the Network Despawn in
SessionRoomHandler.cs.public override void OnNetworkDespawn()
{
NetworkManager.Singleton.CustomMessagingManager.UnregisterNamedMessageHandler("Register");
playerInfoList.OnListChanged -= OnPlayerInfoListChanged;
isGameStarted.OnValueChanged -= OnIsGameStartedValueChanged;
NetworkManager.Singleton.OnServerStarted -= OnServerStarted;
NetworkManager.Singleton.OnClientDisconnectCallback -= OnClientDisconnected;
}