Manage access control for applications
Introduction
AccelByte Gaming Services (AGS) defines an Identity and Access Management (IAM) client as an application, such as a game server or website, that requests access to protected platform resources. IAM clients enable you to control which resources an application can access, as opposed to a user.
This article contains information on:
- How IAM clients work and IAM client types.
- Creating and configuring IAM clients and their permissions in the AGS Admin Portal or with the AGS CLI.
- Retrieving an application access token using AGS SDKs or the AGS CLI.
Prerequisites
-
Access to the AGS Admin Portal and the permissions for IAM clients management.
- AGS Public Cloud
- AGS Private Cloud
AGS Public CloudHaving the Studio Admin or Game Admin role in your AGS account allows you to directly manage IAM clients in the Admin Portal.
Usage Resource Action Create a Client ADMIN:NAMESPACE:{namespace}:CLIENTCreate Retrieve Client ADMIN:NAMESPACE:{namespace}:CLIENTRead Update Client ADMIN:NAMESPACE:{namespace}:CLIENTUpdate Delete Client ADMIN:NAMESPACE:{namespace}:CLIENTDelete Add Client Permission ADMIN:NAMESPACE:{namespace}:CLIENTUpdate Update Client Permission ADMIN:NAMESPACE:{namespace}:CLIENTUpdate Delete Client Permission ADMIN:NAMESPACE:{namespace}:CLIENTUpdate -
To follow the AGS CLI steps, you have installed the AGS CLI and signed in with an account that has the permissions above. See Install and sign in. The examples use a Bash shell.
How IAM clients work
AGS IAM clients implement the OAuth 2.0 framework. You can define this under the publisher or game namespace, depending on whether the intended application is specific to one of your games or used by your publisher platform.
IAM client types
There are two client types based on the OAuth 2.0 Client Type framework:
- A confidential client requires a combination of Client ID and Client Secret to authorize on the backend. You need confidential clients when you need server-to-server (S2S) calls to admin endpoints in AGS. As a result, you will typically define specific access permissions on the client. Therefore, you should only use confidential clients in cases where you can control who has access to the client's ID and secret to prevent unauthorized users from accessing your services.
- A public client does not specify a client secret; you only need the client ID. Public clients are best for applications that require a user to log in with their user account and only need client-to-server calls to public endpoints in AGS. In this case, the access permissions come from the user's account via Role.
Most used IAM clients
Here are the most used IAM client archetypes:
- Game client: configure IAM clients for game clients as Public in most cases.
- Dedicated game server: configure IAM clients for dedicated servers as Public or Confidential. However, you need to assign permissions to the client if your dedicated servers don't log in as a user. This is the most common case.
- Dedicated server uploader: IAM clients for uploading dedicated server builds. Since access for uploaders is usually tightly controlled, it is best to specify these types of clients as Confidential.
Manage IAM clients
This section covers how to create an IAM client, edit it, and manage its permissions.
Create an IAM client
- Admin Portal
- AGS CLI
-
In the AGS Admin Portal, go to your namespace.
-
On the sidebar, select Foundations > Identity & Access > IAM Clients.
-
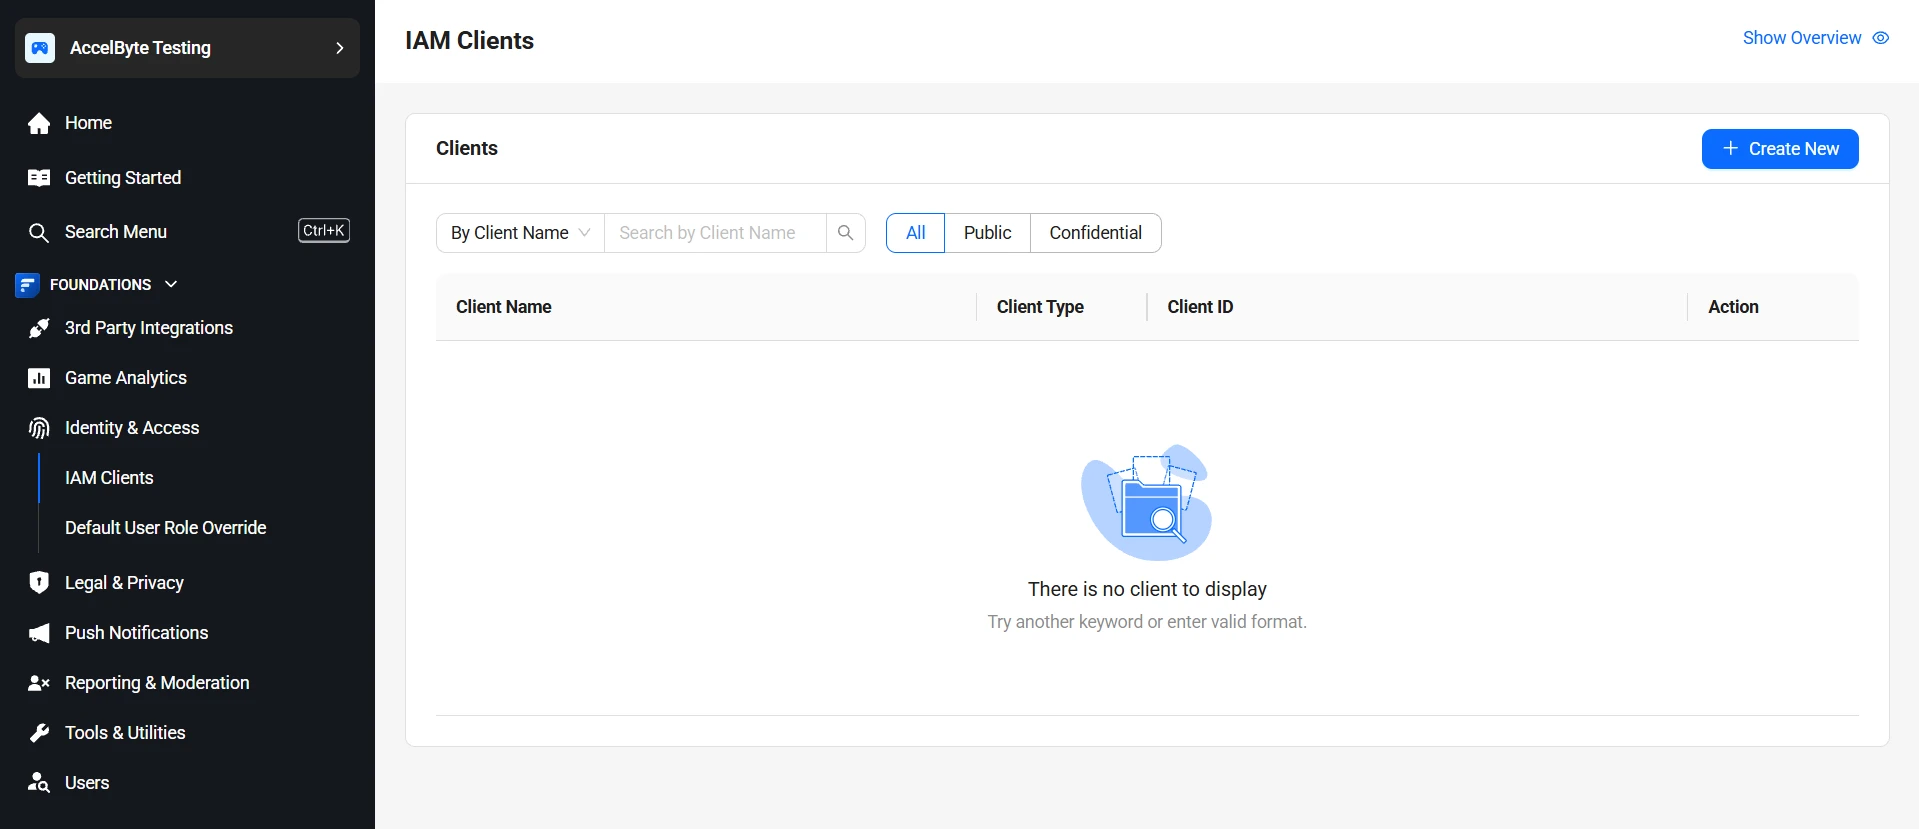
On the IAM Clients page, click Create New. The What is this client for? window appears.
-
Select the template that matches the purpose of your client, then click Continue. A template sets the client type, a default client name, and a Redirect URI. Some templates also preselect the permissions that the client needs.
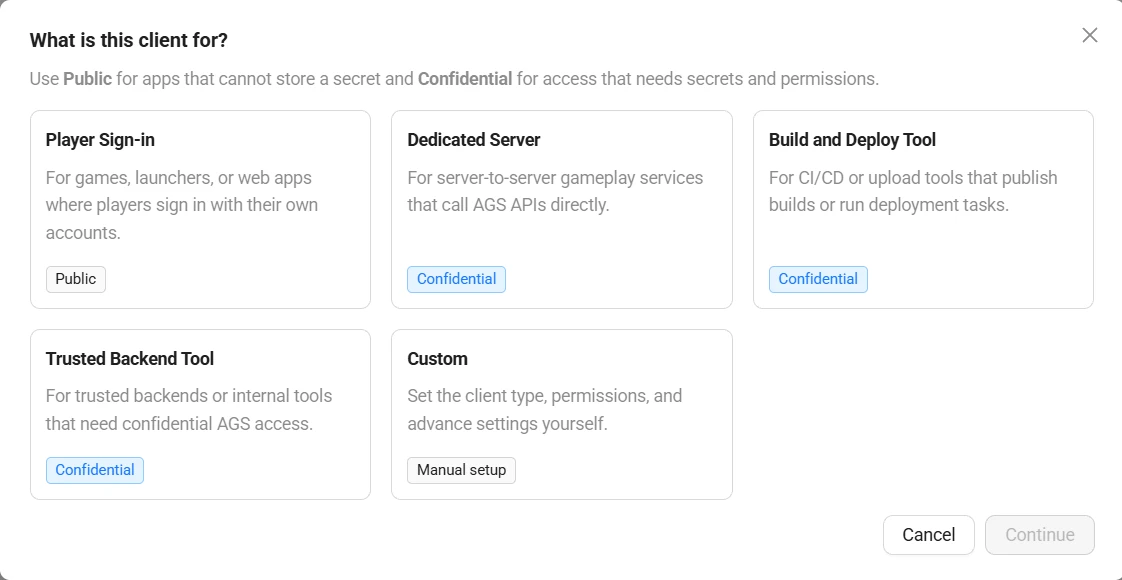
Template Client type Use it for Preselected permissions Player Sign-in Public Games, launchers, or web apps where players sign in with their own accounts. None Dedicated Server Confidential Server-to-server gameplay services that call AGS APIs directly. Matchmaking backfill and Session game session Build and Deploy Tool Confidential CI/CD or upload tools that publish builds or run deployment tasks. AMS dedicated server, dedicated server toolkit, and watchdogs Trusted Backend Tool Confidential Trusted backends or internal tools that need confidential AGS access. None Custom Your choice Clients that you want to set up yourself. None noteThe Dedicated Server and Build and Deploy Tool templates only appear if your namespace has the Multiplayer package.
The New IAM Client page appears.
-
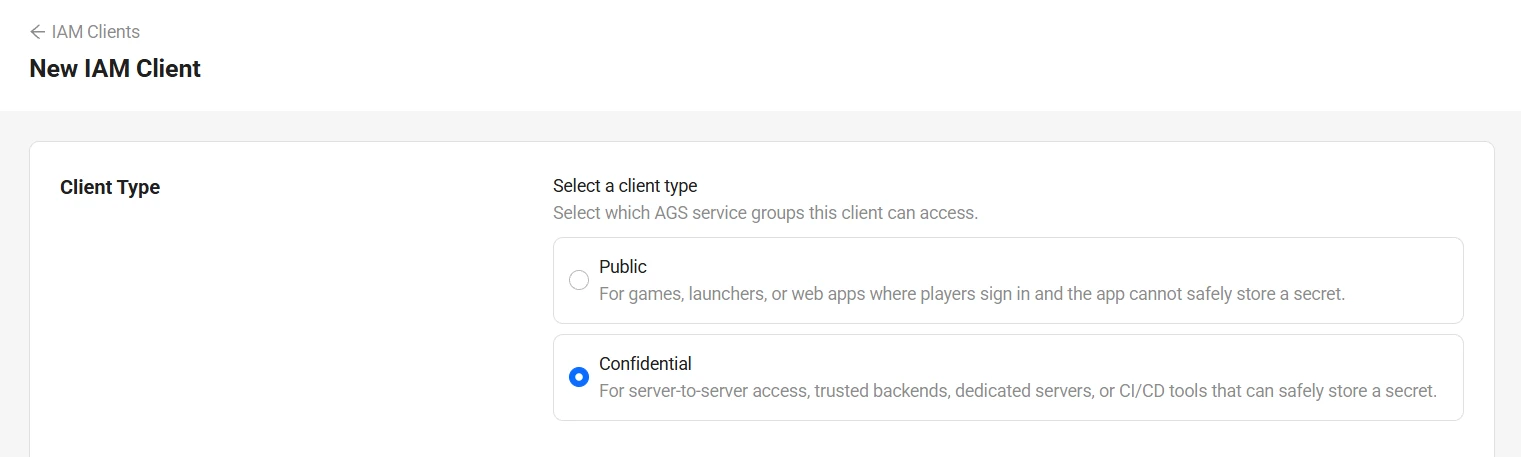
If you selected Custom, choose a Client Type: Public or Confidential. For more information, refer to IAM client types. If you selected any other template, the template sets the client type for you.
-
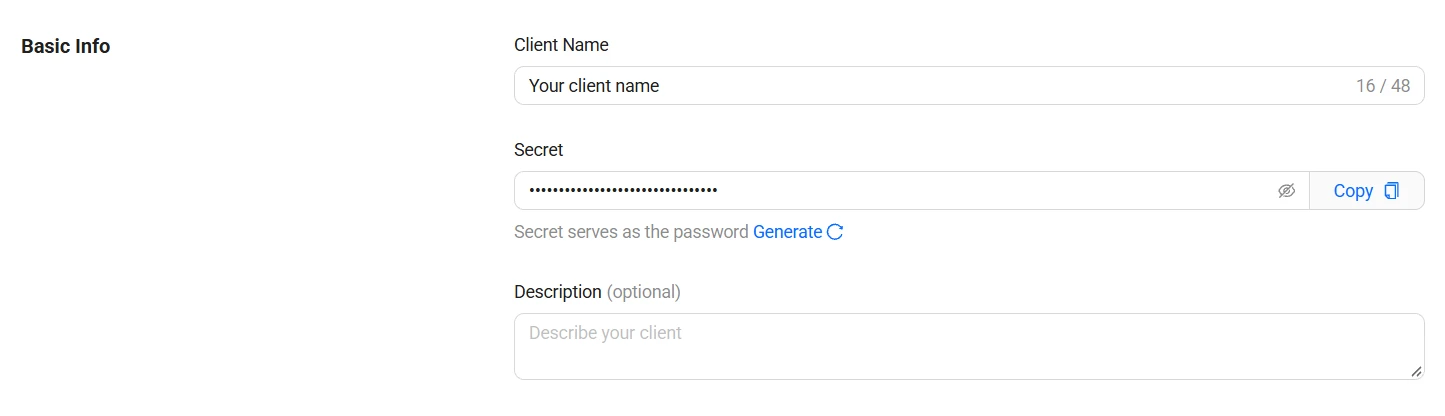
In the Basic Info section, fill in the following information:
- Client Name: type in a name for the client. AGS uses this name to identify the IAM client in user-facing forms and documents.
- Secret (confidential clients only): this serves as the password for the client. Type in your own secret following the recommended format, or click Generate to have AGS create one for you.
- Description (optional): describe the function of the IAM client.
-
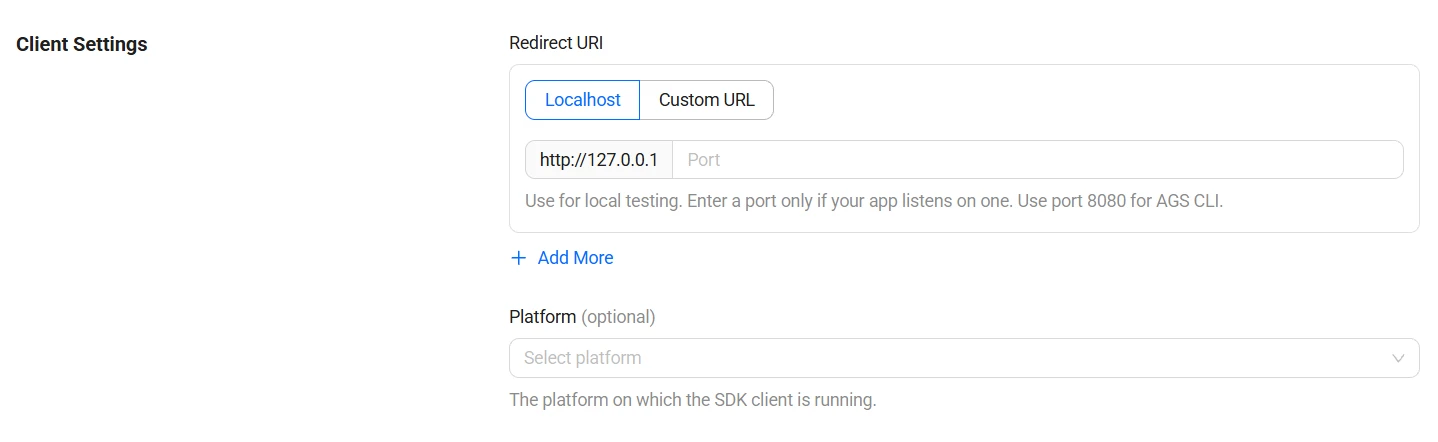
In the Client Settings section, fill in the following information:
-
Redirect URI: the URI that AGS redirects the user to after they are authorized. Choose one of the following:
- Localhost: for non-web-based clients, such as game servers, game clients, or server uploaders. This sets the URI to
http://127.0.0.1. Enter a port only if your app listens on one. - Custom URL: for web-based clients, such as websites or launchers. Enter the full URL, including
http://orhttps://.
tipYou can add multiple URIs by clicking Add More.
- Localhost: for non-web-based clients, such as game servers, game clients, or server uploaders. This sets the URI to
-
Platform (public clients only, optional): select the third-party platform the SDK client runs on. If you don't want to bind the client to a third-party platform, leave it blank.
noteAGS uses this platform information for cross-platform features, such as cross-platform virtual currency and wallet.
-
-
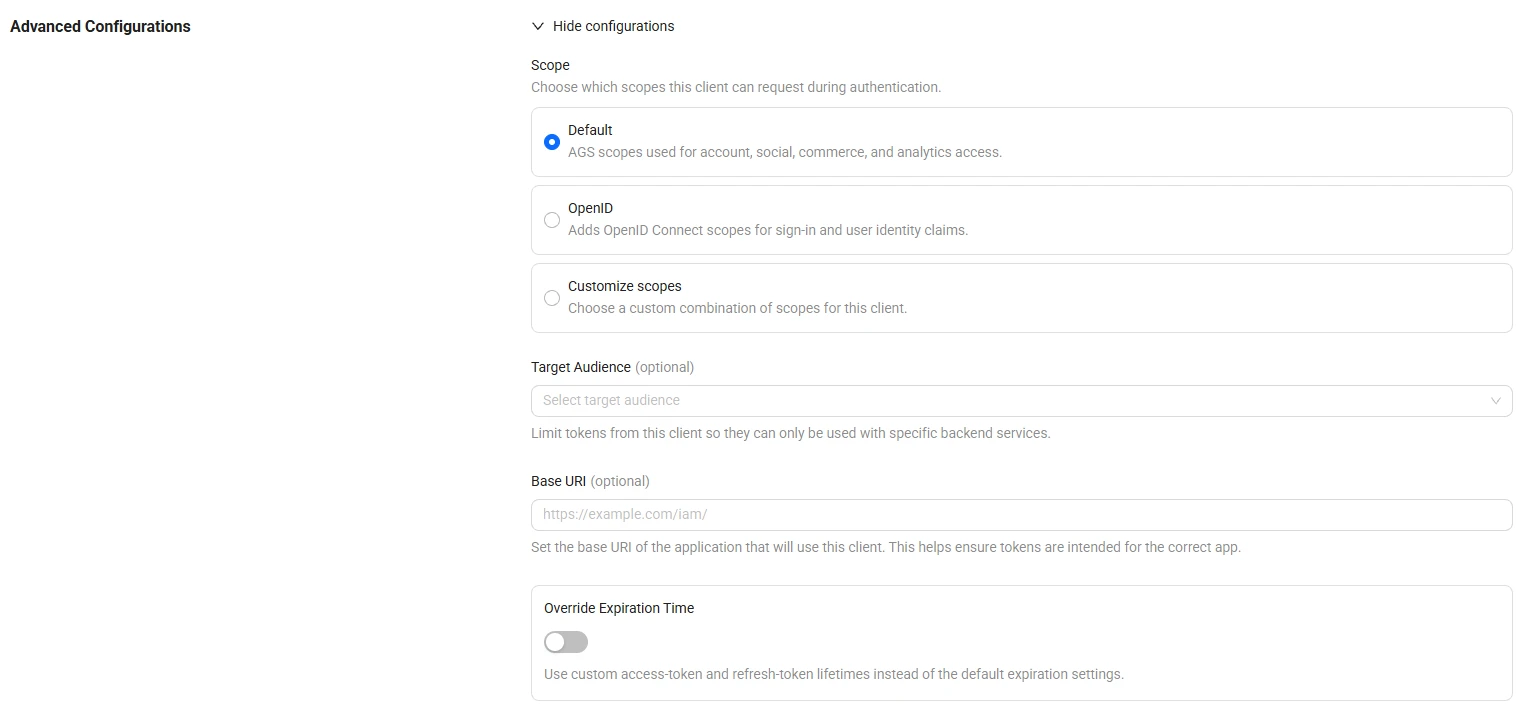
(Optional) In the Advanced Configurations section, click Show configurations to override the default behavior of the IAM client:
-
Scope: a mechanism in OAuth 2.0 that limits which resources an IAM client can access. To learn more, see the OAuth 2.0 documentation. Choose one of the following:
-
Default: AGS scopes for account, social, commerce, and analytics access.
-
OpenID: OpenID Connect scopes for sign-in and user identity claims.
-
Customize scopes: choose your own combination of scopes. The following table shows which services each AGS scope covers.
Scopes Service commerce Platform
Season Passaccount Basic
GDPR
IAM
Legalsocial Achievement
Chat
Cloudsave
Group
Leaderboard
Lobby
Matchmaking
Session
Session Browser
Statisticsanalytics Telemetry
-
-
Target Audience (optional): limits tokens from this client so they can only be used with specific backend services. Each entry in the dropdown represents a target service by its Base URI.
noteThis serves as an allowlist so backend services can quickly reject connection attempts before checking client or user permissions. When the IAM client attempts to access a service endpoint, the service first checks the client's Target Audience list. The system rejects the connection attempt if the service's URI does not match the Base URI of any of the clients in the Target Audience field. If the client passes the Target Audience check, or if the client's Target Audience field is empty, the service proceeds to the next authentication step, such as checking its permissions and scopes.
-
Base URI (optional; works together with Target Audience): the base URI of the application that uses this client. This helps ensure that tokens are intended for the correct app.
-
Override Expiration Time: switch on this toggle to override the default Access Token and Refresh Token expiration times and set your own values. The access token must be between 1 second and 24 hours, and the refresh token must be between 1 minute and 30 days.
-
-
(Confidential clients only) In the Permissions section, find the permissions that you want to add to the client. For each permission, tick the actions (Create, Read, Update, and Delete) that you want it to have. To select every permission in a group at once, tick the checkbox next to the group name. To find permissions faster, use the search field or select Show selected only. You can also add custom permissions here. See Add and edit IAM client permissions.
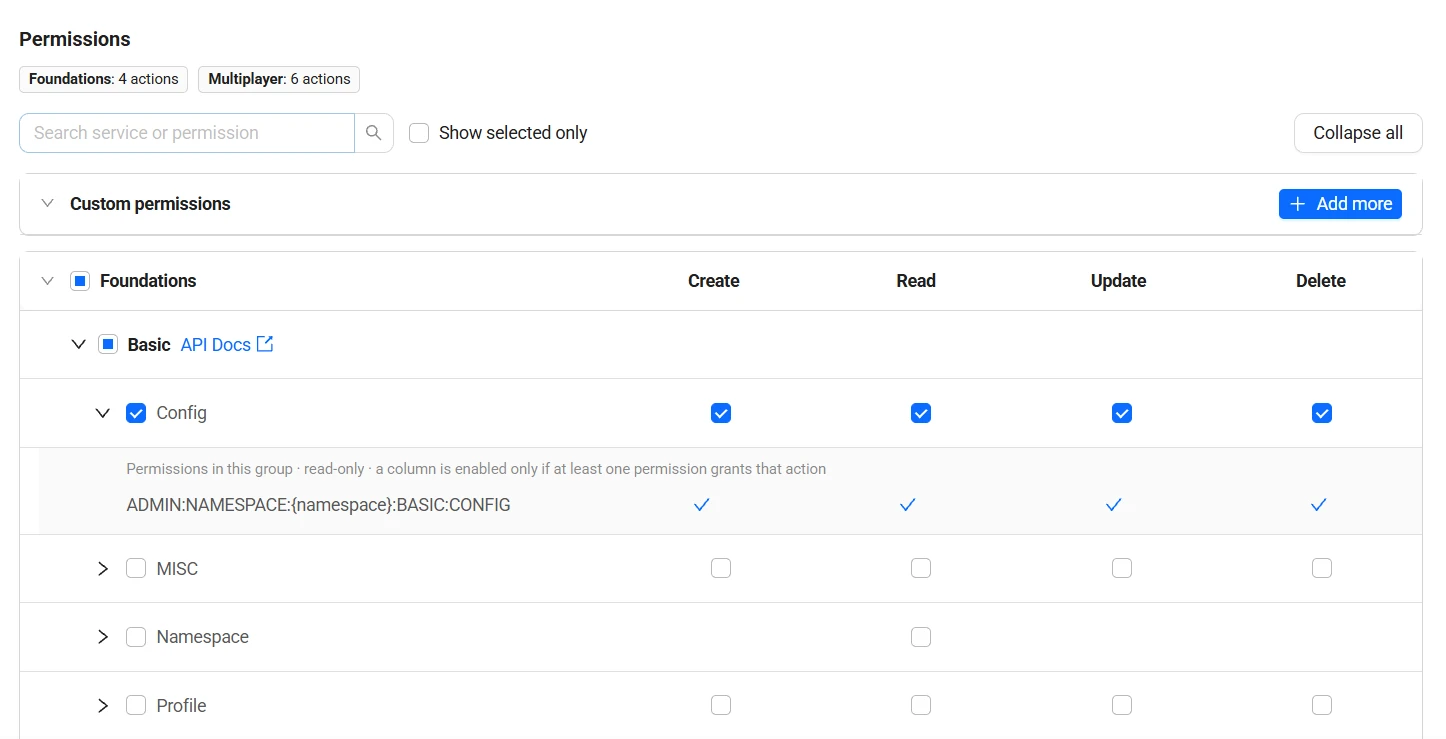
You can skip this step and add permissions later.
-
Create the client:
-
For a public client, click Create.
-
For a confidential client, click Continue. The Save your client secret window appears. Click Copy secret and store the secret in a secure place. Then, tick I have copied and stored this client secret securely and click Create.
warningAfter you create the client, the client secret is no longer visible or accessible.
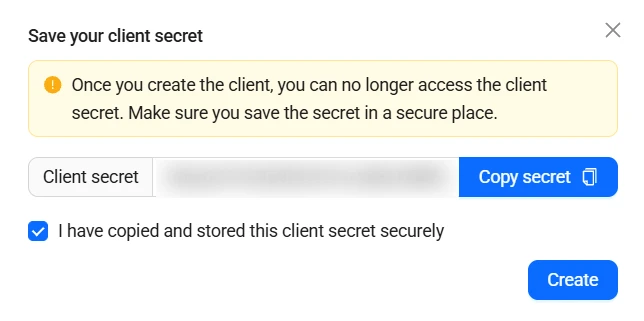
The new IAM client is created with a system-generated client ID, which cannot be edited.
-
-
Choose a template. Each Admin Portal template has a template ID:
Admin Portal template Template ID Player Sign-in game_clientDedicated Server dedicated_serverBuild and Deploy Tool dedicated_server_toolsTrusted Backend Tool custom_backend_toolingTo see each template's settings, run:
ags iam client-config list-templates --format jsonFor each template
id, the output shows the client type (type), the default client name and Redirect URI (defaultValues), and the preselected permissions (basicRequiredPermissions).noteThe
dedicated_serveranddedicated_server_toolstemplates only appear if your namespace has the Multiplayer package.The Admin Portal's Custom option has no template. To set up the client yourself, skip this step.
-
Create a JSON file with the client's settings, using the values from the template or your own. Any file name works. This example uses
client.json:{
"clientId": "<NewClientId>",
"clientName": "<ClientName>",
"namespace": "<YourNamespace>",
"oauthClientType": "Confidential",
"secret": "<YourClientSecret>",
"redirectUri": "http://127.0.0.1",
"modulePermissions": []
}clientId: a new ID for the client. The Admin Portal generates it for you. With the AGS CLI, create one withuuidgen | tr -d '-' | tr '[:upper:]' '[:lower:]', or with any other version 4 UUID generator. It must be a lowercase version 4 UUID without hyphens.namespace: the same namespace that you pass to--namespacein step 3. If the two differ, the AGS CLI uses the one in the file.oauthClientType:ConfidentialorPublic. For a public client, remove thesecretline.secret: 8 to 32 characters long, with at least three of these character types: uppercase letters, lowercase letters, numbers, and symbols. It can't repeat a character three or more times in a row.modulePermissions: the template'sbasicRequiredPermissions, or[]for none.
To set more fields, add them to the file. To see every field, run
ags iam clients create --skeleton. These fields match the Admin Portal settings:Admin Portal setting Request body field Description descriptionPlatform clientPlatform:Playstation,Xbox,Steam,Epic,IOS,GooglePlay,Nintendo, orOculusScope scopesTarget Audience audiencesBase URI baseUriOverride Expiration Time oauthAccessTokenExpirationandoauthRefreshTokenExpiration, withoauthAccessTokenExpirationTimeUnitandoauthRefreshTokenExpirationTimeUnitPermissions modulePermissionsfor predefined AGS permissions andclientPermissionsfor custom permissions. See Add and edit IAM client permissions. -
Create the client. After
@, pass the path to your JSON file:ags iam clients create --namespace <YourNamespace> --json @client.jsonThe command prints the new client.
warningAfter you create the client, the client secret is no longer visible or accessible. Store it in a secure place.
Edit an IAM client
- Admin Portal
- AGS CLI
- On the Admin Portal sidebar, go to Foundations > Identity & Access > IAM Clients. The IAM Clients page appears.
- From the list, click the name of the IAM client you want to edit. The details page of the IAM client appears.
- Click Edit. The Edit Client page appears.
- Edit the information as needed. You can't change the client type or the client secret after you create the client.
- Click Save to save your changes.
-
Find the ID of the client you want to edit:
ags iam clients list --namespace <YourNamespace> -
Check the client's current settings:
ags iam clients get --namespace <YourNamespace> --client-id <ClientId> -
Send only the fields you want to change. Fields you leave out keep their current values. You can't change the client type.
ags iam clients update --namespace <YourNamespace> --client-id <ClientId> \
--json '{"clientName": "<NewClientName>", "description": "<NewDescription>"}'warningclientPlatformis the exception: every update overwrites it. If the client has a platform, includeclientPlatformin the request body, or the update clears it.
Add and edit IAM client permissions
You can add and edit the permissions of an existing confidential IAM client.
- Admin Portal
- AGS CLI
To add and edit the permissions of an IAM client in the AGS Admin Portal, follow these steps:
-
In the AGS Admin Portal, go to your namespace.
-
On the sidebar, select Foundations > Identity & Access > IAM Clients. The IAM Clients page appears.
-
From the list, click the name of the IAM client with the permissions you want to update. The details page of the IAM client appears.
-
Click Edit. The Edit Client page appears.
-
Scroll down to the Permissions section to manage the permissions:
- Manage predefined AGS permissions
- Manage custom permissions
-
Find the permissions that you want to add or edit. Tick or untick the actions (Create, Read, Update, and Delete) that you want to add to or remove from the permission. To select every permission in a group at once, tick the checkbox next to the group name. To find permissions faster, use the search field or select Show selected only.
-
You can grant custom permissions to your Game Server or Custom Backend, allowing them to invoke Custom APIs exposed by your Extend App.
-
In AGS Public Cloud, custom permissions must follow the predefined format. See Custom permissions in Public Cloud for more details. In AGS Private Cloud, custom permissions do not need the
CUSTOM:prefix. You can use any permission resource that follows the granted permission syntax.noteLimitation (AGS Public Cloud): You can add up to 10 custom permissions per IAM client. This hard limit is in place to prevent spam and misuse. If you require more, contact AccelByte Support.
-
To add a custom permission, click Add more in the Custom permissions group. The Add custom permission window appears.
-
Fill in the permission resource:
-
AGS Public Cloud: select a Permission type. Public adds the
CUSTOM:NAMESPACE:{namespace}:prefix and Admin adds theCUSTOM:ADMIN:NAMESPACE:{namespace}:prefix, following the custom permission format. In the Resource field, type in the rest of your resource name. The Final permission field shows the full resource. For example:CUSTOM:NAMESPACE:{namespace}:PROGRESSION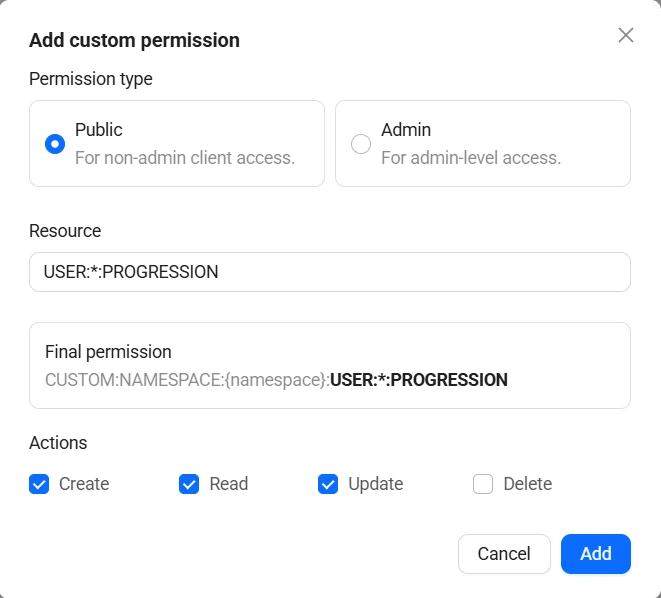
-
AGS Private Cloud: in the Resource field, type in the full permission resource. For example:
NAMESPACE:{namespace}:PROGRESSION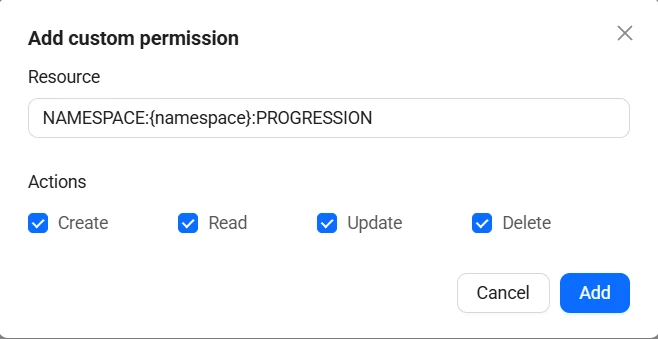
-
-
Select the Actions (Create, Read, Update, Delete) you want to enable for this permission, then click Add.
-
-
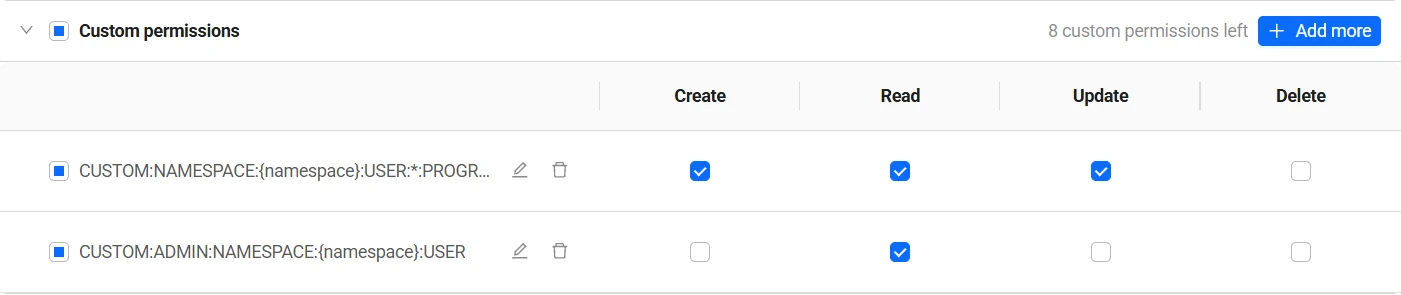
To edit or remove an existing custom permission, click its edit or delete icon in the Custom permissions group. In AGS Public Cloud, the group also shows how many custom permissions you have left.
-
Click Save to save your changes.
notePermission changes take effect automatically on the next token refresh. To apply them right away, restart your connected services.
To manage predefined AGS permissions, use the Admin Portal tab, where you select them with checkboxes. To give a new client a template's predefined permissions, see Create an IAM client. With the AGS CLI, you can manage custom permissions:
-
Custom permissions follow the same rules as in the Admin Portal. In AGS Public Cloud, the resource must start with
CUSTOM:NAMESPACE:{namespace}:for a public permission orCUSTOM:ADMIN:NAMESPACE:{namespace}:for an admin permission, and you can add up to 10 custom permissions per IAM client. See Custom permissions in Public Cloud. In AGS Private Cloud, you can use any resource that follows the granted permission syntax. -
In these commands,
actionis the sum of the actions you want:1(Create),2(Read),4(Update), and8(Delete). For example,3is Create and Read, and15is all four. -
To add a custom permission, run the following command. If the client already has the permission, the new actions are added to the ones it has.
ags iam clients add-permissions --namespace <YourNamespace> --client-id <ClientId> \
--json '{"permissions": [{"resource": "CUSTOM:NAMESPACE:{namespace}:PROGRESSION", "action": 2}]}' -
To remove actions from a custom permission, run the following command. Removing all of its actions removes the permission.
ags iam clients delete-permission --namespace <YourNamespace> --client-id <ClientId> \
  --resource 'CUSTOM:NAMESPACE:{namespace}:PROGRESSION' --action 2
Permission changes take effect automatically on the next token refresh. To apply them right away, restart your connected services.
Get application access token
Get application access token using AGS SDKs
A Credential client requires a valid access token for service-to-service (S2S) calls to AGS.
The code below generates a valid access token using AGS SDK for a Credential client.
- Unreal
- Unity
- C# Extend SDK
- Go Extend SDK
- Java Extend SDK
- Python Extend SDK
bool bServerLoggedIn = false;
bool bServerLoginComplete = false;
auto ServerApiClient = AccelByteOnlineSubsystemPtr->GetServerApiClient();
ServerApiClient->ServerOauth2.LoginWithClientCredentials(FVoidHandler::CreateLambda([&bServerLoggedIn, &bServerLoginComplete]()
{
   UE_LOG(LogAccelByteEcommerceTest, Log, TEXT("Server Login Success"));
   bServerLoginComplete = bServerLoggedIn = true;
}), FErrorHandler::CreateLambda([&bServerLoggedIn, &bServerLoginComplete](int32 ErrCode, FString const& ErrMsg)
{
   UE_LOG(LogAccelByteEcommerceTest, Error, TEXT("Server Login Success"));
   bServerLoginComplete = true;
}));
WaitUntil(bServerLoginComplete, "Waiting for server logged in...");
DedicatedServer server = AccelByteSDK.GetServerRegistry().GetApi().GetDedicatedServer();
Result loginServerResult = null;
server.LoginWithClientCredentials(result => loginServerResult = result);
yield return TestHelper.WaitForValue(() => loginServerResult);
string accessToken = String.Empty;
bool isSuccess = sdk.LoginClient((tokenResp) =>
{
    accessToken = tokenResp.AccessToken!;
});

if (isSuccess)
{
   //do something with `accessToken`.
}
err := oauth.LoginClient(&clientId, &clientSecret)
DefaultConfigRepository configRepo = new DefaultConfigRepository();

final AccelByteSDK sdk1 =
   new AccelByteSDK(
      new AccelByteConfig(new OkhttpClient(), new DefaultTokenRepository(), configRepo));

boolean loggedIn = sdk1.loginClient();
assertTrue(loggedIn);

final String token = sdk1.getSdkConfiguration().getTokenRepository().getToken();

final AccessTokenPayload payload = sdk1.parseAccessToken(token, false);
assertNotNull(payload);
import accelbyte_py_sdk.services.auth as auth_service
from accelbyte_py_sdk.core import AccelByteSDK
from accelbyte_py_sdk.core import MyConfigRepository

sdk = AccelByteSDK()
sdk.initialize(
    options={
        "config": MyConfigRepository(
            base_url="https://****.accelbyte.io",
            client_id="********************************",
            client_secret="********************************",
            namespace="********",
        )
    }
)

result, error = auth_service.login_client(sdk=sdk)
if error:
    exit(error)
Get application access token using the AGS CLI
To get an access token for a confidential client, sign in to the AGS CLI with the client credentials grant, then print the token:
ags auth login --grant client-credentials
ags auth token
The login command prompts for any value that you don't set with the AGS_BASE_URL, AGS_CLIENT_ID, and AGS_CLIENT_SECRET environment variables. For more information, see Install and sign in.
Get application access token using a manual API call
If you simply want to perform API testing using Confidential Client, you can manually create an application access token by following the guide Get authorized in OpenAPI