Install the AGS Game SDK - Initial setup - (Unity module)
About
The AccelByte Gaming Services (AGS) Game SDK for Unity acts as a bridge between your game and AGS. It provides a way to integrate AGS into your game. The AGS Game SDK can be used in both your game's client and server builds. In this tutorial, you are going to install the AGS Game SDK using the Unity Package Manager (UPM) and get it set up to use with Byte Wars.
This tutorial installs the AGS Game SDK for Unity directly from the Unity Editor using UPM. If you'd like to manually download the AGS Game SDK, you can do so from the AccelByte Game SDK for Unity GitHub repository.
Check the latest release
Before continuing with this tutorial, check the latest released version of the AGS Game SDK for Unity.
Install the AGS Game SDK using UPM
-
With Byte Wars open in Unity, go to Window > Package Manager.
-
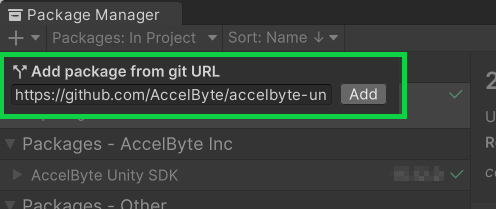
Click the + icon on the Package Manager window and click Add package from git URL...

-
Paste the following link into the URL field and click Add:
https://github.com/AccelByte/accelbyte-unity-sdk.gitinfoFor WebGL support, make sure to use the AGS SDK for Unity version 17.0.0 or later.
Set up a public IAM Client
In order for the AGS Game SDK to be able to access your client environment, you will need to add a public IAM Client in the Admin Portal.
- AGS Shared Cloud
- AGS Private Cloud
-
Log in to the Admin Portal and go to your game namespace dashboard.
-
Go to Foundations > Identity & Access > IAM Clients and click Create IAM Clients.
-
On the new page, fill out the fields using the configurations below.
- Create Options: the available options to create a new IAM client. Choose the Create from Template option to create a new IAM client from a template.
- Select Template: the template to create a new IAM client. Select the Game Client option.
- Client Name: the name of the IAM client. Set it to ByteWars-GameClient.
- Client Type: the confidentiality of the IAM client. Select the Public option.
-
Leave all other fields unchanged and click Create to create the new IAM Client.
-
Log in to the Admin Portal and go to your game namespace dashboard.
-
Go to Foundations > Identity & Access > IAM Clients and click Create New.
-
On the new window, fill out the fields using the configurations below.
- Client Type: the confidentiality of the IAM client. Since the you want the IAM client to be public, set it to Public.
- Client Name: the name of the IAM client. Set it to ByteWars-GameClient.
- Redirect URI: the URI used to redirect once the IAM client authorization is successful. Set it to
https://127.0.0.1.
-
Leave all other fields unchanged and click Create to create the new IAM client.
Configure AGS Game SDK plugins
To let the the game project know you are using the AGS Game SDK, you need to create the configuration files in the /Asset/Resources/ folder. For the detailed installation guide, see Install the AGS Game SDK for Unity.
You will need these files in your project under /Asset/Resources/ before you can proceed:
- AccelByteSDKConfig.json
- AccelByteSDKOAuthConfig.json
Configure the AGS Game SDK to use the IAM client
You will need to create the configuration files with your IAM Client Credentials. This can be done by adding configuration values to the AccelByteSDKConfig.json and AccelByteSDKOAuthConfig.json files.
-
Open your project with your IDE (e.g., Visual Studio).
-
Inside
/Asset/Resources/AccelByteSDKConfig.json, input your client credentials using the following format:- AGS Shared Cloud
- AGS Private Cloud
{
	"Default": {
		"Namespace": "<game_namespace_id>",
		"UsePlayerPrefs": true,
		"EnableDebugLog": false,
		"DebugLogFilter": "Log",
		"BaseUrl": "https://<game_namespace_id>.prod.gamingservices.accelbyte.io",
		"RedirectUri": "http://127.0.0.1",
		"PublisherNamespace": ""
	}
}info- Namespace is the namespace ID of your game namespace.
- BaseUrl is the base URL made out of your game namespace ID combined with your Admin Portal environment.
{
	"Default": {
		"Namespace": "<game_namespace_id>",
		"UsePlayerPrefs": true,
		"EnableDebugLog": false,
		"DebugLogFilter": "Log",
		"BaseUrl": "https://<studio_name>.accelbyte.io",
		"RedirectUri": "http://127.0.0.1",
		"PublisherNamespace": "accelbyte"
	}
}info- Namespace is the namespace ID of your game namespace.
- PublisherNamespace is the publisher ID of your publisher namespace. The default value is
accelbyte. - BaseUrl is the URL of your Admin Portal environment.
tip-
To find your game namespace ID, go to your Admin Portal and navigate to the Namespace page where your game namespaces are listed. Then, locate your game namespace under the GAMES section and click on the gear icon. On the new page, locate the Namespace ID property and there you can find your game namespace ID value.
-
Similarly, to find your publisher namespace ID, go to your Admin Portal and navigate to the Namespace page where your game namespaces are listed. Then, locate your publisher namespace under the PUBLISHER section and click on the gear icon. On the new page, locate the Namespace ID property and there you can find your publisher namespace ID value.
-
Open
/Asset/Resources/AccelByteSDKOAuthConfig.jsonand input your credential using the following format:{
"Default": {
"ClientId": "<game_iam_client_id>",
"ClientSecret": ""
}
}info- ClientId is randomly generated and used to uniquely identify your public IAM client.
-
Save the files and your game SDK configuration is complete.
Enable AMS in the AGS Game SDK
In this section, you will enable AccelByte Multiplayer Servers (AMS) in the installed AGS Game SDK in your project so your game will be able to use AMS features and be authorized to communicate with AMS. You can use one of the following methods.
In the future, AMS will be enabled by default in the AGS Game SDK.
- From Config File
- From Unity Editor
-
Open the
AccelByteSDKConfig.jsonfile in any text editor. -
To enable AMS in the AGS Game SDK, add and enable the
EnableAmsServerQosconfiguration as shown below into theAccelByteSDKConfig.jsonfile.{
"Default": {
...
"EnableAmsServerQos": true
}
} -
Save the file to enable the configuration.
-
Open Byte Wars in the Unity Editor.
-
From the toolbar, go to AccelByte > Edit Client Settings.
-
On the AccelByte Client Config window, expand Service URL Configs and enable Use AMS QoS Server URL to activate AMS in the AGS Game SDK.
-
Once done, click the Save button to save the configuration.
Resources
- GitHub link to the files in the Unity Byte Wars repository: