Test run AMS local server - Dedicated servers with AccelByte Multiplayer Servers (AMS) - (Unity module)
About
For testing your AccelByte Multiplayer Servers (AMS) server locally, AccelByte has provided a simulator called AMS Simulator. This simulator simulates the dedicated server (DS) management and monitoring processes that are done by the Watchdog of AMS. With this AMS Simulator, you are going to validate the AMS implementation without uploading the server build to AMS.
Package Windows dedicated server
To run the game server, you need to build the project targeted for the Dedicated Server platform. Here, you will see how to package a Windows server build to test the server locally.
-
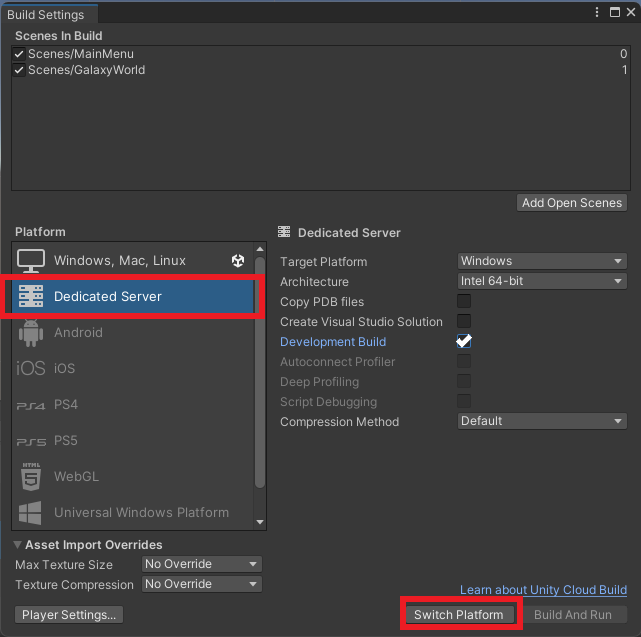
Open Byte Wars in Unity.
-
Go to File > Build Settings. Choose Dedicated Server as the platform and click the Switch Platform button.
-
Enable the Development Build to allow changing the AGS SDK configuration using launch argument and to see the server logs, then click Build.
-
Choose a folder to save the package build and click Select folder.
-
Wait for your server to finish packaging.
Test run the dedicated server locally
This section will test your packaged game server locally to check whether it is able to handle the state changes within the lifecycle of AMS.
-
Log in to the Admin Portal and go to your game namespace dashboard.
-
Go to Multiplayer Server Configuration > Download Resource. Locate and download the AMS Simulator for Windows. The amssim.exe file should be downloaded.
-
Before you run the AMS Simulator, you need to set up a new IAM client for the simulator named ByteWars-AMSSim. To create it, you can follow the same steps when you set up the server and AMS CLI IAM, but this time you need to use the configuration below.
- AGS Shared Cloud
- AGS Private Cloud
When creating the AMS Simulator IAM client, choose the Create from Template option for the Create Options field. Then, choose the Dedicated Server Tools option for the Select Template field. This IAM client template has the necessary permissions for using AMS Simulator.
After creating the AMS Simulator IAM client, add the permission below.
Resource Permission NAMESPACE:{namespace}:AMS:LOCALDSCreate -
After downloading AMS Simulator and creating the IAM client, open Windows PowerShell and run the AMS Simulator executable using the following command to generate a config file:
.\amssim.exe generate-config -
You will be able to see the
config.jsonin the same path as the AMS Simulator executable. Open the file using a text editor and fill out the configuration with the information below. Replace theClientIDand theClientSecretwith the information of the ByteWars-AMSSim IAM client you created. Also, replace other placeholder values based on your game namespace and AGS environment.- AGS Shared Cloud
- AGS Private Cloud
{
    "WatchdogPort": 5555,
    "AGSEnvironmentURL": "<game_namespace_id>.prod.gamingservices.accelbyte.io",
    "AGSNamespace": "<game_namespace_id>",
    "IAM": {
        "ClientID": "<ams_sim_iam_client_id>",
        "ClientSecret": "<ams_sim_iam_client_secret>"
    },
    "LocalDSHost": "127.0.0.1",
    "LocalDSPort": 7778,
    "ClaimKeys": [],
    "ServerName": "Your Local Server Name"
}
{
"WatchdogPort": 5555,
"AGSEnvironmentURL": "<studio_name>.accelbyte.io",
"AGSNamespace": "<game_namespace_id>",
"IAM": {
"ClientID": "<ams_sim_iam_client_id>",
"ClientSecret": "<ams_sim_iam_client_secret>"
},
"LocalDSHost": "127.0.0.1",
"LocalDSPort": 7778,
"ClaimKeys": [],
"ServerName": "Your Local Server Name"
}info- WatchdogPort is the port the app is going to use to connect to your dedicated server.
- AGSEnvironmentURL is the URL of the environment you want to register your local dedicated server to, without
http://. - IAM is the
ClientIDandClientSecretthat were used to authenticate your AMS Simulator that you created in previous steps. - LocalDSHost and LocalDSPort are the IP and port, respectively, of the machine that runs the local dedicated server, so your play tester knows where to connect.
- ClaimKeys provides the list of claim keys that the session service uses to claim your local dedicated server. By default, the
ServerNameis registered as one of the claim keys. - ServerName is the name you want to call your local dedicated server. By default, it is registered as one of the claim keys and automatically generated using your computer name, which you can change as preferred.
tip- To find your game namespace ID, go to your Admin Portal and navigate to the Namespace page where your game namespaces are listed. Then, locate your game namespace under the GAMES section and click on the gear icon. On the new page, locate the Namespace ID property and there you can find your game namespace ID value.
tipFor LocalDSPort, keep in mind that if you are using your own game, the server might be listening to a different port. By default, Byte Wars server listens to port
7778. This logic can be found in theGetPort()function within theConnectionHandler.csclass. -
Once the configuration is complete, run the AMS Simulator executable.
.\amssim.exe runHere is the output of AMS Simulator. Notice that it provides an example ID format for your local dedicated server. This example is
ds_018c1f42-5eb6-7ca3-9650-a732ed75ce6a. Copy it, as you will need it in the next step.AMS simulator url ws://0.0.0.0:5555/watchdog
AMS simulator session id: 01hfaxxvfqhe9gkk2zesfx0b66.
AMS simulator session log path: session\01hfaxxvfqhe9gkk2zesfx0b66.log
Ready to accept local DS
Start the local DS with a valid DS ID that conforms to uuid standards
An example that can be copied and pasted is:
ds_018c1f42-5eb6-7ca3-9650-a732ed75ce6a
==================================Command list=================================================
help show the command list again
info show AMS simulator info
ds
status show status of the ds
ready explicitly set ds into ready state.
claim claim the ds for a game session.
drain drain the ds
exit, quit exit ams simulator
============================================================================================= -
Run the game server executable using the commands below in Windows PowerShell. Notice that it uses the
ds_018c1f42-5eb6-7ca3-9650-a732ed75ce6afrom the previous step as its local dedicated server ID. Also, adjust the path to point to theByteWars.exeof your server build..\ByteWars.exe -log -OverrideSDKConfig "{'DsId': 'ds_018c1f42-5eb6-7ca3-9650-a732ed75ce6a'}" -watchdog_url="ws://localhost:5555/watchdog"info- -log will show game server's log.
- -OverrideSDKConfig is the parameter specifically for Windows server to inject the config parameter, such as the
DsId. - DsId is the parameter is specifically for Windows Server to define the server identification. You can use the example ID provided by the AMS Simulator. In this case, it is
ds_018c1f42-5eb6-7ca3-9650-a732ed75ce6a. If the server is hosted on AMS, AMS provides the specific server ID and substitutes it in the command parameter value. - -watchdog_url is the URL and the port that will be used to connect the game server to AMS. This example uses
ws://localhost:5555/watchdogas the value as this is the default IP and port for AMS Simulator. You can change the configuration for AMS Simulator inconfig.json. Note that this launch parameter will be filled automatically on the AMS side when the dedicated server is launched in AMS.
-
Once your game server runs, a "DS Connected" message will appear in your AMS Simulator Windows PowerShell tab to notify you that your local dedicated server has connected to AMS.
amssim> DS Connected -
Check the dedicated server status using AMS Simulator by executing
ds status. If the game server successfully registers, it will display the log below. Notice that theDS Statehas changed toReady.ds statusAMS Simulator will show the following log:
amssim> ds status
ID: xxxxx
Connected at: 2023-XX-XX 10:00:00
Last Heartbeat: 2023-XX-XX 10:00:00
DS State: ReadyinfoYou can also check the local dedicated sever status from the Admin Portal by navigating to the side bar menu of the dashboard and selecting Multiplayer Server Configuration > Development Servers > Local Server.
-
You can also use the
ds claimcommand to simulate a game session claiming a dedicated server. Notice theDS Statenow has changed toInSession.ds claimAMS Simulator will show the following log:
amssim> ds status
ID: xxxxx
Connected at: 2023-XX-XX 10:00:00
Last Heartbeat: 2023-XX-XX 10:00:00
DS State: InSession -
You can also verify if the game server can handle a drain state by executing
ds drain. Upon receiving the event, the game server shuts down, and the AMS Simulator displays the log below.ds drainAMS Simulator log:
amssim> ds status
no connected dedicated server -
To quit AMS Simulator, execute the following command:
quit