Upload the dedicated server to AMS - Dedicated servers with AccelByte Multiplayer Servers (AMS) - (Unity module)
Upload dedicated server to AMS
Now that you've tested your server locally and verify that it works, in this tutorial, you will upload your dedicated server to AccelByte Multiplayer Servers (AMS).
Package Linux dedicated server
-
Open Byte Wars in Unity.
-
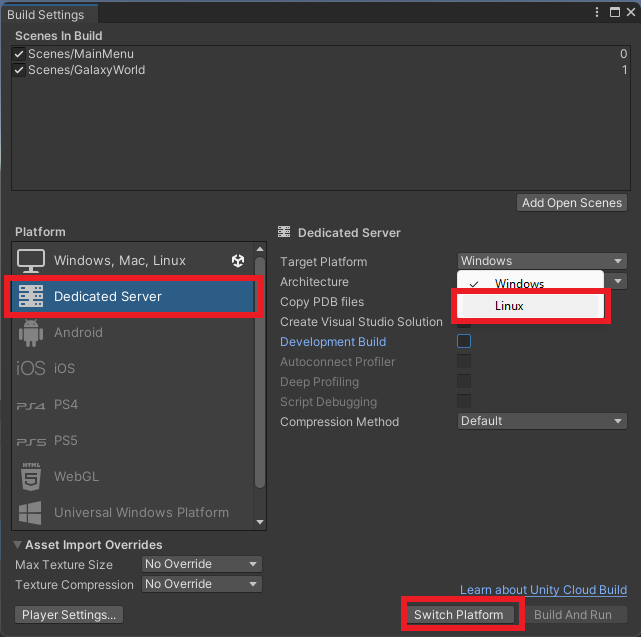
Go to File > Build Settings. Choose Dedicated Server as the platform and click Switch Platform.
-
Enable the Development Build to allow changing the AGS SDK configuration using launch argument and to see the server logs, then click the Build button.
-
A file explorer window will appear. Name the package as
ByteWars.x86_64and save it under a folder namedlinux-server-build. -
Wait until the building process finishes.
Upload server image to AMS
You will need to download the AMS executable file to help you upload the dedicated server to AMS. This section will show you how to do that.
-
Log in to the AccelByte Gaming Services (AGS) Admin Portal and go to your game namespace dashboard.
-
Go to Multiplayer Server Configuration > Download Resource.
-
Download the AMS Command Line Interface (CLI) For Windows (amd64). The ams.exe file should be downloaded.
-
Upload the Linux dedicated server using the AMS CLI. Run ams.exe using a Windows PowerShell with the command below. Use the client ID and client secret of your CLI IAM client to replace
<AMSCLI_ClientID>and<AMSCLI_ClientSecret>..\ams.exe upload -H <AMS_HostURL> -c <AMSCLI_ClientID> -s <AMSCLI_ClientSecret> -n <DSImageName> -p <DSAbsoluteLocalPath> -e ByteWars.x86_64infoHere are the details of the AMS CLI command to upload your dedicated server.
-H: the AMS host URL depending on where you run your AGS namespace. For AGS Private Cloud, your host URL is<studio_name>.accelbyte.io. For AGS Shared Cloud, your host URL isprod.gamingservices.accelbyte.io.-c: the IAM client ID used to authenticate. Set it to the IAM client ID from the AMS CLI IAM client you created.-s: the IAM client secret used to authenticate. Set it to the IAM client secret from the AMS CLI IAM client you created.-n: the name of the dedicated server image after the upload process completes. It can be anything, but make it meaningful. For example,1.0.3-unity-bytewars, which indicates the server version.-p: the absolute local path to the server directory to upload. For example,C:/Documents/ByteWars/LinuxServer.-e: the dedicated server executable within the server directory. In this case, the executable is theByteWars.x86_64file.
-
Once the uploading process finishes, you can see your new dedicated server image listed in the Admin Portal. You can also check it by going to Multiplayer Server Configuration > Server Images.
Create a fleet to manage the dedicated server
AMS fleets function to scale virtual machines and manage dedicated servers that are hosted within those virtual machines based on regional configurations. In this section, you will learn how to create a fleet for your game.
-
Log in to the Admin Portal and go to your game namespace dashboard.
-
Go to Multiplayer Server Configuration > Fleet Manager.
-
In the Region List section, toggle the regions where you want your dedicated servers to be deployed. In this tutorial, ap-southeast-1 and us-east-2 are enabled.
-
Click Create Fleet > Create New to create a new fleet.
-
On the new Fleet & Image tab, fill in fleet name and select the server image that you just uploaded. The fleet name can be anything, but to make it simpler, you can use the same name as the server image name. Once done, click the Next button.
-
On the Deployment Profile tab, leave Timeout and Port Configuration configs as default. For Command Line config, enter the default command below, which configures the dedicated server so it can be managed by AMS. Once done, click Next.
-dsid ${dsid} -port ${default_port} -
On the DS Host & Region tab, you can select a Virtual Machine (VM) instance type based on your need. For this tutorial, let's use a small instance. Select the ttx1.s for the Host Instance and set the Dedicated Servers number to 2. This configuration tells the fleet to spawn two dedicated servers on the selected VM instance.
-
Still in the DS Host & Region tab, go to the Regional Configuration section. Then, enable your desired regions, in this example we use ap-southeast-1 and us-east-2. For this tutorial, set the Min Servers to 0, Max Servers to 2, and the Buffer Value to 1.
info- Min Servers: The minimum number of servers that the deployment needs to maintain, regardless of whether the servers are in the "Ready" (warmed buffer) state or "In Session" (serving a game session) state.
- Max Servers: The maximum number of servers that the region can maintain. This value is useful as a limiter to make sure the cost of game servers will not go over budget.
- Buffer Value: The buffer value tells the fleet the number of servers to maintain as warmed buffers.
-
On the Log & Artifacts Sampling tab, you want the dedicated server able to generate logs. To do this, enable the Enable Log Sampling option and set the samples to 100%. This config lets the dedicated server log every single event. Once done, click the Next button.
-
On the Summary tab, you can review your fleet configurations. Then, click the Create button to create the new fleet.
-
Your fleet is created and available in the fleet list. Open the fleet details by clicking on the fleet name.
-
If your fleet is not activated, locate the Fleet Status toggle on the top-left corner, below your fleet name. Make sure to toggle it to Active.
-
On the fleet details page, locate the Dedicated Server List section. There, you can see your dedicated servers and their statuses.
infoA new fleet usually take around around 3 minutes to get the dedicated server up and running before you can see them in the list. Below are the states of the dedicated servers on a fleet.
- Creating: the dedicated server is currently initializing (not yet calling the send ready message to the AMS watchdog).
- Ready: the dedicated server has sent a ready signal to AMS and is ready to go.
- Claiming: the fleet manager is currently claiming the dedicated server to a session using a claim key.
- Claimed: the dedicated server is already bound to a game session and the game is currently in progress.
- Removed: the dedicated server is removed from the fleet.
Set up a game session to use an AMS dedicated server
In this section, you will learn how to set up the game session to use the dedicated server from your new AMS fleet.
Create claim keys for the fleet
-
Log in to the Admin Portal and go to your game namespace dashboard.
-
Go to Multiplayer Server Configuration > Fleet Manager and click on the name of your fleet you created.
-
Under the Fleet Information section, click the Add More button. For this tutorial, you need to input a new claim key named unity-ds-ams.
Set up the Session Template
-
Log in to the Admin Portal and go to your game namespace dashboard.
-
Go to Multiplayer > Matchmaking > Session Configuration and click on the Session Template tab.
-
From here, you can either create a new Session Template by clicking the Add Session Template button, or you can modify your existing Session Template by clicking on the Session Template name.
-
On the Session Template General tab, locate the Server section. Then, select the DS - AMS option. This tells the Session Template to use dedicated servers from AMS fleets when the game session is created.
-
When the DS - AMS option is selected, you will find a new configuration named Requested Regions. Add all of your enabled AMS regions by clicking on the Add Region button.
-
On the Fallback Claim Keys, add a new claim key that matches the claim keys you configured in your AMS fleet. In the tutorial example, you need to add the unity-ds-ams claim key. To add new claim keys, click on the Add Key button.
infoThere are two types of claim keys you can configure for Session Template: Preferred Claim Keys and Fallback Claim Keys.
- Preferred Claim Keys: the top priority claim keys for the game session to claim AMS dedicated servers.
- Fallback Claim Keys: the fallback claim keys in case no AMS dedicated servers are found when using the Preferred Claim Keys.
-
Now that you have configured your Session Template to claim dedicated servers from your AMS fleets, click Save. Or, if you are creating a new Session Template, click Next to complete your new Session Template configuration.
Use a development fleet to manage dedicated servers
By default, the fleet you created before is a production fleet. A production fleet is meant for live games and the configurations, such as dedicated images and command line arguments, are immutable unless you stop and restart the fleet.
Alternatively, you can create a development fleet. A development fleet provides more flexibility and cost efficiency by letting you run multiple dedicated server image versions and command line permutations in the same fleet. This type of fleet will only spawn dedicated servers when requested. In this section, you will learn how to configure a development fleet and use it for your game sessions.
Create a development fleet
-
Log in to the Admin Portal and go to your game namespace dashboard.
-
Go to Multiplayer Server Configuration > Fleet Manager. Then, create a new fleet by clicking Create Fleet > Create New.
-
On the new Fleet & Image tab, fill in the fleet name. Then, turn on the Development Fleet option. Once done, click Next.
-
On the Deployment Profile tab, keep everything as default, leaving the Command Line empty as it will be filled by the build configuration, which will be discussed later. Once done, click Next.
-
On the DS Host tab, select ttx1.s for the VM Instance and set the Number of servers to 1. This configuration tells the fleet to spawn one (1) dedicated server on the selected virtual machine (VM) instance. Now, click Next.
-
On the Region tab, expand the enabled regions. Locate the pencil icon under the Action column to edit how many dedicated servers should be deployed by the fleet. Unlike production fleets, buffer for development fleets is how many DS you want to have room to launch on ready VMs, therefore you need at least 1 buffer. For this tutorial, set the Min Servers to 0, the Max Servers to 1, and the Buffer Value to 1.
-
On the Log & Artifacts Sampling tab, you want the dedicated server able to generate logs. To do this, enable the Enable Log Sampling option and set the samples to 100%. This config lets the dedicated server log every single event. Once done, click Next.
-
On the Summary tab, you can review your development fleet configuration. Now, click Create and activate the fleet.
Create a build configuration
A development fleet only spawns dedicated servers when requested, and it does not know what configuration to use to spawn dedicated servers. Thus, you need to create a build configuration.
A build configuration stores the dedicated server configuration, including dedicated server image and command line, to be used by your development fleet to spawn your dedicated server instances. This way, you can make many build configuration for each of your game versions and deploy them on the same development fleet. In this section, you will create a build configuration.
-
Log in to the Admin Portal and go to your game namespace dashboard.
-
Go to Multiplayer Server Configuration > Development Servers > Build Configurations. Then, create a new config by clicking Create Config > Create New.
-
On the Name & Image tab, set your configuration by using the guide below. Once done, click Next.
-
Build Configuration Name: you need to fill this with the exact version of your game.
-
Image: select your desired dedicated server version. Make sure it also has the same exact game version of your Build Configuration Name.
tipFor Unity Engine projects, you can find the game version from Unity Editor by navigating to Edit > Project Settings > Player. There, you will see the game version in the Version field.
Alternatively, you can also print the game version value by script.
Debug.Log(Application.version); -
-
On the Command Line tab, fill the Command section with the command below. It configures the dedicated server so it can be managed by AMS. Once done, click Next.
-dsid ${dsid} -port ${default_port} -watchdogUrl ${watchdog_url} -
On the Summary tab, review your config. Click Create when ready, and then activate your configuration.
Create claim keys for development fleet
-
Log in to the Admin Portal and go to your game namespace dashboard.
-
Go to Multiplayer Server Configuration > Fleet Manager. Then, click on the name of your development fleet you created in the previous section.
-
Under the Fleet Information section, click the Add More button next to the Claim Keys attribute. For this tutorial, input a new claim key named unity-ds-ams-dev.
Set up the session template to use development fleets
-
Log in to the Admin Portal and go to your game namespace dashboard.
-
Go to Multiplayer > Matchmaking > Session Configurations. Then, go to the Session Template tab.
-
From here, you can either create a new session template by clicking Add Session Template, or you can modify your existing session template by clicking on the session template name.
-
On the General tab, select the DS - AMS option in the Server section. This tells the session template to use dedicated servers from AMS fleets when the game session is created.
-
When the DS - AMS option is selected, you can find a new configuration named Requested Regions. Add all of your enabled AMS regions by clicking on the Add Region button.
-
Then, on the Fallback Claim Keys, add a new claim key that matches the claim keys you have configured on your AMS development fleet. If you're following this tutorial example, you need to add the unity-ds-ams-dev claim key. To add new claim keys, click Add Key. You can add it to the Preferred Claim Keys or the Fallback Claim Keys.
-
Now, you have configured your session template to claim dedicated servers from your AMS development fleet. If you're modifying an existing session template, click Save to save your session template configuration. If you are creating a new session template, click Next and complete the session template creation as normal.
Congratulations! You have successfully set up a game session to use an AMS development fleet.
Set up game to send requests to development fleets
To make your game send requests to your development fleets based on the game version, you need to set a game session attribute named client_version. This attribute is the game version of your game.
When client_version is set, the game session will first request a dedicated server from the development fleet that has the same claim key with the requested game session. In this case, the claim key you use will be unity-ds-ams-dev.
Then, the development fleet will spawn a new dedicated server instance based on your build configuration you created. The fleet will select the build configuration that has the Build Configuration Name that is the same as the game session's client_version attribute. After the dedicated server instance is created, the fleet will claim it and inform the game session.
To set the client_version attribute in the Byte Wars project, you can set the config below in the TutorialModuleConfig.json to true. This config will set the client_version value to the Unity's project version when the game requests a game session, whether through matchmaking or a match session.
"overrideDSVersion": true
The config above sets the client_version value by adding the session settings before starting matchmaking or creating a match session.
// Set client version for matchmaking
MatchmakingV2CreateTicketRequestOptionalParams optionalParams = new MatchmakingV2CreateTicketRequestOptionalParams();
optionalParams.attributes.Add("client_version", Application.version);

// Set client version for match session
SessionV2GameSessionCreateRequest request = new SessionV2GameSessionCreateRequest();
request.clientVersion = Application.version;
You can also check the sample code from the Byte Wars project in the MatchmakingSessionWrapper and GameSessionConfig class.
public async Task StartMatchmakingAsync(string matchPool, bool isLocal = false)
{
	...
	MatchmakingV2CreateTicketRequestOptionalParams optionalParams = new MatchmakingV2CreateTicketRequestOptionalParams();
	optionalParams.attributes = new Dictionary<string, object>();
	...
	// Add client version
	optionalParams.attributes.Add("client_version", TutorialModuleUtil.IsOverrideDedicatedServerVersion() ? Application.version : string.Empty);
	...
	matchmakingV2.CreateMatchmakingTicket(matchPool, optionalParams, OnStartMatchmakingComplete);
}
private static readonly string UnitySessionClientVersion = TutorialModuleUtil.IsOverrideDedicatedServerVersion() ? Application.version : string.Empty;

public static readonly Dictionary<InGameMode, Dictionary<
    GameSessionServerType, SessionV2GameSessionCreateRequest>>
    SessionCreateRequest =
        new Dictionary<InGameMode, Dictionary<GameSessionServerType, SessionV2GameSessionCreateRequest>>()
        {
            ...
            { InGameMode.CreateMatchElimination, new Dictionary<GameSessionServerType,
                SessionV2GameSessionCreateRequest>()
                {
                    ...
                    {
                        GameSessionServerType.DedicatedServerAMS, new SessionV2GameSessionCreateRequest()
                        {
                            type = SessionConfigurationTemplateType.DS,
                            joinability = SessionV2Joinability.OPEN,
                            configurationName = UnitySessionEliminationDSAMS,
                            matchPool = UnitySessionEliminationDSAMS,
                            clientVersion = UnitySessionClientVersion
                        }
                    }
                    ...
                }
            },
            ...
        };
...
You can check your game session attribute once it's created on the Admin Portal. You can do this by navigating to Multiplayer > Matchmaking > Sessions and Parties. Then, select your game session. On the Session Details page, select the Session Data (JSON) tab. There, you can check the clientVersion attribute value.