Byte Warsのクローンと実行 - 初期設定 - (Unityモジュール)
注釈:本資料はAI技術を用いて翻訳されています。
Byte Warsリポジトリのクローン
Byte Wars AMSプロジェクトは、Byte Wars Unity GitHubリポジトリのtutorialmodules-amsブランチから入手できます。以下のGitコマンドを使用してプロジェクトをクローンしてください。
git clone -b tutorialmodules-ams https://github.com/AccelByte/accelbyte-unity-bytewars-game.git
UnityでByte Warsプロジェクトを開く
-
Unity Hubを起動します。サイドパネルからProjectsを選択し、Addボタンをクリックします。ドロップダウンからAdd project from diskを選択します。
-
ポップアップウィンドウで、クローンしたByte Warsプロジェクトを見つけて、Add Projectボタンをクリックします。
-
完了すると、Byte WarsプロジェクトがUnity Hubにリストされます。EDITOR VERSIONが2022.3.50f1に設定されていることを確認してください。
-
リストからプロジェクトエントリをクリックして、Unity Editorで開きます。
Byte Warsの実行
Byte WarsはUnity Editorで直接実行することも、.exe実行ファイルまたはWebページ(WebGL)としてビルドして実行することもできます。
Unity EditorでByte Warsを実行する
-
Unity EditorでByte Warsプロジェクトを開きます。次に、Assets/Scenesフォルダに移動し、MainMenu.unityシーンファイルをダブルクリックしてメインメニューシーンを開きます。
-
再生ボタンをクリックして、Unity Editorでゲームを開始します。
ゲームビルドとしてByte Warsを実行する
- Windows
- WebGL
-
Unity EditorでByte Warsプロジェクトを開きます。次に、File > Build Settingsに移動します。
-
Build Settingsウィンドウで、PlatformにWindows, Mac, Linuxを選択し、Target PlatformとしてWindowsを選択します。次に、Buildボタンをクリックして、ゲームクライアントを実行ファイルとしてビルドします。
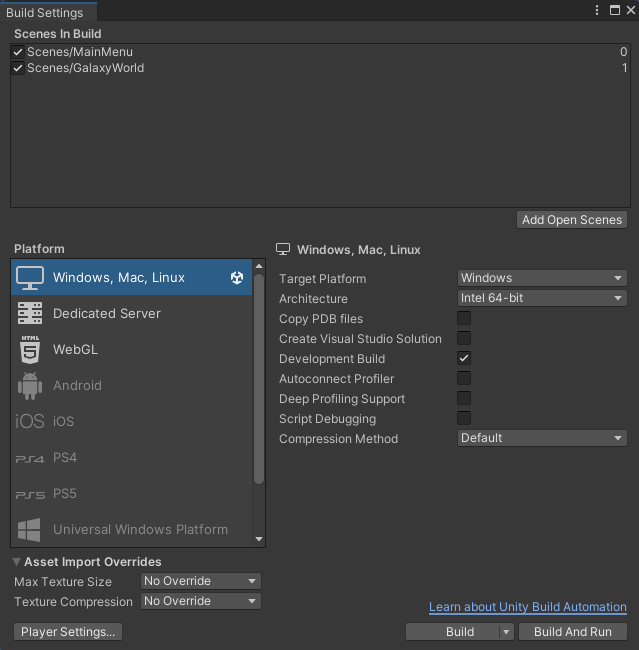
-
ファイルマネージャーウィンドウで、ゲームビルドファイルを保存するフォルダを選択し、Select Folderボタンをクリックします。
-
Unityがゲームのビルドとパッケージ化を開始します。完了したら、ゲームビルドを保存したフォルダを開きます。次に、
ByteWars.exeを実行してゲームを開始します。
以下のコマンドを使用して、ターミナルからByte Warsを実行することもできます。
ByteWars.exe -window-mode -screen-width 1280 -screen-height 720
Unity EditorにWebGL Build Supportモジュールがインストールされている必要があります。まだインストールしていない場合は、Unity Hubを使用してインストールできます。必要なモジュールの追加の詳細については、Unity Hubドキュメントを参照してください。
-
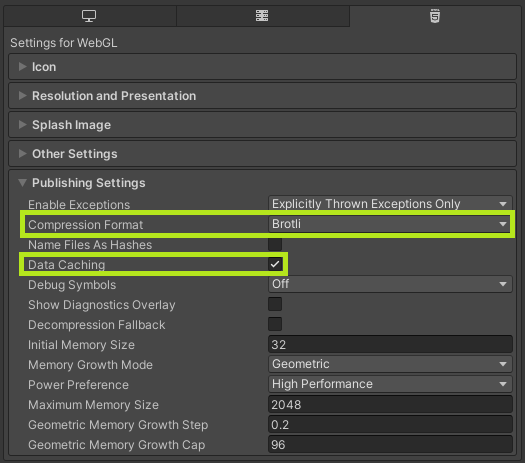
まず、パッケージ化されたWebGLビルドを最適化するために、圧縮とデータキャッシュを有効にする必要があります。これを行うには、Unity EditorでByte Warsを開き、File > Edit > Project Settingsに移動します。
-
新しいウィンドウで、左パネルからPlayerを選択し、Settings for WebGLタブを選択します。次に、Publishing Settingsセクションを展開し、Compression FormatをBrotliに設定し、Data Cachingを有効にします。
-
次に、ゲームをWebGLビルドとしてパッケージ化します。File > Build Settingsに移動します。ビルドプラットフォームとしてWebGLを選択し、Buildボタンをクリックします。
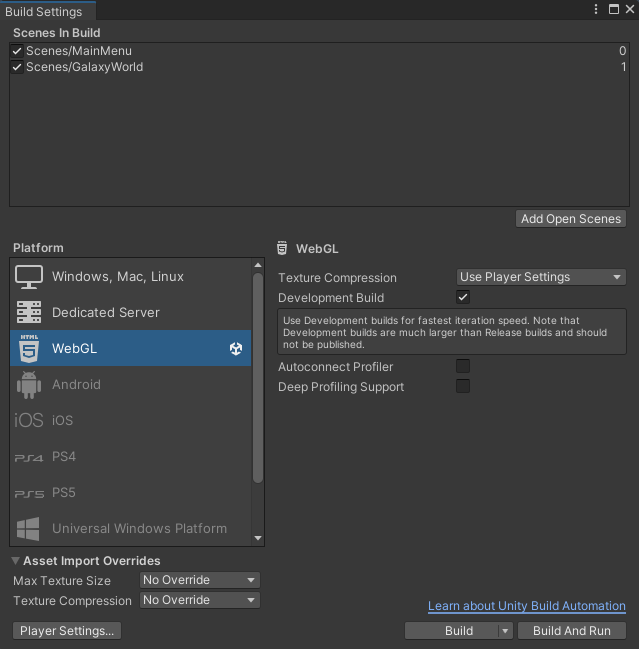
-
ファイルマネージャーウィンドウで、ゲームビルドファイルを保存するフォルダを選択し、Select Folderボタンをクリックします。
-
Unityがゲームのビルドとパッケージ化を開始します。
-
ファイルを保存したフォルダを開き、ローカルWebサーバーにコピーします。
-
WebブラウザでローカルWebサーバーのIPアドレスを開いてゲームを実行します。