カスタムマッチメイキングメニューの追加 - ゲームクライアント統合 - (Unreal Engine モジュール)
注釈:本資料はAI技術を用いて翻訳されています。
メニューの内容
このチュートリアルでは、サンプルマッチメイキングバックエンドサービスを使用してマッチメイキングを実行するために使用するメニューを準備する方法を説明します。メニューはリソースセクションで入手でき、以下のファイルで構成されています。
CustomMatchmakingWidget_Starter: ほとんどの実装が行われるC++クラス。- ヘッダーファイル:
/Source/AccelByteWars/TutorialModules/Play/CustomMatchmaking/UI/CustomMatchmakingWidget_Starter.h - CPPファイル:
/Source/AccelByteWars/TutorialModules/Play/CustomMatchmaking/UI/CustomMatchmakingWidget_Starter.cpp
- ヘッダーファイル:
W_CustomMatchmaking_Starter: Unreal Motion Graphics (UMG) を使用して作成および設計されたWidget Blueprintクラス。- Widget Blueprintファイル:
/Content/TutorialModules/Play/CustomMatchmaking/UI/W_CustomMatchmaking_Starter.uasset
- Widget Blueprintファイル:
ヘッダーファイルとCPPファイルにいくつかの要素を用意しています。
- 後で実装するサブシステムオブジェクトへの参照をヘッダーファイルに、それを取得するコードをCPPファイルに用意しています。
private:
	UPROPERTY()
	UCustomMatchmakingSubsystem_Starter* Subsystem;
void UCustomMatchmakingWidget_Starter::NativeOnActivated()
{
// ...
	Subsystem = GetGameInstance()->GetSubsystem<UCustomMatchmakingSubsystem_Starter>();
	if (!Subsystem)
	{
		UE_LOG_CUSTOMMATCHMAKING(Fatal, TEXT("Can't retrieve UCustomMatchmakingSubsystem"))
	}
// ...
}
- このメニューには、マッチメイキングの状態に基づいて関連するユーザーインターフェースを表示するための異なる状態があり、これは事前定義された状態を持つカスタムWidget SwitcherであるAccelByteWars Widget Switcherによって実現されています。
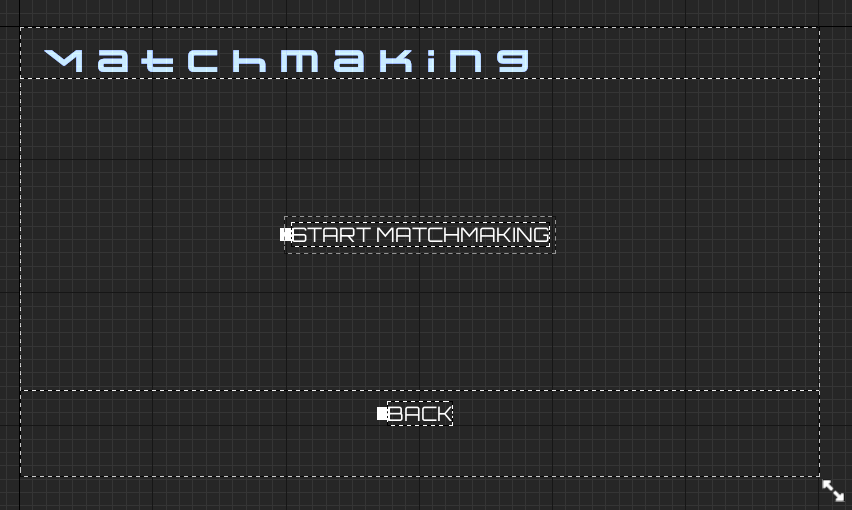
- Default: Start Matchmakingボタンを表示します。
- Loading: ローディング表示、メッセージ、キャンセルボタンを表示します。
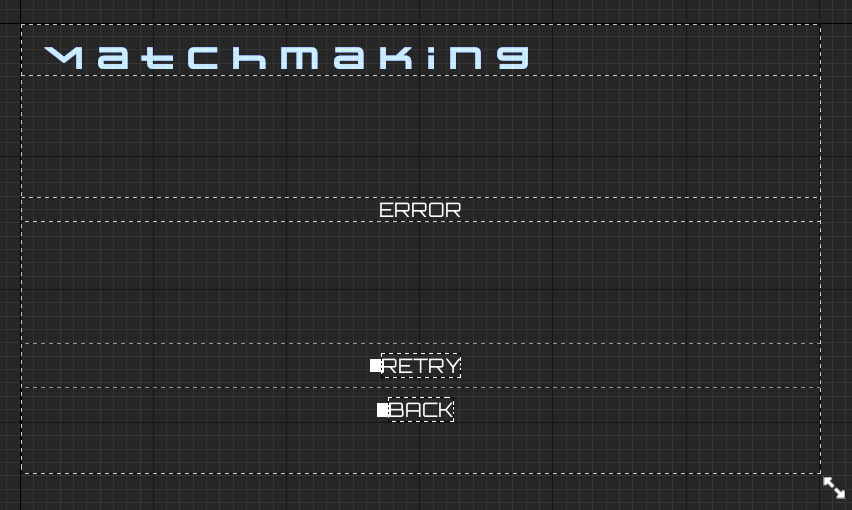
- Error: リトライボタンと戻るボタンを表示します。
private:
// ...
	UPROPERTY(BlueprintReadOnly, meta = (BindWidget, BlueprintProtected = true, AllowPrivateAccess = true))
	UAccelByteWarsWidgetSwitcher* W_Root;
- 状態を切り替える関数。
void UCustomMatchmakingWidget_Starter::SwitchWidget(const EAccelByteWarsWidgetSwitcherState State)
{
	UWidget* FocusTarget = W_Root;
	bool bIsBackable = true;

	switch (State)
	{
	case EAccelByteWarsWidgetSwitcherState::Loading:
		bIsBackable = false;
		break;
	case EAccelByteWarsWidgetSwitcherState::Not_Empty:
		FocusTarget = Btn_StartMatchmaking;
		break;
	}

	W_Root->SetWidgetState(State);

	FocusTarget->SetUserFocus(GetOwningPlayer());

	bIsBackHandler = bIsBackable;
	Btn_Back->SetVisibility(bIsBackable ? ESlateVisibility::Visible : ESlateVisibility::Collapsed);

	W_Root->ForceRefresh();
}
デフォルト状態
これは、プレイヤーがゲームにサンプルマッチメイキングバックエンドサービスへの接続とマッチメイキングプロセスの開始を指示する場所です。このメニューには、Start MatchmakingボタンとBackボタンの2つのボタンがあります。
これらのボタンはヘッダーファイルで宣言されています。
private:
// ...
	UPROPERTY(BlueprintReadOnly, meta = (BindWidget, BlueprintProtected = true, AllowPrivateAccess = true))
	UCommonButtonBase* Btn_StartMatchmaking;

	UPROPERTY(BlueprintReadOnly, meta = (BindWidget, BlueprintProtected = true, AllowPrivateAccess = true))
	UCommonButtonBase* Btn_Back;
お気づきかもしれませんが、Backボタンはプレイヤーが前のメニューに戻るための方法です。CPPファイルで、ボタンのOnClickに組み込みのDeactivateWidget関数をバインドすることで、その機能をすでに提供しています。
void UCustomMatchmakingWidget_Starter::NativeOnActivated()
{
// ...
	Btn_Back->OnClicked().AddUObject(this, &ThisClass::DeactivateWidget);
// ...
}
ローディング状態
冒頭で述べたように、この状態はカスタムWidget Switcherによって実現されています。ローディングメッセージとCancelボタンで構成されています。ローディングメッセージはW_Root->LoadingMessageの値を設定することで設定できます。CancelボタンのOnClickイベントはW_Root->OnCancelClickedデリゲートを操作することで設定できます。また、W_Root->bEnableCancelButtonの値を設定することで無効化/有効化することもできます。
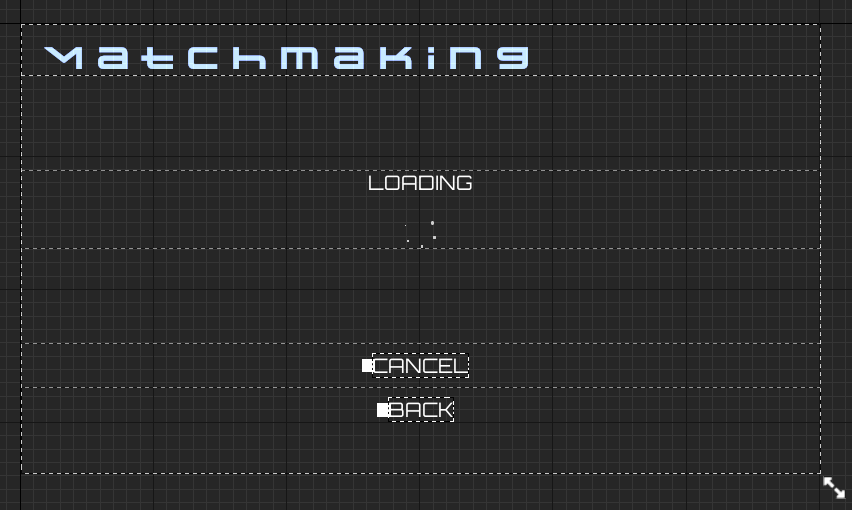
エディタでは、この状態にBackボタンがあることに気づくかもしれません。ゲームはこの状態に切り替えるときにこのBackボタンを非表示にします。このロジックは、前のセクションで述べたSwitchWidget関数で確認できます。
エラー状態
この状態もカスタムWidget Switcherによって提供されています。エラーメッセージ、Retryボタン、およびDefault状態と同じBackボタンで構成されています。エラーメッセージはW_Root->ErrorMessageの値を設定することで設定できます。RetryボタンのOnClickイベントはW_Root->OnRetryClickedデリゲートを操作することで設定できます。
UIの準備
CustomMatchmakingWidget_Starterヘッダーファイルを開き、以下の関数宣言を追加します。これらは、プレイヤーが特定のボタンを押したときに呼び出される関数です。
protected:
	UFUNCTION()
	void StartMatchmaking();

	UFUNCTION()
	void StopMatchmaking();
CustomMatchmakingWidget_StarterCPPファイルを開き、StartMatchmaking関数を定義します。後でこの関数を使用してマッチメイキングプロセスをトリガーしますが、今のところは以下のダミー実装を追加します。ゲームが現在マッチメイキングプロセスの開始を試みていることをユーザーに知らせたいので、関数がトリガーされるとすぐに、関連するメッセージとともにウィジェットの状態をLoadingに変更します。
void UCustomMatchmakingWidget_Starter::StartMatchmaking()
{
	W_Root->LoadingMessage = FText::FromString(TEXT_LOADING_REQUEST);
	W_Root->bEnableCancelButton = false;
	SwitchWidget(EAccelByteWarsWidgetSwitcherState::Loading);
// ...
}
StopMatchmaking関数を定義します。ここで実際のマッチメイキング停止機能を呼び出します。今のところは、以下のダミー実装を追加します。先ほどと同様に、関数の開始時にウィジェットの状態をLoadingと関連するメッセージに変更することで、ゲームが現在リクエストを処理していることをプレイヤーに知らせたいと考えています。
void UCustomMatchmakingWidget_Starter::StopMatchmaking()
{
	W_Root->LoadingMessage = FText::FromString(TEXT_LOADING_CANCEL);
	SwitchWidget(EAccelByteWarsWidgetSwitcherState::Loading);
// ...
}
NativeOnActivated関数に移動し、関数の最後にこれらの実装を追加します。これは、マッチメイキングの開始と停止のダミー実装を対応するボタンにバインドするためです。
void UCustomMatchmakingWidget_Starter::NativeOnActivated()
{
// ...
	Btn_StartMatchmaking->OnClicked().AddUObject(this, &ThisClass::StartMatchmaking);
	W_Root->OnCancelClicked.AddUObject(this, &ThisClass::StopMatchmaking);
	W_Root->OnRetryClicked.AddUObject(this, &ThisClass::StartMatchmaking);
// ...
}
NativeOnDeactivated関数に移動し、関数の最後にこれらの実装を追加します。これにより、メニューが閉じられたときにクリーンなクローズが保証されます。
void UCustomMatchmakingWidget_Starter::NativeOnDeactivated()
{
// ...
	Btn_StartMatchmaking->OnClicked().RemoveAll(this);
	W_Root->OnCancelClicked.RemoveAll(this);
	W_Root->OnRetryClicked.RemoveAll(this);
// ...
}
CustomMatchmakingWidget_Starterヘッダーファイルに戻り、さらに関数を宣言します。これらの関数は、マッチメイキングサービスからの変更イベントに反応する責任があります。
protected:
// ...
	void OnMatchmakingStarted();
	void OnMessageReceived(const FMatchmakerPayload& Payload);
	void OnMatchmakingFailed(const FString& ErrorMessage);
CustomMatchmakingWidget_StarterCPPファイルを開き、OnMatchmakingStarted関数を定義します。これは、バックエンドがマッチメイクのリクエストに成功し、現在進行中であることを確認したときに処理します。ここでは、メニューの状態をLoadingに変更します。
void UCustomMatchmakingWidget_Starter::OnMatchmakingStarted()
{
	W_Root->LoadingMessage = FText::FromString(TEXT_LOADING_FINDING_MATCH);
	W_Root->bEnableCancelButton = true;
	SwitchWidget(EAccelByteWarsWidgetSwitcherState::Loading);
}
OnMessageReceived関数を定義します。これは、ゲームがマッチメイキングサーバーからメッセージを受信したときに処理します。この場合、ゲームは単にメッセージをローディングメッセージとして表示します。
void UCustomMatchmakingWidget_Starter::OnMessageReceived(const FMatchmakerPayload& Payload)
{
	W_Root->LoadingMessage = FText::FromString(Payload.Message);
	SwitchWidget(EAccelByteWarsWidgetSwitcherState::Loading);
}
OnMatchmakingFailed関数を定義します。これは、ゲームがエラーを受信したときに処理します。この関数は、メニューの状態をErrorに変更し、エラーメッセージを表示します。
void UCustomMatchmakingWidget_Starter::OnMatchmakingFailed(const FString& ErrorMessage)
{
	W_Root->ErrorMessage = FText::FromString(ErrorMessage);
	SwitchWidget(EAccelByteWarsWidgetSwitcherState::Error);
}
-
プロジェクトをビルドし、Unreal Engine Editorで開きます。エディタで、
/Content/TutorialModules/Play/CustomMatchmaking/に移動します。DA_CustomMatchmakingというデータアセットが見つかります。それを開き、Is Starter Mode Activeを有効にします。次に、データアセットを保存します。これにより、ゲームをプレイするときにウィジェットをナビゲートできるようにウィジェットがアクティブ化されます。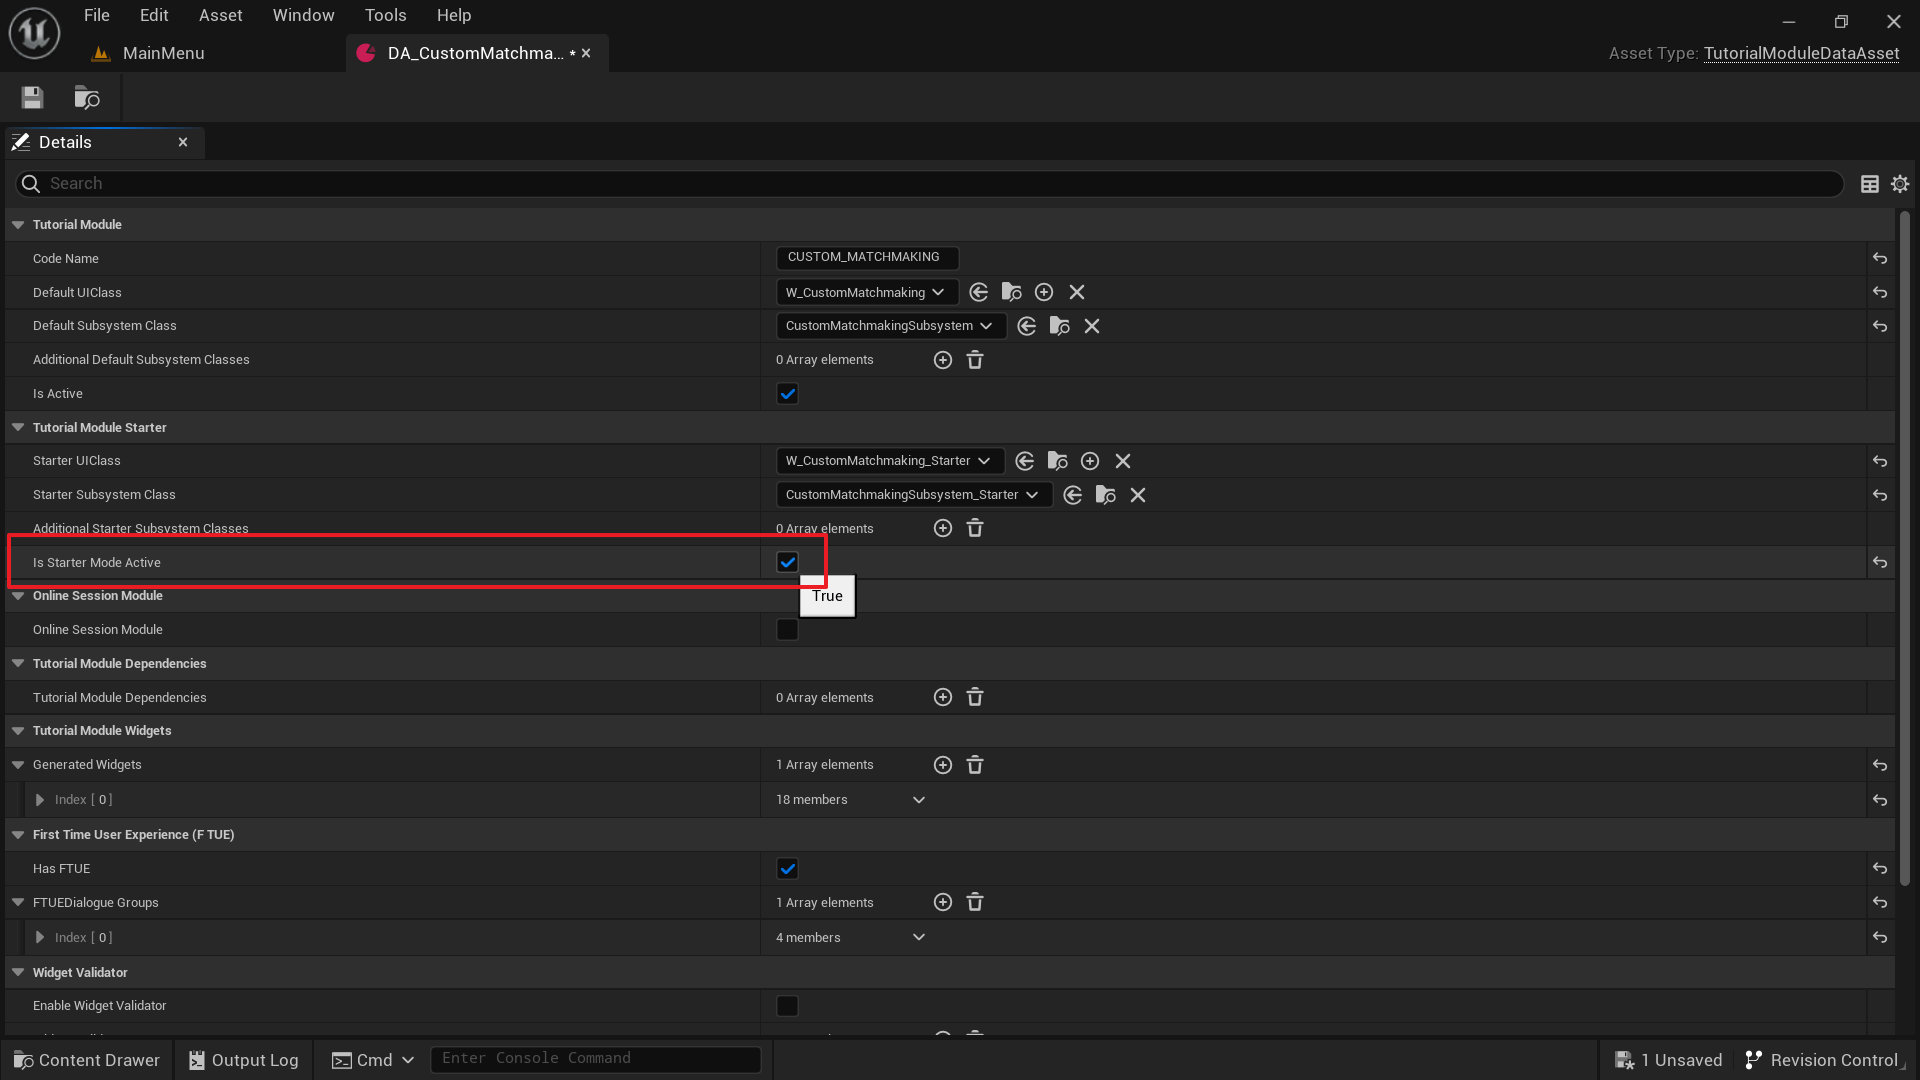
-
エディタでゲームをプレイすると、実装が成功していればCustom Matchmaking > Start Matchmakingにナビゲートできるようになります。
リソース
- このチュートリアルセクションで使用されているファイルは、Byte Wars Unreal GitHubリポジトリで入手できます。
- AccelByteWars/Source/AccelByteWars/TutorialModules/Play/CustomMatchmaking/UI/CustomMatchmakingWidget_Starter.h
- AccelByteWars/Source/AccelByteWars/TutorialModules/Play/CustomMatchmaking/UI/CustomMatchmakingWidget_Starter.cpp
- AccelByteWars/Content/TutorialModules/Play/CustomMatchmaking/UI/W_CustomMatchmaking_Starter.uasset
- AccelByteWars/Content/TutorialModules/Play/CustomMatchmaking/DA_CustomMatchmaking.uasset