専用サーバーをAMSにアップロードする - ゲームサーバー統合 - (Unreal Engine モジュール)
注釈:本資料はAI技術を用いて翻訳されています。
Linux専用サーバーをパッケージ化する
専用サーバーをAccelByte Multiplayer Servers (AMS)にアップロードするには、ゲームをLinuxゲームサーバーとしてパッケージ化する必要があります。これを行うには、Cross-Compile Toolchainをインストールする必要があります。詳細については、UnrealのDevelopment Requirementsを参照してください。Cross-Compile Toolchainをダウンロードしてインストールした後、コンピューターを再起動し、以下の手順に従ってください。
-
Unreal EngineエディターでByte Warsプロジェクトを開きます。
-
Platforms > Linuxに移動し、ShippingとAccelByteWarsServerを選択して、Package Projectをクリックしてプロジェクトをパッケージ化します。次に、プロジェクトをコンピューター上の場所に保存します。
サーバーイメージをAMSにアップロードする
AccelByteツールを使用して、LinuxゲームサーバーをAMSにアップロードします。
-
Admin Portalにログインし、ゲームのネームスペースダッシュボードに移動します。
-
サイドバーメニューから、Multiplayer Server Configuration > Download Resourceを選択します。
-
次に、AMS Command Line Interface (CLI) **For Windows (amd64)**をダウンロードします。ams.exeファイルがダウンロードされます。
-
次のステップは、AMS CLIを使用してLinux専用サーバーをアップロードすることです。以下のコマンドでWindows PowerShellを使用してams.exeを実行します。CLI IAMクライアントのクライアントIDとクライアントシークレットを使用して、
<AMSCLI_ClientID>と<AMSCLI_ClientSecret>を置き換えてください。.\ams.exe upload -H <AMS_HostURL> -c <AMSCLI_ClientID> -s <AMSCLI_ClientSecret> -n <DSImageName> -p <DSAbsoluteLocalPath> -e AccelByteWarsServer.sh備考専用サーバーをアップロードするためのAMS CLIコマンドの詳細は以下の通りです。
-H: AGSネームスペースを実行する場所に応じたAMSホストURL。AGS Private Cloudの場合、ホストURLは<studio_name>.accelbyte.ioです。AGS Shared Cloudの場合、ホストURLはprod.gamingservices.accelbyte.ioです。-c: 認証に使用されるIAMクライアントID。前のチュートリアルセクションで作成したAMS CLI IAMクライアントのIAMクライアントIDに設定します。-s: 認証に使用されるIAMクライアントシークレット。前のチュートリアルセクションで作成したAMS CLI IAMクライアントのIAMクライアントシークレットに設定します。-n: アップロードプロセス完了後の専用サーバーイメージの名前。任意の名前を付けることができますが、意味のある名前にしてください。例えば、サーバーバージョンを示す2.7.5-unreal-bytewarsなど。-p: アップロードするサーバーディレクトリへの絶対ローカルパス。例えば、C:/Documents/ByteWars/LinuxServer。-e: サーバーディレクトリ内の専用サーバー実行可能ファイル。この場合、実行可能ファイルはAccelByteWarsServer.shファイルです。
-
アップロードプロセスが完了すると、新しい専用サーバーイメージがAdmin Portalにリストされます。ダッシュボードのサイドバーメニューから、Multiplayer Server Configuration > Server Imagesを選択して確認できます。アップロードプロセス後には2つの状態があります:
- Uploaded: 専用サーバーバイナリが正常にアップロードされました。
- Complete: 専用サーバーイメージが正常に作成され、使用準備が整いました。DSイメージの状態がアップロード済みから完了に変わるまで数分かかります。
専用サーバーを管理するフリートを作成する
AMSフリートは、地域構成に基づいて仮想マシンをスケーリングし、それらの仮想マシン内でホストされている専用サーバーを管理する機能を持っています。このセクションでは、ゲーム用のフリートを作成する方法を学びます。
-
Admin Portalにログインし、ゲームのネームスペースダッシュボードに移動します。
-
サイドバーメニューから、Multiplayer Server Configuration > Fleet Managerを選択します。
-
次に、Region Listセクションを見つけて、専用サーバーをデプロイしたい地域を切り替えます。このチュートリアルでは、ap-southeast-1とus-east-2地域を有効にします。
-
次に、Create Fleet > Create Newをクリックして新しいフリートを作成します。
-
新しいFleet & Imageタブで、フリート名を入力し、先ほどアップロードしたサーバーイメージを選択します。フリート名は任意ですが、簡単にするために、サーバーイメージ名と同じ名前を使用できます。完了したら、Nextボタンをクリックします。
-
Deployment Profileタブで、TimeoutとPort Configurationの設定はデフォルトのままにします。Command Line設定には、以下のデフォルトコマンドを入力します。以下のコマンドは、専用サーバーがAMSによって管理できるように構成します。完了したら、Nextボタンをクリックします。
-dsid=${dsid} -port=${default_port} -
DS Hostタブでは、ニーズに基づいて仮想マシン(VM)インスタンスタイプを選択できます。このチュートリアルでは、小さなインスタンスを使用しましょう。Host Instanceにttx1.sを選択し、Dedicated Serversの数を2に設定します。この構成は、選択したVMインスタンス上に2つの専用サーバーを生成するようフリートに指示します。完了したら、Nextをクリックします。
-
Regionタブで、有効にした地域を展開します。この例ではap-southeast-1とus-east-2です。Action列の下にあるPencilアイコンを見つけて、フリートによってデプロイされる専用サーバーの数を編集します。このチュートリアルでは、Min Serversを0、Max Serversを1、Buffer Valueを1に設定します。
備考- Min Servers: サーバーが「Ready」(ウォームバッファ)状態または「In Session」(ゲームセッションを提供中)状態にあるかどうかに関係なく、デプロイメントが維持する必要がある最小サーバー数。
- Max Servers: 地域が維持できる最大サーバー数。この値は、ゲームサーバーのコストが予算を超えないようにするためのリミッターとして役立ちます。
- Buffer Value: バッファ値は、ウォームバッファとして維持するサーバー数をフリートに指示します。
-
Log & Artifacts Samplingタブでは、専用サーバーがログを生成できるようにします。これを行うには、Enable Log Samplingオプションを有効にし、サンプルを**100%**に設定します。この設定により、専用サーバーはすべてのイベントをログに記録します。完了したら、Nextボタンをクリックします。
-
Summaryタブで、フリート構成を確認できます。次に、Createボタンをクリックします。
-
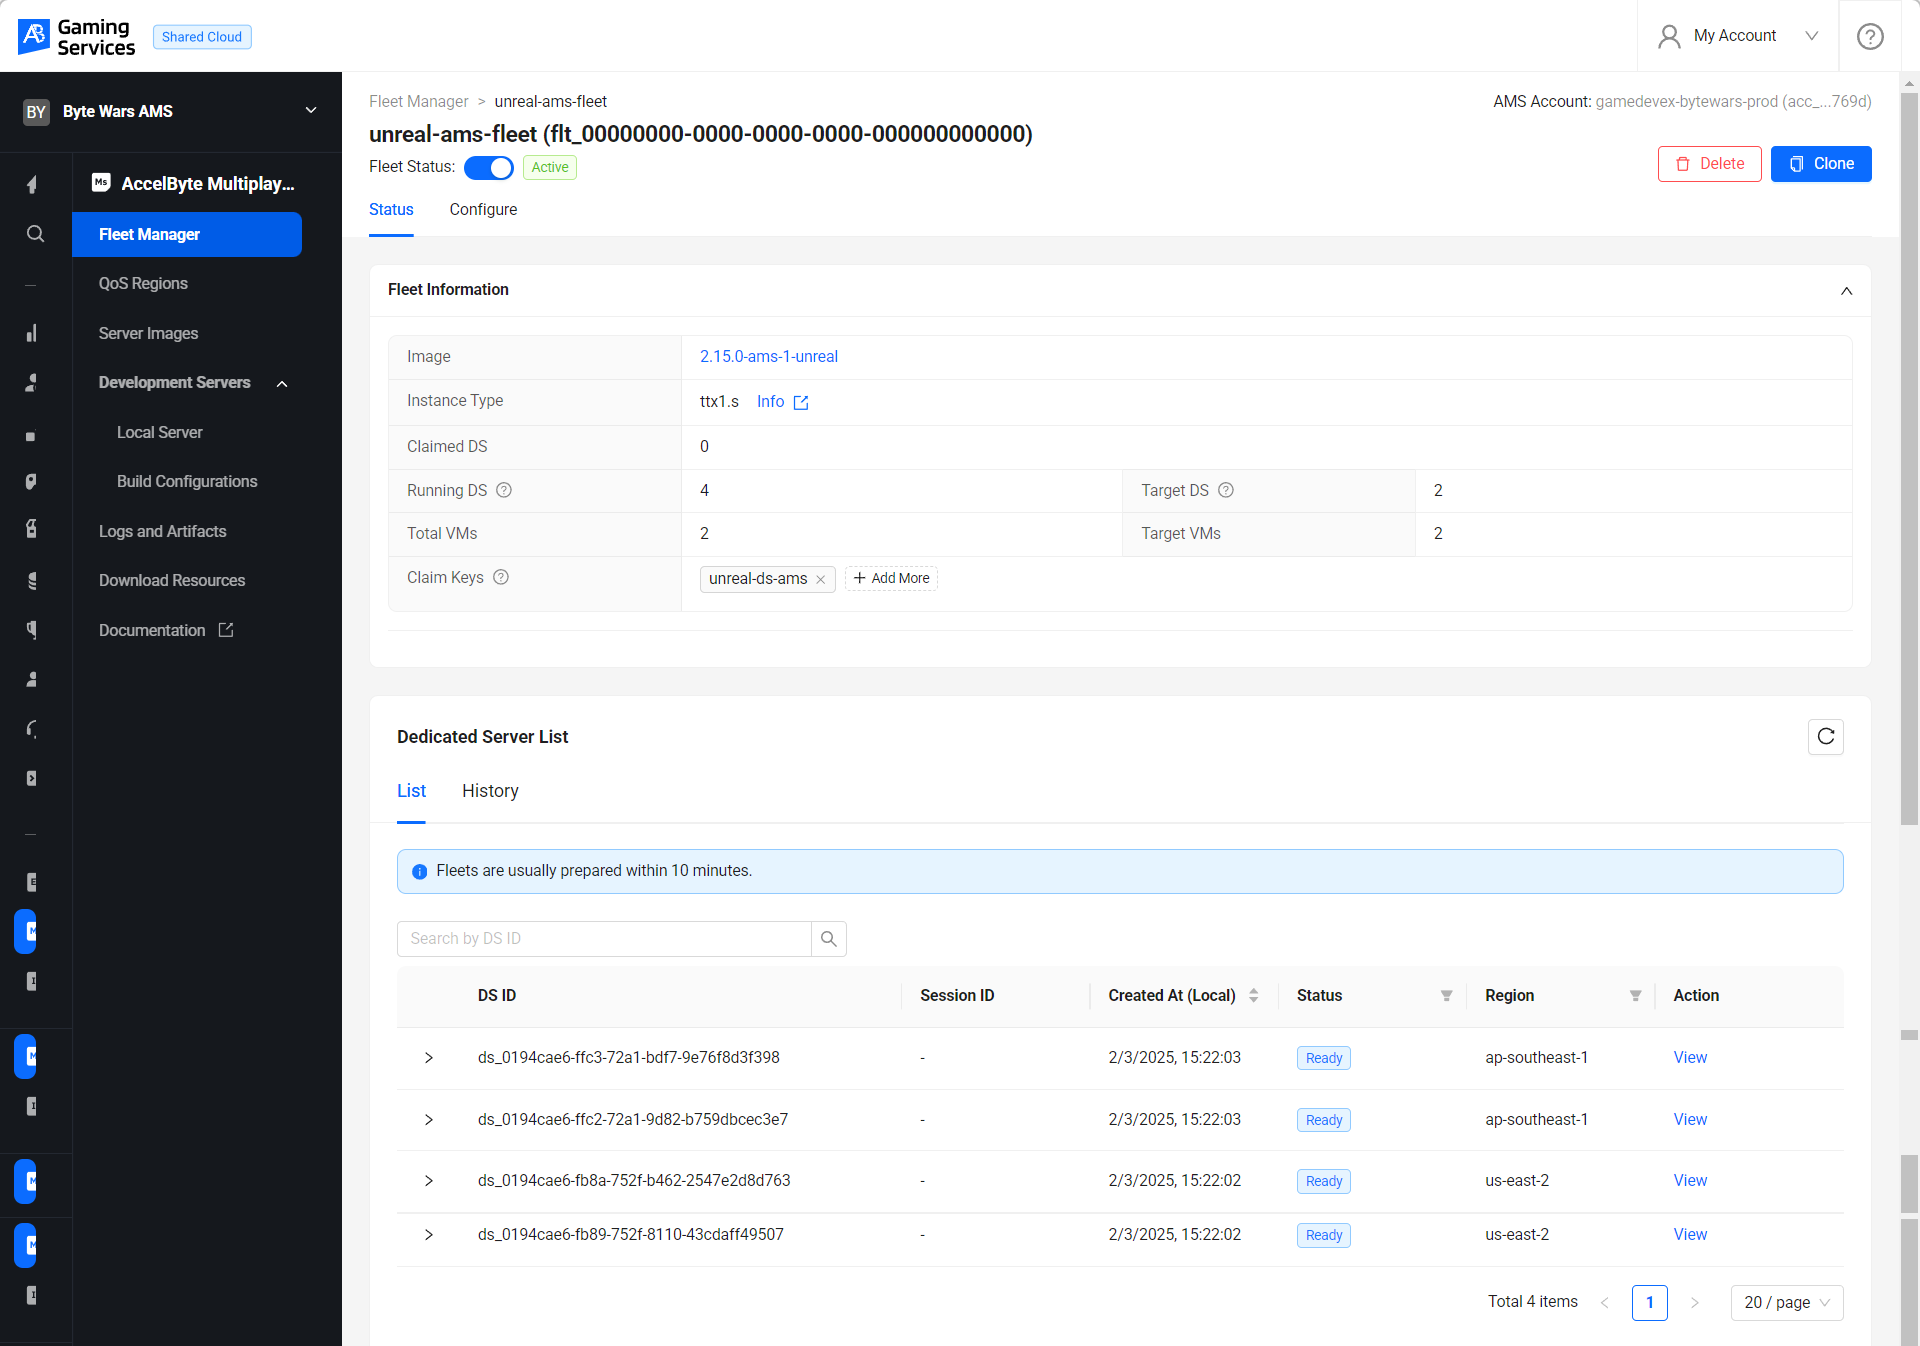
これで、フリートが作成され、フリートリストで利用可能になります。フリート名をクリックして、フリートの詳細を開きます。
-
左上のフリート名のすぐ下に、Fleet statusとその横にトグルが表示されます。トグルをクリックしてフリートをアクティブにします。数分後、Dedicated Server Listセクションにサーバーのリストとそのステータスが表示されます。
備考新しいフリートは、リストに表示される前に専用サーバーが起動して実行されるまで約10分かかります。以下は、フリート上の専用サーバーの状態です。
- Creating: 専用サーバーは現在初期化中です(まだAMSウォッチドッグに準備完了メッセージを送信していません)。
- Ready: 専用サーバーはAMSに準備完了信号を送信し、使用準備が整いました。
- Claiming: フリートマネージャーは現在、クレームキーを使用してセッションに専用サーバーをクレームしています。
- Claimed: 専用サーバーはすでにゲームセッションにバインドされており、ゲームは現在進行中です。
- Removed: 専用サーバーはフリートから削除されました。
フリート用のクレームキーを作成する
-
Admin Portalにログインし、ゲームのネームスペースダッシュボードに移動します。
-
サイドバーメニューから、Multiplayer Server Configuration > Fleet Managerを選択します。次に、前のチュートリアルで作成したフリートの名前をクリックします。
-
Fleet Informationセクションの下で、Claim Keys属性の横にあるAdd Moreボタンをクリックします。このチュートリアルでは、unreal-ds-amsという名前の新しいクレームキーを入力する必要があります。