UIの追加 - ログインキュー - (Unityモジュール)
注釈:本資料はAI技術を用いて翻訳されています。
メニューの内容
関連ファイルはリソースセクションで入手でき、以下のコンポーネントで構成されています:
LoginQueueMenu_Starter.cs:実装の大部分が含まれるC#スクリプト。- CSファイル:
/Assets/Resources/Modules/Access/LoginQueue/Scripts/UI/LoginQueueMenu_Starter.cs
- CSファイル:
LoginQueueMenu_Starter.prefab:Canvas UI GameObjectから作成されたUnity Prefab。- Prefabファイル:
/Assets/Resources/Modules/Access/LoginQueue/Prefabs/LoginQueueMenu_Starter.prefab
- Prefabファイル:
ハンドラーは待機メニューを表示し、プレイヤーがキューから外れたときにそれを閉じる役割を担います。これにより、Byte Warsのすべてのログイン統合でこの機能が動作します。
このログインキューメニューには2つの状態があります:
- キュー中:キューに関する情報を表示するデフォルトビュー。
- キャンセル中:キャンセルリクエストが送信され、現在レスポンスを待機していることを示すローディング画面。
プレイヤーがキューから退出し、正常にログインすると、ゲームはメインメニューに移動します。
このログインキューメニューには、すでにいくつかの準備が整っています:
- AccelByte SDKのオブジェクトを使用できるようにするライブラリ。
using AccelByte.Models;
- UI状態を変更するためのカスタムセッターゲッターを持つ
Current View変数。この変数はUIStateという列挙型です。
private enum UIState
{
    InQueue,
    Canceling
}

private UIState CurrentView
{
    get => CurrentView;
    set
    {
        switch (value)
        {
            case UIState.InQueue:
                inQueuePanel.SetActive(true);
                cancelingPanel.SetActive(false);
                StartCoroutine(SetSelectedGameObject(cancelLoginButton.gameObject));
                break;
            case UIState.Canceling:
                inQueuePanel.SetActive(false);
                cancelingPanel.SetActive(true);
                break;
            default:
                throw new ArgumentOutOfRangeException();
        }
    }
}
- Prefab内のコンポーネントにバインドされたUIコンポーネントの参照。
[SerializeField] private GameObject inQueuePanel;
[SerializeField] private GameObject cancelingPanel;
[SerializeField] private TMP_Text positionInQueueText;
[SerializeField] private TMP_Text estimatedWaitingTimeText;
[SerializeField] private TMP_Text lastUpdateTimeText;
[SerializeField] private Button cancelLoginButton;
- 後で実装するスターターラッパーへの参照。また、このラッパーオブジェクトの開始時に参照を取得するコード。
private LoginQueueWrapper_Starter loginQueueWrapper;
private void Start()
{
    // Get wrapper reference.
    loginQueueWrapper = TutorialModuleManager.Instance.GetModuleClass<LoginQueueWrapper_Starter>();
}
- UIコンポーネントを更新するためのユーティリティ関数。
private void SetPositionText(int position)
{
    positionInQueueText.SetText($"{position}");
}

private void SetEstimatedWaitingTimeText(int timeInSeconds)
{
    estimatedWaitingTimeText.SetText($"{timeInSeconds} Seconds");
}

private void SetLastUpdateTimeText()
{
    lastUpdateTimeText.SetText(DateTime.Now.ToString("HH:mm:ss"));
}
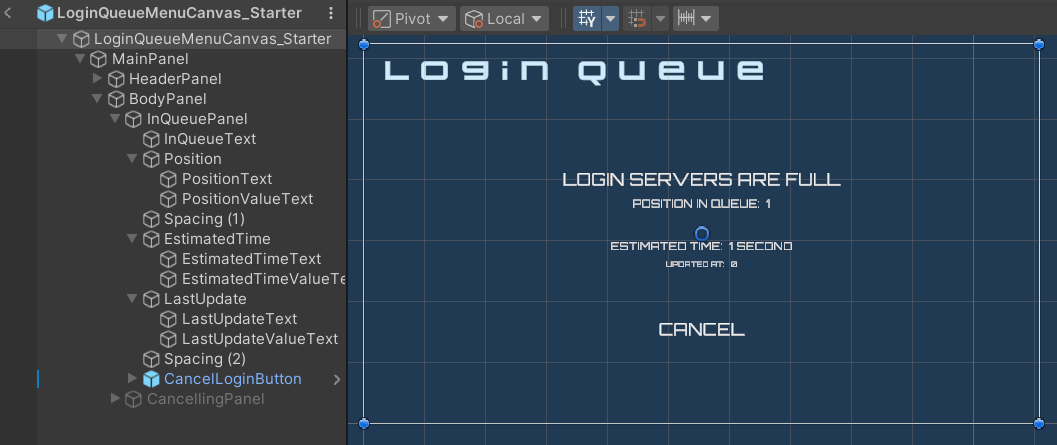
キュー中パネル
キュー中パネルは、4つのUIコンポーネントで構成されるデフォルトビューです:
positionInQueueText:キュー内の現在のプレイヤーの位置を表示します。estimatedWaitingTimeText:現在のプレイヤーがログインするまでの推定待機時間を表示します。lastUpdateTimeText:バックエンドから最後の更新を受信した時刻を表示します。cancelLoginButton:プレイヤーがキューを終了し、ログイン試行をキャンセルできるようにします。
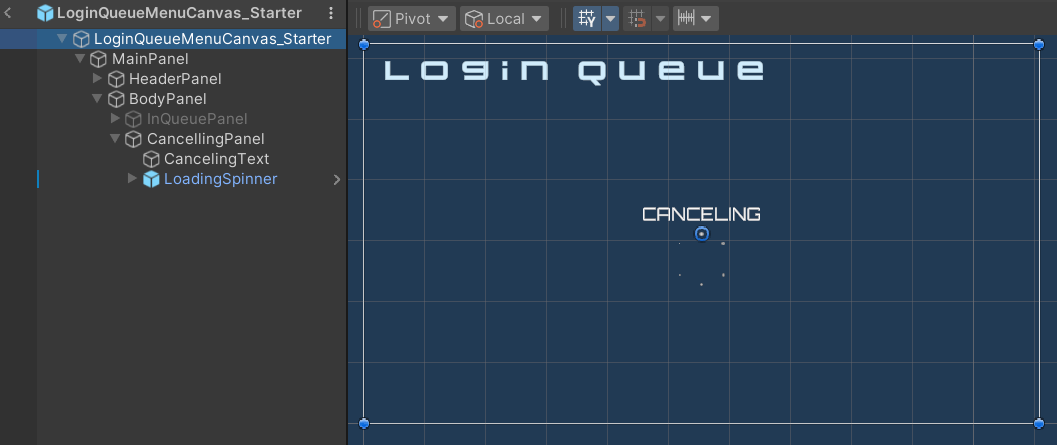
キャンセル中パネル
キャンセルリクエストが処理中であることを示すテキストと画像アニメーションを表示します。
UIの準備
-
UnityでByte Warsを開き、
LoginQueueMenu_Starter.csファイルを開きます。 -
LoginQueued()という新しい関数を作成します。この関数はログインキュー情報を表示します。この関数は、後でSDKがログインキュー更新情報を受信したときのコールバックとして使用します。private void LoginQueued(LoginQueueTicket loginQueueTicket)
{
CurrentView = UIState.InQueue;
SetPositionText(loginQueueTicket.Position);
SetEstimatedWaitingTimeText(loginQueueTicket.EstimatedWaitingTimeInSeconds);
SetLastUpdateTimeText();
} -
ログインキャンセルをトリガーする新しい関数を作成します。今のところ、この関数はUIをキャンセル中状態に遷移させるだけです。実際のログインキャンセル機能は後で呼び出します。
private void CancelLogin()
{
    CurrentView = UIState.Canceling;
} -
ログインキャンセルへのレスポンスを受信したときのコールバックとなる新しい関数を作成します。この関数は単純にメニューを前のメニューに遷移させます。この場合、ログインメニューに戻ります。
private void LoginCanceled()
{
    // Go back to the previous menu
    MenuManager.Instance.OnBackPressed();
} -
Start()関数を見つけて、現在の実装を以下のコードに置き換えます。これにより、cancelLoginButtonのOnClickを作成したCancelLogin()関数にバインドします。private void Start()
{
// Get wrapper reference.
loginQueueWrapper = TutorialModuleManager.Instance.GetModuleClass<LoginQueueWrapper_Starter>();
// Bind button.
cancelLoginButton.onClick.AddListener(CancelLogin);
} -
Projectウィンドウから
Assets\Resources\Modules\LoginQueue\LoginQueueAssetConfig.assetを開き、InspectorでIs Starter Active設定を有効にします。
ラッパーがこのメニューを表示する責任を持つため、この時点でゲームを試しても変更は見られません。