専用サーバーを展開するためのフリートを作成します
For Shared Cloud customers, AccelByte Multiplayer Servers (AMS) is available for a free trial with limitations. For more information, refer to Shared Cloud free trial benefits for AMS for more information.
Introduction
A fleet scales host instances, and manages dedicated servers (DS) running within those host instances, based on regional scaling configurations.
This article walks you through how to create and customize a fleet in AMS to suit your needs, using the Admin Portal.
To learn how to automate fleet creation, see How to Automate Fleet Creation (using Extend).
Prerequisites
Before you begin this guide, you must have:
- Set up an AMS account.
- Integrated a dedicated server with the AccelByte Gaming Services (AGS) Game SDK.
- Uploaded a dedicated server build to AMS.
Enable regions
While not required in order to run Dedicated Servers in a fleet, if you are using AGS matchmaking you must enable QoS for any regions you would like your players to be able to use dedicated servers in.
To enable QoS for the available regions:
- Go to your game namespace in the AccelByte Admin Portal.
- On the sidebar select AMS > QoS Regions.
- In the QoS Regions list, switch on the toggle button of the regions you want to be available for your players.
Fleet types
AMS supports two types of fleets:
Production
Production fleets are optimized for live games and are designed to quickly and efficiently allocate dedicated servers to players by always keeping a buffer of dedicated servers ready to be consumed. This is the default fleet type when creating new fleets. Production fleets also use immutable attributes like the dedicated server image and command line arguments to help prevent accidental changes that could break your dedicated server deployments and negatively impact players of your live game.
Using a production fleet during development is a perfectly fine option, and may be the best approach in some cases.
Development
Development fleets provide more flexibility and cost efficiency during development by letting you run multiple dedicated server versions and command line permutations on the same set of VMs. This helps reduce costs during development by minimizing the number of host instances needed to test multiple dedicated server versions, game modes, maps, and more. Development fleets accomplish this by decoupling the dedicated server image and command line arguments from the fleet, allowing you to late-bind the dedicated server image and command line arguments in the dedicated server claim flow. Development fleets don't know which configurations to run until they are requested so they cannot maintain a full buffer of ready dedicated servers. However, development fleets maintain enough VM capacity to supply the buffer needed to start a dedicated server as soon as a particular dedicated server configuration is requested.
For additional cost efficiency, development fleets can be set to "hibernate" after a configured period has passed without matching claim requests or running DS. When a development fleet is hibernated, its effective buffer is set to zero, draining any watchdogs and releasing VMs. An incoming matching claim request will cause the previously configured size to be reinstated.
Development fleets work in conjunction with Development Server Build Configurations, referred to as "Build Configurations" for brevity in the AGS official documentation and in the Admin Portal. Build Configurations consist of a dedicated server image and command line arguments, which are appended to the command line arguments specified in the associated development fleet. To learn how to create a Build Configuration and associate it with a development fleet, see Use build configurations with development fleets.
Never use development fleets for any production scenarios.
Create a fleet
AMS can start up your dedicated game servers whenever there is demand. However, before AMS can do so efficiently, it needs to have all the necessary data on how best to run your dedicated game servers, as well as where and when to run them. The fleet creation process will ensure that you have given all information required for AMS to manage your fleet.
To create a fleet, follow these steps:
-
Go to your game namespace in the AccelByte Admin Portal.
-
On the sidebar, open the AMS menu and select Fleet Manager. The Fleet Manager page appears.
-
Hover over the Create Fleet button and choose Create New. The Create Fleet form appears.
-
In the Fleet & Image section, type in a name for your fleet, which must be unique within the namespace. Then, depending on the type of fleet, do one of the following:
- For a production fleet, choose one dedicated server image that has been uploaded to the account. The fleet will start dedicated servers based on this image. You can search for an image by using its image ID or image name.
- For a development fleet, click the slider next to Development Fleet. Then, decide whether to enable hibernation using the Hibernate feature slider. With hibernation enabled, choose a time period after which hibernation will take place using the Set hibernate time input.
-
Click Next to go to the Deployment Profile section.
-
In the Deployment Profile section, adjust your timeout values, port configuration, and command line, port configuration, and command line as necessary.
Timeout
-
Creation Timeout: The creation timeout starts counting counting when the local watchdog launches your dedicated server, and marks its state as "Creating." This timeout gives a configurable time limit for your dedicated server to initialize, so that if your dedicated server fails to do so, AMS will remove the server, and replace it with a new one.
- The creation timeout is applicable only when the dedicated server is in the "Creating" state. Once the dedicated server notifies the watchdog that it is ready to host a game session, it will enter the "Ready" state.
-
Claim Timeout: Claim timeout starts counting when the dedicated server enters the "Ready" state. It gives a time limit for your dedicated server to remain idle before being claimed for a game session, so that watchdog can remove idle servers that might degrade over time and replace them with new ones.
-
Session Timeout: The session timeout starts counting when the dedicated server is claimed by a game session and enters the "In Session" state. It gives a time limit for your dedicated server to serve a game session so that the watchdog can remove stale servers that fail to exit normally once the game session has finished.
-
Drain Timeout: The drain timeout starts counting when the dedicated server that is not serving an active game session receives the drain signal from the local watchdog. The drain signal tells the dedicated server that the VM it is running on is slated to be removed, and gives a configurable period of time for it to finish any essential work and then exit before the watchdog forcibly kills it. Note that DS which are serving a session will never be subject to the drain timeout.
-
Unresponsive Timeout: The unresponsive timeout starts counting when a server goes into unresponsive state due to it not sending timely heartbeats to the AMS watchdog. During the configured timeout, it is expected for your dedicated server to try to recover and send heartbeats again to the watchdog. If the timeout is exceeded before receiving a heartbeat, AMS will remove the server and replace it with a new one.
Port Configuration
Add the ports that you want the dedicated servers listen to. The actual port values for the ports you create will be generated at runtime. A default port is automatically created for the fleet, which cannot be edited or deleted.
Command Line
In the command line box, add your dedicated server command line arguments and ensure that you specify any additional parameters required for your dedicated server to run in the desired configuration. To learn how to construct your command, see Construct your dedicated server command line.
-
-
Click Next to go to the DS Host & Region & Region section.
-
In the DS Host & Region section, select which instance type you want your dedicated servers to run in and the number of dedicated servers you want to run in the instance. For considerations when choosing the most optimal instance type for your fleet, refer to the Choosing the instance type for AMS fleets guidelines page. Next, configure the scaling strategy of your fleet. For each region you want the fleet to run dedicated servers in, configure the min, max and buffer sizes (in number of dedicated servers, not instances) as follows:
- Min Servers: The minimum number of DS always running in this region. Assuming you set a buffer value (recommended), a minimum size of 0 is usually sufficient. Setting a minimum can be useful prior to events (including launch) when you expect an initial large influx of players which would otherwhise overwhelm the configured buffer.
- Max Servers: The largest number of DS to run in a region. This is a safeguard to ensure the cost of game servers will not go over budget. For a production fleet it should accommodate the number of players you expect during peak times. That is:
max = <peak CCU> / <players per DS>. - Buffer Servers: Additional instances ready to dynamically handle increases in demand. The fleet will maintain this many DS in the "Ready" state, ready to be claimed by game sessions. This ensures that during periods of increasing demand (e.g. due to rising player counts) the fleet creates additional DS to handle the load. For production fleets, check the guide linked below on how to choose an appropriate buffer size.
- An incorrectly configured scaling strategy leads to players being unable to claim a DS for their match. Insufficient max or buffer size are a common cause of claim failures. To learn more about tailoring your fleet size to your specific game requirements, refer to the Optimizing fleet size page.
- The fleet maximizes AMS instance usage by rounding the minimum and maximum servers to the nearest multiple of servers per instance. This ensures that there are no wasted resources in AMS instances that are billed to your account. For example, if when having 5 servers per instance, a minimum of 3, and a maximum of 28, the fleet adjusts to 5 and 30, respectively. Additionally, if the buffer value results in an additional virtual machine to be requested, all five dedicated servers within the new instance will become buffers.
- For development fleets, in most cases, a buffer setting of between 1 and whatever number you have set as the number of DS per VM is appropriate. With a setting of 1, it won't start a new VM until the existing VMs are all full. With a setting equal to the DS/VM setting, it will start a new VM as soon as any claimed DS exists on all of the existing VMs. In general, a new VM will start if the existing VMs don't have room to fit the number of DS set in the buffer setting.
-
Click Next to go to the Logs & Artifacts Sampling section.
-
In the Logs & Artifacts Sampling section, configure sampling rules for collecting dedicated server logs and artifacts. To learn about sampling rules, see the Sampling rules section.
-
Click Next to go to the Summary section.
-
Review your fleet configuration, then click the Create button. The Create Fleet pop-up appears.
-
(Optional) On the pop-up, you have the option to activate the fleet immediately after it's created. You can skip this step and activate or deactivate the fleet at a later time.
-
Click Create to create the fleet. Your fleet is immediately added to the Fleets list.
Construct your dedicated server command line
Aside from a few required flags, you are free to construct your own dedicated server command line.
Development fleets work a little differently than production fleets. The dedicated server command line for a development fleet is a combination of the fleet's command line appended with the associated Build Configuration's command line. If the required flags are not specified in either the development fleet command line or the Build Configuration command line, no dedicated servers will successfully launch with the build configuration in the fleet.
The required flags are as follows:
- Unreal
- Unity
-dsid=${dsid} -port=${default_port} -watchdog_url=${watchdog_url}
-ABDsId, -dsid: Dedicated server ID
The dsid should be passed into the dedicated server by the flag -ABDsId ${dsid} or -dsid ${dsid}. The usage of the flag is covered by the SDK.
-ABPort, -port: Ports
Ports can be passed to the dedicated server with any format of flags that you desire. The substitution variable for your ports will follow the format: ${<<your_port_name_in_lowercase>>_port}.
-ABWatchdogUrl, -watchdog_url: the URL to the local watchdog
The watchdog is the monitoring agent of the dedicated servers in the hosting machine. The SDK will connect to the watchdog automatically using the URL.
Using -AB as a prefix will add the ability to inject the AGS Unreal SDK config. Therefore, you can get the value and use that as needed by calling this:
auto ServerApiClient = AccelByteOnlineSubsystemPtr->GetServerApiClient();
ServerApiClient->ServerSettings->AMSServerWatchdogUrl;
ServerApiClient->ServerSettings->DSId;
ServerApiClient->ServerSettings->StatsDServerPort;
To obtain AccelByteOnlineSubsystemPtr used in snippet, follow this [guide.]
-dsid ${dsid} -port ${default_port} -watchdogUrl ${watchdog_url}
-ABDsId, -dsid: Dedicated server ID
The dsid should be passed into the dedicated server by the flag -ABDsId ${dsid} or -dsid ${dsid}. The usage of the flag is covered by the SDK.
-ABPort, -port: Ports
Ports can be passed to the dedicated server with any format of flags that you desire. The substitution variable for your ports will follow the format: ${<<your_port_name_in_lowercase>>_port}.
-ABWatchdogUrl, -watchdogUrl: the URL to the local watchdog
The watchdog is the monitoring agent of the dedicated servers in the hosting machine. The SDK will connect to the watchdog automatically using the URL.
Using -AB as a prefix will add the ability to inject the AGS Unity SDK config. Therefore, you can get the value and use that as needed by calling this:
var dsid = AccelByteSDK.GetServerRegistry().Config.DsId;
var port = AccelByteSDK.GetServerRegistry().Config.Port;
var watchdogUrl = AccelByteSDK.GetServerRegistry().Config.WatchdogUrl;
Additional variables for substitution
Additionally, AMS supports variable substitution for the following variables in your dedicated server command line:
| Variable name | Description |
|---|---|
${creation_timeout} | Expands to the value of the creation timeout, as defined in the fleet. |
${session_timeout} | Expands to the value of the session timeout, as defined in the fleet. |
${drain_timeout} | Expands to the value of the drain idle timeout, as defined in the fleet. |
${unresponsive_timeout} | Expands to the value of the unresponsive timeout, as defined in the fleet. |
${artifact_path} | Expands to the value of the absolute path of an artifact directory that will get recursively collected. |
Sampling rules
Sampling rules tell AMS when to collect logs, custom artifacts, and core dumps for your dedicated servers managed by this fleet. Sampling rules are defined by artifact type and dedicated server exit status.
There are three configurable rules:
- Percentage of logs and custom artifacts to collect for dedicated servers that exit with a status of 0 (success)
- Percentage of logs and custom artifacts to collect for dedicated servers that exit with a status > 0 (failure)
- Percentage of core dumps to collect for dedicated servers that exit with a status > 0 (failure)
The Enable Log Sampling section of the UI applies to both Logs and Custom Artifacts. The Enable Artifacts Sampling section of the UI only applies to Core Dumps so only the abnormal exit sampling rate is applicable. We are aware this is confusing and will fix the UI in an upcoming release.
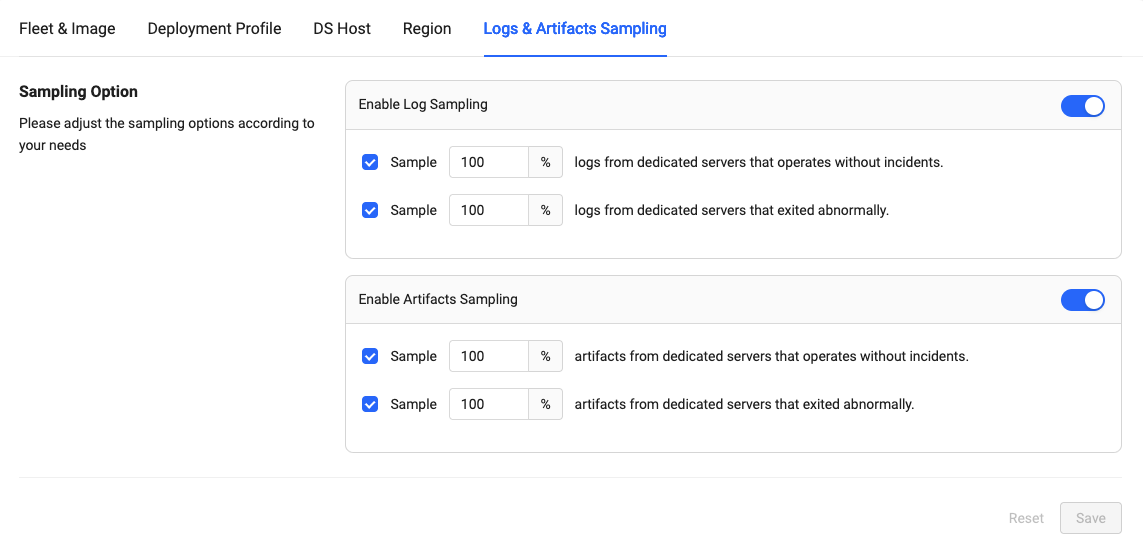
The value of each rule defines the percentage of dedicated servers for which artifacts will be collected. For example, a sampling value of 100 tells AMS to collect artifacts for all dedicated servers belonging to the fleet, whereas 50 means that AMS will collect artifacts from roughly half of the dedicated servers.
Setting the sampling percentage to zero tells AMS to report all matching artifacts, but not actually collect and store them for you to retrieve.
Sampling rules can also be deactivated, effectively disabling the sampling rule, which means AMS will not even report artifacts matching the rule.
To view and manage the collected artifacts from your dedicated servers using the Admin Portal, see the View and manage dedicated server logs and artifacts article.
What's next
If you created a development fleet, you need to learn how to use a build configuration with your development fleet. If you created a production fleet to deploy your dedicated servers, you are ready to configure a Play Session to claim dedicated servers from your new fleet.
You can also explore different dedicated server claim scenarios.