ログインメニューを追加する - デバイスIDでログインする - (Unreal Engine モジュール)
注釈:本資料はAI技術を用いて翻訳されています。
メニューの内容
このチュートリアルでは、後で AccelByte Gaming Services (AGS) にログインリクエストを送信するために使用できる、シンプルなログインメニューウィジェットを準備する方法を学びます。
ログインメニューのファイルは リソース セクションで入手でき、以下で構成されています:
LoginWidget_Starter- 実装の大部分を保持します。- Header ファイル:
/Source/AccelByteWars/TutorialModules/Access/AuthEssentials/UI/LoginWidget_Starter.h - CPP ファイル:
/Source/AccelByteWars/TutorialModules/Access/AuthEssentials/UI/LoginWidget_Starter.cpp
- Header ファイル:
W_Login_Starter- エンジンに組み込まれている Unreal Motion Graphics (UMG) を使用して作成および設計されています。- Widget Blueprint ファイル:
/Content/TutorialModules/Access/AuthEssentials/UI/W_Login_Starter.uasset
- Widget Blueprint ファイル:
UMG の詳細については、UMG UI Designer を参照してください。
ログインメニューには3つの状態があります:
- Default: 利用可能なログイン方法を表示します。
- Logging In: ログインリクエストが AGS に送信され、レスポンスを待機しています。
- Failed Login: ログインレスポンスが失敗し、ウィジェットはリトライまたはゲームを終了するオプションを表示します。
ログインレスポンスの結果が成功した場合、ゲームはユーザーをメインメニューに誘導します。
状態の変更は、ログインに含まれる Widget Switcher コンポーネントを使用して可能になります。各状態の UI コンポーネントは、Widget Switcher の子として Vertical Box コンポーネントの下にグループ化されています。これはタブコントロールのように機能し、その子を切り替えます。
以下は、C++ ヘッダーファイルでの Widget Switcher コンポーネントの宣言です。
public:
// ...
	UPROPERTY(BlueprintReadOnly, meta = (BindWidget, BlueprintProtected = true, AllowPrivateAccess = true))
	UWidgetSwitcher* Ws_LoginState;
Widget Switcher を使用して状態を変更できるようにするには、以下のヘルパー関数を使用します。コントローラーのフォーカスは、選択されたアクティブなウィジェットの下にあるボタンに設定されます。以下のコードには FTUE 関連の関数が含まれていますが、これらは Byte Wars 固有の First Time User Experience ダイアログを処理する関数であり、このチュートリアルでは無視できます。
void ULoginWidget_Starter::SetLoginState(const ELoginState NewState) const
{
	UWidget* WidgetToActivate;

	switch (NewState)
	{
	case ELoginState::Default:
		WidgetToActivate = Vb_LoginOptions;
		Btn_LoginWithDeviceId->SetUserFocus(GetOwningPlayer());
		InitializeFTUEDialogues(true);
		break;
	case ELoginState::LoggingIn:
		WidgetToActivate = Vb_LoginLoading;
		DeinitializeFTUEDialogues();
		HideFTUEDevHelpButton();
		break;
	case ELoginState::Failed:
		WidgetToActivate = Vb_LoginFailed;
		Btn_RetryLogin->SetUserFocus(GetOwningPlayer());
		DeinitializeFTUEDialogues();
		break;
	default:
		WidgetToActivate = Vb_LoginOptions;
		Btn_LoginWithDeviceId->SetUserFocus(GetOwningPlayer());
		InitializeFTUEDialogues(true);
		break;
	}

	Ws_LoginState->SetActiveWidget(WidgetToActivate);
}
Widget Switcher の詳細については、Unreal Engine API Reference を参照してください。
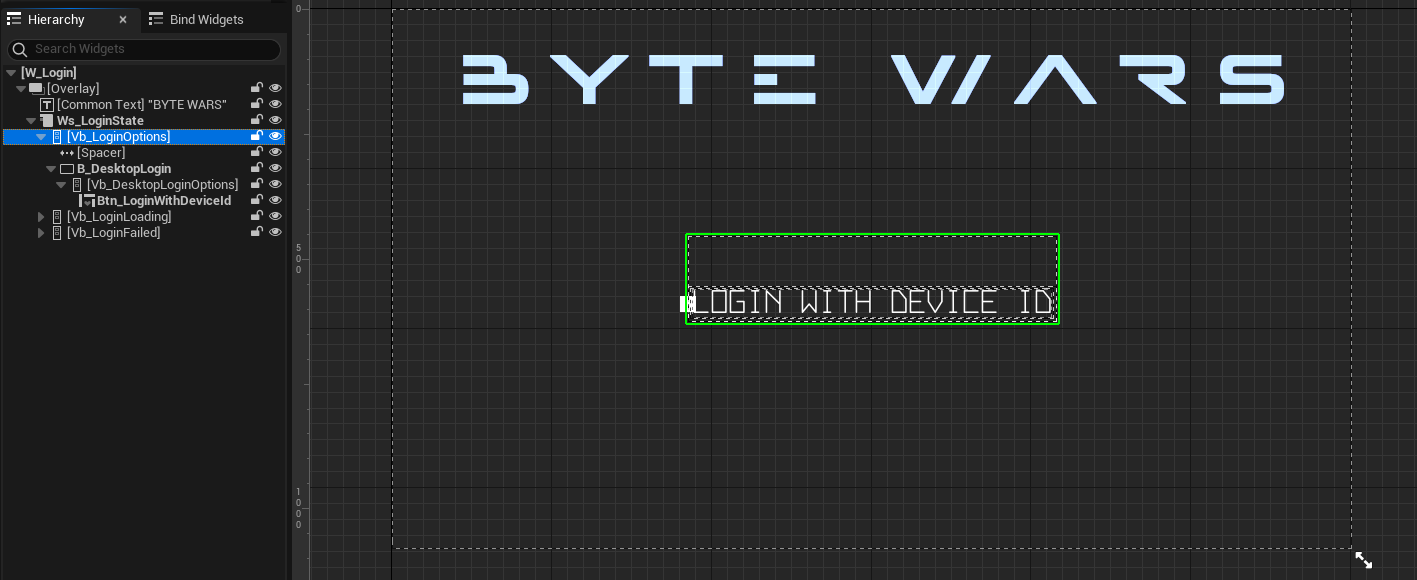
Default 状態
Default 状態は、Btn_LoginWithDeviceId というログインボタンを表示し、C++ 親クラスにバインドされています。ボタンタイプとして Common Button Base を使用します。
以下のコードは、ヘッダーファイルクラスでのボタン宣言です:
private:
// ...
	UPROPERTY(BlueprintReadOnly, meta = (BindWidget, BlueprintProtected = true, AllowPrivateAccess = true))
	UCommonButtonBase* Btn_LoginWithDeviceId;
以下は、デフォルト状態のウィジェットブループリントプレビューです。
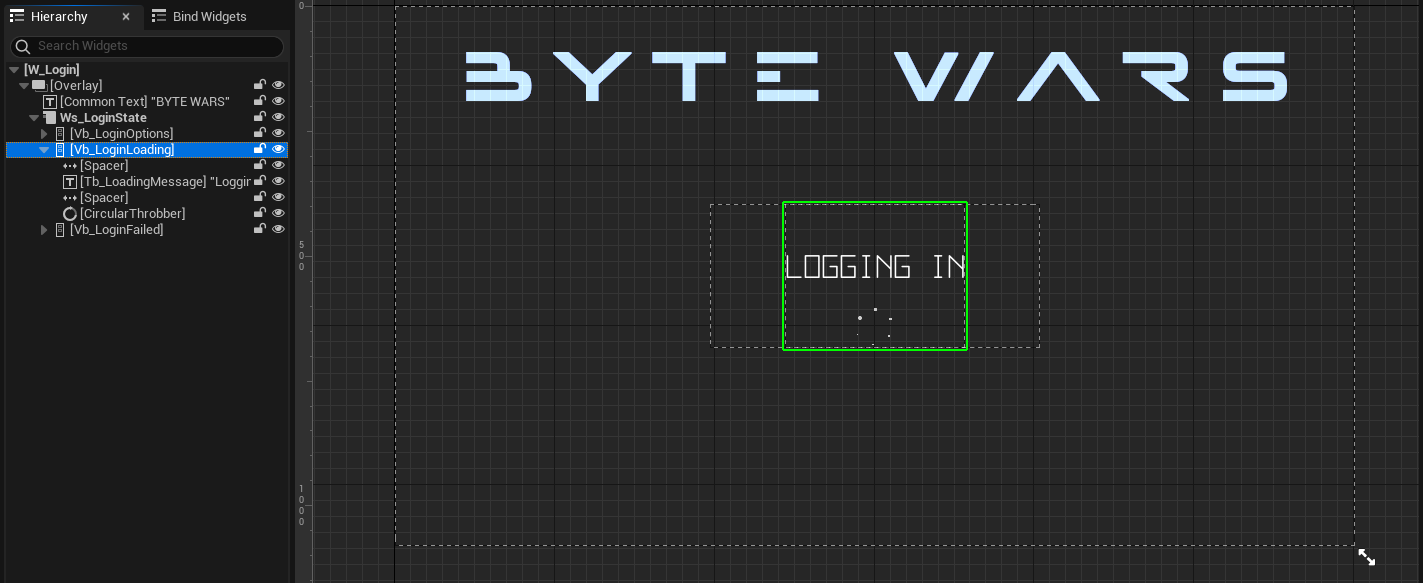
Logging In 状態
Logging In 状態は、ログインリクエストが進行中のときにテキストとスピナーを表示します。
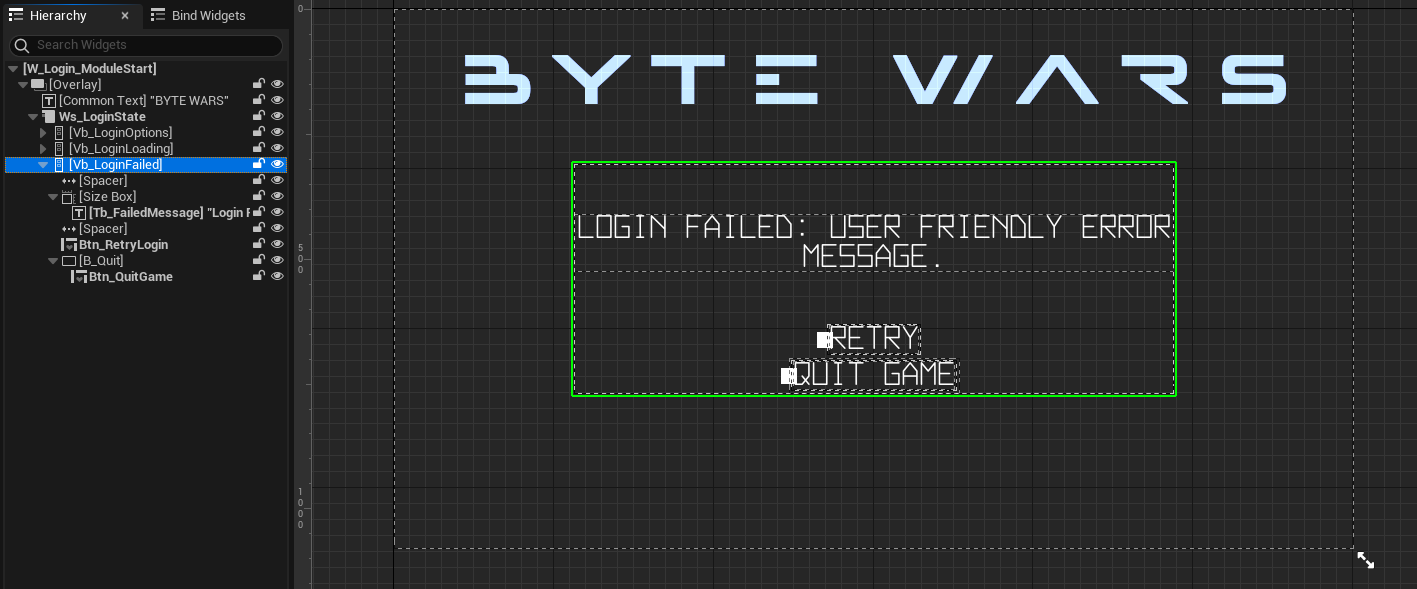
Failed 状態
Failed 状態は、ログインが失敗したときにエラーメッセージを表示し、Btn_RetryLogin と Btn_QuitGame ボタンが配置されています。また、AGS OSS から送られてくるエラーメッセージを表示するための Text Block コンポーネントもあります。
private:
// ...
	UPROPERTY(BlueprintReadOnly, meta = (BindWidget, BlueprintProtected = true, AllowPrivateAccess = true))
	UCommonButtonBase* Btn_RetryLogin;

	UPROPERTY(BlueprintReadOnly, meta = (BindWidget, BlueprintProtected = true, AllowPrivateAccess = true))
	UCommonButtonBase* Btn_QuitGame;

	UPROPERTY(BlueprintReadOnly, meta = (BindWidget, BlueprintProtected = true, AllowPrivateAccess = true))
	UTextBlock* Tb_FailedMessage;
UI を準備する
このセクションでは、AGS OSS ログイン統合のために UI を準備します。
-
IDE を使用して
AccelByteWars.slnを開きます。ソリューションエクスプローラーから、LoginWidget_Starterクラスの CPP ファイルを開きます。次に、以下のコードをOnLoginWithDeviceIdButtonClicked()関数に追加します。このコードは、ログイン状態を Logging In に設定し、デバイス ID でのリトライログインにデリゲートをバインドします。void ULoginWidget_Starter::OnLoginWithDeviceIdButtonClicked()
{
SetLoginState(ELoginState::LoggingIn);
OnRetryLoginDelegate.AddUObject(this, &ThisClass::OnLoginWithDeviceIdButtonClicked);
// ...
} -
次に、AccelByteWars プロジェクトをビルドし、Unreal Editor で開きます。
-
Content Browser から、
/Content/TutorialModules/Access/AuthEssentials/UI/に移動し、W_Login_Starterを開きます。UMG エディターに新しいメニューが表示されます。Bind Widgets タブですべてのウィジェットが適切にバインドされていること、および Widget Blueprint の Parent class がLoginWidget_Starterに設定されていることを確認してください。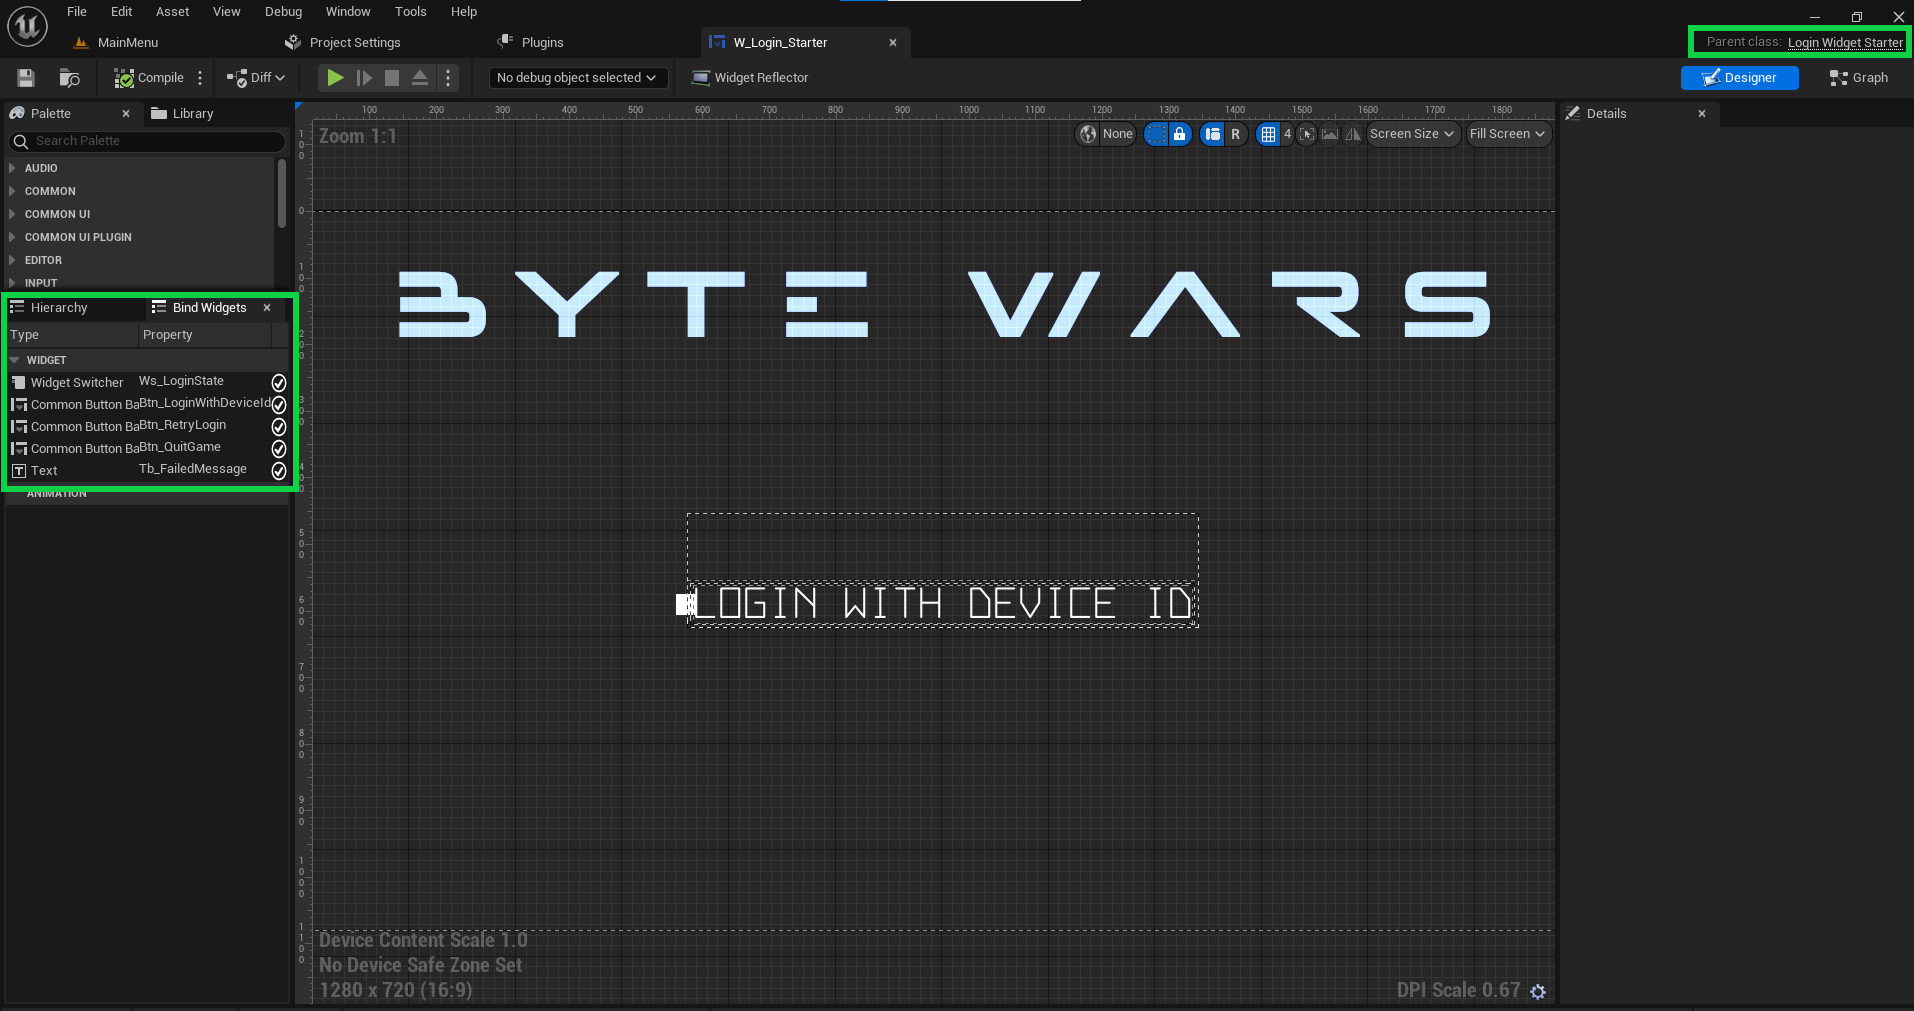
-
Content Browser から、
Content/TutorialModules/Access/AuthEssentials/DA_AuthEssentials.uassetを開き、Is Starter Mode Activeを有効にして、Data Asset を保存します。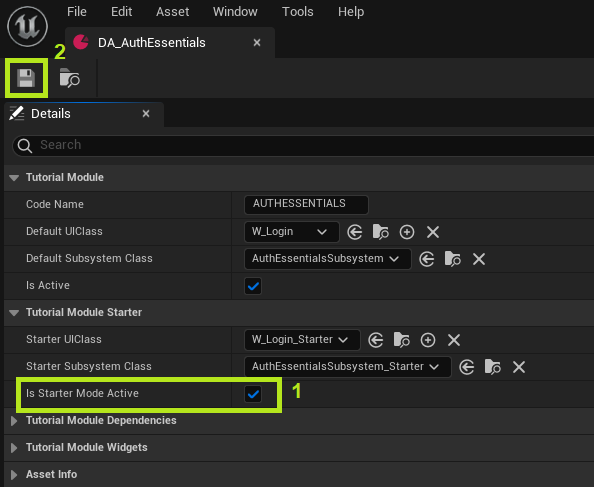
-
エディターでゲームをプレイします。Login with Device ID をクリックすると、状態が "Logging In" に変わります。
リソース
- このチュートリアルで使用されるファイルは、Byte Wars Unreal GitHub リポジトリで入手できます:
- AccelByteWars/Content/TutorialModules/Access/AuthEssentials/DA_AuthEssentials.uasset
- AccelByteWars/Content/TutorialModules/Access/AuthEssentials/UI/W_Login_Starter.uasset
- AccelByteWars/Source/AccelByteWars/TutorialModules/Access/AuthEssentials/UI/LoginWidget_Starter.h
- AccelByteWars/Source/AccelByteWars/TutorialModules/Access/AuthEssentials/UI/LoginWidget_Starter.cpp