クイックプレイメニューを追加する - 専用サーバーでのクイックマッチ - (Unreal Engine モジュール)
注釈:本資料はAI技術を用いて翻訳されています。
クイックプレイUIについて
Byte Warsでは、クイックプレイはマッチメイキング機能にアクセスする場所で、プレイヤーがゲームモードとサーバータイプを選択してマッチメイキングを行います。選択できるゲームモードは2種類あります:EliminationとTeam Deathmatchです。Eliminationは4人のフリーフォーオール(FFA)で、Team Deathmatchは各チーム最大4人の2つの対戦チームで構成されます。
クイックプレイウィジェットはリソースセクションで利用可能で、以下のファイルで構成されています:
- ヘッダーファイル:
/Source/AccelByteWars/TutorialModules/Play/MatchmakingEssentials/UI/QuickPlayWidget.h - CPPファイル:
/Source/AccelByteWars/TutorialModules/Play/MatchmakingEssentials/UI/QuickPlayWidget.cpp - Blueprintウィジェット:
/Content/TutorialModules/Play/MatchmakingEssentials/UI/W_QuickPlay.uasset
このウィジェットは、マッチメイキングの状態に基づいて関連するユーザーインターフェース(UI)を表示するための異なる状態を持っています。状態は以下の通りです:
- Select Game Mode: ゲームモードを選択するボタンを表示します。
- Select Server Type: マッチメイキングに使用するサーバータイプを選択するボタンを表示します。ここでマッチメイキング専用サーバーボタンが生成されます。
このウィジェットで注目すべき重要な点は、選択されたゲームモードにアクセスする方法です。
EGameModeType UQuickPlayWidget::GetSelectedGameModeType() const
{
	return SelectedGameModeType;
}
EGameStyle UQuickPlayWidget::GetSelectedGameStyle() const
{
	return SelectedGameStyle;
}
マッチメイキングDS UIについて
マッチメイキングDS(専用サーバー)UIメニューは、実際のマッチメイキングフローが表示される場所です。関連ファイルはリソースセクションで利用可能で、以下のファイルで構成されています:
- ヘッダーファイル:
/Source/AccelByteWars/TutorialModules/Play/MatchmakingDS/UI/MatchmakingDSWidget_Starter.h - CPPファイル:
/Source/AccelByteWars/TutorialModules/Play/MatchmakingDS/UI/MatchmakingDSWidget_Starter.cpp - Blueprintウィジェット:
/Content/TutorialModules/Play/MatchmakingDS/UI/W_MatchmakingDS_Starter.uasset
このウィジェットにはすでにいくつかの機能が提供されているため、統合に集中できます。
OnlineSession変数。セッション機能へのゲートウェイです。
private:
	UPROPERTY()
	UAccelByteWarsOnlineSessionBase* OnlineSession;
void UMatchmakingDSWidget_Starter::NativeOnActivated()
{
// ...
	UOnlineSession* BaseOnlineSession = GetWorld()->GetGameInstance()->GetOnlineSession();
	if (!ensure(BaseOnlineSession))
	{
		return;
	}

	OnlineSession = Cast<UAccelByteWarsOnlineSessionBase>(BaseOnlineSession);
	ensure(OnlineSession);
// ...
}
- マッチの現在のセッション招待を保存する
SessionInvite変数
private:
// ...
	TSharedPtr<FOnlineSessionInviteAccelByte> SessionInvite;
- 選択されたゲームモードタイプを保存する
SelectedGameModeType変数。クイックプレイUIから取得されます。
private:
// ...
	EGameModeType SelectedGameModeType;

	EGameStyle SelectedGameStyle;
void UMatchmakingDSWidget_Starter::NativeOnActivated()
{
// ...
	UAccelByteWarsBaseUI* BaseUIWidget = Cast<UAccelByteWarsGameInstance>(GetGameInstance())->GetBaseUIWidget();
	for (const UCommonActivatableWidget* Widget : BaseUIWidget->Stacks[EBaseUIStackType::Menu]->GetWidgetList())
	{
		if (const UQuickPlayWidget* QuickPlayWidget = Cast<UQuickPlayWidget>(Widget))
		{
			SelectedGameModeType = QuickPlayWidget->GetSelectedGameModeType();
			SelectedGameStyle = QuickPlayWidget->GetSelectedGameStyle();
		}
	}
// ...
}
-
各マッチメイキング状態を表すハイレベルの状態:
- Request Sent: リクエストが送信され、現在レスポンスを待っていることを示すローディング画面。
- Finding Match: マッチの検索を示すキャンセルボタン付きのローディング画面。
- Match Found: マッチが見つかり、次のステップに進もうとしていることを示すローディング画面。
- Canceling Match: マッチキャンセルリクエストが送信され、現在レスポンスを待っていることを示すローディング画面。
- Waiting for Player: プレイヤーが見つかったマッチに参加または拒否できる画面。
- Rejecting Match: マッチ拒否リクエストが送信され、現在レスポンスを待っていることを示すローディング画面。
- Joining Match: セッション参加リクエストが送信され、現在レスポンスを待っていることを示すローディング画面。
- Session Joined: セッション参加成功レスポンスが受信され、次のステップに進もうとしていることを示すローディング画面。
- Requesting Server: サーバーがリクエストされ、現在サーバーの準備を待っていることを示すローディング画面。
- Error: リトライボタン付きの一般的なエラー画面。
-
これらのハイレベル状態を切り替える関数:
// ...
protected:
// ...
	void ChangeWidgetState(const EWidgetState State);
- ハイレベル状態を表す実際の個別のウィジェットコンポーネントであるローレベル状態:
-
Loading: テキスト、サブテキスト、キャンセルボタンを含む、タスクが進行中であることを示す画面。
-
Error: エラーテキストとリトライボタンを含む、タスクが失敗したことを示す画面。
-
Waiting for Player: カウントダウンテキスト、参加ボタン、拒否ボタンを含む画面。
状態の変更は、3つのウィジェットコンポーネントを持つUnreal Motion GraphicsのWidget Switcherを使用して可能です。これらのコンポーネントの宣言は以下の通りです:
-
// ...
private:
// ...
	UPROPERTY(BlueprintReadOnly, meta = (BindWidget, BlueprintProtected = true, AllowPrivateAccess = true))
	UWidgetSwitcher* Ws_Root;

	UPROPERTY(BlueprintReadOnly, meta = (BindWidget, BlueprintProtected = true, AllowPrivateAccess = true))
	UWidget* W_Loading;

	UPROPERTY(BlueprintReadOnly, meta = (BindWidget, BlueprintProtected = true, AllowPrivateAccess = true))
	UWidget* W_Error;

	UPROPERTY(BlueprintReadOnly, meta = (BindWidget, BlueprintProtected = true, AllowPrivateAccess = true))
	UWidget* W_WaitingForPlayer;
ローディング状態
ここでは、プレイヤーはテキスト、サブテキスト(ハイレベル状態に応じて)、およびハイレベル状態に応じて無効化される可能性のあるキャンセルボタンを見ることができます。

これらのコンポーネントはヘッダーファイルで宣言されています:
// ...
private:
// ...
	UPROPERTY(BlueprintReadOnly, meta = (BindWidget, BlueprintProtected = true, AllowPrivateAccess = true))
	UCommonButtonBase* Btn_Cancel;
// ...
	UPROPERTY(BlueprintReadOnly, meta = (BindWidget, BlueprintProtected = true, AllowPrivateAccess = true))
	UTextBlock* Tb_LoadingText;

	UPROPERTY(BlueprintReadOnly, meta = (BindWidget, BlueprintProtected = true, AllowPrivateAccess = true))
	UTextBlock* Tb_LoadingSubText;
エラー状態
この状態では、プレイヤーはエラーテキスト、リトライボタン、戻るボタンを見ることができます。
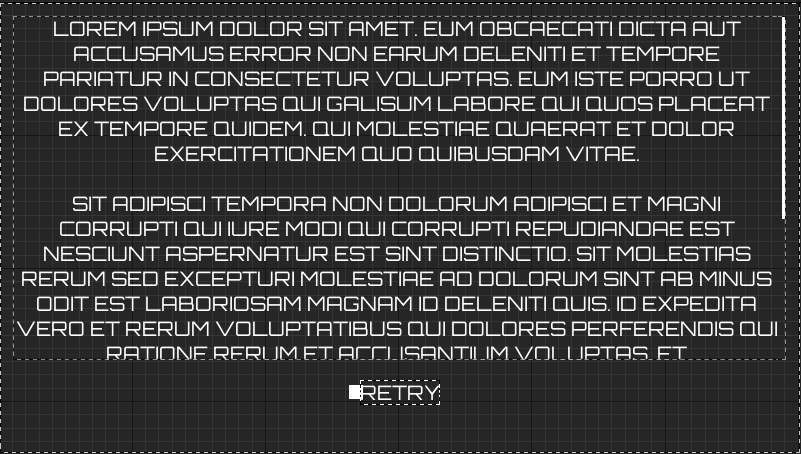
これらのコンポーネントはヘッダーファイルで宣言されています:
// ...
private:
// ...
	UPROPERTY(BlueprintReadOnly, meta = (BindWidget, BlueprintProtected = true, AllowPrivateAccess = true))
	UCommonButtonBase* Btn_Back;
// ...
	UPROPERTY(BlueprintReadOnly, meta = (BindWidget, BlueprintProtected = true, AllowPrivateAccess = true))
	UCommonButtonBase* Btn_Retry;
// ...
	UPROPERTY(BlueprintReadOnly, meta = (BindWidget, BlueprintProtected = true, AllowPrivateAccess = true))
	UTextBlock* Tb_ErrorText;
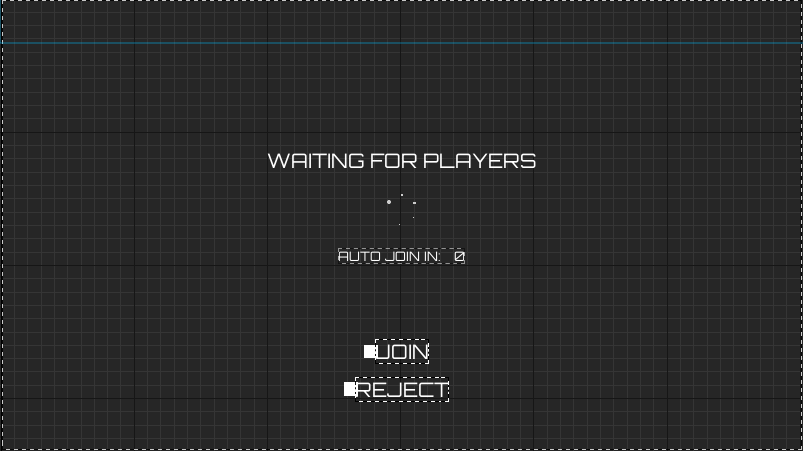
プレイヤー待機状態
この状態は、プレイヤーがマッチに参加するか拒否するかを選択できる場所です。カウントダウン、参加ボタン、拒否ボタンで構成されています。
// ...
private:
// ...
	UPROPERTY(BlueprintReadOnly, meta = (BindWidget, BlueprintProtected = true, AllowPrivateAccess = true))
	UCommonButtonBase* Btn_Reject;

	UPROPERTY(BlueprintReadOnly, meta = (BindWidget, BlueprintProtected = true, AllowPrivateAccess = true))
	UCommonButtonBase* Btn_Join;
// ...
	UPROPERTY(BlueprintReadOnly, meta = (BindWidget, BlueprintProtected = true, AllowPrivateAccess = true))
	UTextBlock* Tb_WaitingForPlayersCountdown;
カウントダウンは自動参加機能として使用されます。カウントダウンがゼロになったときにプレイヤーが何もクリックしていない場合、後で定義するアクションがアクティブになります。以下は、ヘッダーファイルでのカウントダウン変数の宣言とCPPファイルでの実装です:
// ...
private:
// ...
	const float AutoJoinDelay = 10;
// ...
	float AutoJoinCurrentCountdown = 0;
void UMatchmakingDSWidget_Starter::NativeTick(const FGeometry& MyGeometry, float InDeltaTime)
{
	Super::NativeTick(MyGeometry, InDeltaTime);

	MoveCameraToTargetLocation(InDeltaTime, FVector(60.0f, 800.0f, 160.0f));

	// Manual "Auto" Join
	if (WidgetState == EWidgetState::WAITING_FOR_PLAYER && AutoJoinCurrentCountdown > 0)
	{
		AutoJoinCurrentCountdown -= InDeltaTime;
		Tb_WaitingForPlayersCountdown->SetText(FText::FromString(FString::FromInt(AutoJoinCurrentCountdown)));

		if (AutoJoinCurrentCountdown <= 0)
		{
// ...
		}
	}
// ...
}
UIの準備
このセクションでは、MatchmakingDSWidget_Starterウィジェットクラスを準備します。
-
マッチメイキングと関連イベントをトリガーするために呼び出される関数を宣言します。
MatchmakingDSWidget_Starterヘッダーファイルを開き、以下のコードを追加します:protected:
UFUNCTION()
void StartMatchmaking();
UFUNCTION()
void JoinSession();
UFUNCTION()
void CancelMatchmaking();
UFUNCTION()
void RejectSessionInvite(); -
MatchmakingDSWidget_StarterCPPファイルを開き、StartMatchmaking()関数を定義します。後でこれをトリガーしてマッチメイキングを開始しますが、今のところは以下のダミー関数を追加します。W_Parent変数は親ウィジェット、つまりクイックプレイウィジェットへの参照です。これにより、クイックプレイの状態を切り替えることができます。void UMatchmakingDSWidget_Starter::StartMatchmaking()
{
if (OnlineSession->ValidateToStartMatchmaking.IsBound() &&
!OnlineSession->ValidateToStartMatchmaking.Execute(SelectedGameModeType))
{
return;
}
// Reset stored invite
SessionInvite = nullptr;
// Reset auto join session countdown.
AutoJoinCurrentCountdown = AutoJoinDelay;
MatchFoundCurrentCountdown = MatchFoundDelay;
SessionJoinedCurrentCountdown = SessionJoinedDelay;
Tb_WaitingForPlayersCountdown->SetText(FText::FromString(FString::FromInt(AutoJoinCurrentCountdown)));
ChangeWidgetState(EWidgetState::REQUEST_SENT);
// ...
} -
JoinSession()関数を定義します。後でここで実際のセッション参加関数を呼び出します。今のところは、以下のダミー関数を追加します:void UMatchmakingDSWidget_Starter::JoinSession()
{
if (!SessionInvite)
{
ChangeWidgetState(EWidgetState::ERROR);
Tb_ErrorText->SetText(TEXT_FAILED_SESSION_INVITE_INVALID);
}
ChangeWidgetState(EWidgetState::JOINING_MATCH);
// ...
} -
CancelMatchmaking()関数を定義します。後でこれをトリガーしてマッチメイキングをキャンセルしますが、今のところは以下のダミー関数を追加します:void UMatchmakingDSWidget_Starter::CancelMatchmaking()
{
ChangeWidgetState(EWidgetState::CANCELING_MATCH);
// ...
} -
RejectSessionInvite()関数を定義します。後でここで実際のセッション招待拒否機能を呼び出します。今のところは、以下のダミー関数を追加します:void UMatchmakingDSWidget_Starter::RejectSessionInvite()
{
if (!SessionInvite)
{
ChangeWidgetState(EWidgetState::ERROR);
Tb_ErrorText->SetText(TEXT_FAILED_SESSION_INVITE_INVALID);
}
ChangeWidgetState(EWidgetState::REJECTING_MATCH);
// ...
} -
MatchmakingDSWidget_Starterヘッダーファイルに戻ります。追加の関数を宣言します。これらの関数は、マッチメイキングイベントが完了したときのコールバックを処理します。protected:
// ...
void OnStartMatchmakingComplete(FName SessionName, bool bSucceeded);
void OnMatchmakingComplete(FName SessionName, bool bSucceeded);
void OnSessionInviteReceived(
const FUniqueNetId& UserId,
const FUniqueNetId& FromId,
const FOnlineSessionInviteAccelByte& Invite);
void OnJoinSessionComplete(FName SessionName, EOnJoinSessionCompleteResult::Type Result);
void OnSessionServerUpdateReceived(
const FName SessionName,
const FOnlineError& Error,
const bool bHasClientTravelTriggered);
void OnCancelMatchmakingComplete(FName SessionName, bool bSucceeded);
void OnRejectSessionInviteComplete(bool bSucceeded); -
MatchmakingDSWidget_StarterCPPファイルを開き、OnStartMatchmakingComplete()関数を定義します。この関数は、マッチメイキング開始プロセスが完了したときのコールバックを処理し、クイックプレイウィジェットを関連する状態に切り替えます。OnlineSession変数は、現在アクティブなオンラインセッションへの参照です。オンラインセッションの詳細については後で説明します。void UMatchmakingDSWidget_Starter::OnStartMatchmakingComplete(FName SessionName, bool bSucceeded)
{
// Abort if not a game session.
if (!SessionName.IsEqual(OnlineSession->GetPredefinedSessionNameFromType(EAccelByteV2SessionType::GameSession)))
{
return;
}
if (bSucceeded)
{
ChangeWidgetState(EWidgetState::FINDING_MATCH);
}
else
{
Tb_ErrorText->SetText(TEXT_FAILED_FIND_MATCH);
ChangeWidgetState(EWidgetState::ERROR);
}
} -
OnMatchmakingComplete()関数を定義します。この関数は、マッチメイキングプロセスが完了したときのコールバックを処理し、ウィジェットを関連する状態に切り替えます。void UMatchmakingDSWidget_Starter::OnMatchmakingComplete(FName SessionName, bool bSucceeded)
{
// Abort if not a game session.
if (!SessionName.IsEqual(OnlineSession->GetPredefinedSessionNameFromType(EAccelByteV2SessionType::GameSession)))
{
return;
}
if (bSucceeded)
{
ChangeWidgetState(EWidgetState::MATCH_FOUND);
}
else
{
Tb_ErrorText->SetText(TEXT_FAILED_FIND_MATCH);
ChangeWidgetState(EWidgetState::ERROR);
}
} -
OnSessionInviteReceived()関数を定義します。この関数は、ゲームがマッチメイキングで見つかったセッションへの招待を受信したときのコールバックを処理し、ウィジェットを関連する状態に切り替えます。この関数には2つの可能な結果があります。まず自動参加フラグをチェックし、有効になっている場合はウィジェットをJOINING_MATCHに遷移させます。そうでない場合はWAITING_FOR_PLAYERに遷移します。この関数は、後で他の関数で使用できるように、セッション招待を変数に保存する役割も担っています。自動参加機能を有効または無効にする方法については後で説明します。void UMatchmakingDSWidget_Starter::OnSessionInviteReceived(
const FUniqueNetId& UserId,
const FUniqueNetId& FromId,
const FOnlineSessionInviteAccelByte& Invite)
{
// Abort if not a game session.
if (Invite.SessionType != EAccelByteV2SessionType::GameSession)
{
return;
}
// Store session invite for later use
SessionInvite = MakeShared<FOnlineSessionInviteAccelByte>(Invite);
// Check if auto join is enabled or not
const TSharedPtr<FOnlineSessionInfoAccelByteV2> SessionInfo =
StaticCastSharedPtr<FOnlineSessionInfoAccelByteV2>(Invite.Session.Session.SessionInfo);
check(SessionInfo.IsValid());
const bool bAutoJoin = SessionInfo->GetBackendSessionData()->Configuration.AutoJoin;
/**
* If auto join, show joining match screen, else show waiting for players screen.
* Only if the match found screen has been up for longer than MatchFoundDelay
*/
if (MatchFoundCurrentCountdown <= 0)
{
ChangeWidgetState(bAutoJoin ? EWidgetState::JOINING_MATCH : EWidgetState::WAITING_FOR_PLAYER);
}
} -
OnJoinSessionComplete()関数を定義します。この関数は、セッション参加プロセスが完了したときのコールバックを処理し、ウィジェットを関連する状態に切り替えます。void UMatchmakingDSWidget_Starter::OnJoinSessionComplete(FName SessionName, EOnJoinSessionCompleteResult::Type Result)
{
// Abort if not a game session.
if (!SessionName.IsEqual(OnlineSession->GetPredefinedSessionNameFromType(EAccelByteV2SessionType::GameSession)))
{
return;
}
if(Result == EOnJoinSessionCompleteResult::Success)
{
ChangeWidgetState(EWidgetState::SESSION_JOINED);
}
else
{
Tb_ErrorText->SetText(TEXT_FAILED_JOIN_MATCH);
ChangeWidgetState(EWidgetState::ERROR);
}
} -
OnSessionServerUpdateReceived()関数を定義します。この関数は、ゲームがバックエンドからサーバーに関する更新を受信したときのコールバックを処理し、ウィジェットを関連する状態に切り替えます。void UMatchmakingDSWidget_Starter::OnSessionServerUpdateReceived(
const FName SessionName,
const FOnlineError& Error,
const bool bHasClientTravelTriggered)
{
if (Error.bSucceeded && SessionJoinedCurrentCountdown <= 0)
{
ChangeWidgetState(EWidgetState::REQUESTING_SERVER);
}
else if (!Error.bSucceeded)
{
Tb_ErrorText->SetText(TEXT_FAILED_FIND_SERVER);
ChangeWidgetState(EWidgetState::ERROR);
}
} -
OnCancelMatchmakingComplete()関数を定義します。この関数は、マッチメイキングキャンセルプロセスが完了したときのコールバックを処理し、クイックプレイウィジェットを関連する状態に切り替えます。void UMatchmakingDSWidget_Starter::OnCancelMatchmakingComplete(FName SessionName, bool bSucceeded)
{
// Abort if not a game session.
if (!SessionName.IsEqual(OnlineSession->GetPredefinedSessionNameFromType(EAccelByteV2SessionType::GameSession)))
{
return;
}
// Abort if match already found.
if (WidgetState == EWidgetState::MATCH_FOUND || WidgetState == EWidgetState::WAITING_FOR_PLAYER)
{
UE_LOG_MATCHMAKINGDS(Log, TEXT("Match already found, cancel matchmaking canceled."))
return;
}
if (bSucceeded)
{
DeactivateWidget();
}
else
{
Tb_ErrorText->SetText(TEXT_FAILED_CANCEL_MATCH);
ChangeWidgetState(EWidgetState::ERROR);
}
} -
OnRejectSessionInviteComplete()関数を定義します。この関数は、セッション招待拒否プロセスが完了したときのコールバックを処理し、クイックプレイウィジェットを関連する状態に切り替えます。void UMatchmakingDSWidget_Starter::OnRejectSessionInviteComplete(bool bSucceeded)
{
if (bSucceeded)
{
DeactivateWidget();
}
else
{
Tb_ErrorText->SetText(TEXT_FAILED_REJECT_MATCH);
ChangeWidgetState(EWidgetState::ERROR);
}
} -
ボタンをバインドしてマッチメイキングを開始し、ウィジェットが開いたらすぐにマッチメイキング開始関数を呼び出します。
NativeOnActivated()関数に、以下のハイライトされたコードを追加します。void UMatchmakingDSWidget_Starter::NativeOnActivated()
{
// ...
Btn_Back->OnClicked().AddUObject(this, &ThisClass::DeactivateWidget);
Btn_Join->OnClicked().AddUObject(this, &ThisClass::JoinSession);
Btn_Cancel->OnClicked().AddUObject(this, &ThisClass::CancelMatchmaking);
Btn_Reject->OnClicked().AddUObject(this, &ThisClass::RejectSessionInvite);
Btn_Retry->OnClicked().AddUObject(this, &ThisClass::StartMatchmaking);
// ...
// Start matchmaking immediately
StartMatchmaking();
} -
ウィジェットがアクティブでないときは、これらのボタンのバインドを解除します。
NativeOnDeactivated()に以下のコードを追加します:void UMatchmakingDSWidget_Starter::NativeOnDeactivated()
{
Btn_Back->OnClicked().RemoveAll(this);
Btn_Join->OnClicked().RemoveAll(this);
Btn_Cancel->OnClicked().RemoveAll(this);
Btn_Reject->OnClicked().RemoveAll(this);
Btn_Retry->OnClicked().RemoveAll(this);
// ...
Super::NativeOnDeactivated();
} -
プロジェクトをビルドし、Unreal Engine Editorで開きます。
/Content/TutorialModules/Play/MatchmakingDS/に移動します。そこにDA_MatchmakingDSEssentialsというデータアセットがあります。それを開き、Is Starter Mode Activeを有効にします。次に、データアセットを再度保存します。これによりウィジェットがアクティブになり、ゲームをプレイするときにそれらをナビゲートできるようになります。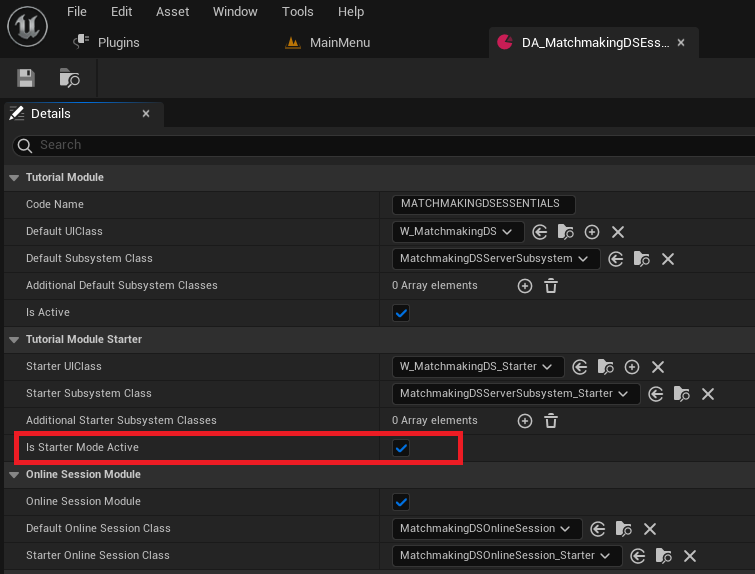
-
Editorでゲームをプレイします。メインメニューから、Play Online > Quick Play > Elimination > Dedicated Serverに移動します。実装が成功していれば、ローディング状態を確認できます。
リソース
-
このチュートリアルセクションで使用されているファイルは、Unreal Byte Wars GitHubリポジトリで入手できます。
- AccelByteWars/Content/TutorialModules/Play/MatchmakingEssentials/UI/W_QuickPlay.uasset
- AccelByteWars/Source/AccelByteWars/TutorialModules/Play/MatchmakingEssentials/UI/QuickPlayWidget.h
- AccelByteWars/Source/AccelByteWars/TutorialModules/Play/MatchmakingEssentials/UI/QuickPlayWidget.cpp
- AccelByteWars/Content/TutorialModules/Play/MatchmakingDS/UI/W_MatchmakingDS_Starter.uasset
- AccelByteWars/Source/AccelByteWars/TutorialModules/Play/MatchmakingDS/UI/MatchmakingDSWidget_Starter.h
- AccelByteWars/Source/AccelByteWars/TutorialModules/Play/MatchmakingDS/UI/MatchmakingDSWidget_Starter.cpp