Getting started with AGS AI Analytics
Overview
Connect an AI assistant to AccelByte Gaming Services (AGS), ask your first question about your player data, and keep the results in a dashboard. By the end, you will have run a plain-language query against your own analytics data and pinned a chart your team can revisit.
AGS AI Analytics is in early access. The connection details for your environment, including the server URL and any required credentials, are provided by AccelByte during onboarding.
How to get access
How you turn on AGS AI Analytics depends on your AGS deployment:
| AGS deployment | Availability | How to enable |
|---|---|---|
| Public Cloud | Always on | Nothing to do. You already have it. |
| Private Cloud | Enabled after deployment to your environment | Existing customers who have it are set. New customers: contact your AccelByte representative to enable it. |
Prerequisites
Before you begin, make sure you have:
- An AGS environment with Game Analytics enabled and game telemetry flowing.
- AGS AI Analytics enabled for your environment (see How to get access).
- An AI assistant that supports the Model Context Protocol (MCP), so it can connect to the AGS AI Analytics MCP server.
- For interactive charts and dashboards, an assistant that also supports the MCP Apps extension. Without MCP Apps you can still connect and ask questions, but answers come back as text only. Host support for MCP Apps varies by assistant, so confirm yours supports it.
- The
ADMIN:NAMESPACE:{namespace}:ANALYTICS:QUERYpermission (READ) on the account you log in with, where{namespace}is the namespace you want to query.
Step 1: Connect your AI assistant to AGS
AGS AI Analytics is delivered as an MCP server that you add to your AI assistant as a custom connector, then sign in to your environment. These steps use Claude Desktop, the recommended client for AGS AI Analytics. Any assistant that supports the MCP Apps extension works and follows a similar flow.
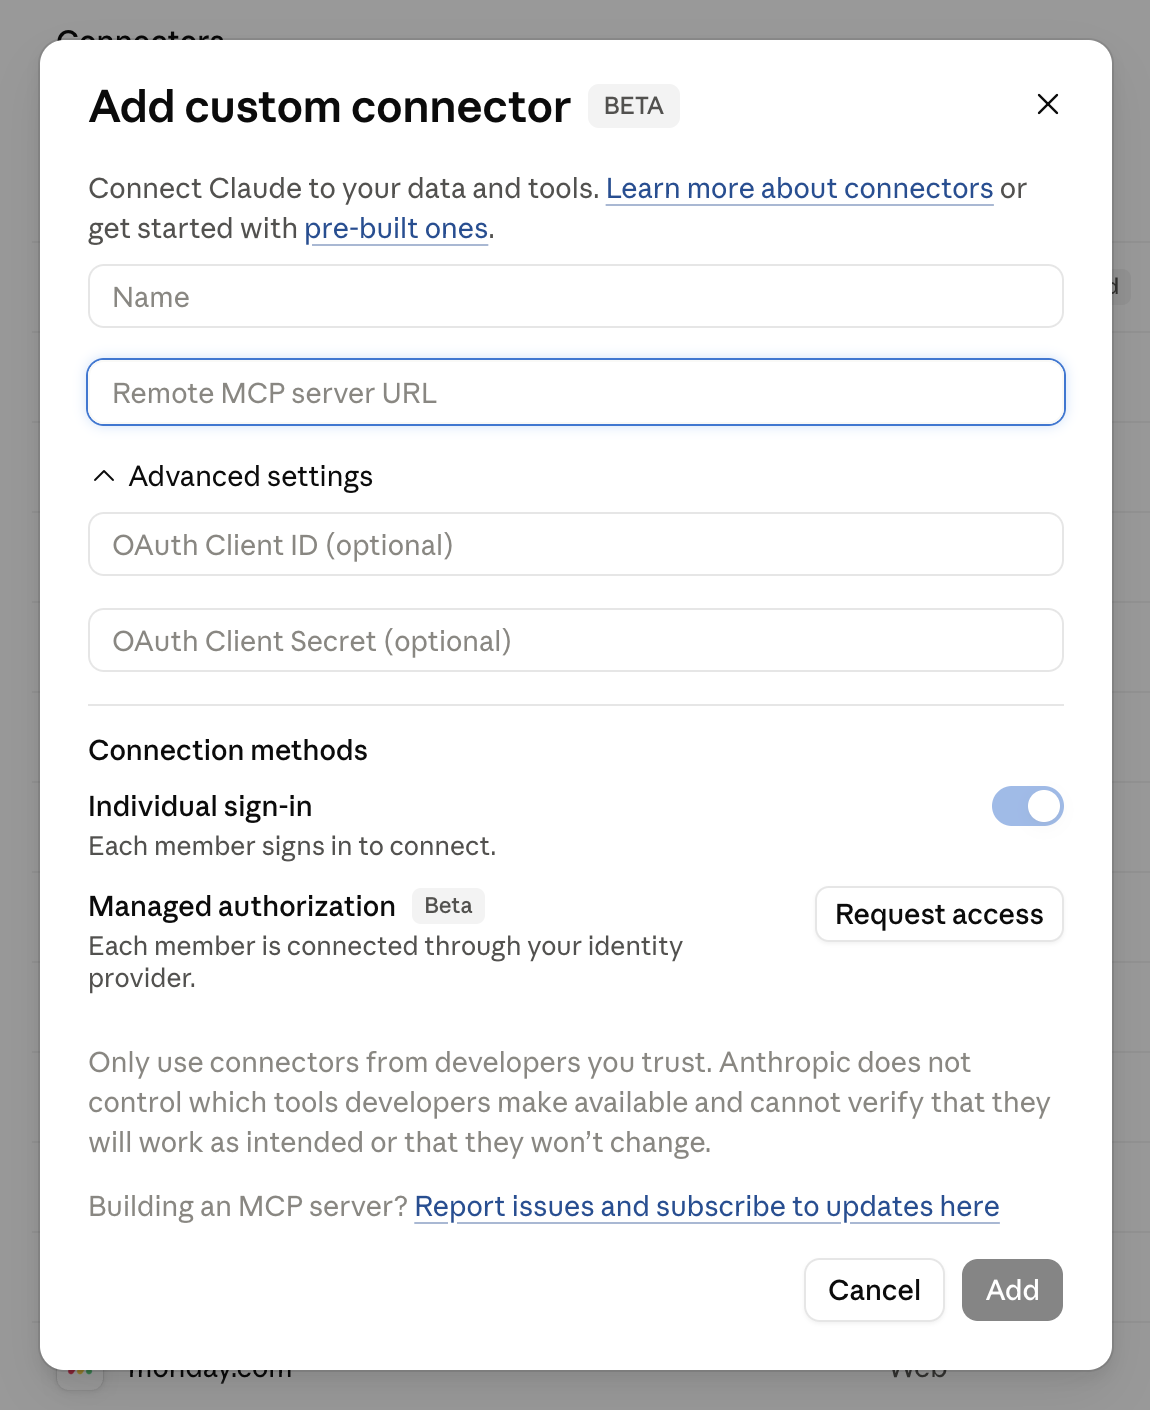
- In Claude Desktop, open the + menu and go to Connectors > Add custom connector.
- In Name, enter a name you will recognize, for example,
AGS AI Analytics. - In Remote MCP server URL, enter the server URL AccelByte provided for your environment.
- If AccelByte provided OAuth credentials, expand Advanced settings and enter the OAuth Client ID and OAuth Client Secret. Otherwise, leave them blank.
- Under Connection methods, keep Individual sign-in so each person signs in with their own AGS account, then select Add.
- When prompted, log in with your AGS account to authorize access.
When the connection succeeds, the connector appears in your Connectors menu and its tools become available. Its displayed name comes from your environment, for example AGS API or development-ags-api.
Step 2: Add an analytics playbook
The connector ships with ready-made playbooks that guide the assistant through common analytics tasks. Add one to your conversation:
- Open the + menu and go to Connectors. Under your AGS connector, select the Add from … entry (it is labeled with your connector's name, for example Add from AGS API).
- Select a playbook, for example Run Analytics Playbook to start an analysis, or Run Analytics Context Playbook to build game context.
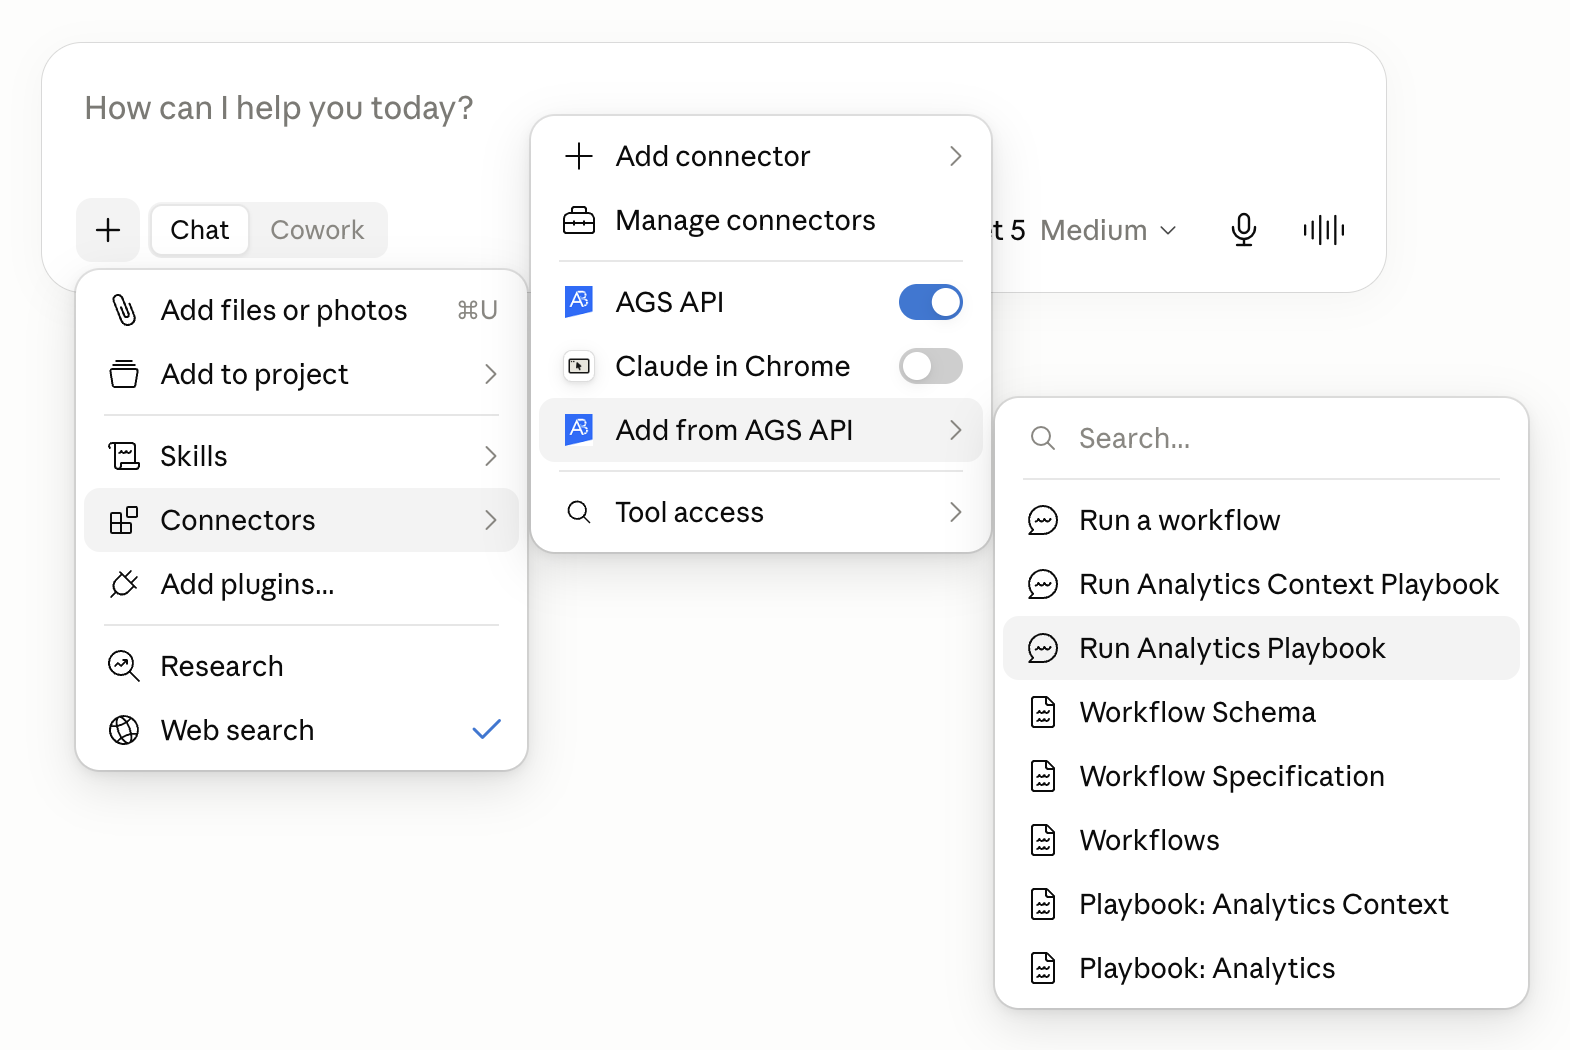
Use the environment you actually want to analyze. Analytics data is scoped per environment, so connecting to a development environment only surfaces that environment's data, which is often sparse.
Step 3: Ask your first question
Ask a question in plain language. AGS AI Analytics translates it into a query, runs it against your analytics data, and returns the result. Try a starter prompt such as:
Show me the daily active users (DAU) for the last 30 days.
Out of the box, you get a general answer. In the next steps you make that answer specific to your game.
Step 4: Scope the query to your namespace
By default, a query runs against your own namespace — the one your AGS account signs in to. To target a specific game, name its namespace in your prompt:
Show me the daily active users for the last 30 days for the <YourGameNamespace> namespace.
Replace <YourGameNamespace> with your game's namespace. If results look lower than expected, confirm you are querying the namespace where your players actually authenticate.
Step 5: Understand data availability
Knowing when data is available helps you read results correctly:
- Backfill: By default, the most recent 3 months of data are available. To query further back, request a longer backfill window from AccelByte.
- Daily aggregation: Data is aggregated once per day, so a given day's data becomes available the following day rather than in real time.
Step 6: Make answers game-specific with a context file
A plain question returns a general answer because the assistant does not yet know how your game works, for example which accounts are test or quality assurance (QA) users, or what your latest event was. Add a context file to teach it. With a context file in place, the same question comes back segmented, ranked, and specific to your game.
For how to write one, see Writing a context file for AGS AI Analytics. Once your context file is ready, return here and continue to Step 7.
Step 7: Pin a chart to your dashboard
When a question produces a chart worth keeping, pin it to a dashboard so your team can return to it without starting a new conversation.
- Generate a chart by asking a question that returns time-series or comparative data.
- Pin the chart to your dashboard.
- Refresh the dashboard on demand to re-run the underlying query and pull the latest data.
Changing a chart's date range, for example from 30 days to 7 days, asks the assistant to run a new query rather than re-slicing data it already fetched.