Manage display and section
Overview
The AccelByte Gaming Services (AGS) Store Display & Section service allows you to better manage the store catalog, and offer players more choices in your in-game stores. A rotation of items can be configured, to allow an in-game store to display a different set of items for each set period of time. A Store Display can be considered as a page of store catalogs displayed for players in an in-game store. A Section on a Display can be considered as a placeholder for one or more items to be sold in an in-game store.
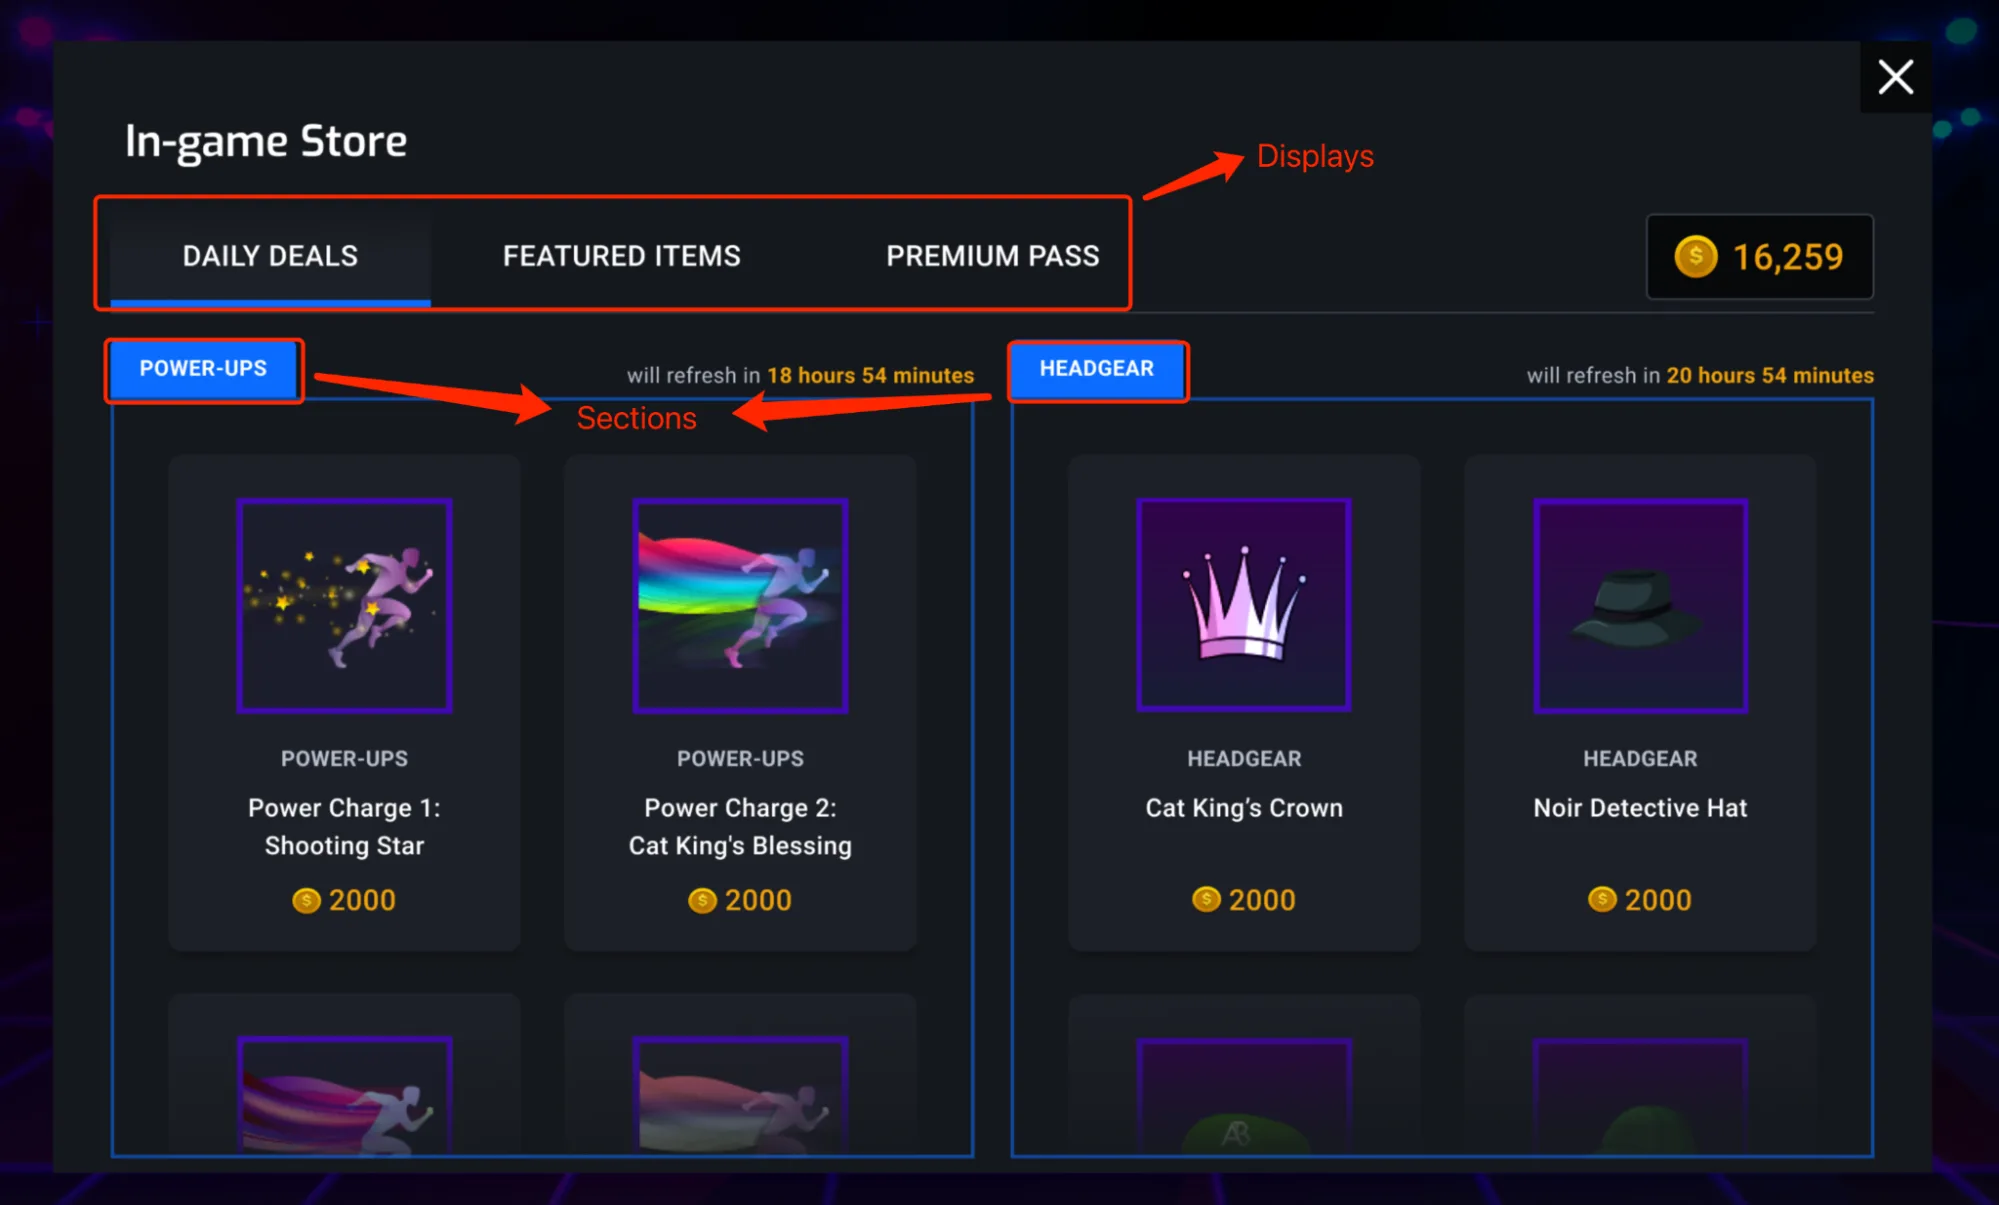
As demonstrated in our example below, Daily Deals, Featured Items and Premium Pass are set up using Display; Power-Ups & Headgear are Sections under Daily Deals; Power Charge 1: Shooting Star is an item selling under Power-Ups.
Goals
- Explain in detail what Display & Section are
- Explain the item rotation capability in the Store
- Guide the configuration of Display & Section in the Admin Portal or with the AGS CLI, and explain how to customize the service
Prerequisites
- Access to your AccelByte admin portal
- Appropriate namespaces are created
- A Store is set up and configured properly
- To follow the AGS CLI steps, you have installed the AGS CLI and signed in with an account that has access to these features. See Install and sign in. The examples use a Bash shell.
Manage Display & Section
Create a Display
A Store Display can be considered as a page of store catalogs displayed for players in an in-game store. Use the following steps to create a Display,
- Admin Portal
- AGS CLI
-
On the Admin Portal sidebar, go to Online > Store & Catalog > Stores.
-
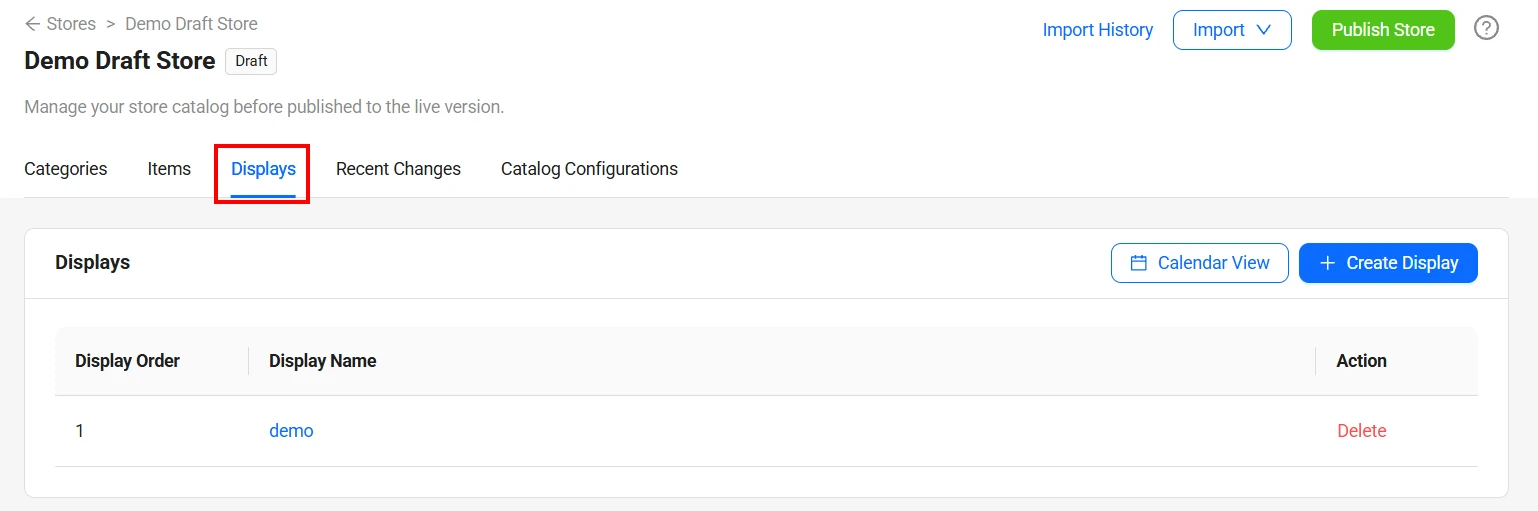
Open the draft store Draft Store and select the Displays tab.
-
Click Create Display button and fill up the pop-up to create a Display
Display Order manages the order the Display will be shown in the in-game store.
-
Find your draft store. In the output, the draft store has
publishedset tofalse. Note itsstoreIdanddefaultLanguage.ags platform stores list --namespace <YourNamespace> --format json -
Create the Display. Replace
<StoreId>with the draft store'sstoreId,<DefaultLanguage>with itsdefaultLanguage, and<DisplayName>with a name for the Display:ags platform views create --namespace <YourNamespace> --store-id <StoreId> \
--json '{"name": "<DisplayName>", "displayOrder": 1, "localizations": {"<DefaultLanguage>": {"title": "<DisplayName>"}}}'displayOrder: the Display Order, which manages the order the Display will be shown in the in-game store.localizations: the Display's title in the store's default language. The Admin Portal sets it to the Display name for you. The store's default language is required.
The command prints the new Display. Its
viewIdis the ID you use when you create a Section.
Create a Section
A Display page consists of a number of sections and each Section can be considered as a placeholder for one or more items to be sold. Individual merchandise for sale must be put within a section. Use the following steps to create a Section on a Display.
- Admin Portal
- AGS CLI
-
Click Create Section on the Display Details tab after a Display is successfully created.
-
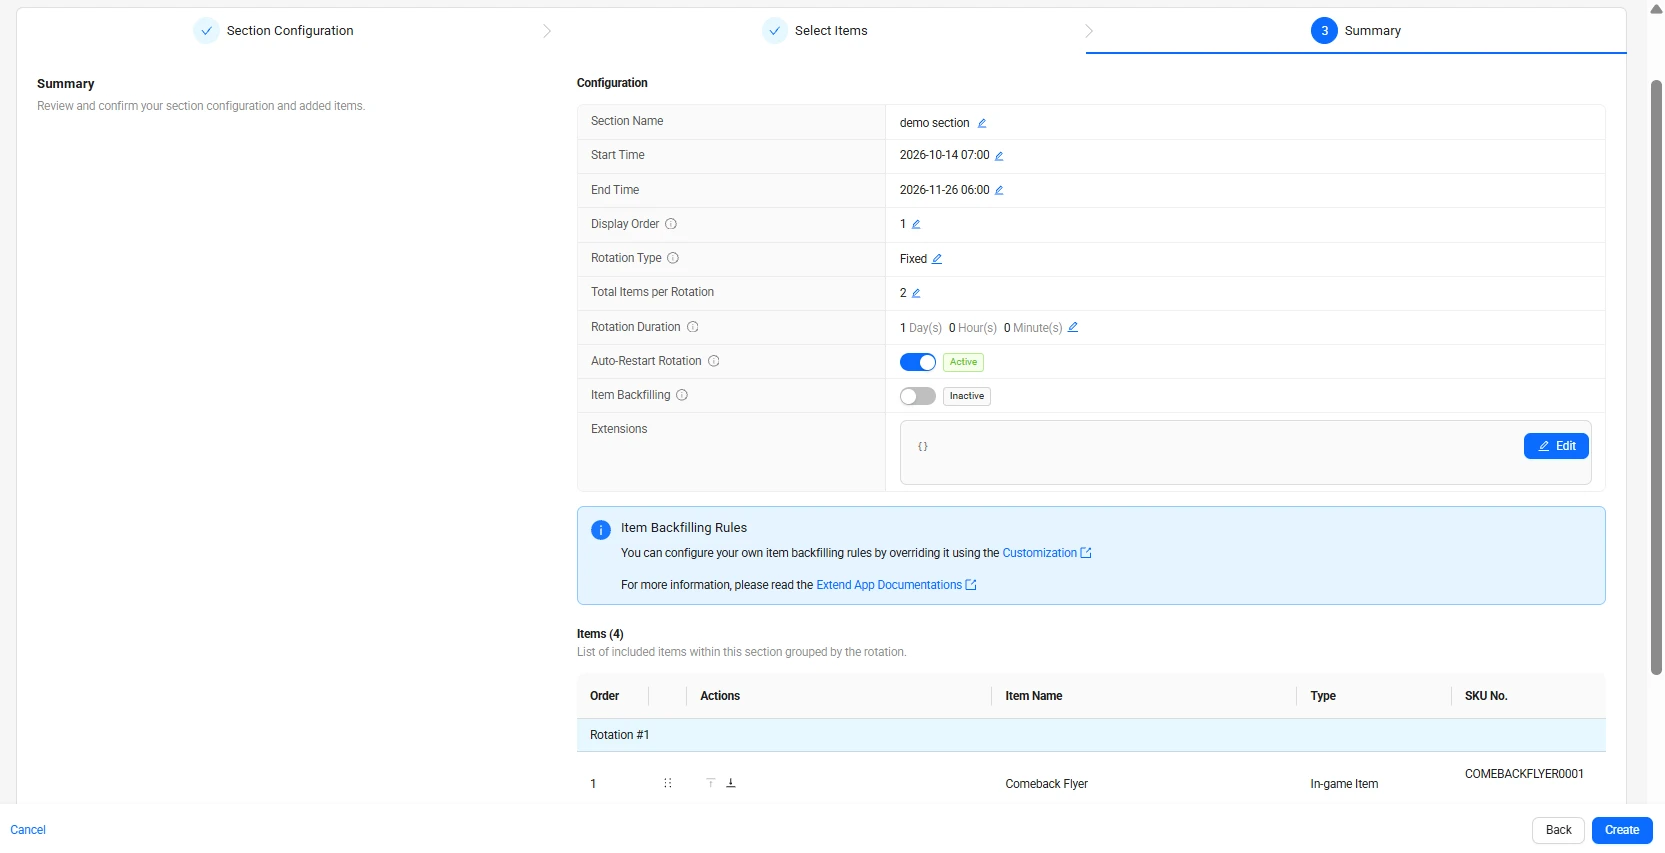
Fill in the form to create a Section. There are three types of Item Rotation to choose from:
- None: There will be no item rotation, which means all items chosen in the next step (add items to the Section) will be included in the Section at the same time for the entire period, defined by Start Time & End Time.
- Fixed: There will be a fixed-period rotation for items chosen in the next step. A rotation means a swap of items placed in a Section.
- Total items per Rotation: The amount of items to be changed for each Rotation cycle.
- Rotation Duration: This defines how long the set of items will stay in the Section for each Rotation cycle.
- Item Backfilling: Item backfilling is made possible using a gRPC solution. Therefore, to enable this, please make sure a Custom Service is configured. When this is turned on, if a player already owns an item currently sold in the Rotation cycle, the system will replace the item based on rules defined in the Custom Service. Otherwise, the system will not intervene.
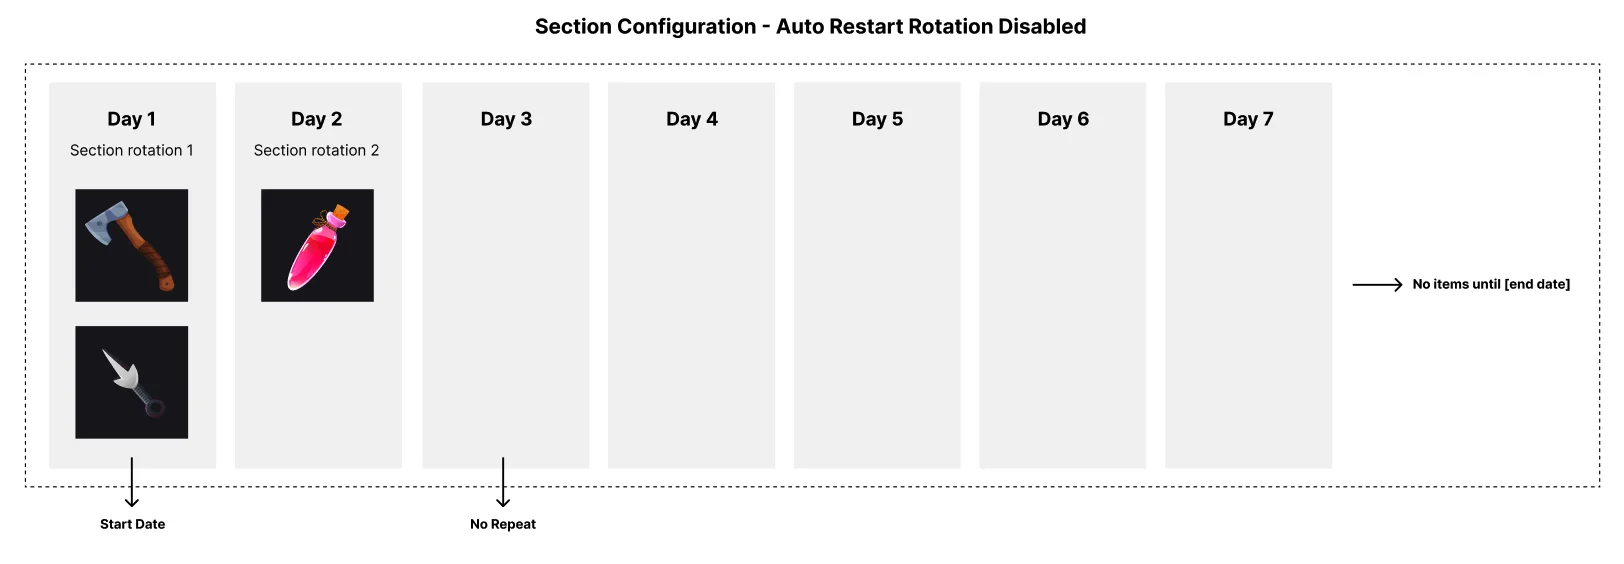
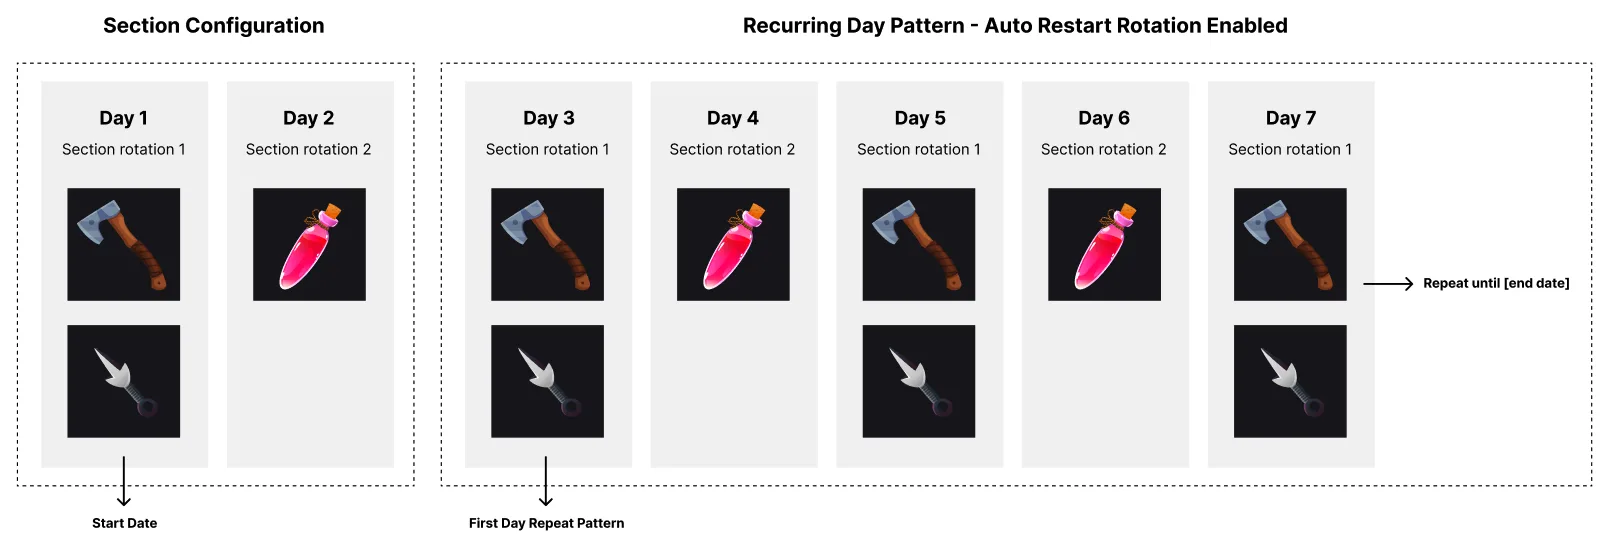
- Auto-Restart Rotation: When active, a display section with a defined sequence of rotating items will automatically restart from the beginning once the entire sequence has been presented. This continuous cycling of items will continue until the display section's configured overall end time is reached.
- Disabled
- Enabled
- Disabled
- Custom: The system will change items displayed for a Section based on rules defined in your Custom Service.
noteItem Backfilling and Custom rotation requires a Custom Service. You have to configure the Custom Service first before you are able to enable the options. View the instructions in the Custom Service Configuration section of this document.
-
Click Next to add items to the Section.
After adding all the items to the Section, a summary page is shown and details of the section can be edited on this page.
-
Find the IDs of the items that you want to sell in the Section. Replace
<StoreId>with the ID of your draft store. To find it, see Create a Display.ags platform items list --namespace <YourNamespace> --store-id <StoreId> --format jsonEach item's ID is in its
itemIdfield. -
Create a JSON file with the Section's settings. Any file name works. This example uses
section.json:{
"name": "<SectionName>",
"viewId": "<ViewId>",
"localizations": {
"<DefaultLanguage>": { "title": "<SectionName>" }
},
"startDate": "<StartDate>",
"endDate": "<EndDate>",
"rotationType": "FIXED_PERIOD",
"fixedPeriodRotationConfig": {
"itemCount": 1,
"duration": 1440,
"rule": "SEQUENCE",
"backfillType": "NONE"
},
"items": [
{ "id": "<ItemId>" },
{ "id": "<AnotherItemId>" }
]
}viewId: the ID of the Display that the Section belongs to.localizations: the Section's title in the store's default language (defaultLanguage). The Admin Portal sets it to the Section name for you. The store's default language is required.startDateandendDate: the Start Time and End Time of the Section, in ISO 8601 format, such as2027-01-01T00:00:00Z.rotationType: the Item Rotation. UseNONEfor None,FIXED_PERIODfor Fixed, orCUSTOMfor Custom. ForNONEandCUSTOM, removefixedPeriodRotationConfig.fixedPeriodRotationConfig: the Fixed rotation settings.itemCountis the Total items per Rotation, anddurationis the Rotation Duration in minutes. SetruletoLOOPto turn on Auto-Restart Rotation, orSEQUENCEto turn it off. SetbackfillTypetoCUSTOMto turn on Item Backfilling, orNONEto turn it off.items: the IDs of the items in the Section.
CUSTOMrotation andCUSTOMbackfill need a Custom Service. See Configure a Custom Service. To see every field, runags platform sections create --skeleton. -
Create the Section. After
@, pass the path to your JSON file:ags platform sections create --namespace <YourNamespace> --store-id <StoreId> --json @section.json
Backfill an Owned Item in Section
- Admin Portal
- AGS CLI
-
Login to the Admin Portal and choose your namespace
-
Configure your gRPC server address on the Customization page
-
Implement your own
Backfill()function in your gRPC servicenoteYou need to use the item ID or item SKU which exists in the Store of your namespace when you implement your own
Backfill()function. -
Now create a Display and create a section in this Display, choose Rotation Type as Fixed and enable Item Backfilling.
-
Configure your gRPC server address. See Configure a Custom Service.
-
Implement your own
Backfill()function in your gRPC service.noteYou need to use the item ID or item SKU which exists in the Store of your namespace when you implement your own
Backfill()function. -
Create a Display and a Section in it, as described in Create a Display and Create a Section. In the Section's JSON file, set
rotationTypetoFIXED_PERIODandbackfillTypetoCUSTOM.
Custom Rotation Items in a Section
- Admin Portal
- AGS CLI
-
Admin login to the Admin Portal and choose your namespace
-
Configure your gRPC server address on the Customization page
-
Implement your own
GetRotationItems()function in your gRPC servicenoteYou need to use the item ID or item SKU which exists in the Store of your namespace when you implement your own
GetRotationItems()function. -
Now create a Display and create a section in this Display, and choose Rotation Type as Custom.
-
Configure your gRPC server address. See Configure a Custom Service.
-
Implement your own
GetRotationItems()function in your gRPC service.noteYou need to use the item ID or item SKU which exists in the Store of your namespace when you implement your own
GetRotationItems()function. -
Create a Display and a Section in it, as described in Create a Display and Create a Section. In the Section's JSON file, set
rotationTypetoCUSTOMand removefixedPeriodRotationConfig.
Custom Service Configuration
Custom Service refers to the use of a custom gRPC service. In order to use Custom Service, you will need to configure a gRPC server first.
Configure Custom Service
Configure a Custom Service
- Admin Portal
- AGS CLI
-
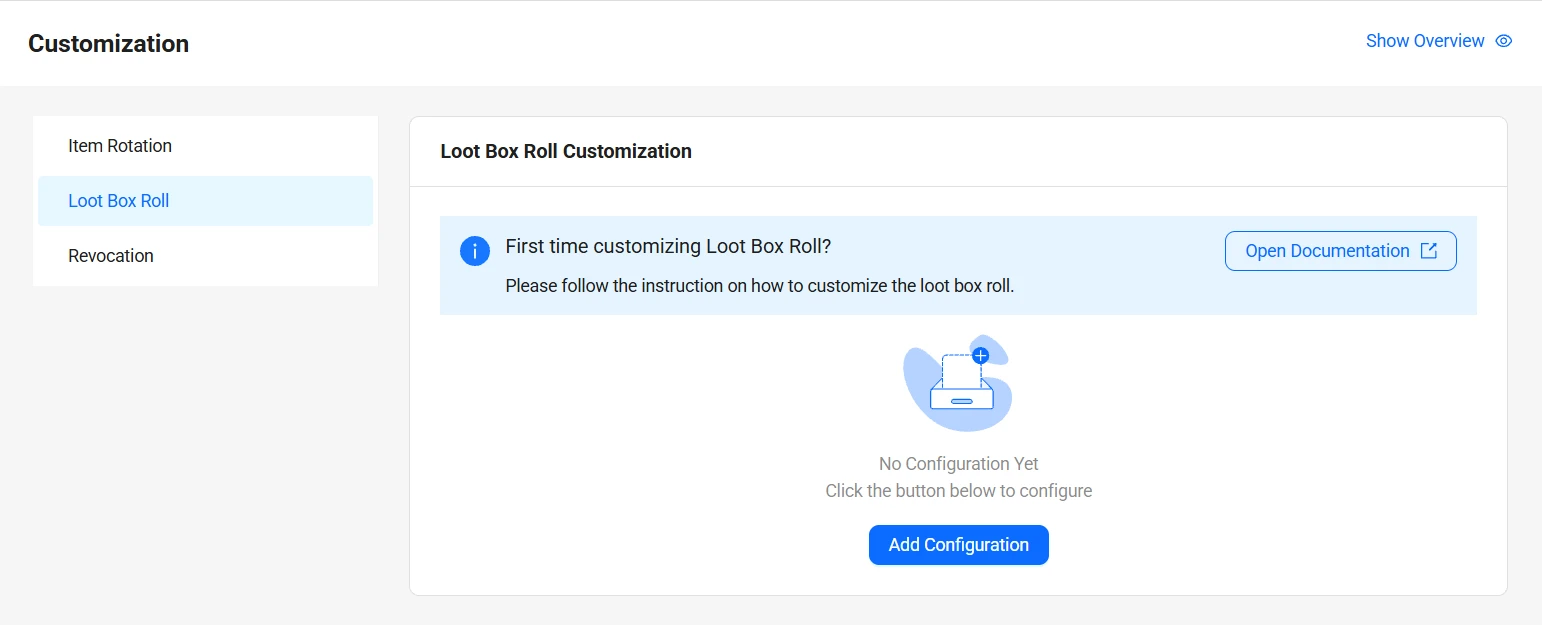
On the Admin Portal sidebar, go to Online > Store & Catalog > Customization.
-
Click Add Configuration and enter your gRPC Server Address, then click Add in the pop-up window to finish the configuration.
-
Once you have configured the Custom Service, you can also update or remove the configuration on the Customization page.
-
Set your gRPC server address. Replace
<GrpcServerAddress>with the address in<host>:<port>format:ags platform plugin-config update-section --namespace <YourNamespace> \
--json '{"extendType": "CUSTOM", "customConfig": {"grpcServerAddress": "<GrpcServerAddress>", "connectionType": "INSECURE"}}' -
Once you have configured the Custom Service, you can also check, update, or remove the configuration:
- To update it, run the command in step 1 again with the new address.
- To check it, run
ags platform plugin-config get-section --namespace <YourNamespace> --format json. - To remove it, run
ags platform plugin-config delete-loot-section --namespace <YourNamespace>. Despite its name, this command removes the Section plugin configuration.