Setting up payments
Introduction
The payment service included in AccelByte Gaming Services (AGS) allows transactions to be performed with both real and virtual currency, and can integrate with Adyen, Xsolla, Stripe, PayPal, AliPay, WxPay, and wallet services. The payment service provides a retry mechanism that prevents notifications from failing to appear during the payment process. This retry mechanism will resend failed notifications until the client acknowledges their receipt, or the maximum number of retries has been reached.
The Payment service feature is not yet supported in AGS Public Cloud.
AGS's Payment service boasts several features to support the payment process, including:
- Real and virtual currency. One payment service can cover both real currency purchases of games or add-ons, or in-game purchases of items or boosters using AccelByte coins.
- Support for multiple payment providers. Our payment service can integrate with Adyen, Xsolla, and Stripe payment aggregators, and can accept payments from PayPal, Visa, Mastercard, AliPay, and WxPay.
- Payment account management. Our Admin Portal allows you to configure your payment aggregators and manage what types of payments you accept.
- Customized payment station. You can change the look of your payment station to highlight your brand.
- Email notifications. Players receive email verification of successful transactions.
Goals
- Explain in detail how to set up payment in the Admin Portal or with the AGS CLI for Adyen, Xsolla, Stripe, and Checkout.
- Explain in detail on how to Manage payment methods.
Prerequisites
- Access to AccelByte Admin Portal
- Appropriate Namespaces are created
- To follow the AGS CLI steps, you have installed the AGS CLI and signed in. See Install and sign in.
Configure payment methods
Adyen
- Admin Portal
- AGS CLI
-
In your publisher namespace, go to Online > Wallets & Payment > Payment Configurations.
-
Click on the New Configuration button.
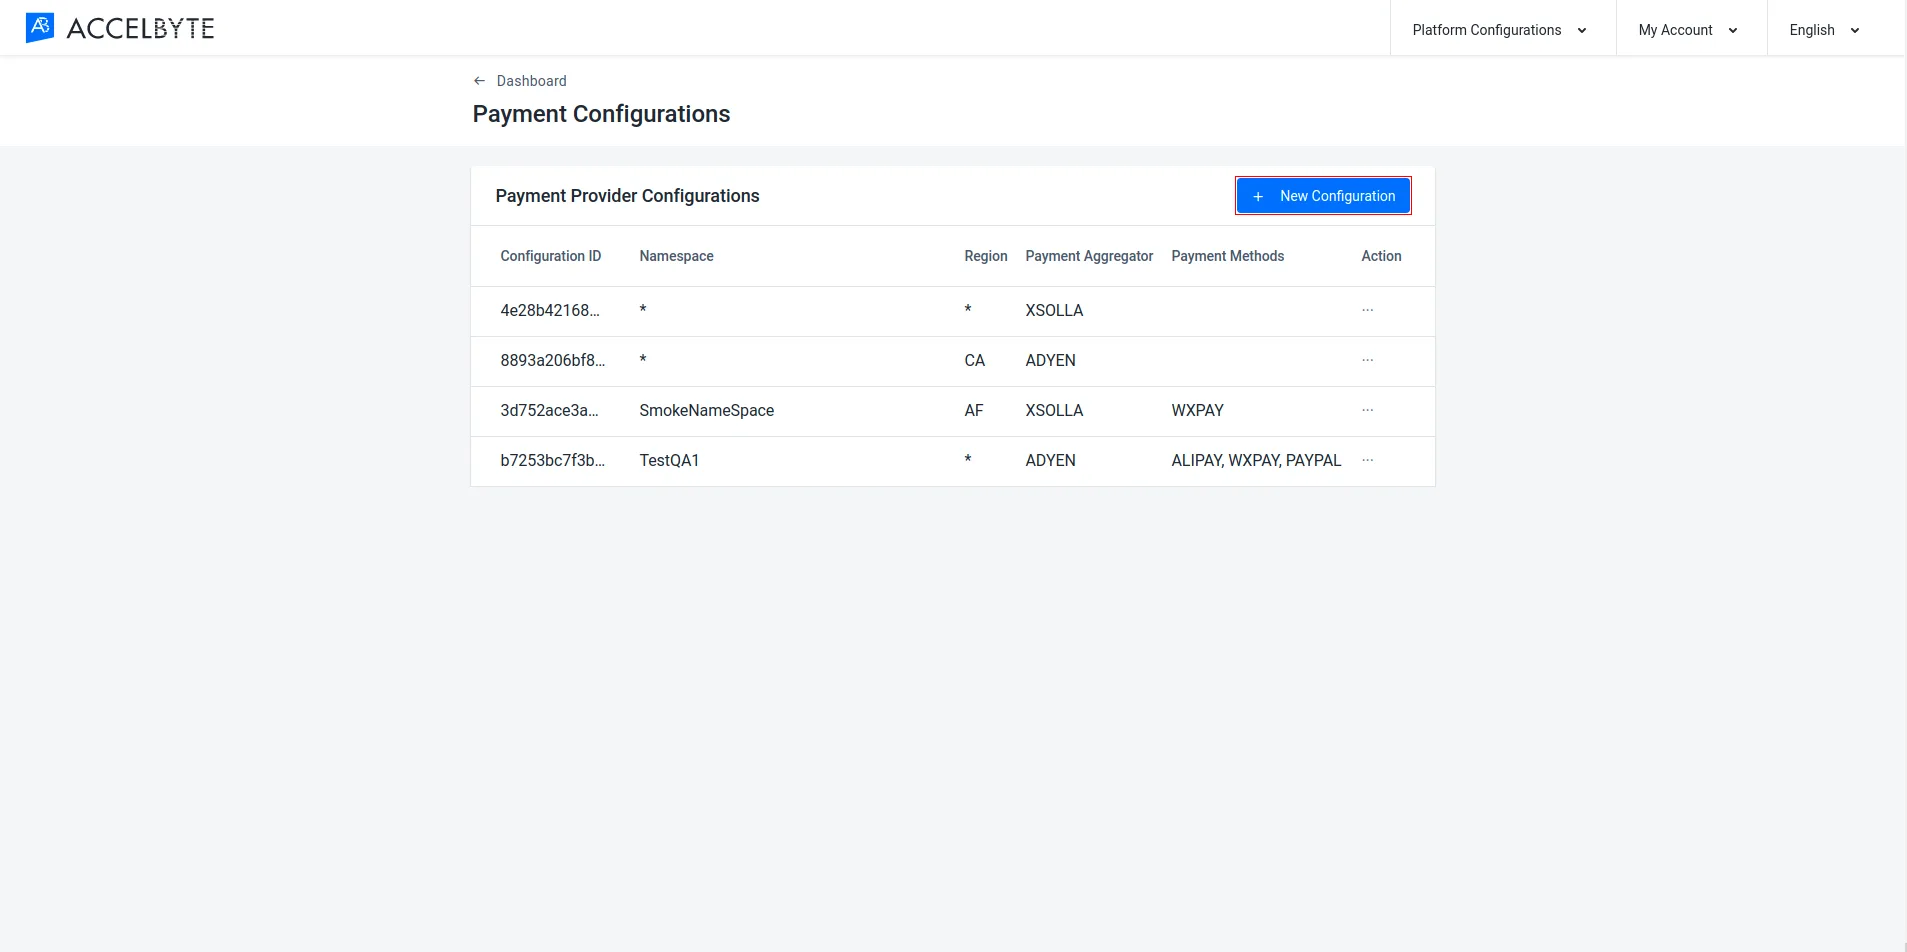
-
Fill in the required fields.
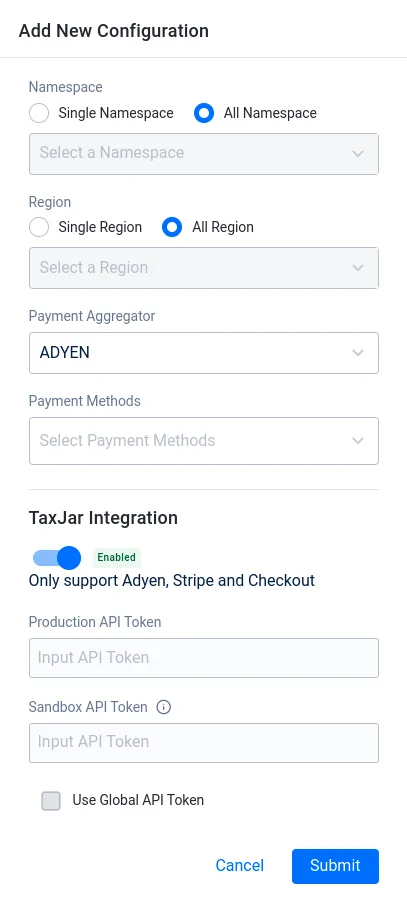
- Select the Namespace for the payment configuration. You can select all namespaces if desired.
- Select the Region for the payment configuration. You can select all regions if desired.
- Select Adyen from the Payment Aggregator dropdown list.
- You can leave the Payment Methods field empty.
- If you want to use TaxJar, enable the TaxJar Integration option. The Production and Sandbox API Token fields will fill automatically based on your global TaxJar configuration if one exists. Change the Production API Token value to the token from the TaxJar account you want to use for this namespace. You can choose to use the global Sandbox API Token, or use your own.
-
Once completed, click the Submit button and you will be redirected to the Payment Configuration page.
-
In your newly created payment configurations, go to the Payment Aggregator section and click the Configure Now button.
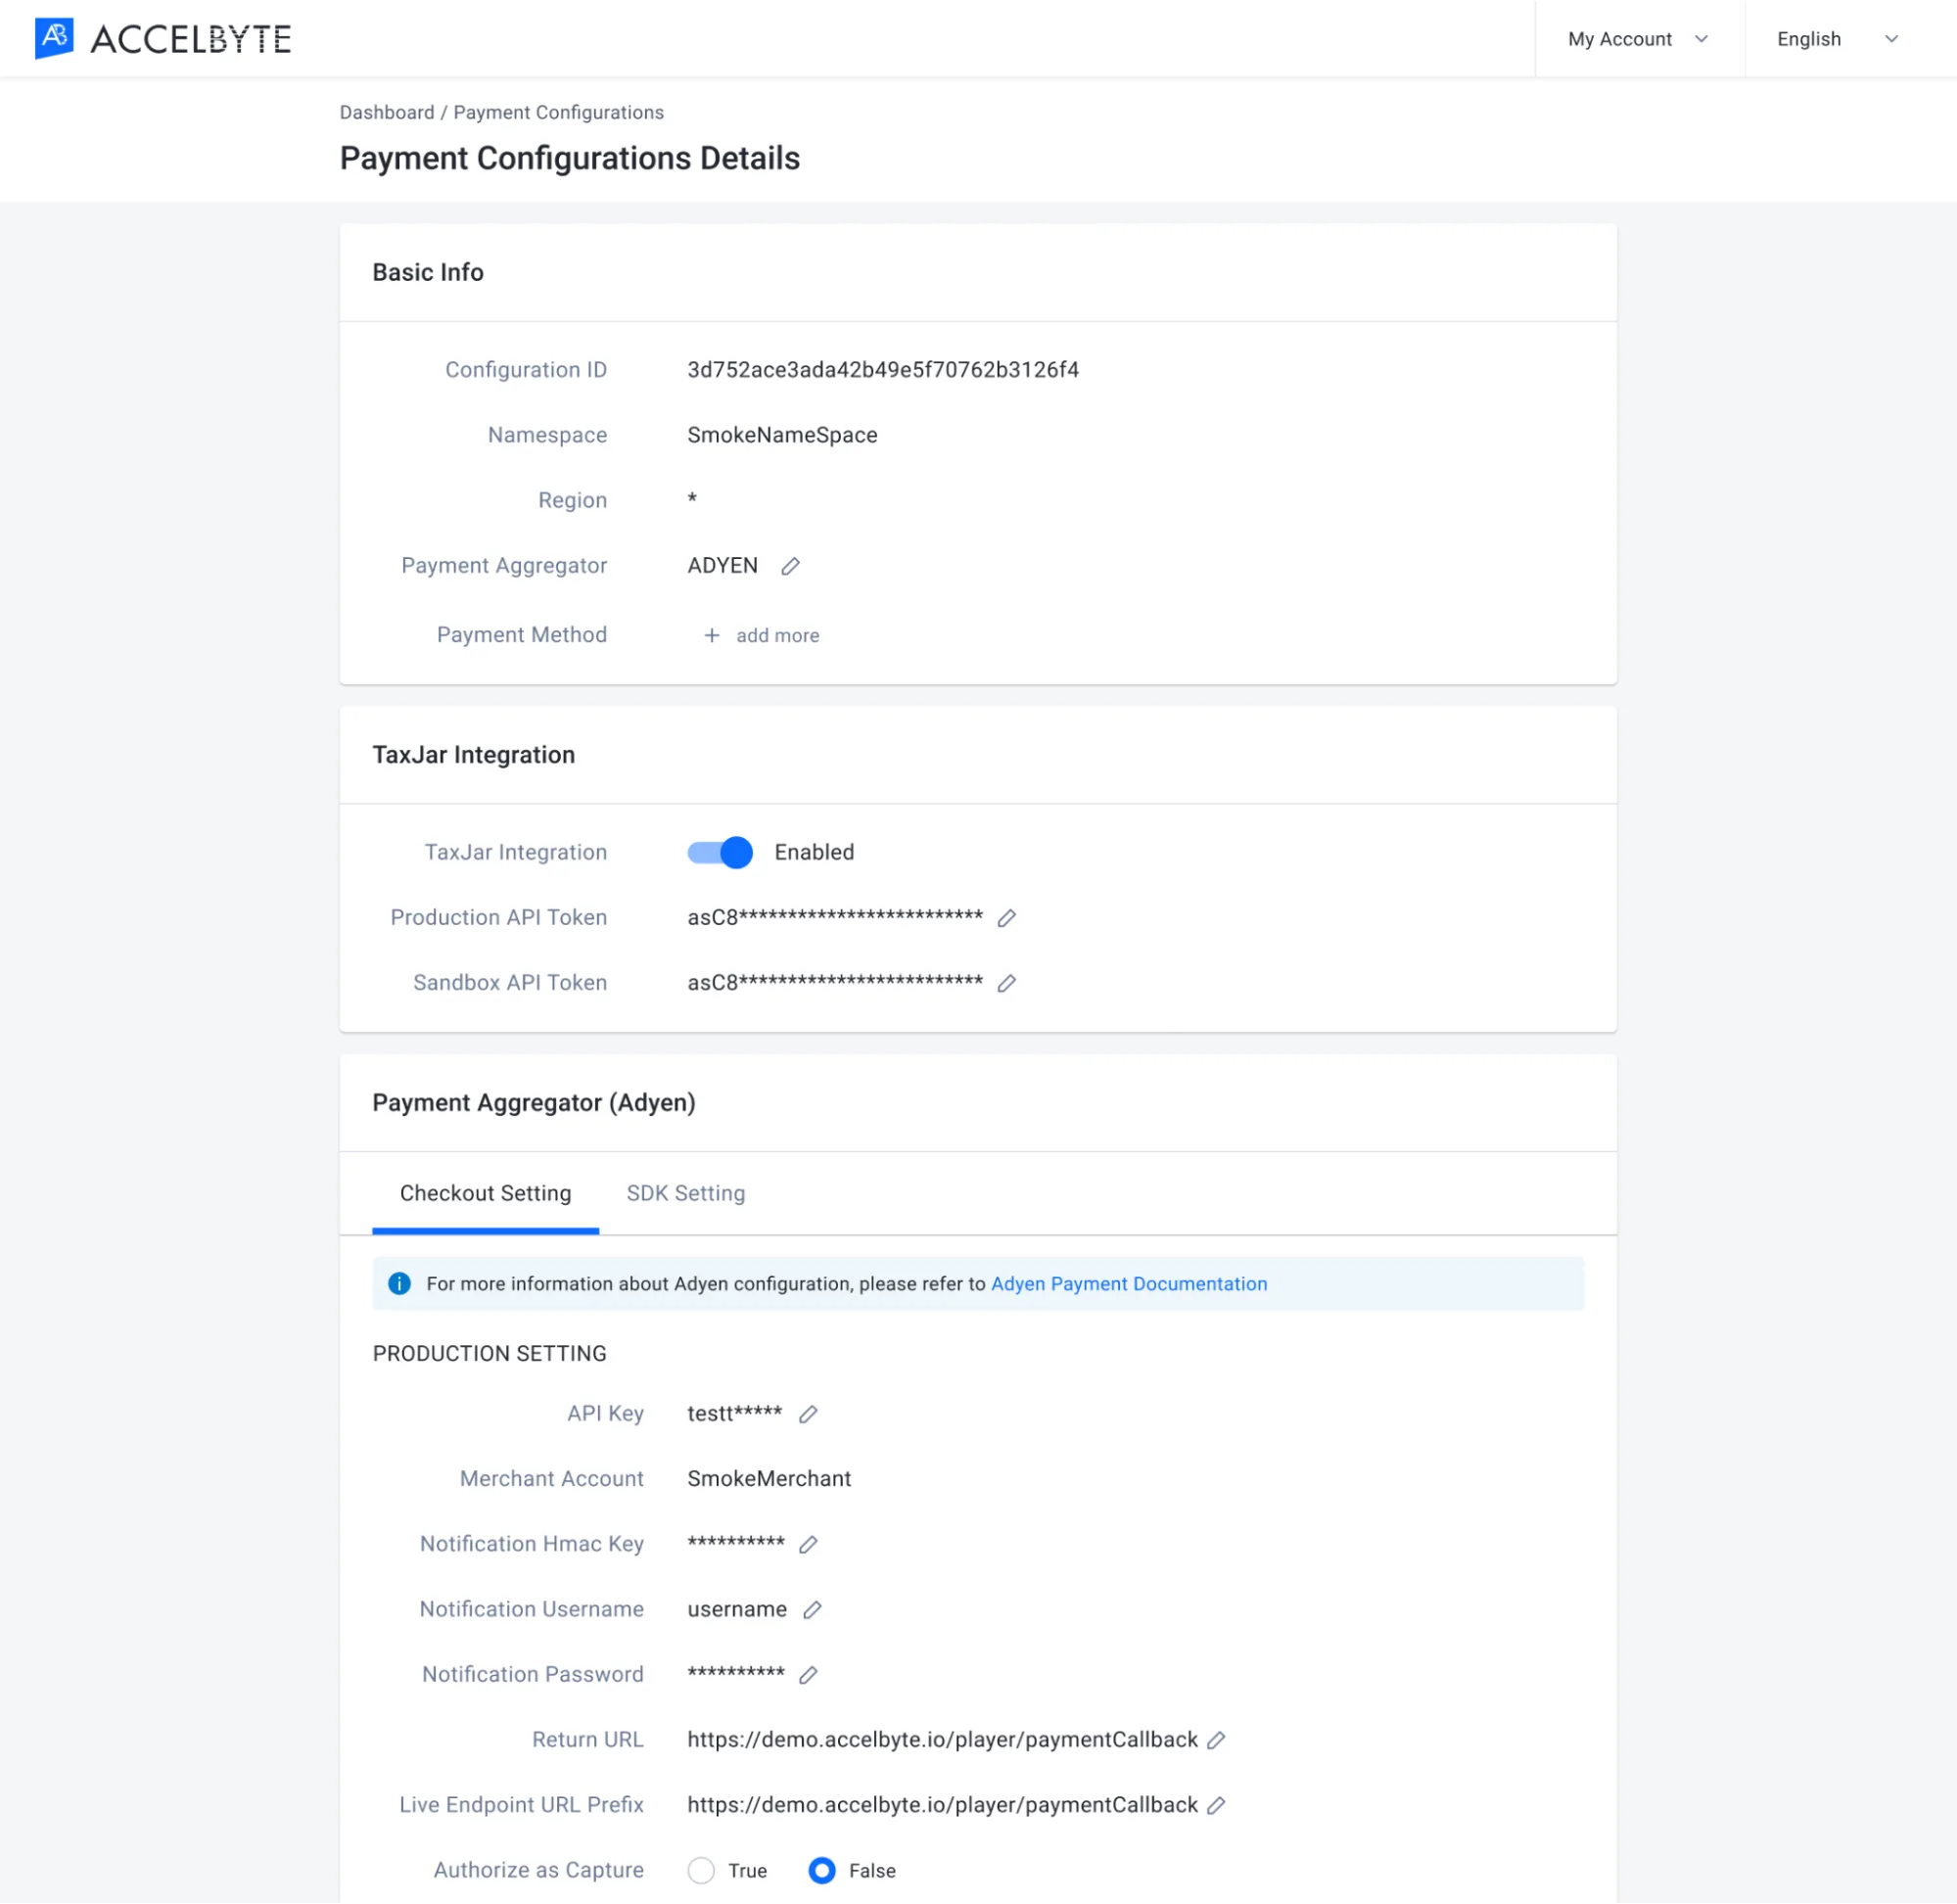
-
Fill in the required fields.
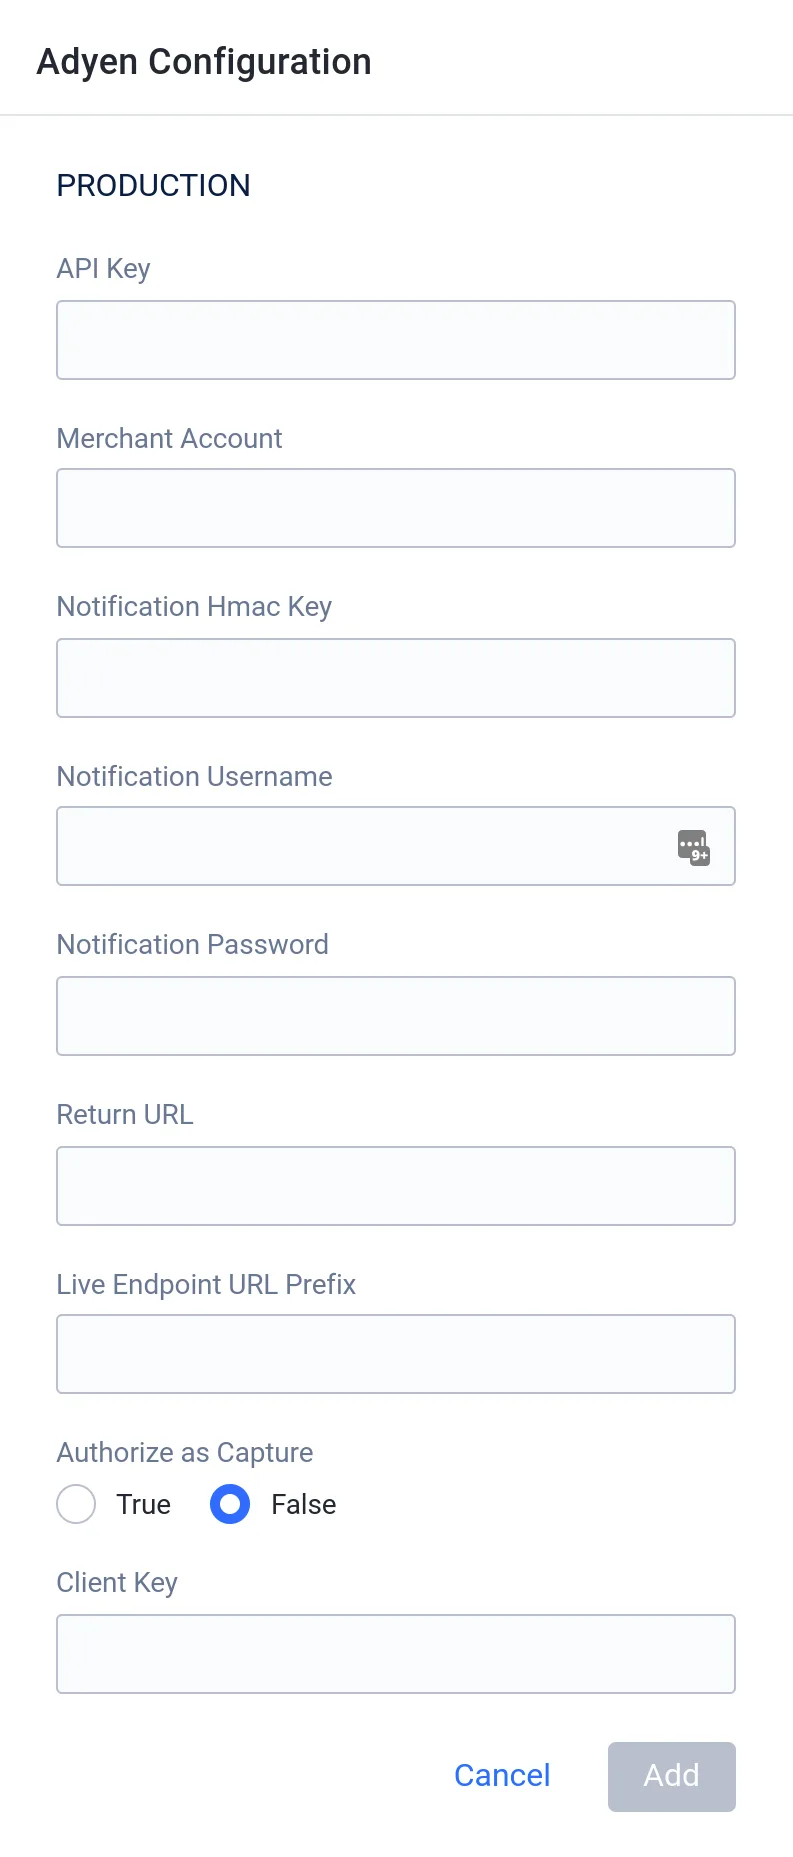
- Input the API Key from Adyen.
- Input the Adyen Merchant Account.
- Input the Notification Hmac Key.
- Input the Notification Username and Password.
- Input the Return URL.
- Input the Live Endpoint URL Prefix
- Choose if you want to enable Authorize as Capture
-
Once completed, click Add to save your configuration.
-
Create a JSON file for the payment configuration. Any file name works. This example uses
payment-config.json:{
"namespace": "<YourGameNamespace>",
"region": "<RegionCode>",
"aggregate": "ADYEN",
"specials": []
}namespace: the namespace for the payment configuration. Use*for all namespaces.region: the region for the payment configuration. Use*for all regions.specials: the payment methods. Leave it as[]to leave Payment Methods empty.
To use TaxJar, see Create a specific tax configuration.
-
Create the payment configuration:
ags platform payment-config create-provider --json @payment-config.jsonIn the output, copy the
paymentMerchantConfigIdvalue. You need it in the next steps. -
Create a JSON file with your Adyen settings. This example uses
adyen-config.json:{
"apiKey": "<AdyenApiKey>",
"merchantAccount": "<AdyenMerchantAccount>",
"notificationHmacKey": "<NotificationHmacKey>",
"notificationUsername": "<NotificationUsername>",
"notificationPassword": "<NotificationPassword>",
"returnUrl": "<ReturnUrl>",
"liveEndpointUrlPrefix": "<LiveEndpointUrlPrefix>",
"authoriseAsCapture": false
}Set
authoriseAsCapturetotrueto enable Authorize as Capture. -
Save the settings. Replace
<PaymentMerchantConfigId>with the value from step 2:ags platform payment-config update-adyen --id <PaymentMerchantConfigId> --sandbox false --json @adyen-config.jsonUse
--sandbox falsefor the production environment. Use--sandbox truefor the sandbox environment. The default istrue.After the command runs, delete the file, because it contains secrets.
Set up the Adyen Drop-In SDK
In response to Adyen's decision to phase out Checkout Web SDK, AccelByte has started migrating to Drop-in. If you currently use Checkout Web SDK, you will need to follow the below steps to migrate.
-
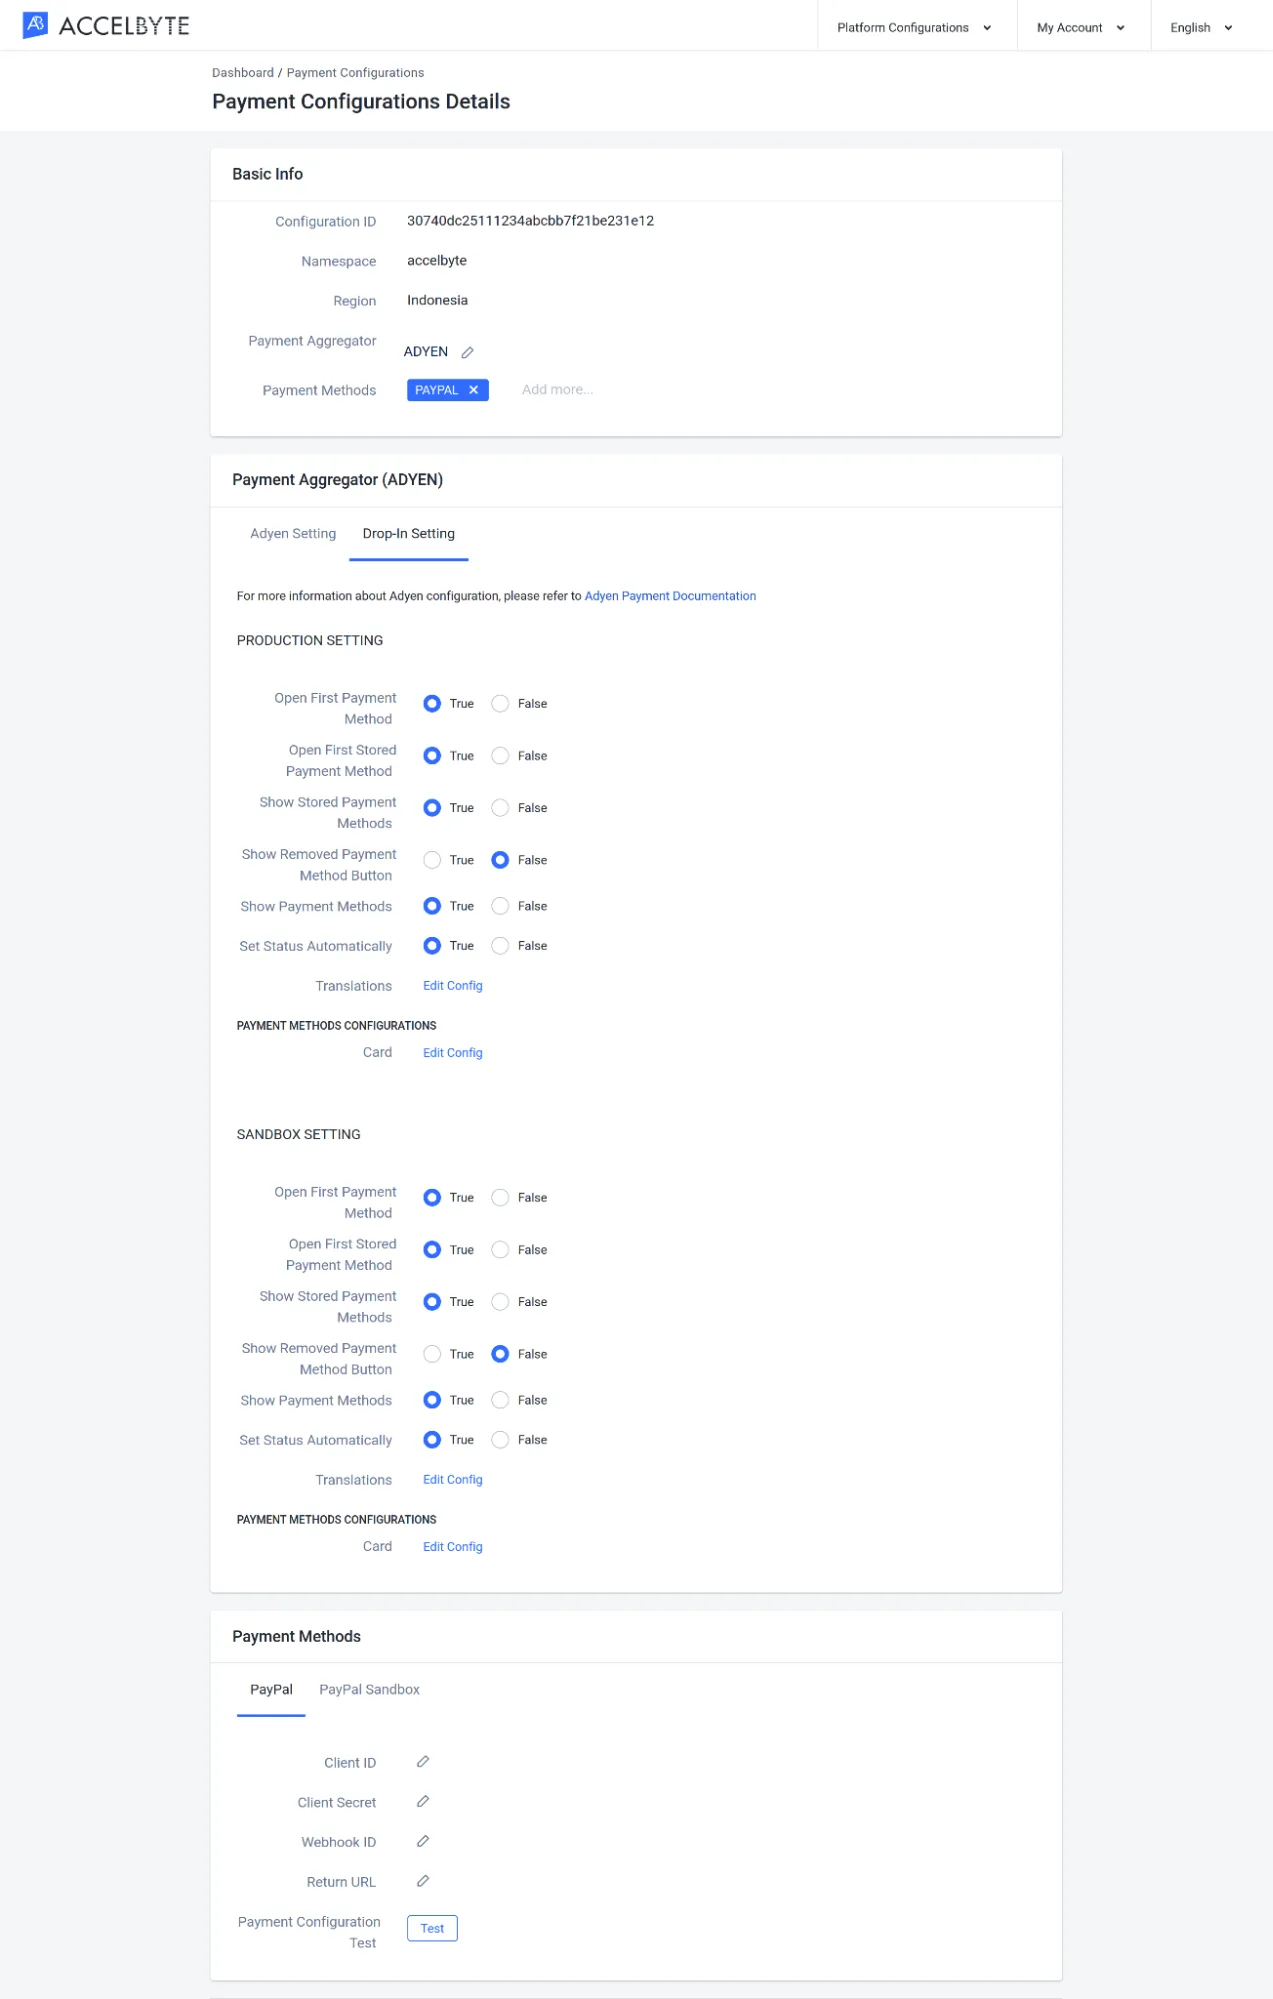
In the Adyen Payment Configuration Details page, scroll down to Payment Aggregator (ADYEN) and click the Drop-In Setting tab. Adjust these settings according to your preferences. See Adyen's optional configuration guide for a full list of settings with descriptions.
Xsolla
- Admin Portal
- AGS CLI
-
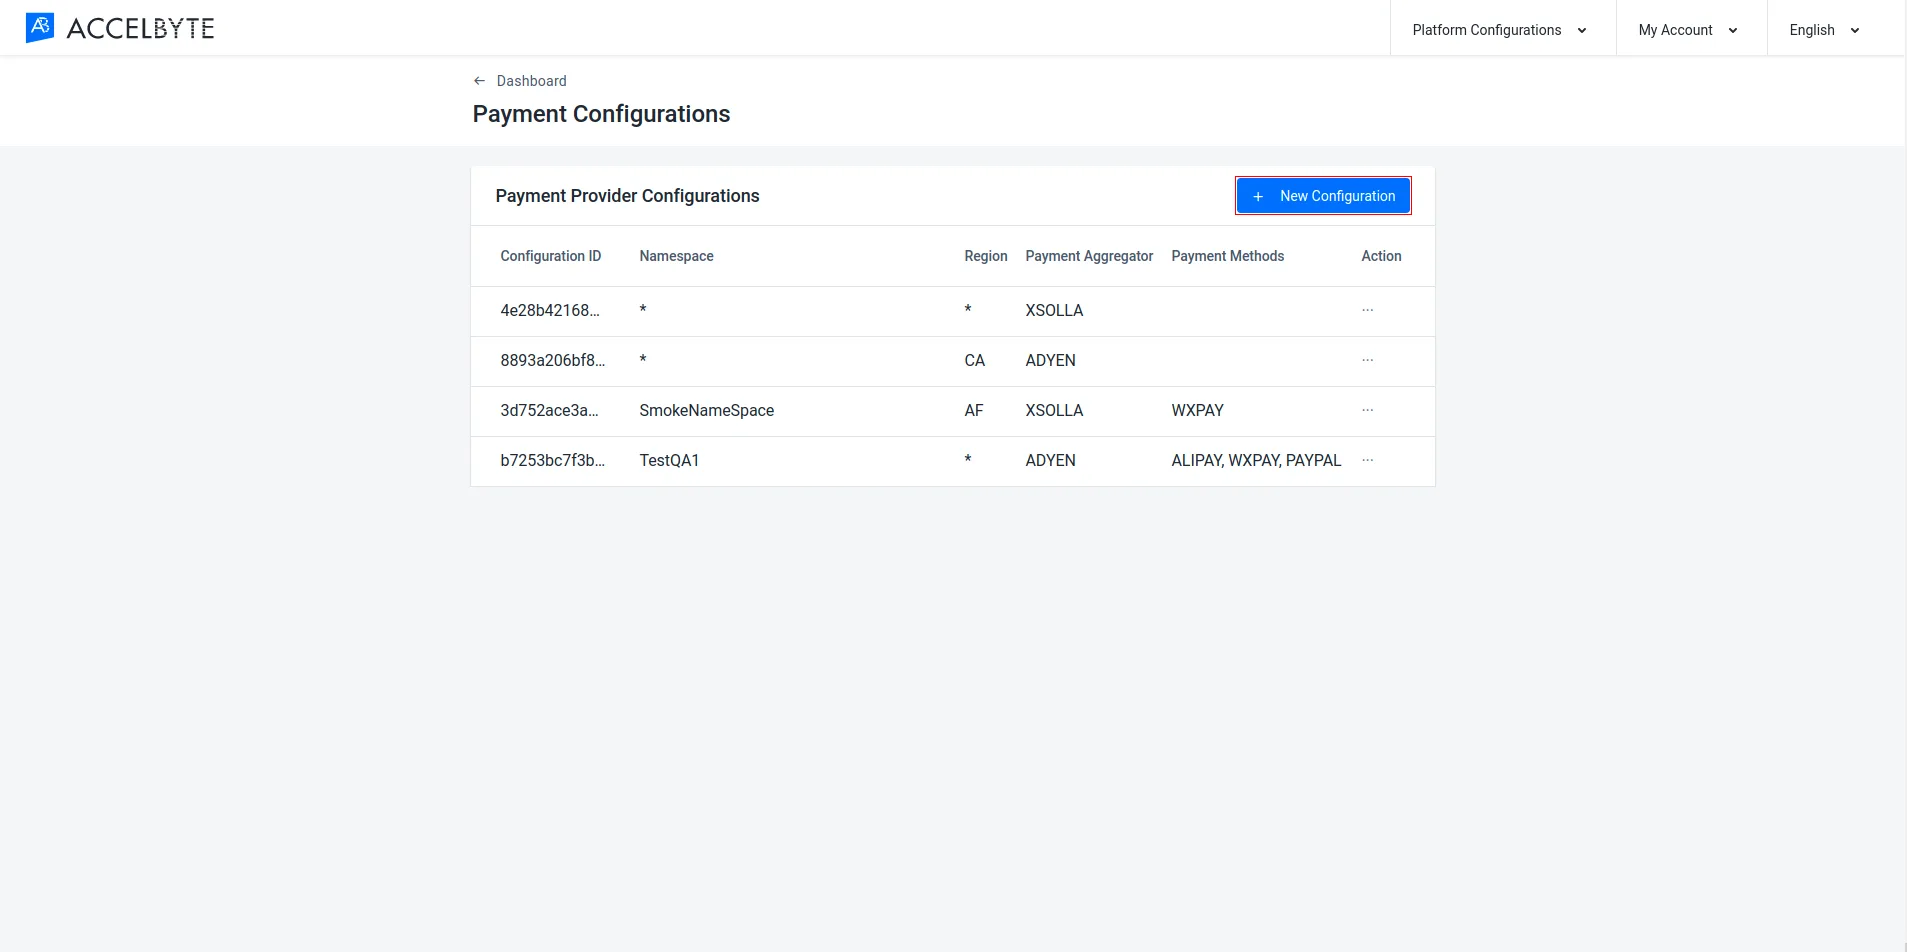
In your publisher namespace, go to Online > Wallets & Payment > Payment Configurations.
-
Click on the New Configuration button.
-
Fill in the required information.
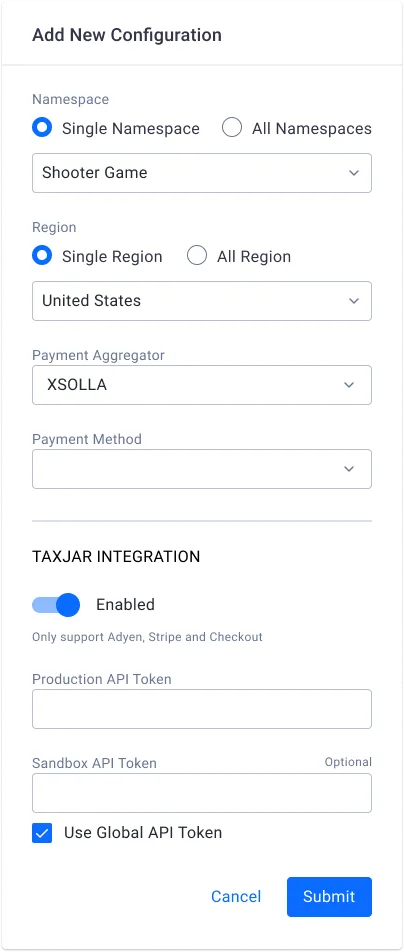
- Select the Namespace for the payment configuration. You can select all namespaces if desired.
- Select the Region for the payment configuration. You can select all regions if desired.
- Select Xsolla from the Payment Aggregator dropdown list.
- You can leave the Payment Methods field empty.
-
Click Submit to continue. You will be redirected to the Payment Configuration page.
-
In the Payment Aggregator section, under the Xsolla tab, fill in the required information.
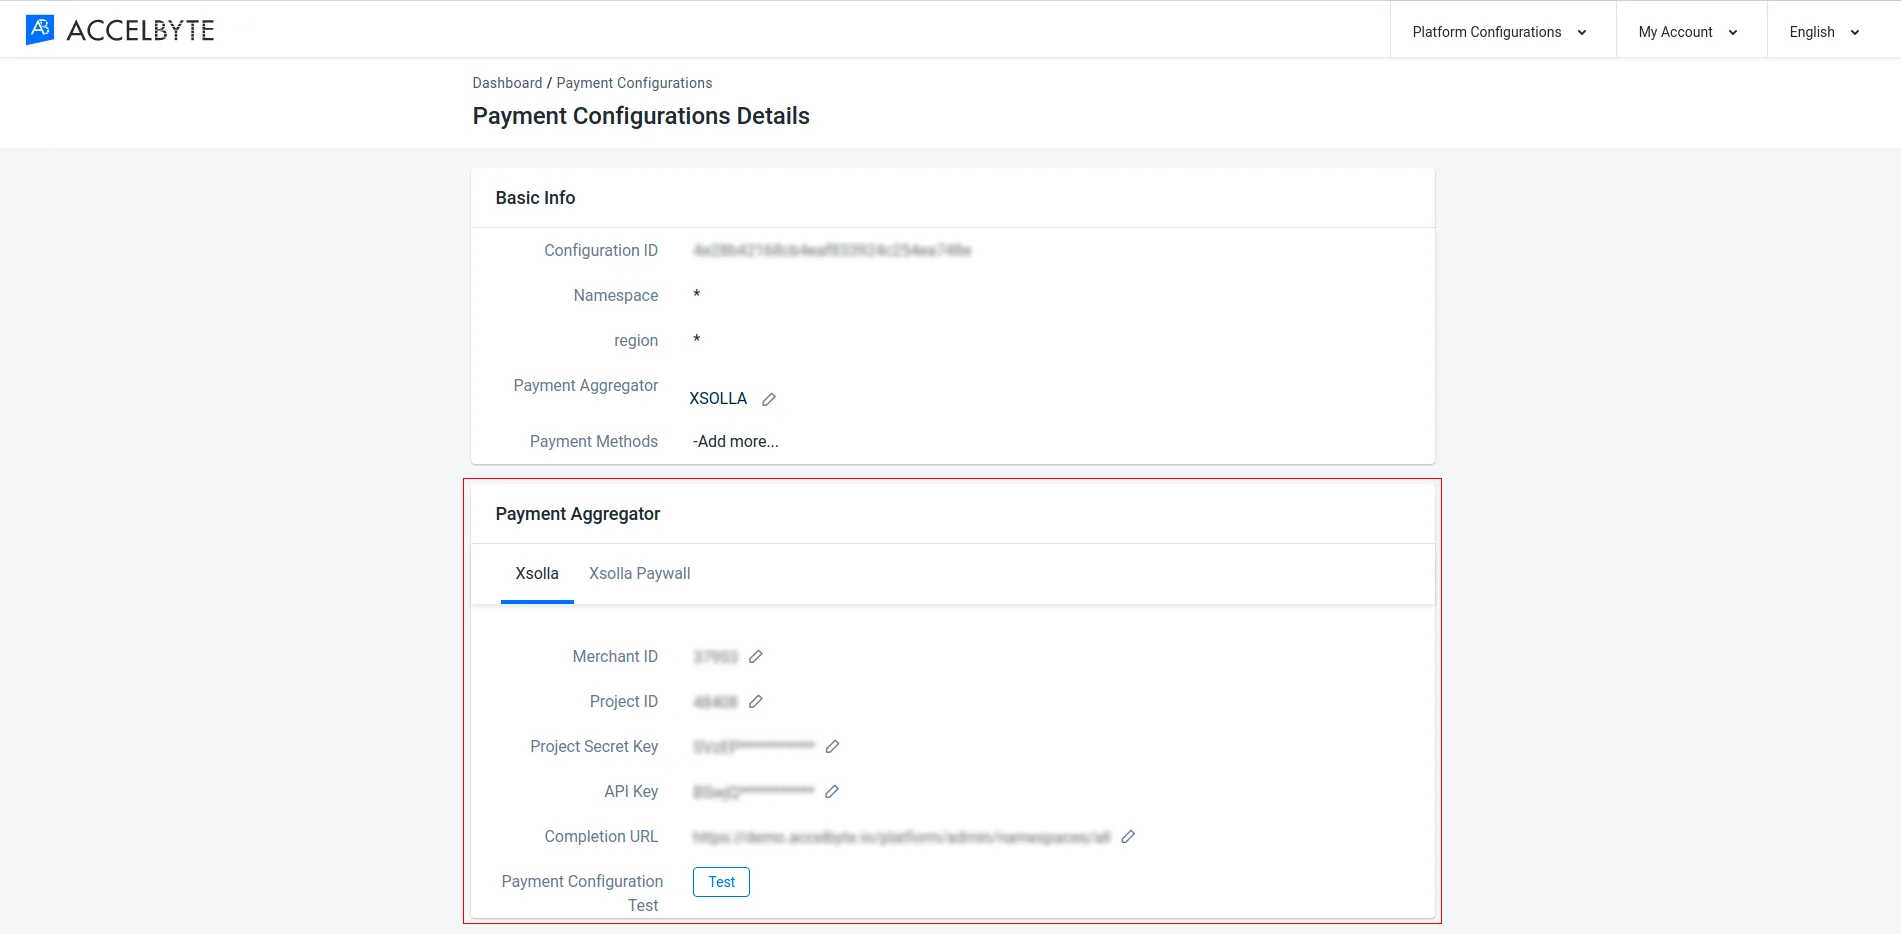
- Input your Xsolla Merchant ID.
- Input your Project ID / Project Number from Xsolla.
- Input your Project Secret Key from Xsolla.
- Input the API Key from Xsolla.
- Input the Completion URL with the appropriate format, as seen below:
- Dev environment:
https://dev.example.accelbyte.io/paymentCallback - Production environment:
https://example.com/paymentCallback
- Dev environment:
-
Click the Test button and make sure you get Xsolla configured correctly notification.

-
Create a JSON file for the payment configuration. Any file name works. This example uses
payment-config.json:{
"namespace": "<YourGameNamespace>",
"region": "<RegionCode>",
"aggregate": "XSOLLA",
"specials": []
}namespace: the namespace for the payment configuration. Use*for all namespaces.region: the region for the payment configuration. Use*for all regions.specials: the payment methods. Leave it as[]to leave Payment Methods empty.
To use TaxJar, see Create a specific tax configuration.
-
Create the payment configuration:
ags platform payment-config create-provider --json @payment-config.jsonIn the output, copy the
paymentMerchantConfigIdvalue. You need it in the next steps. -
Create a JSON file with your Xsolla settings. This example uses
xsolla-config.json:{
"merchantId": 0,
"projectId": 0,
"projectSecretKey": "<ProjectSecretKey>",
"apiKey": "<XsollaApiKey>",
"flowCompletionUrl": "https://example.com/paymentCallback"
}merchantIdandprojectId: numbers. Replace0with your Xsolla Merchant ID and Project ID.flowCompletionUrl: the Completion URL. For a dev environment, use the formathttps://dev.example.accelbyte.io/paymentCallback.
-
Save the settings. Replace
<PaymentMerchantConfigId>with the value from step 2:ags platform payment-config update-xsolla --id <PaymentMerchantConfigId> --json @xsolla-config.jsonAfter the command runs, delete the file, because it contains secrets.
-
Test the configuration. A successful result means Xsolla is configured correctly:
ags platform payment-config check-xsolla-by-id --id <PaymentMerchantConfigId>
Stripe
- Admin Portal
- AGS CLI
-
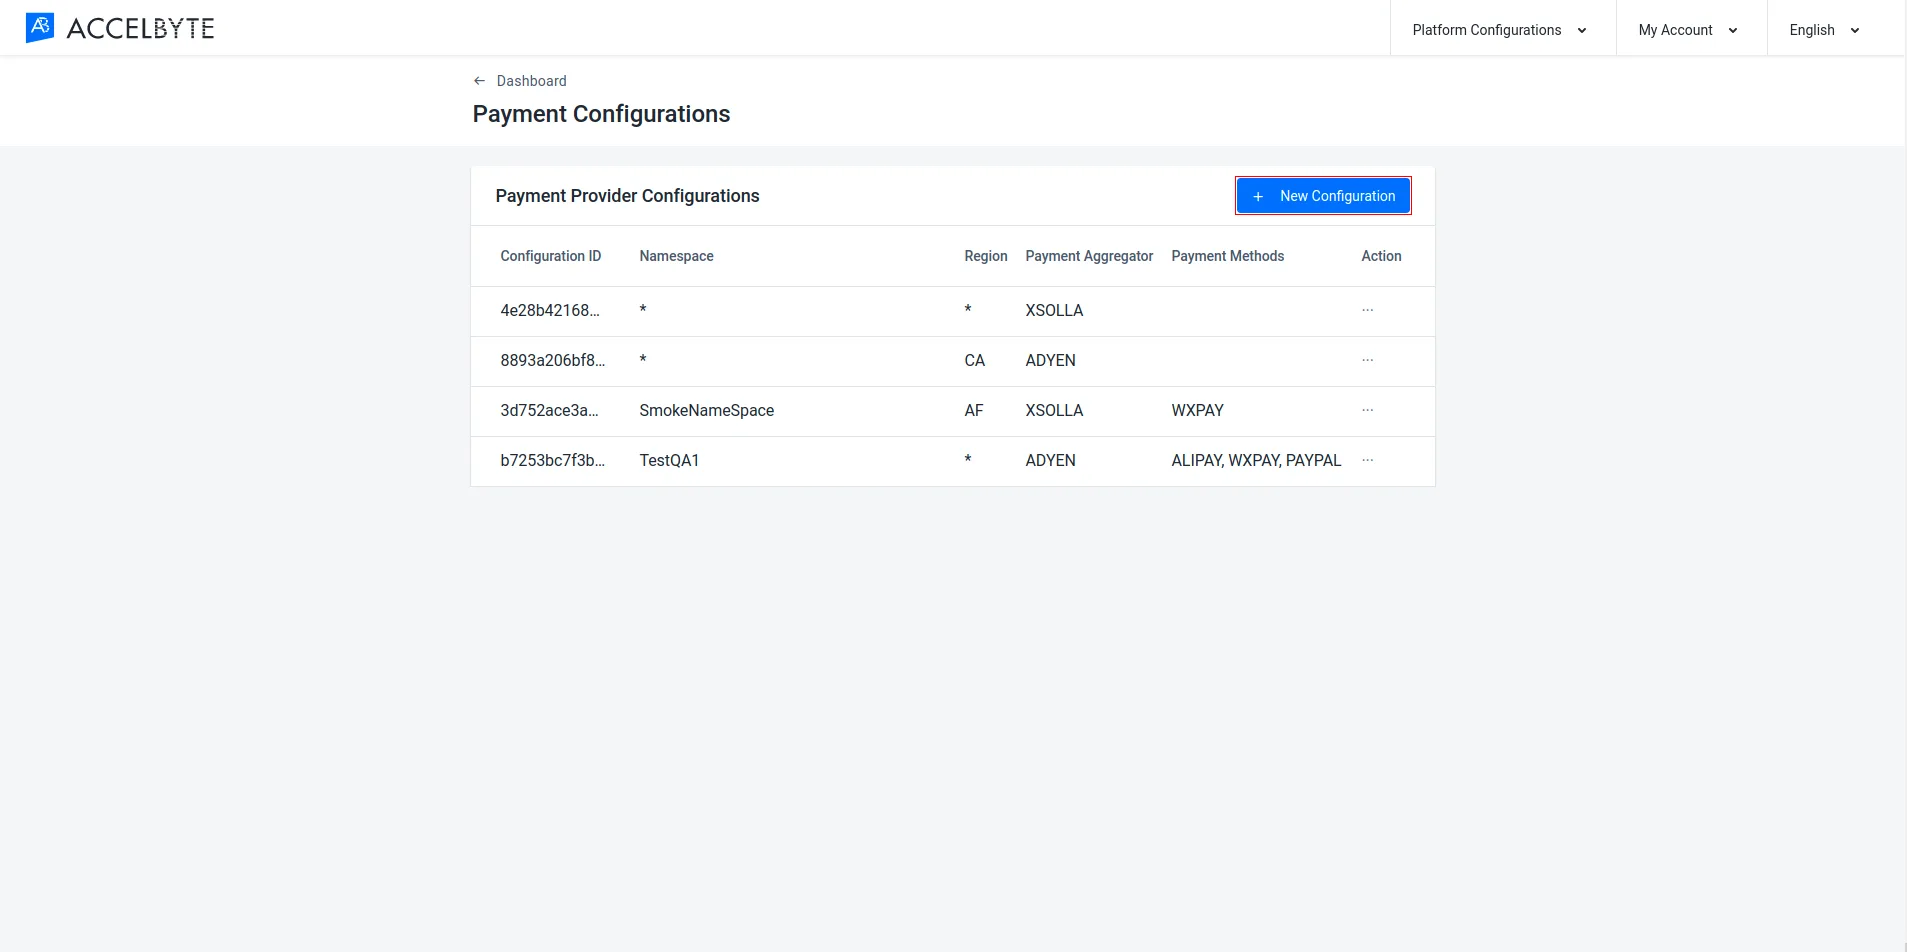
In your publisher namespace, go to Online > Wallets & Payment > Payment Configurations.
-
Click on the New Configuration button.
-
Fill in the required fields.
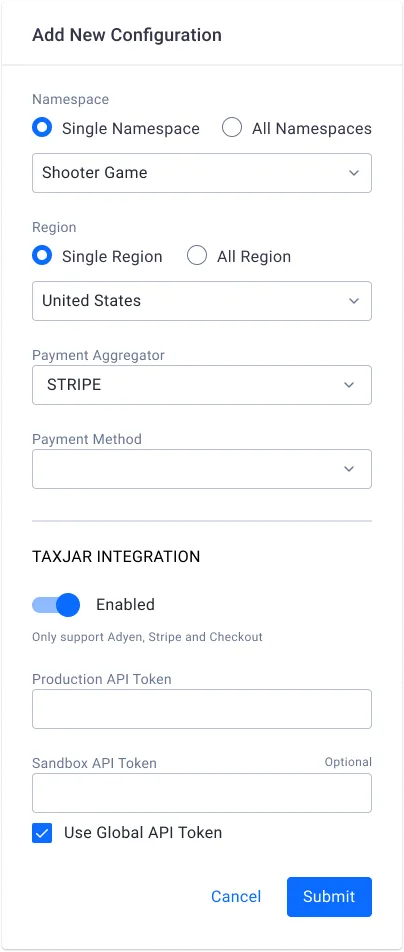
- Select the Namespace for the payment configuration. You can select all namespaces if desired.
- Select the Region for the payment configuration. You can select all regions if desired.
- Select Stripe from the Payment Aggregator dropdown list.
- You can leave the Payment Methods field empty.
- If you want to use TaxJar, enable the TaxJar Integration option. The Production and Sandbox API Token fields will fill automatically based on your global TaxJar configuration if one exists. Change the Production API Token value to the token from the TaxJar account you want to use for this namespace. You can choose to use the global Sandbox API Token, or use your own.
When you're done, click the Submit button and you will be redirected to the Payment Configuration page.
-
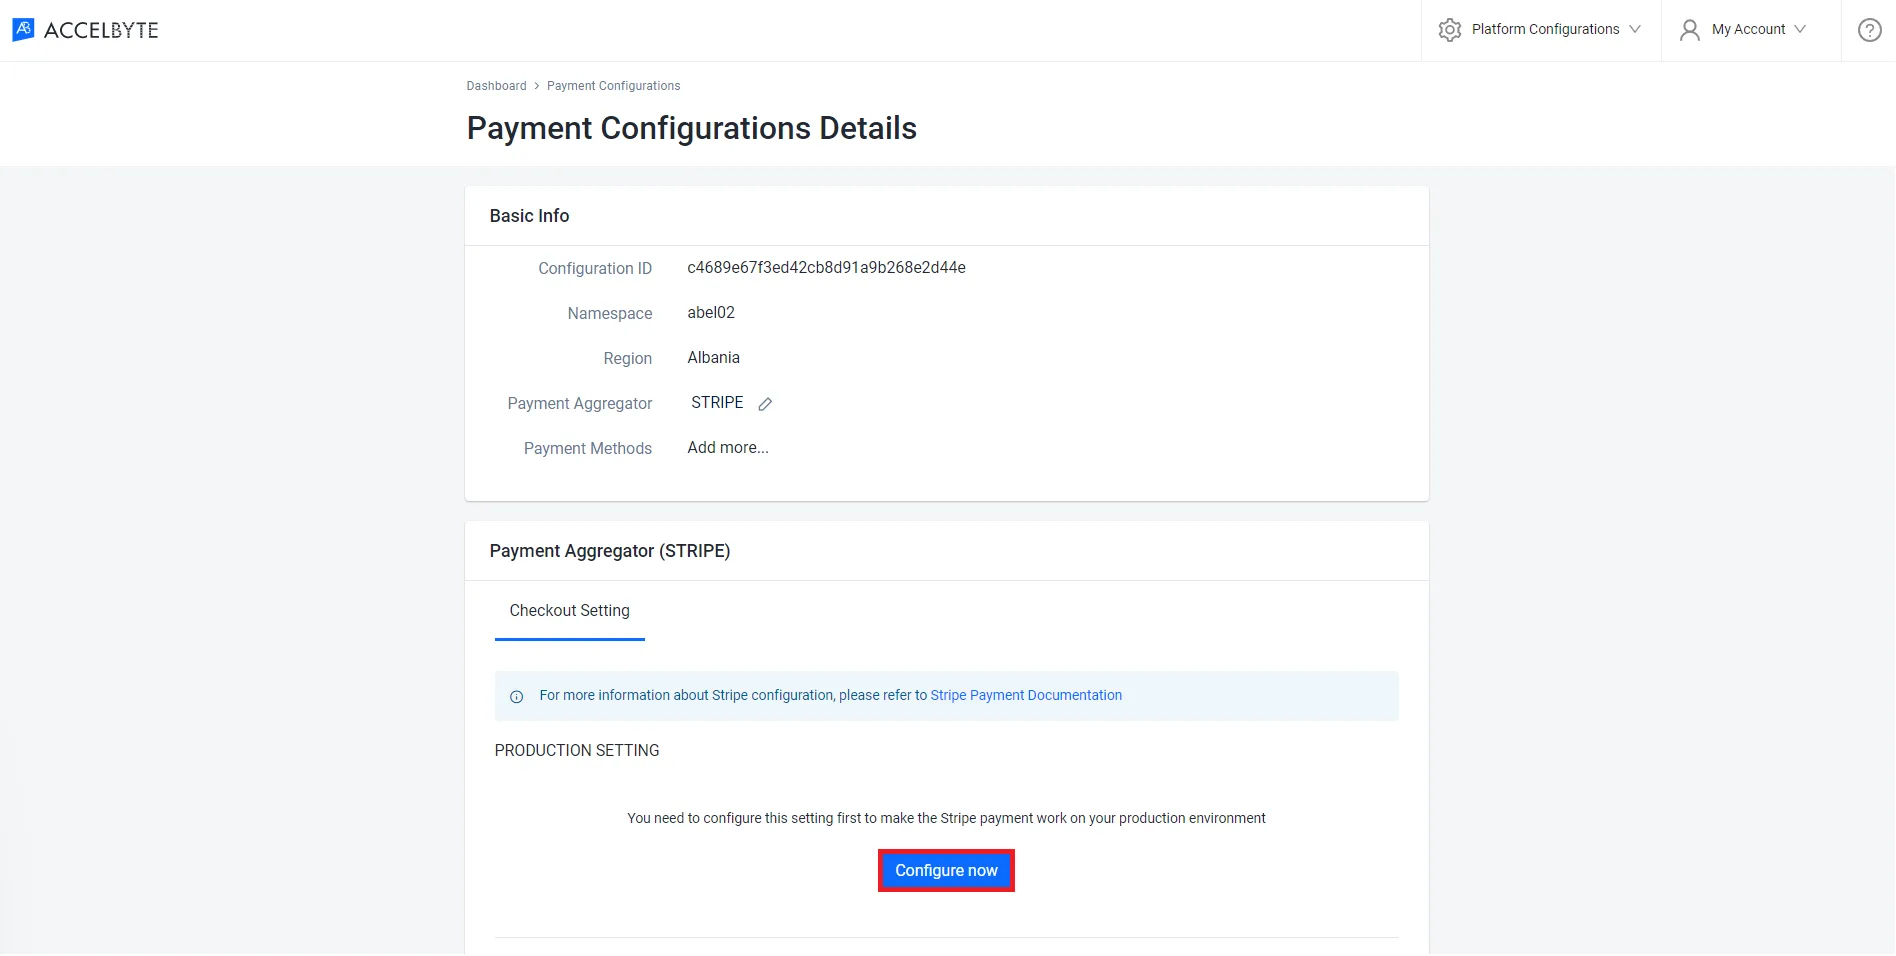
In the Payment Aggregator section, click Configure Now.
-
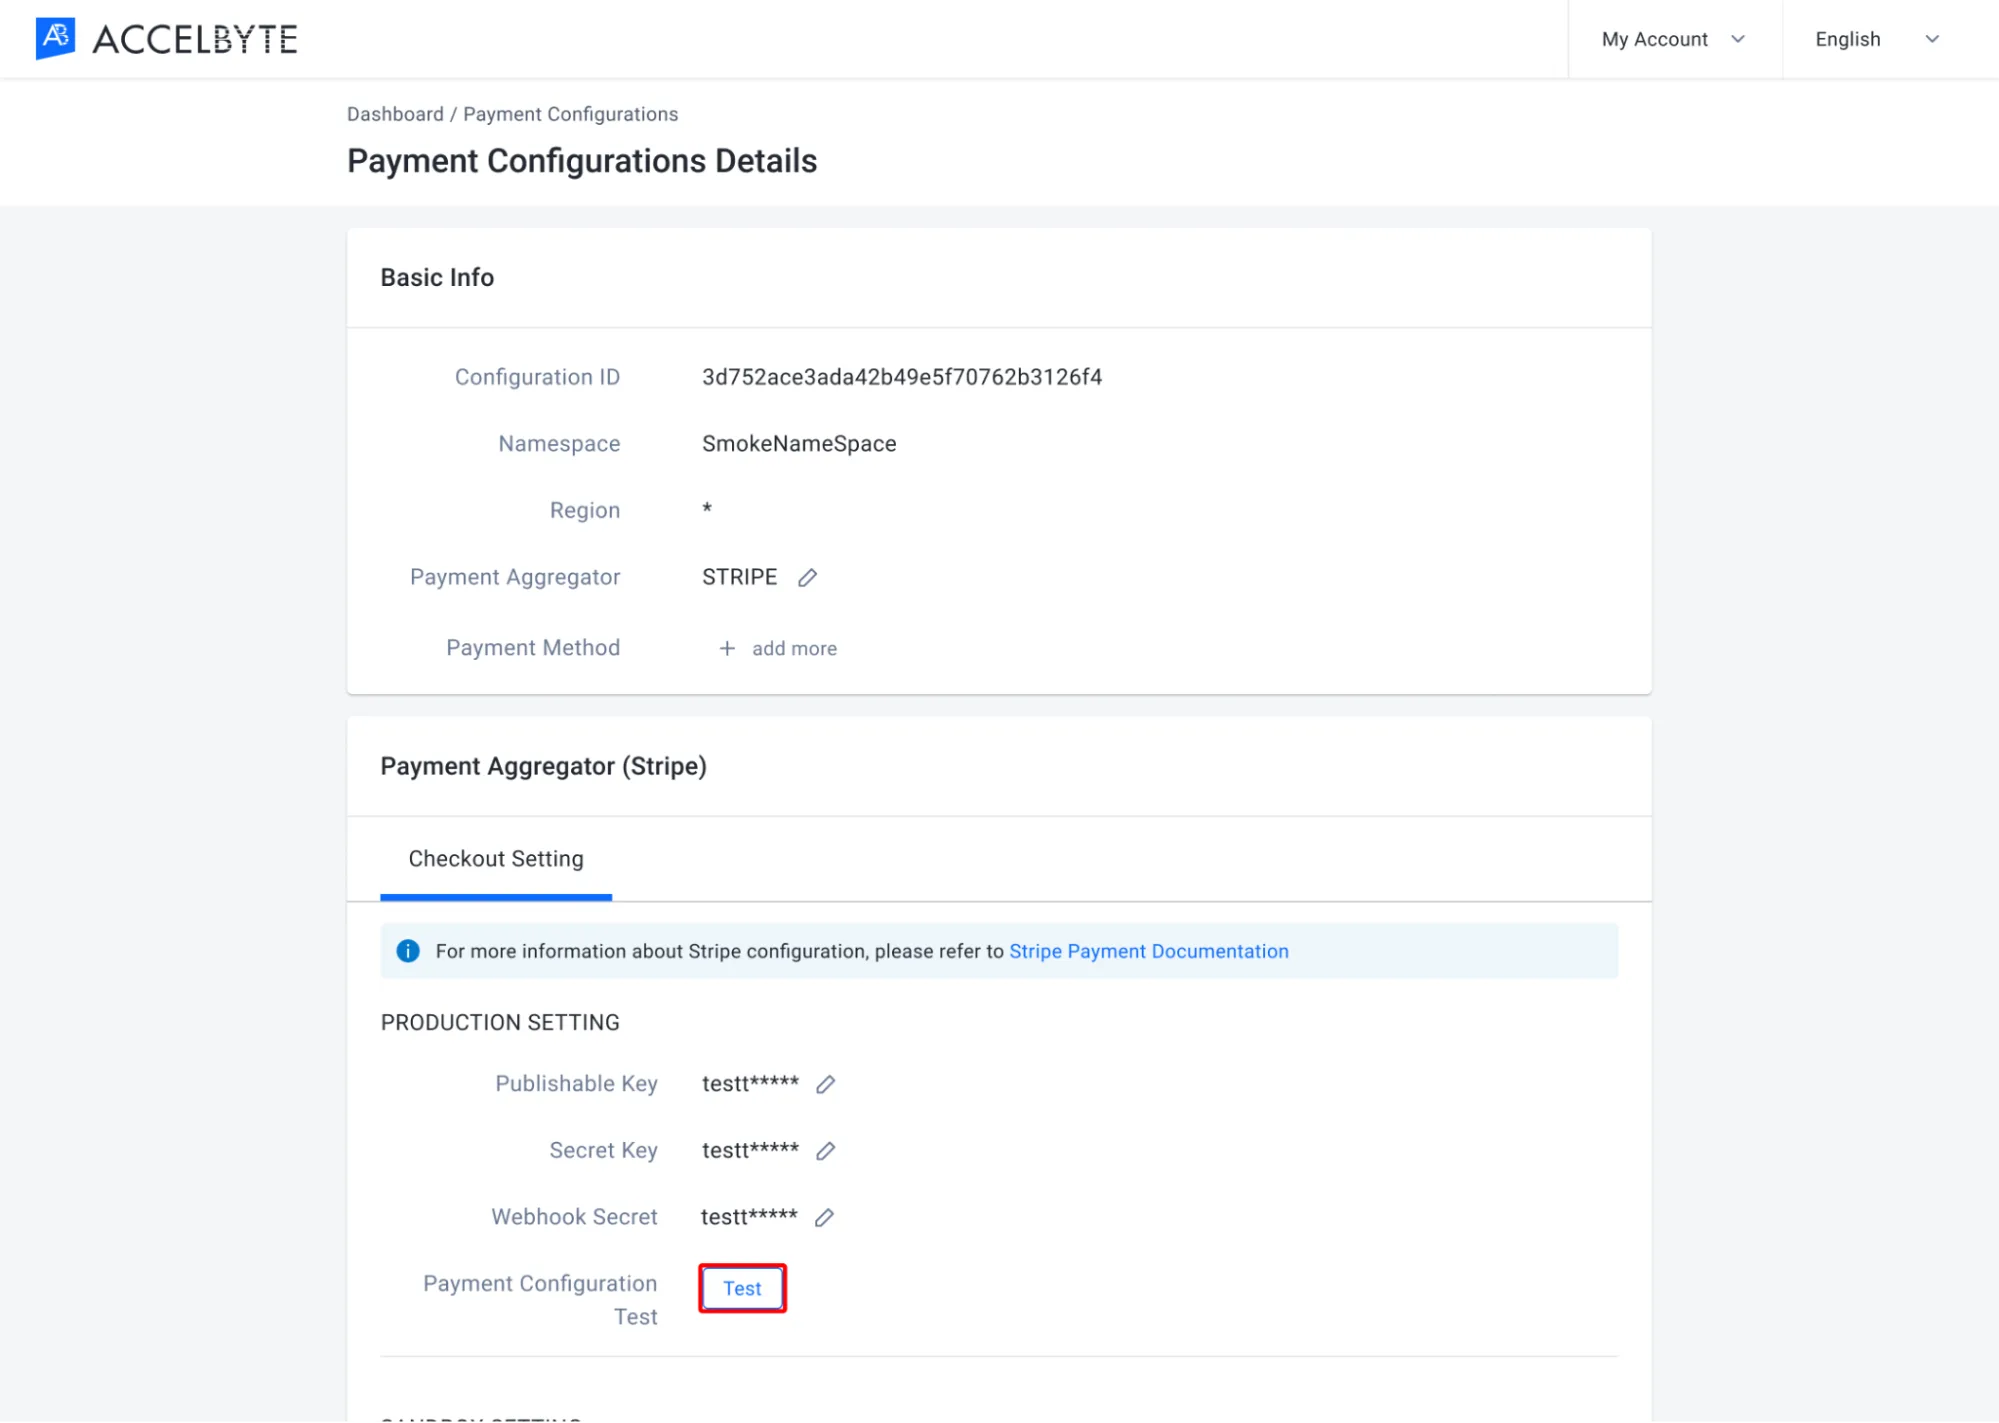
Fill in the required fields.
- Input the Publishable Key field with the key you received from the Stripe dashboard.
- Input the Secret Key field with the key you received from the Stripe dashboard.
- Input the Webhook Secret field with the secret you received from the Stripe dashboard.

-
Click the Test button and make sure you receive a notification that Stripe has been configured correctly.
-
Create a JSON file for the payment configuration. Any file name works. This example uses
payment-config.json:{
"namespace": "<YourGameNamespace>",
"region": "<RegionCode>",
"aggregate": "STRIPE",
"specials": []
}namespace: the namespace for the payment configuration. Use*for all namespaces.region: the region for the payment configuration. Use*for all regions.specials: the payment methods. Leave it as[]to leave Payment Methods empty.
To use TaxJar, see Create a specific tax configuration.
-
Create the payment configuration:
ags platform payment-config create-provider --json @payment-config.jsonIn the output, copy the
paymentMerchantConfigIdvalue. You need it in the next steps. -
Create a JSON file with your Stripe settings. This example uses
stripe-config.json:{
"publishableKey": "<PublishableKey>",
"secretKey": "<SecretKey>",
"webhookSecret": "<WebhookSecret>"
} -
Save the settings. Replace
<PaymentMerchantConfigId>with the value from step 2:ags platform payment-config update-stripe --id <PaymentMerchantConfigId> --sandbox false --json @stripe-config.jsonUse
--sandbox falsefor the production environment. Use--sandbox truefor the sandbox environment. The default istrue.After the command runs, delete the file, because it contains secrets.
-
Test the configuration. Use the same
--sandboxvalue as in step 4:ags platform payment-config check-stripe-by-id --id <PaymentMerchantConfigId> --sandbox false
Checkout
- Admin Portal
- AGS CLI
-
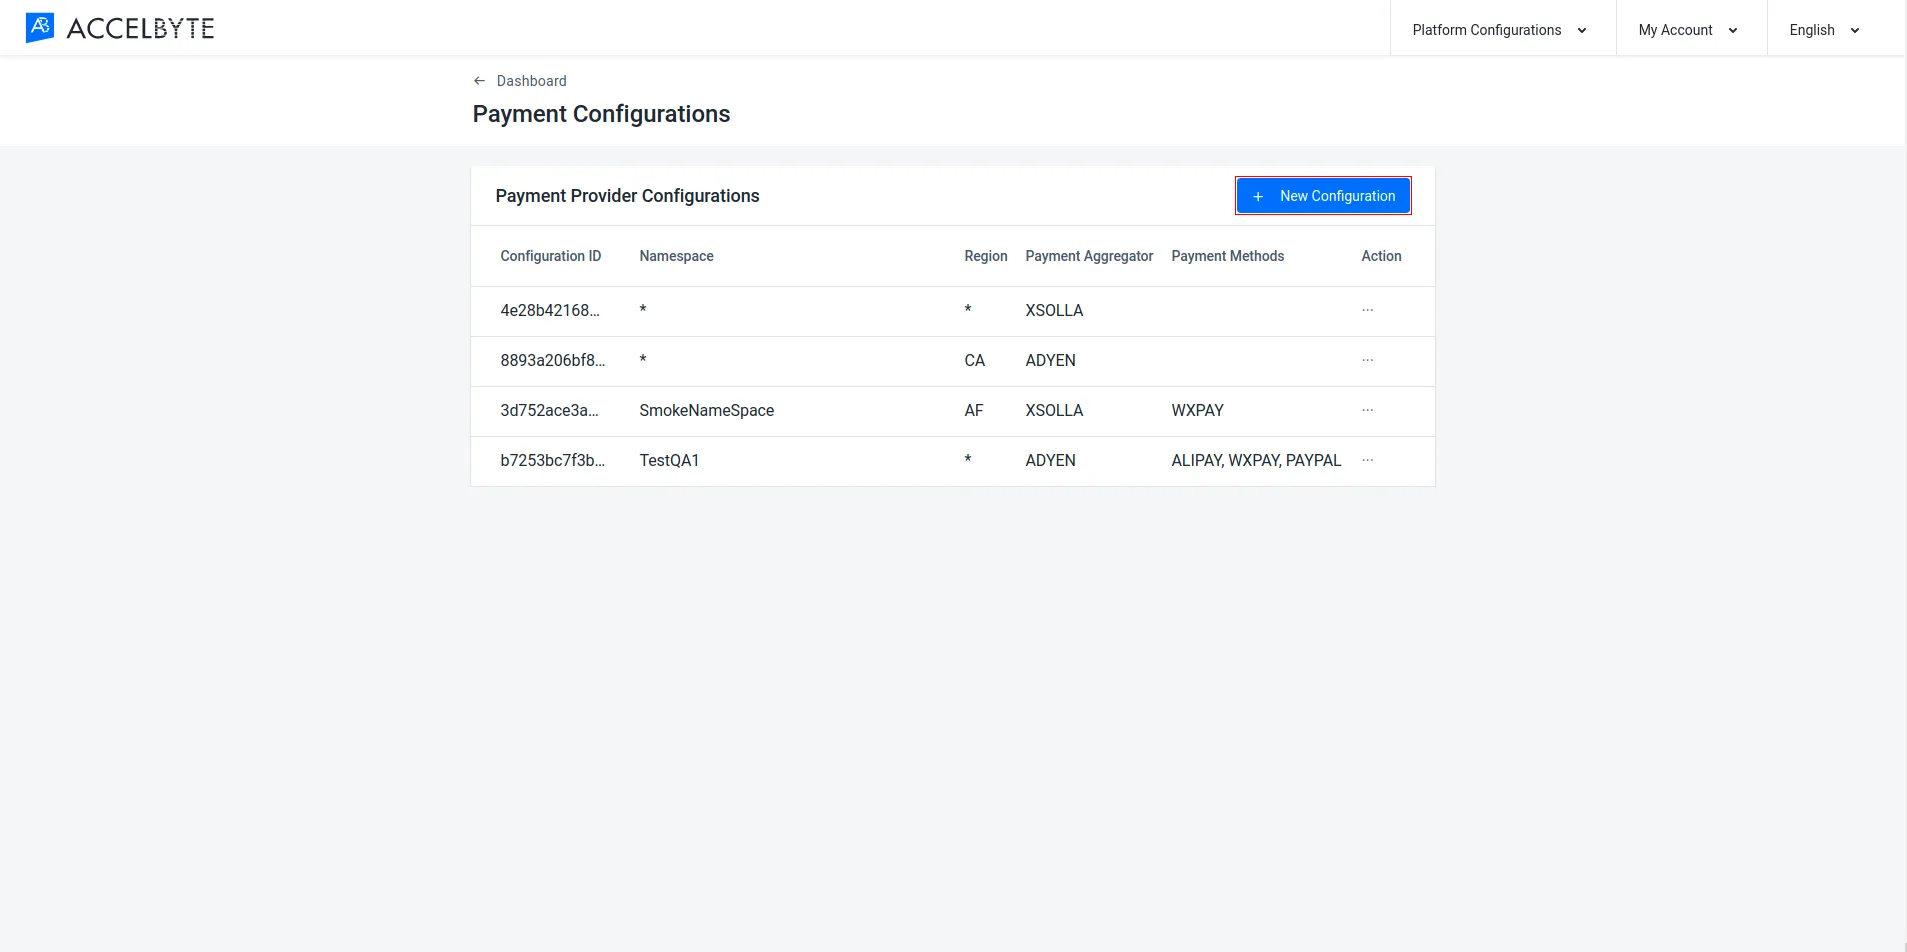
In your publisher namespace, go to Online > Wallets & Payment > Payment Configurations.
-
Click on the New Configuration button.
-
Fill in the required fields.
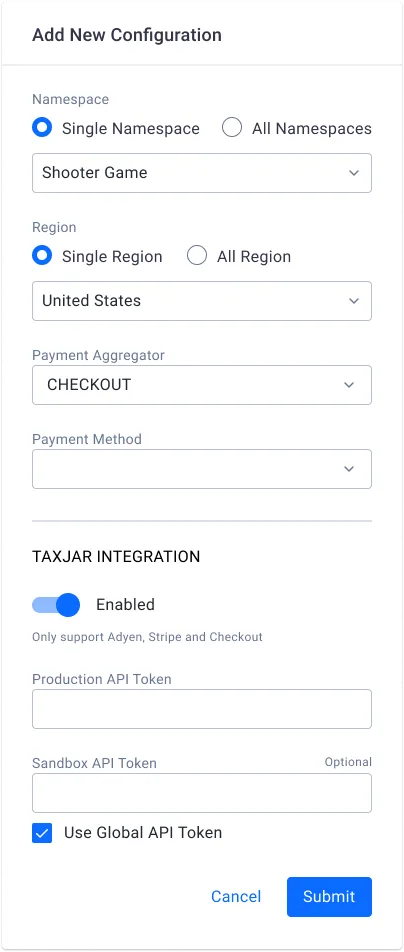
- Select the Namespace for the payment configuration. You can select all namespaces if desired.
- Select the Region for the payment configuration. You can select all regions if desired.
- Select Checkout from the Payment Aggregator dropdown list.
- You can leave the Payment Methods field empty.
- If you want to use TaxJar, enable the TaxJar Integration option. The Production and Sandbox API Token fields will fill automatically based on your global TaxJar configuration if one exists. Change the Production API Token value to the token from the TaxJar account you want to use for this namespace. You can choose to use the global Sandbox API Token, or use your own.
-
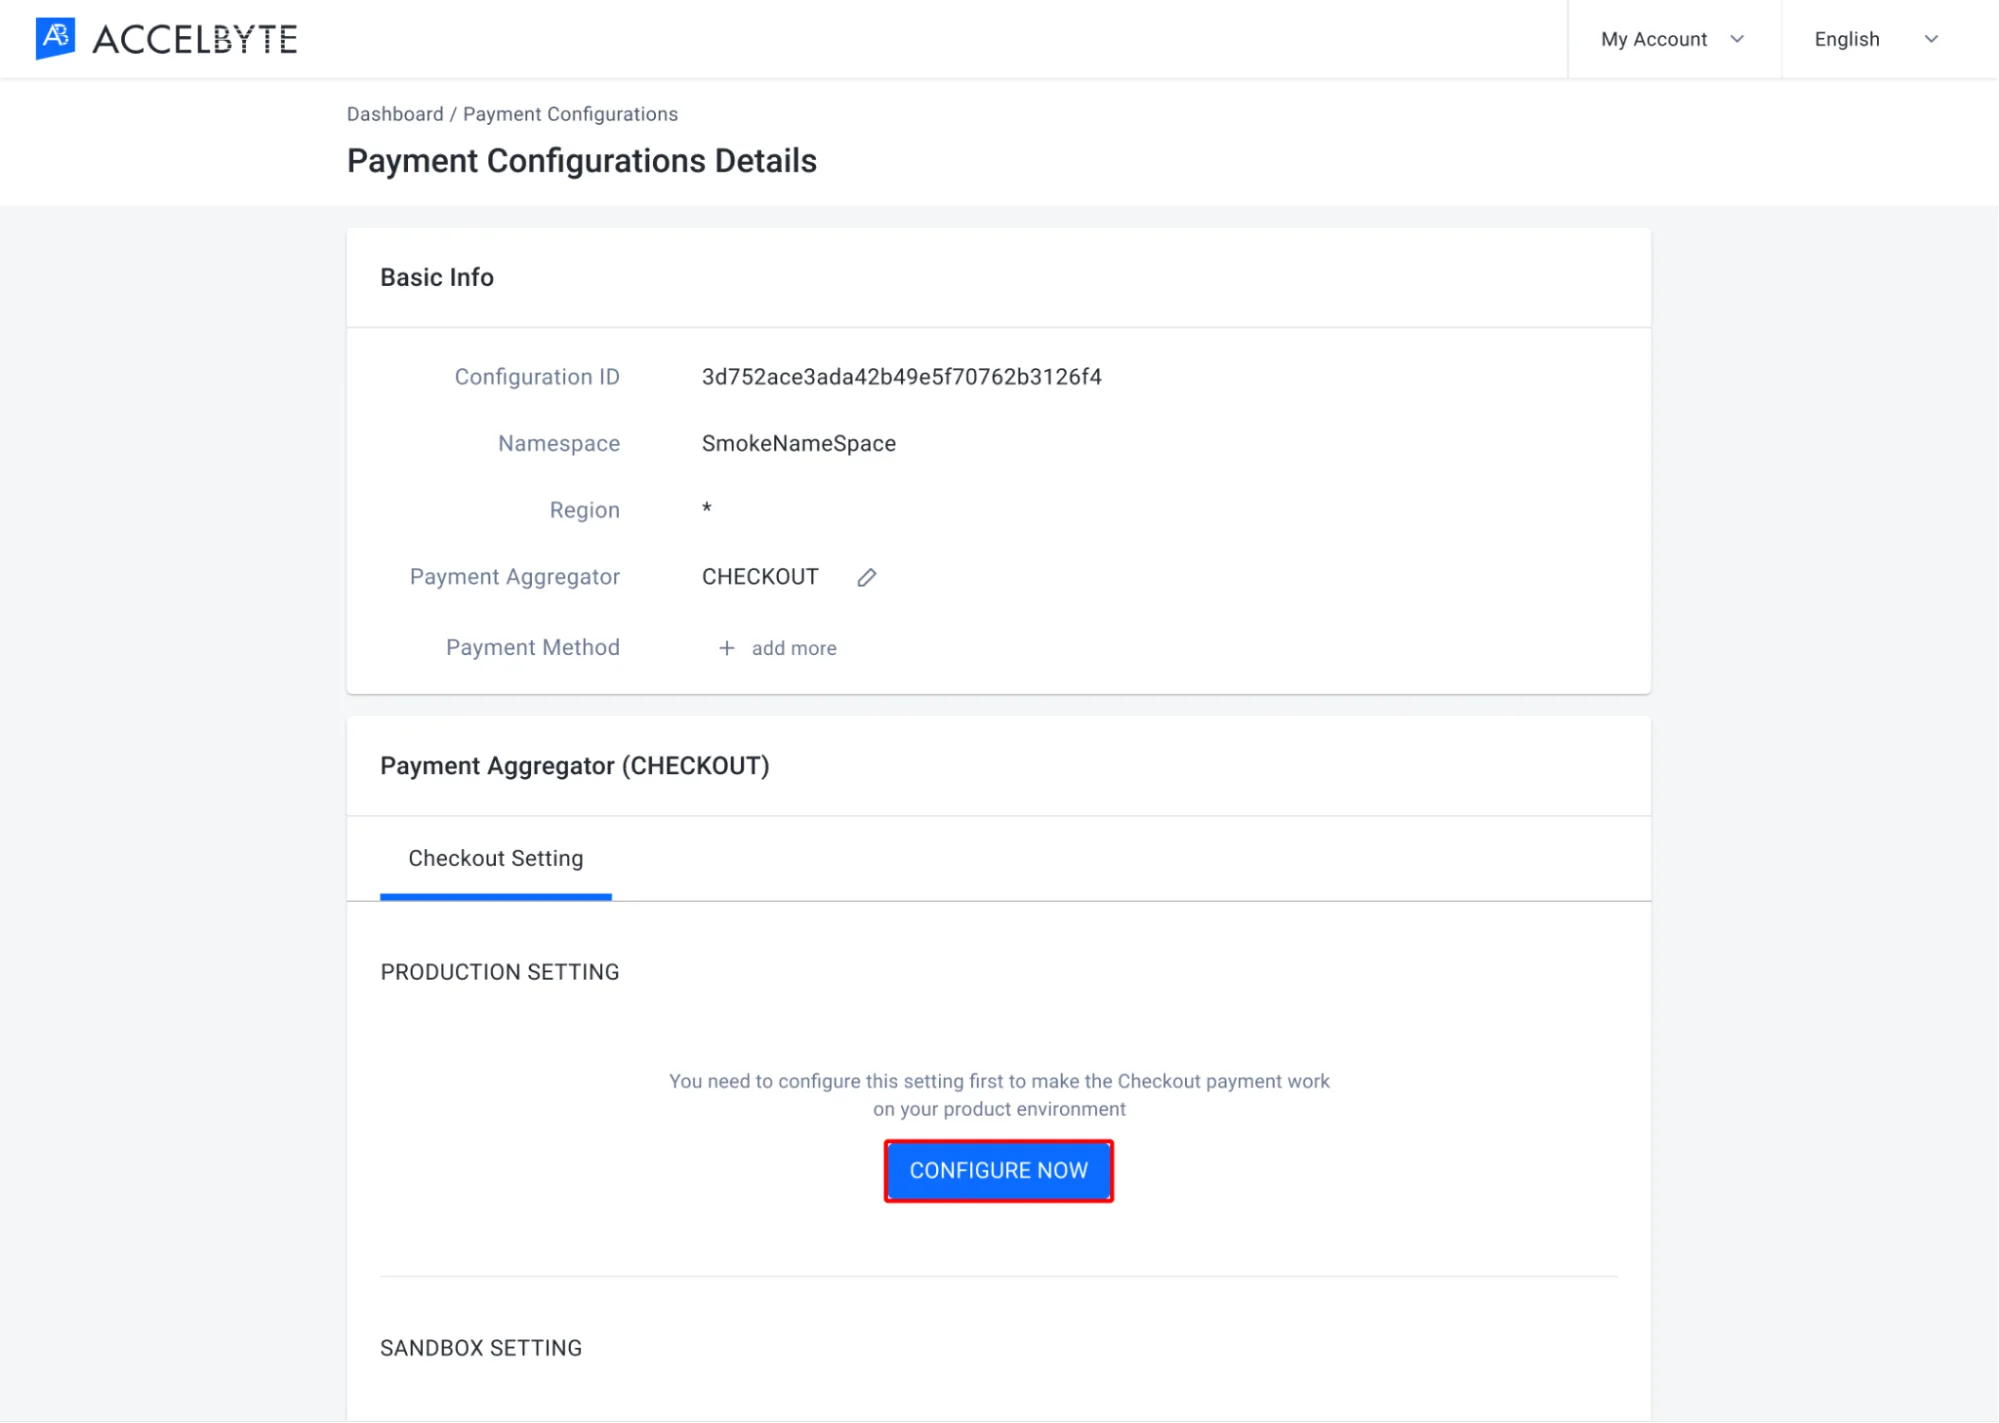
In the Payment Aggregator section, click the Configure Now button.
-
A configuration form appears. Fill in the required information.
- Input the Public Key from checkout.com.
- Input the Secret Key from checkout.com.
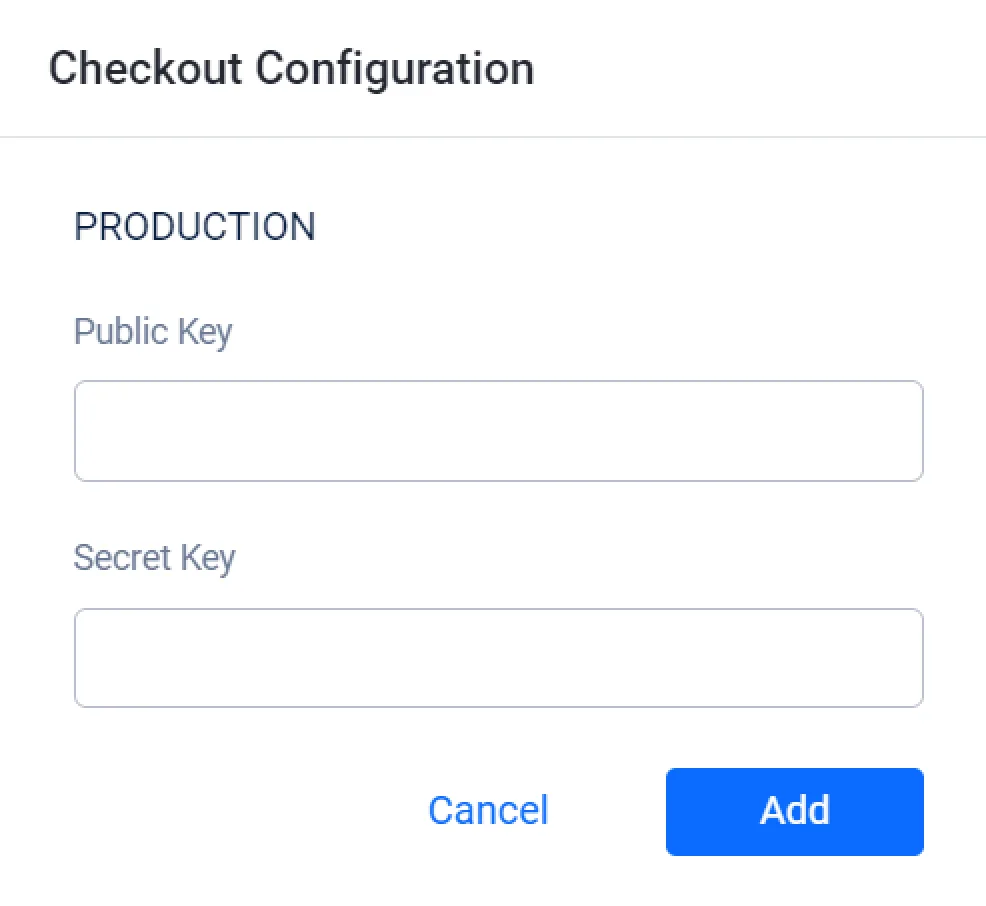
After entering the payment configuration, you'll be directed to the Payment Configuration Details. You can click the Test button to make sure that your payment aggregator configuration is working.

-
Create a JSON file for the payment configuration. Any file name works. This example uses
payment-config.json:{
"namespace": "<YourGameNamespace>",
"region": "<RegionCode>",
"aggregate": "CHECKOUT",
"specials": []
}namespace: the namespace for the payment configuration. Use*for all namespaces.region: the region for the payment configuration. Use*for all regions.specials: the payment methods. Leave it as[]to leave Payment Methods empty.
To use TaxJar, see Create a specific tax configuration.
-
Create the payment configuration:
ags platform payment-config create-provider --json @payment-config.jsonIn the output, copy the
paymentMerchantConfigIdvalue. You need it in the next steps. -
Create a JSON file with your checkout.com settings. This example uses
checkout-config.json:{
"publicKey": "<PublicKey>",
"secretKey": "<SecretKey>"
} -
Save the settings. Replace
<PaymentMerchantConfigId>with the value from step 2:ags platform payment-config update-checkout --id <PaymentMerchantConfigId> --sandbox false --json @checkout-config.jsonUse
--sandbox falsefor the production environment. Use--sandbox truefor the sandbox environment. The default istrue.After the command runs, delete the file, because it contains secrets.
-
Test the configuration. Use the same
--sandboxvalue as in step 4:ags platform payment-config check-checkout-by-id --id <PaymentMerchantConfigId> --sandbox false
Neon Pay
Support for the Neon Pay payment configuration is still in beta phase.
- Admin Portal
- AGS CLI
-
In your publisher namespace, go to Online > Wallets & Payment > Payment Configurations.
-
On the Payment Configurations page, click on the + New Configuration button.
-
On the Add New Configuration form, fill in the required information:
- Select the game namespace in which the payment configuration will be available. The All Namespaces option is also available if you want to apply the payment configuration to all your game namespaces.
- Select the applicable region for the payment configuration. The All Regions option is also available if you want to apply the payment method to all regions.
- From the Payment Aggregator dropdown, select NEONPAY.
- In the Payment Methods field, select the applicable payment method. This can be left blank.
-
Click Submit to continue. The details page of the Neon Pay payment method appears.
-
In the Payment Aggregator section, under the Neonpay Setting tab, you have the option to configure your setting for your production environment and for your testing (sandbox) environment. Click on the Configure now button for the environment you want to set up. On the pop-up, add your API key and your Webhook Secret Key from Neon Pay. Then, click Add.
-
Click on the Test button to test your Neon Pay setting. AGS displays a notification at the top-right section of the page that will show whether your configuration is correct or not.
-
Create a JSON file for the payment configuration. Any file name works. This example uses
payment-config.json:{
"namespace": "<YourGameNamespace>",
"region": "<RegionCode>",
"aggregate": "NEONPAY",
"specials": []
}namespace: the namespace for the payment configuration. Use*for all namespaces.region: the region for the payment configuration. Use*for all regions.specials: the payment methods. Leave it as[]to leave Payment Methods empty.
To use TaxJar, see Create a specific tax configuration.
-
Create the payment configuration:
ags platform payment-config create-provider --json @payment-config.jsonIn the output, copy the
paymentMerchantConfigIdvalue. You need it in the next steps. -
Create a JSON file with your Neon Pay settings. This example uses
neonpay-config.json:{
"apiKey": "<NeonPayApiKey>",
"webhookSecretKey": "<NeonPayWebhookSecretKey>"
} -
Save the settings for the environment you want to set up. Replace
<PaymentMerchantConfigId>with the value from step 2:ags platform payment-config update-neonpay --id <PaymentMerchantConfigId> --sandbox false --json @neonpay-config.jsonUse
--sandbox falsefor the production environment. Use--sandbox truefor the sandbox environment. The default istrue.After the command runs, delete the file, because it contains secrets.
-
Test the configuration. Use the same
--sandboxvalue as in step 4:ags platform payment-config check-neonpay-by-id --id <PaymentMerchantConfigId> --sandbox false
Manage your payment methods
After you've configured your payment aggregator, you can also configure the payment methods you support.
- Admin Portal
- AGS CLI
-
In the Admin Portal, go to Payment Configurations Details and scroll down to the Payment Methods panel.
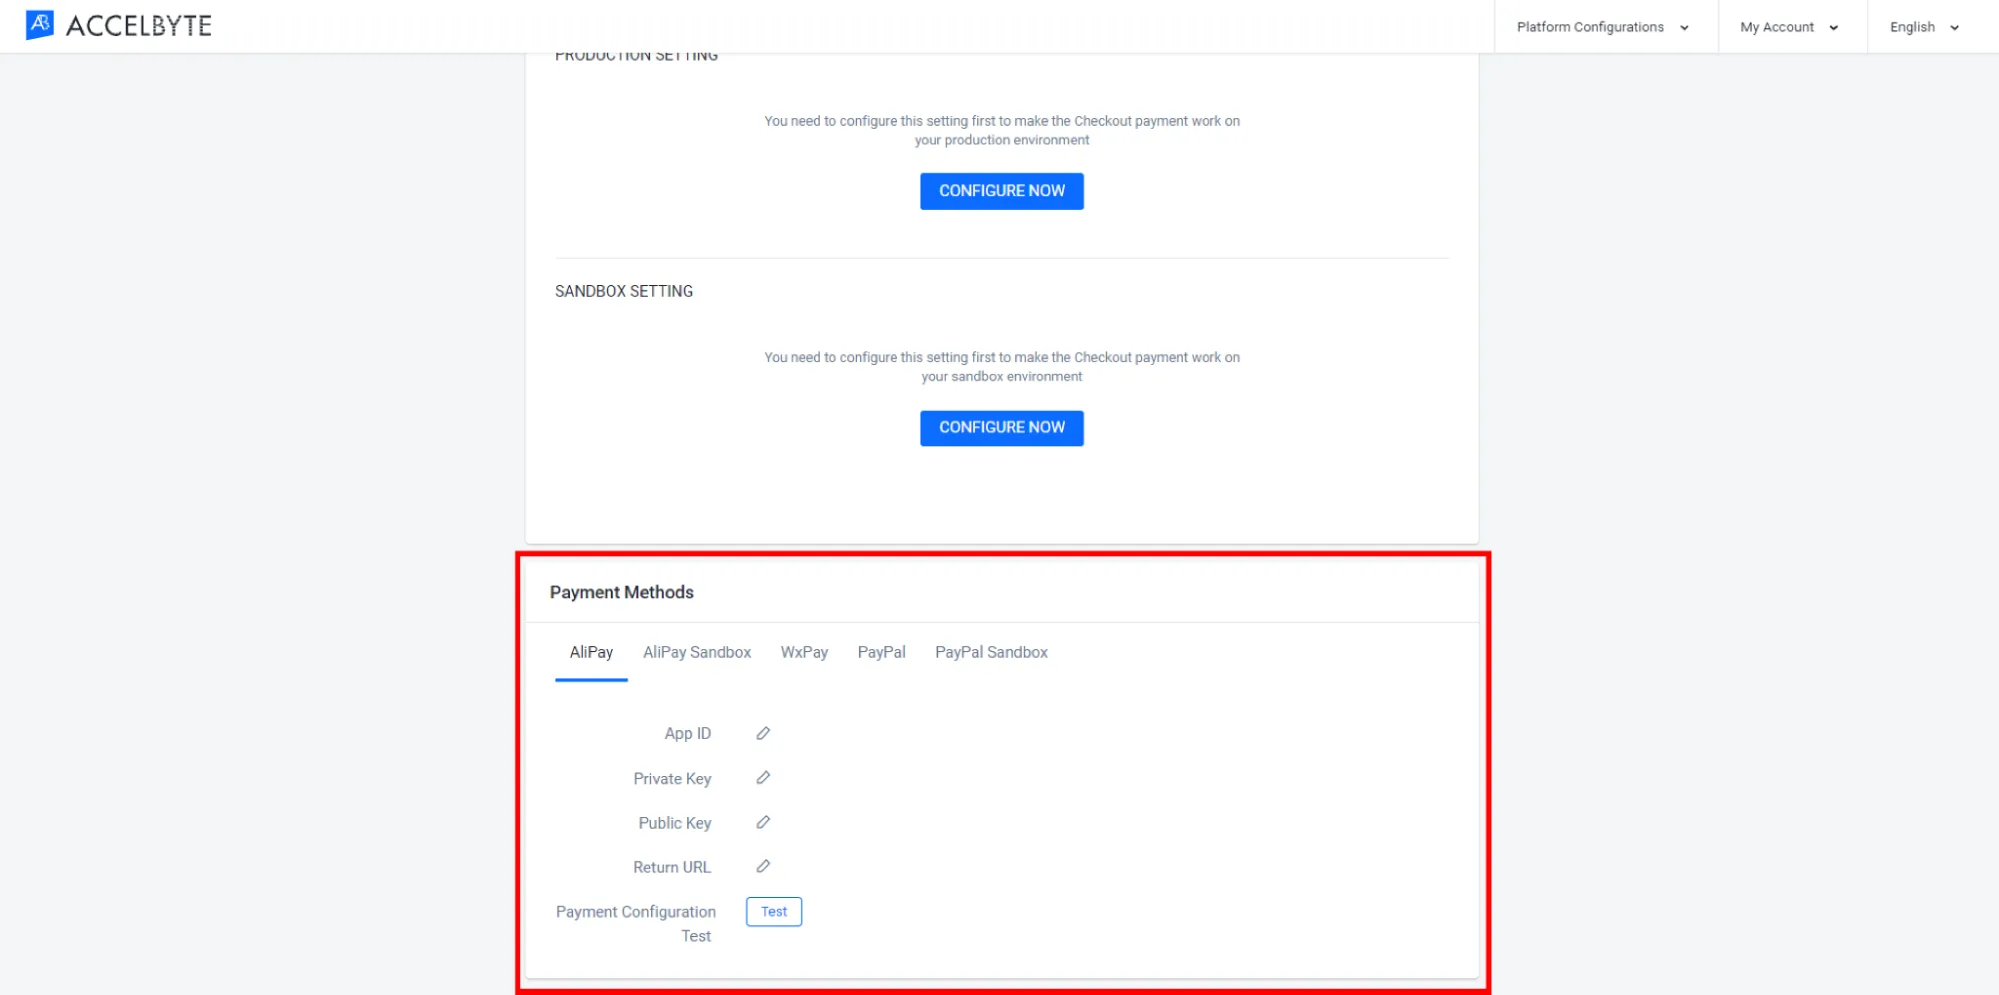
-
In the Payment Methods section, choose your payment method and input the required information.
-
For AliPay:
- Input the App ID from the AliPay platform.
- Input the Private Key.
- Input the Public Key.
- Input the Return URL.
-
For AliPay Sandbox:
- Input the App ID from the AliPay Sandbox platform.
- Input the Private Key.
- Input the Return URL.
- Input the Public Key.
-
For WxPay:
- Input the App ID from the WxPay platform.
- Input the Key.
- Input the MCHID.
- Input the Return URL.
- Upload the Certificate AWS Path by clicking the Upload button and searching for the file on your computer.
- Input the Return URL.
-
For PayPal:
- Input the Client ID from the PayPal platform.
- Input the Client Secret.
- Input the Webhook ID.
- Input the Return URL.
-
For PayPal Sandbox:
- Input the Client ID from the PayPal platform.
- Input the Client Secret.
- Input the Webhook ID.
- Input the Return URL.
-
Once completed, click the Test button to test the payment configuration.
-
Find the ID of the payment merchant configuration. In the output, copy the
paymentMerchantConfigIdof the configuration:ags platform payment-config list-providers --namespace <YourGameNamespace> -
Create a JSON file for your payment method. The fields depend on the payment method:
Payment method Fields AliPay and AliPay Sandbox appId,privateKey,publicKey,returnUrlWxPay appId,key,mchid,returnUrlPayPal and PayPal Sandbox clientID,clientSecret,webHookId,returnUrlFor example, this is
paypal-config.json:{
"clientID": "<PayPalClientId>",
"clientSecret": "<PayPalClientSecret>",
"webHookId": "<PayPalWebhookId>",
"returnUrl": "<ReturnUrl>"
} -
Save the settings with the command for your payment method. Replace
<PaymentMerchantConfigId>with the value from step 1:ags platform payment-config update-alipay --id <PaymentMerchantConfigId> --sandbox false --json @alipay-config.json
ags platform payment-config update-wxpay --id <PaymentMerchantConfigId> --json @wxpay-config.json
ags platform payment-config update-paypal --id <PaymentMerchantConfigId> --sandbox false --json @paypal-config.jsonFor AliPay Sandbox and PayPal Sandbox, use
--sandbox true. The default istrue.After the command runs, delete the file, because it contains secrets.
-
For WxPay, upload the certificate file:
ags platform payment-config update-wxpay-certificate --id <PaymentMerchantConfigId> --file <PathToCertificate> -
Test the payment configuration with the command for your payment method. Use the same
--sandboxvalue as in step 3:ags platform payment-config check-alipay-by-id --id <PaymentMerchantConfigId> --sandbox false
ags platform payment-config check-wxpay-by-id --id <PaymentMerchantConfigId>
ags platform payment-config check-paypal-by-id --id <PaymentMerchantConfigId> --sandbox false
Payment metadata history
You can view detailed payment metadata history in the Admin Portal.
-
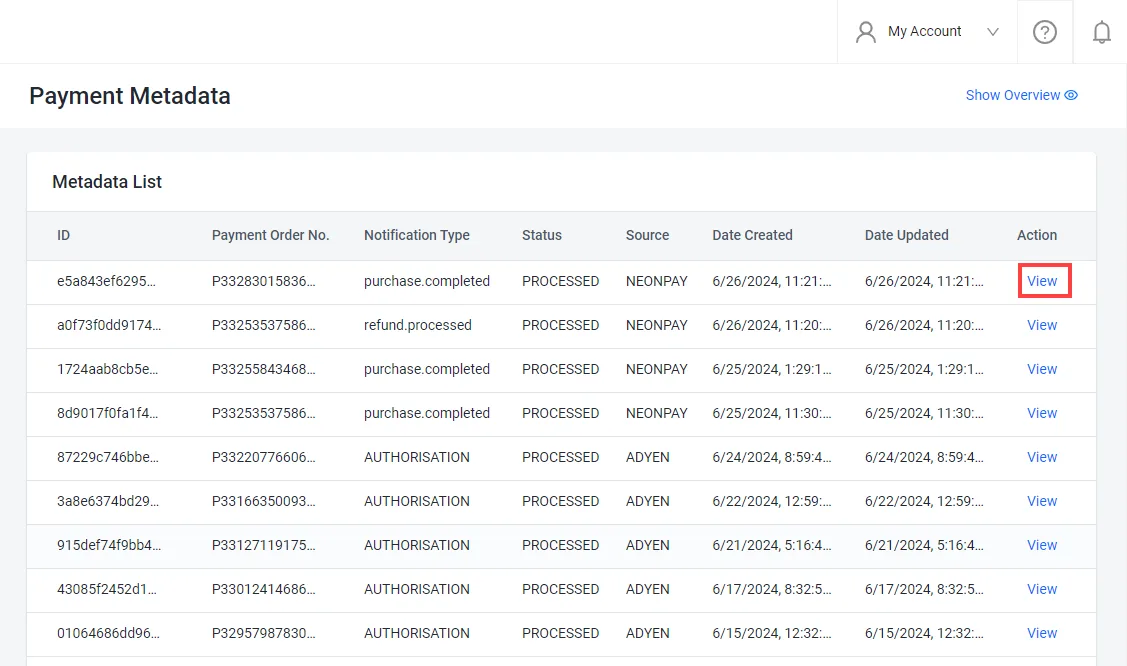
In the Admin Portal, go to the Online > Wallets & Payment > Sales > Payment Metadata.
-
Here you can see a list of all the payment metadata history in your game namespace. To see the details of a specific payment, click View in the Action column of your selected metadata.
-
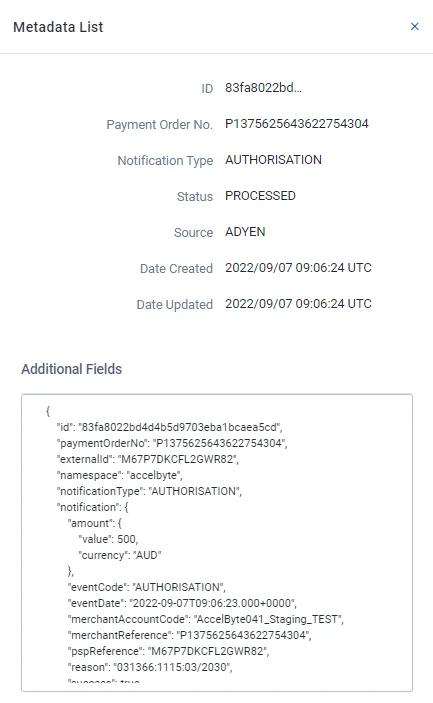
The Metadata List will appear. Here you can see the selected metadata's detailed information.
TaxJar integration
In some countries and regions, sales tax needs to be collected during the sale of digital products. Tax law can differ depending on the state, city, or even the district that the player making the purchase lives in. To comply with all of these different regulations, tax handling services can be used. AGS supports integration with TaxJar, which can be used to automatically calculate and apply sales tax to online purchases.
Integration with TaxJar allows you to configure how sales tax is applied to online purchases. There are two types of configurations that you can create in the Admin Portal:
- Global Configurations apply to all purchases across all namespaces and payment configurations.
- Specific Configurations for TaxJar apply only to a specific payment configuration or a specific game namespace.
This can be used if the publisher and developer of your game have separate TaxJar accounts, or are located in different regions. This way, even if the publisher's TaxJar account is used for the global configuration, online sales made in the game can still use the developer's TaxJar account for sales tax calculation.
For now, TaxJar can only be enabled for online stores published in the United States (US). Follow the tutorials below to create a global or specific TaxJar integration.
Create a global tax configuration
- Admin Portal
- AGS CLI
-
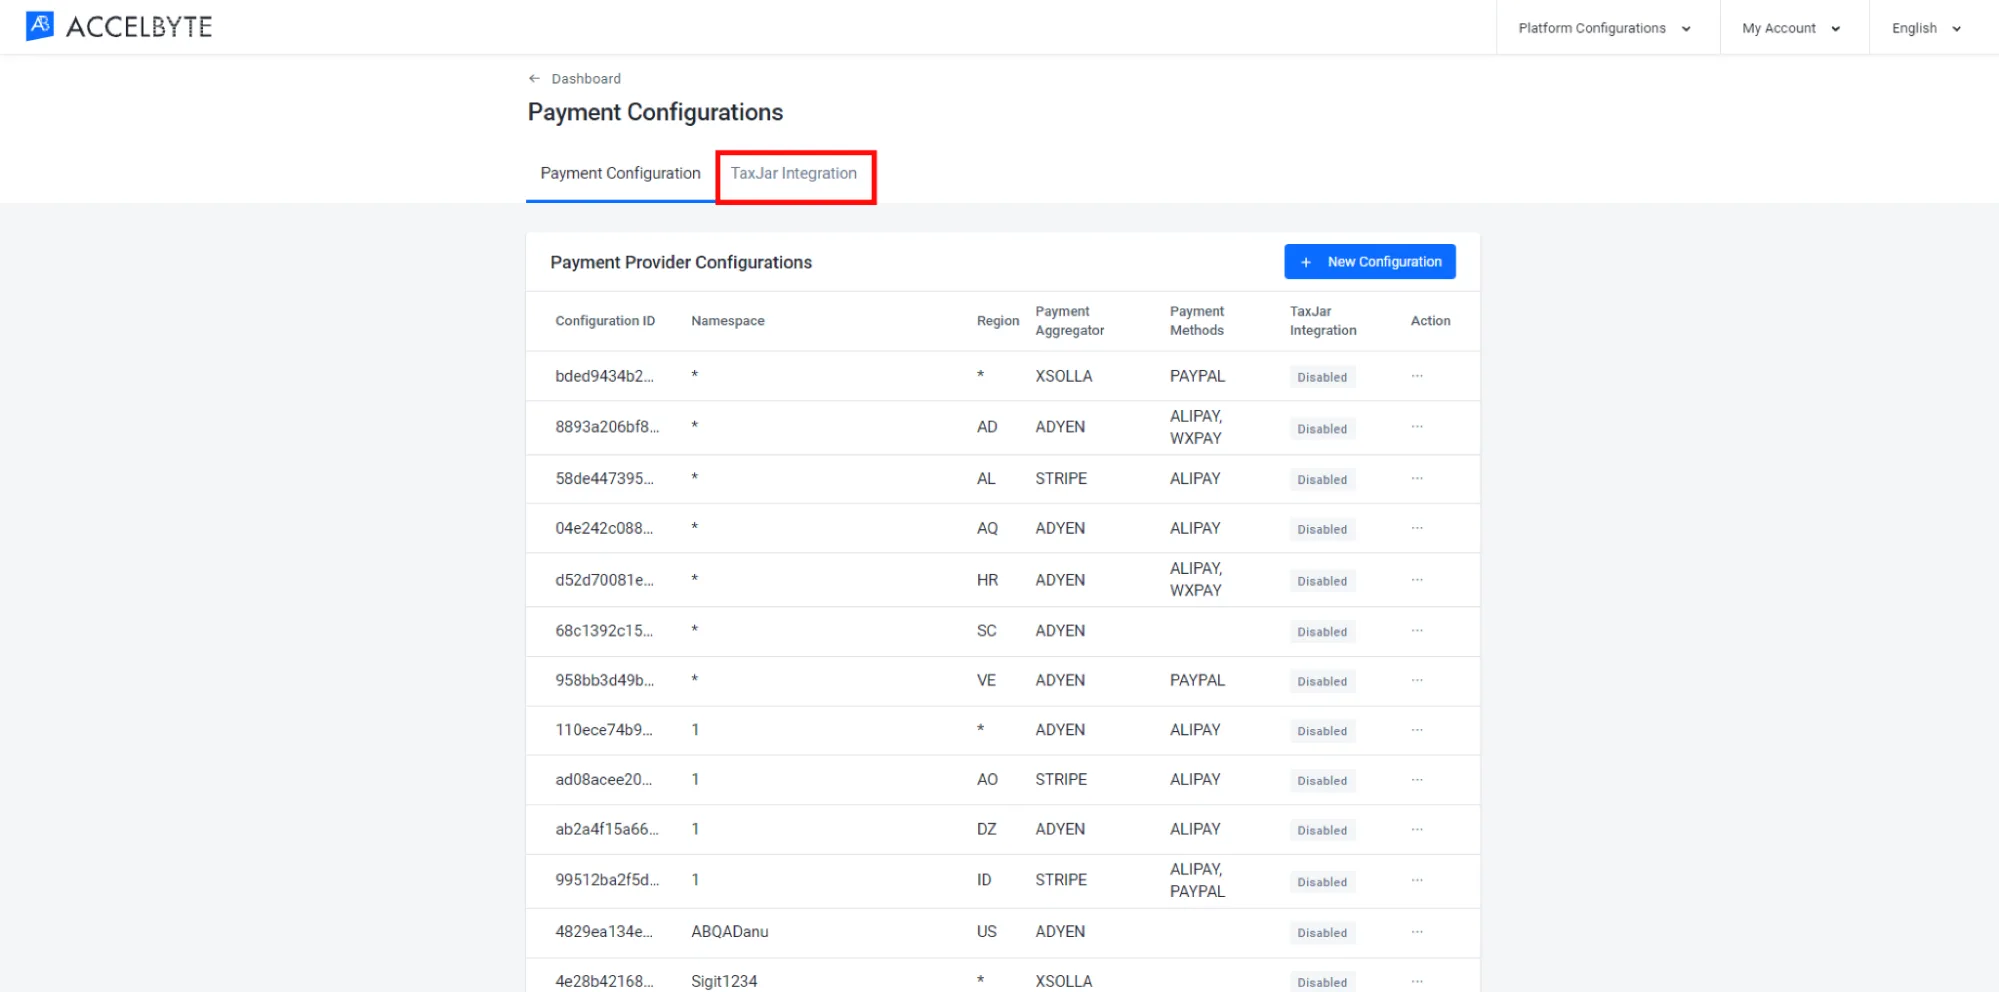
On the Payment Configuration page of the Admin Portal, switch to the TaxJar Integration tab.
-
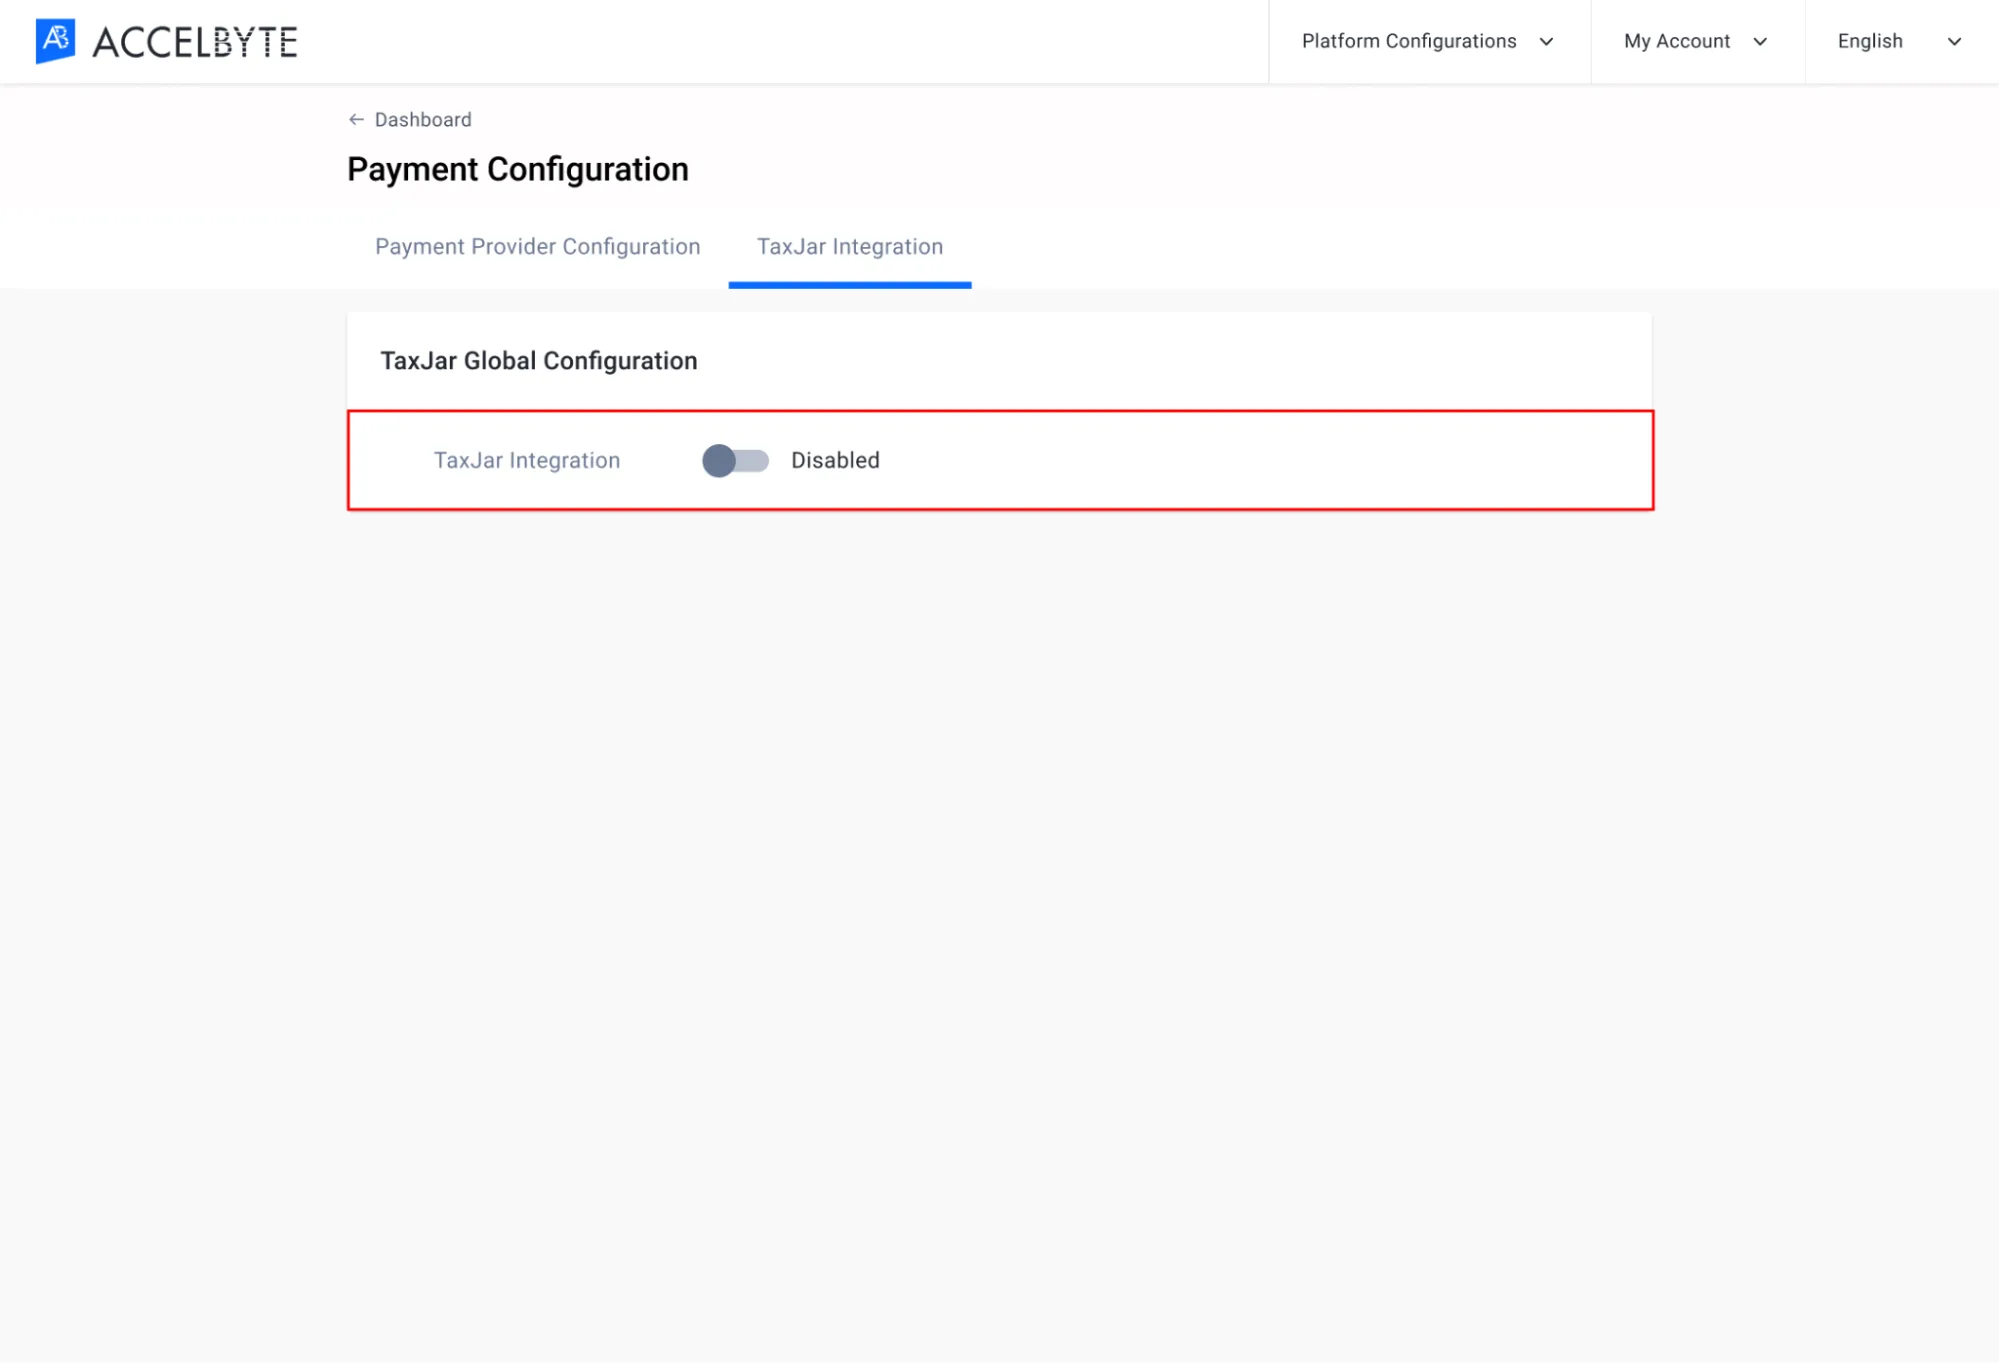
On the TaxJar Integration tab, toggle the integration to enable.
-
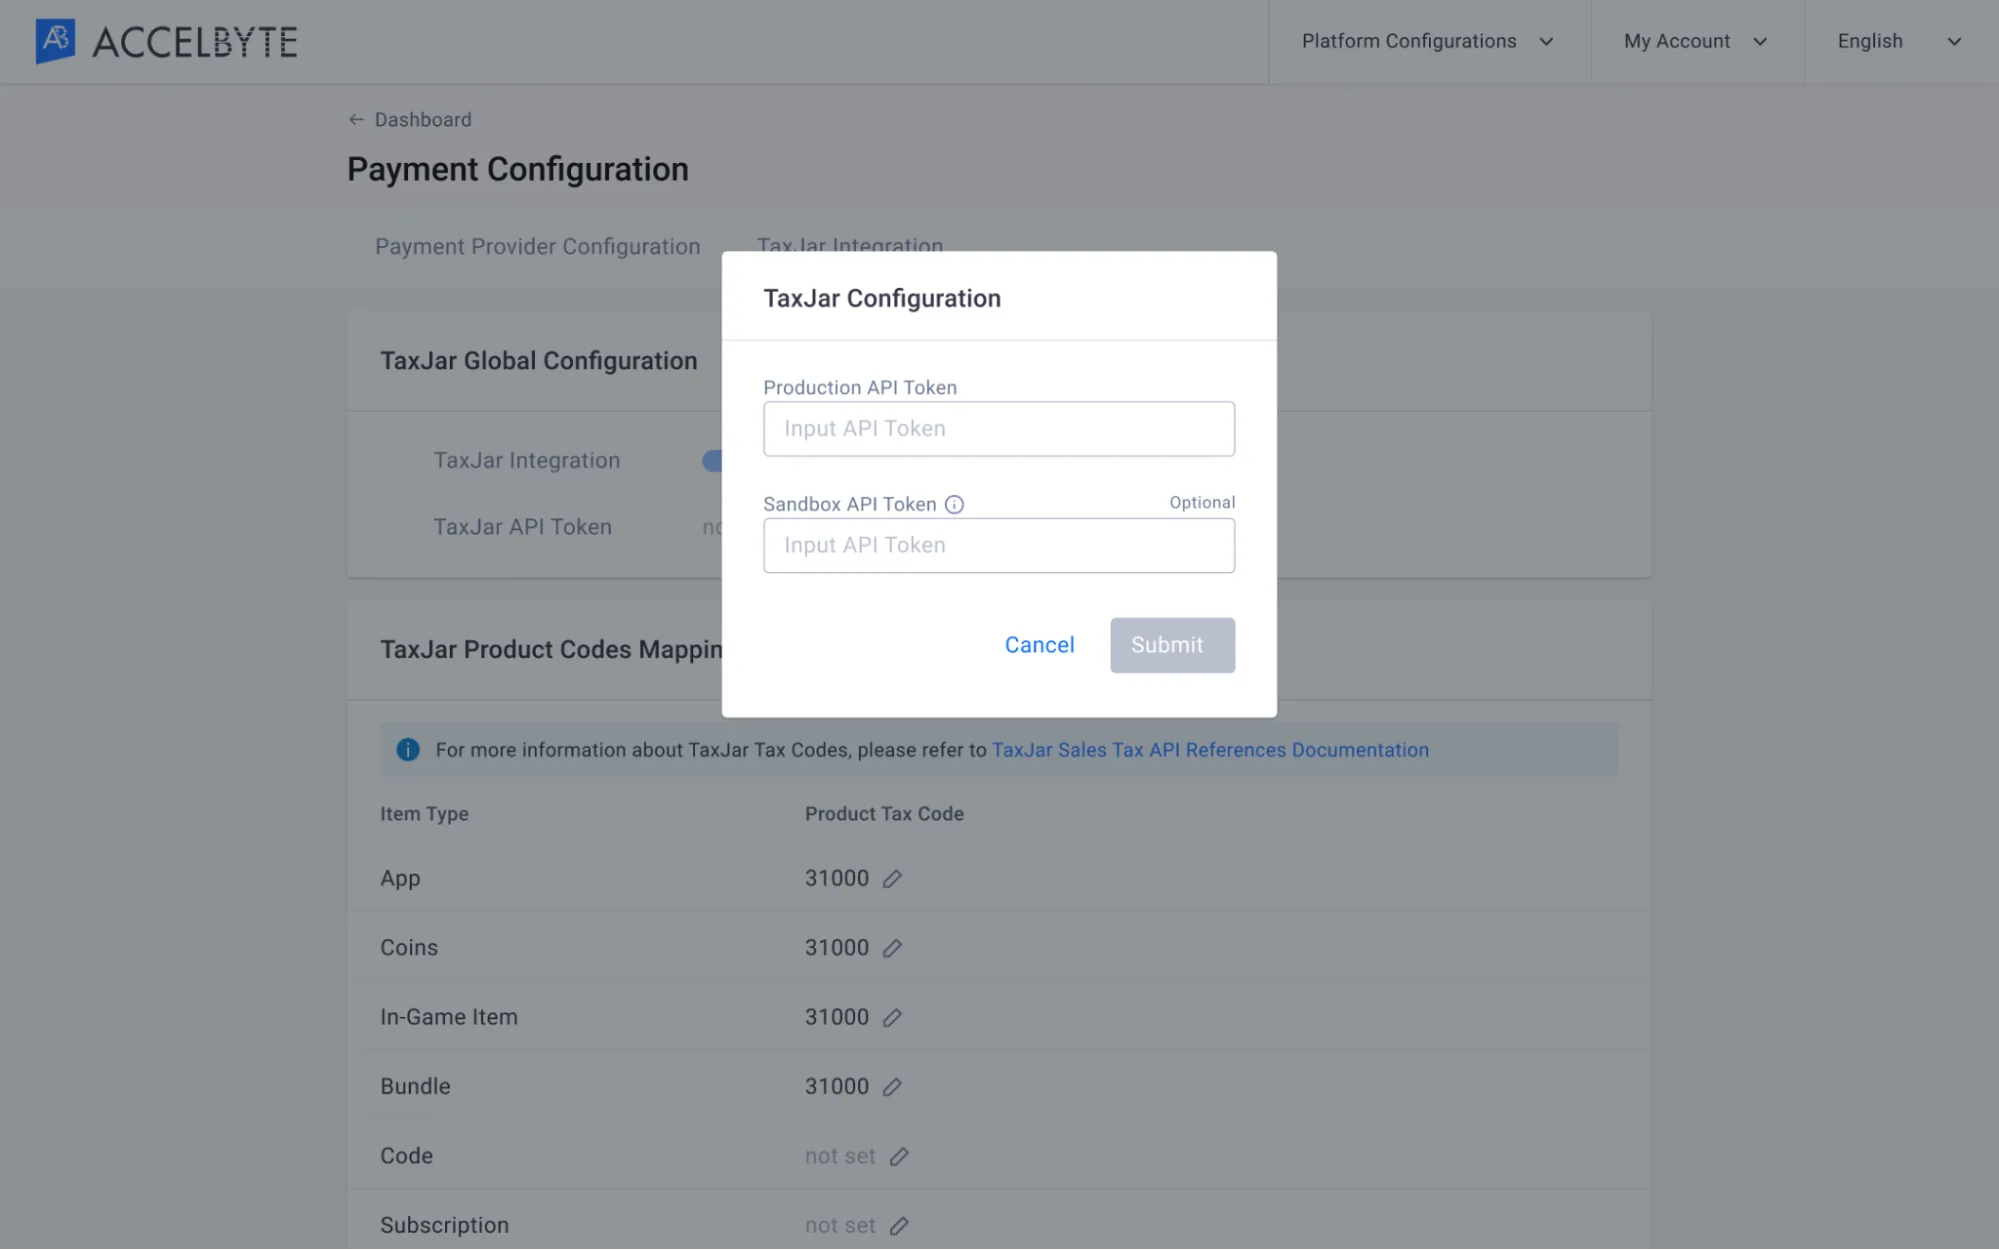
Fill in the TaxJar Configuration form.
-
Input the Production API Token from TaxJar.
-
Input the Sandbox API Token from TaxJar.
When you're done, click Submit.
-
-
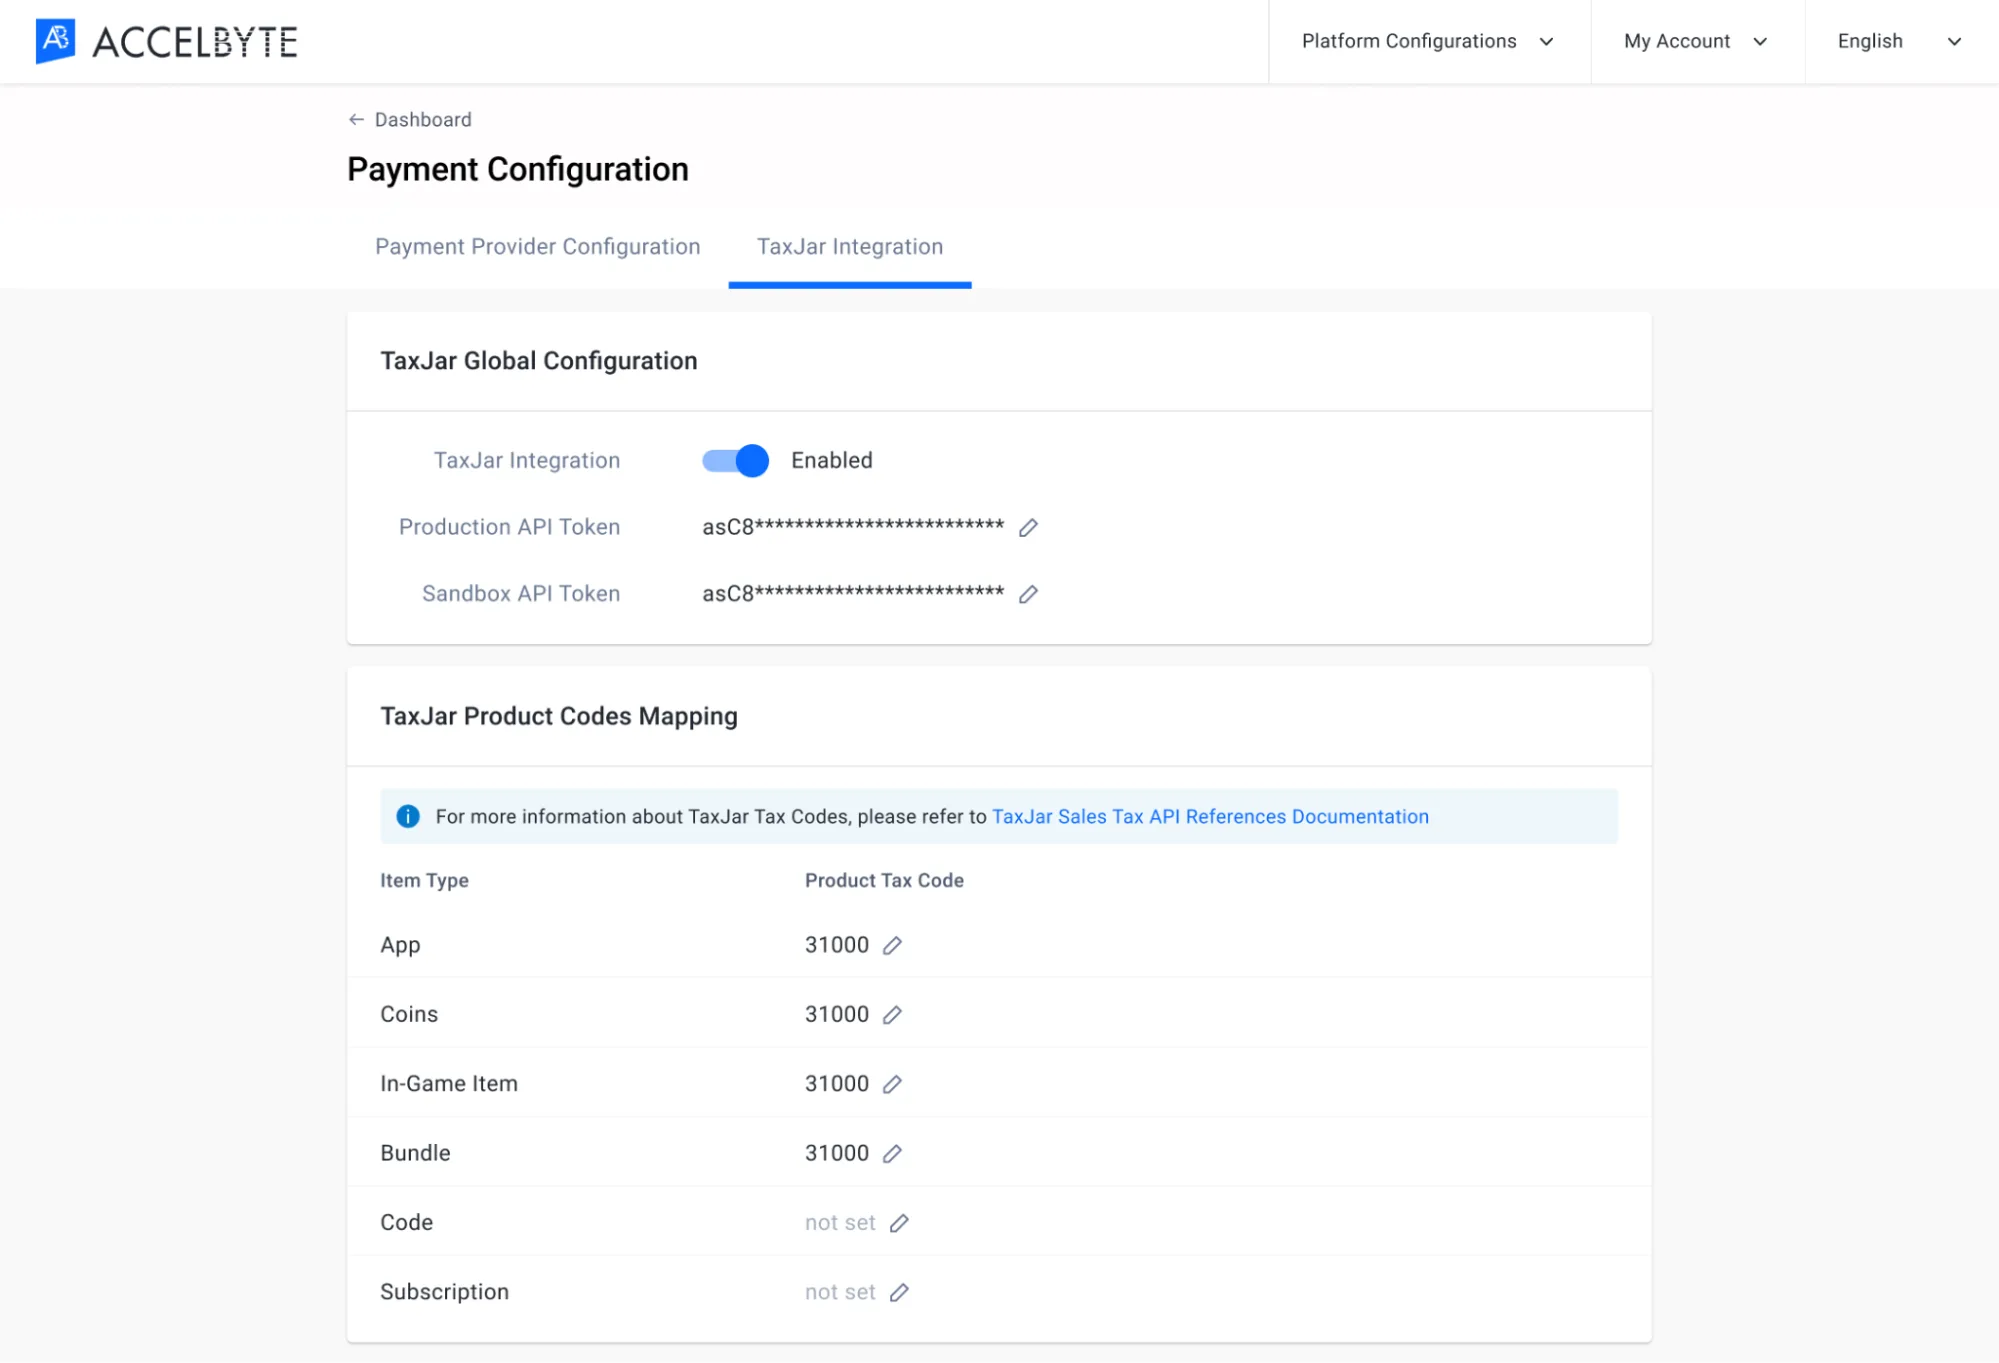
Next, add the appropriate TaxJar product codes to each item type in the TaxJar Product Codes Mapping panel by clicking the pencil icon next to each item type and typing the product code. For digital goods, the product tax code is 31000. You can also browse a list of TaxJar codes in the TaxJar documentation.
-
Create a JSON file with your TaxJar API tokens. Any file name works. This example uses
tax-config.json:{
"taxJarEnabled": true,
"taxJarApiToken": "<TaxJarProductionApiToken>",
"sandboxTaxJarApiToken": "<TaxJarSandboxApiToken>"
}taxJarEnabledis the TaxJar Integration toggle. You must settaxJarApiTokento enable it. -
Save the global tax configuration:
ags platform payment-config update-tax --json @tax-config.jsonAfter the command runs, delete the file, because it contains secrets.
-
Add the TaxJar product codes to each item type. Create a JSON file, for example
tax-codes.json. For digital goods, the product tax code is31000:{
"taxJarProductCodesMapping": {
"APP": "31000",
"COINS": "31000",
"INGAMEITEM": "31000",
"BUNDLE": "31000",
"CODE": "31000",
"SUBSCRIPTION": "31000"
}
} -
Save the product codes. This keeps the settings you saved in step 2:
ags platform payment-config update-tax --json @tax-codes.json -
To check the result, run:
ags platform payment-config get-tax
Create a specific tax configuration
- Admin Portal
- AGS CLI
-
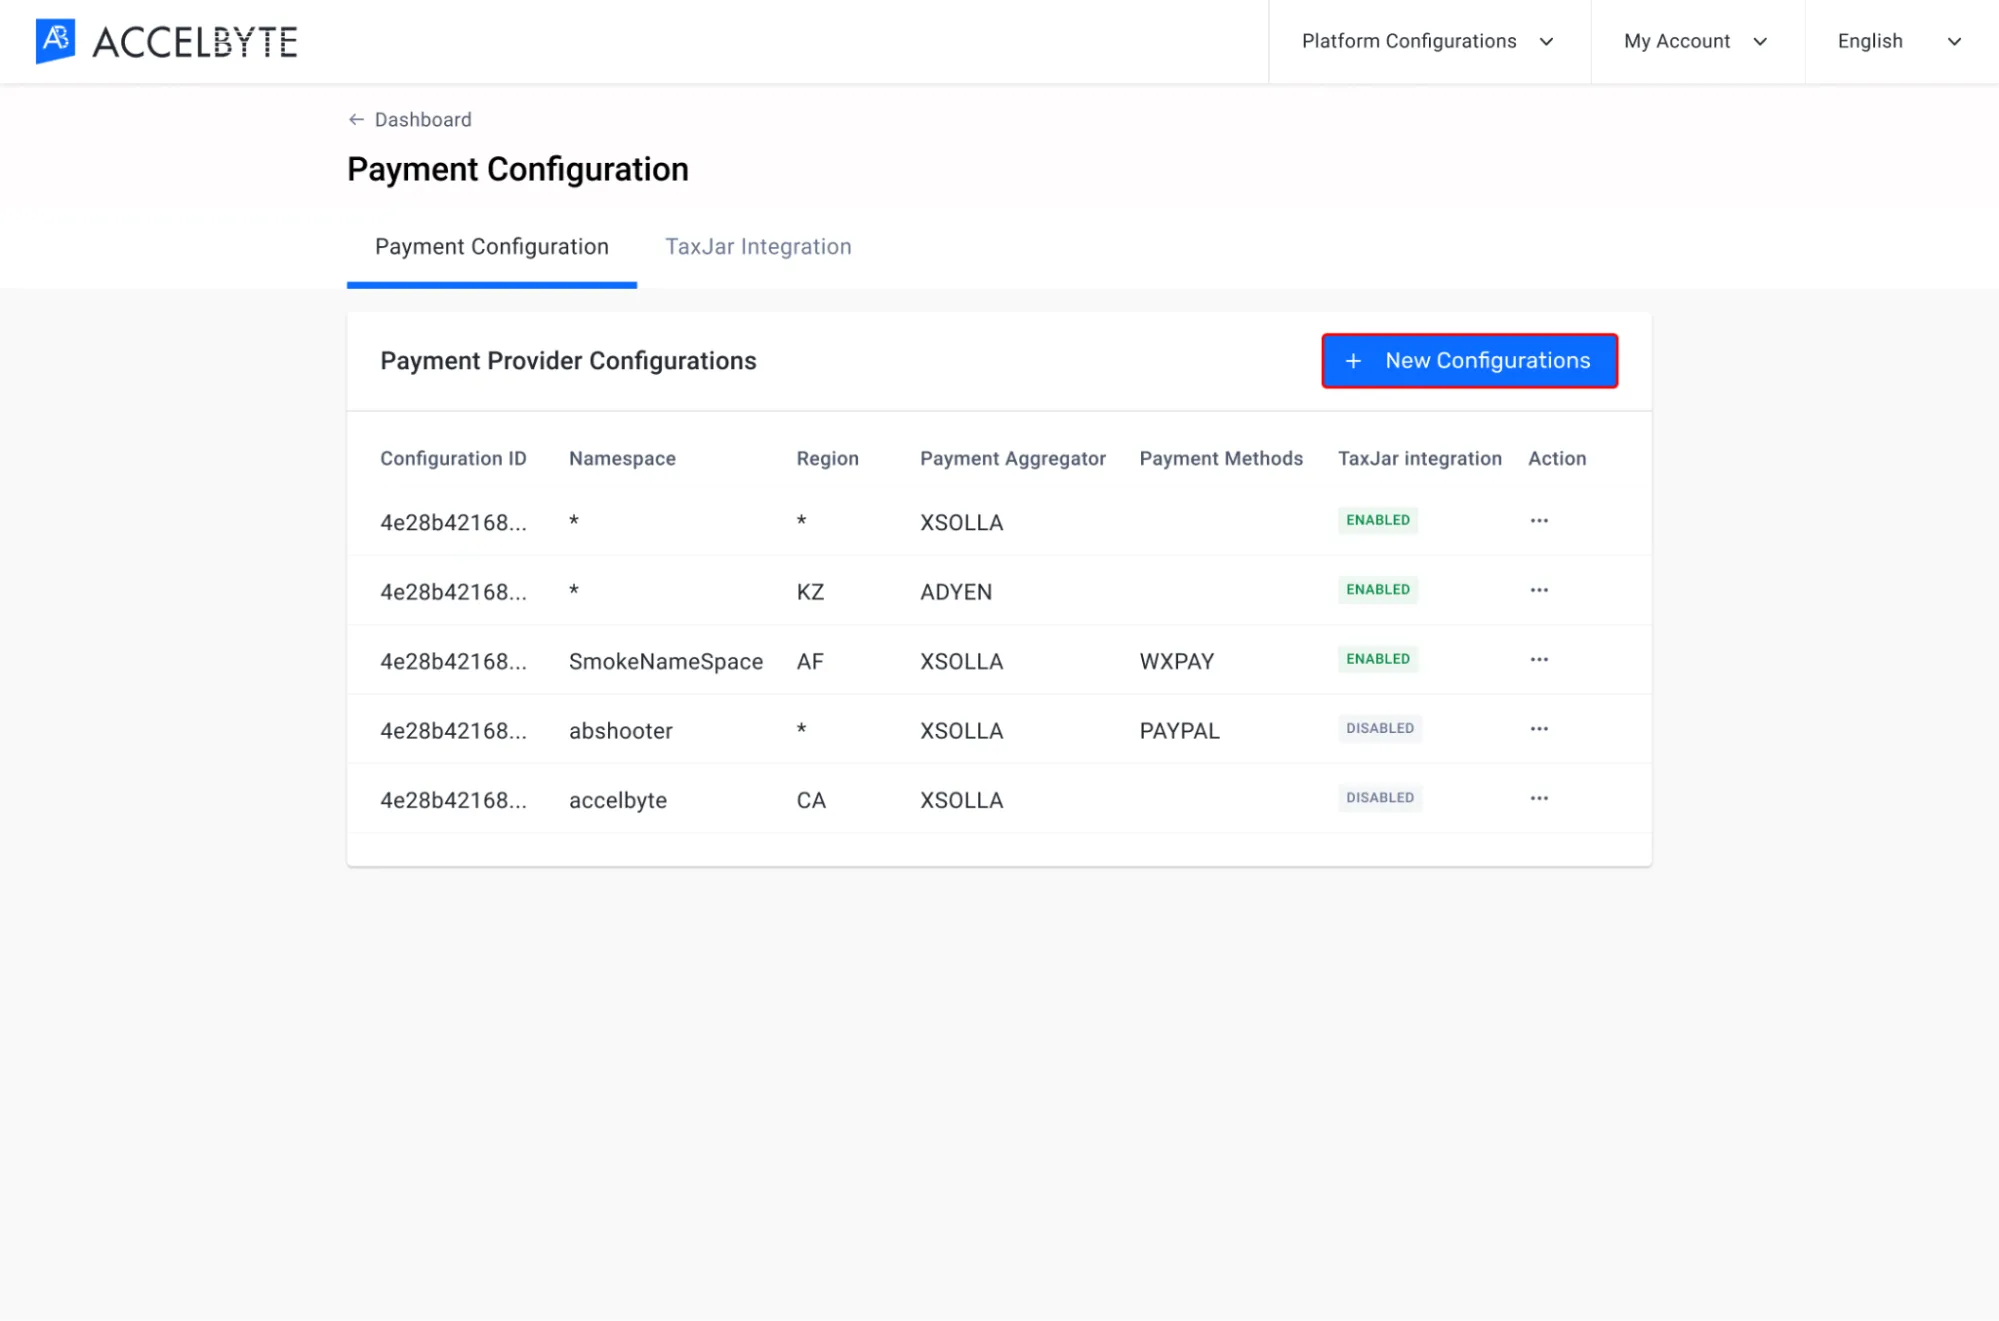
On the Payment Configuration page of the Admin Portal, click the New Configuration button.
-
Fill in the Add New Configuration form that appears with the required information:
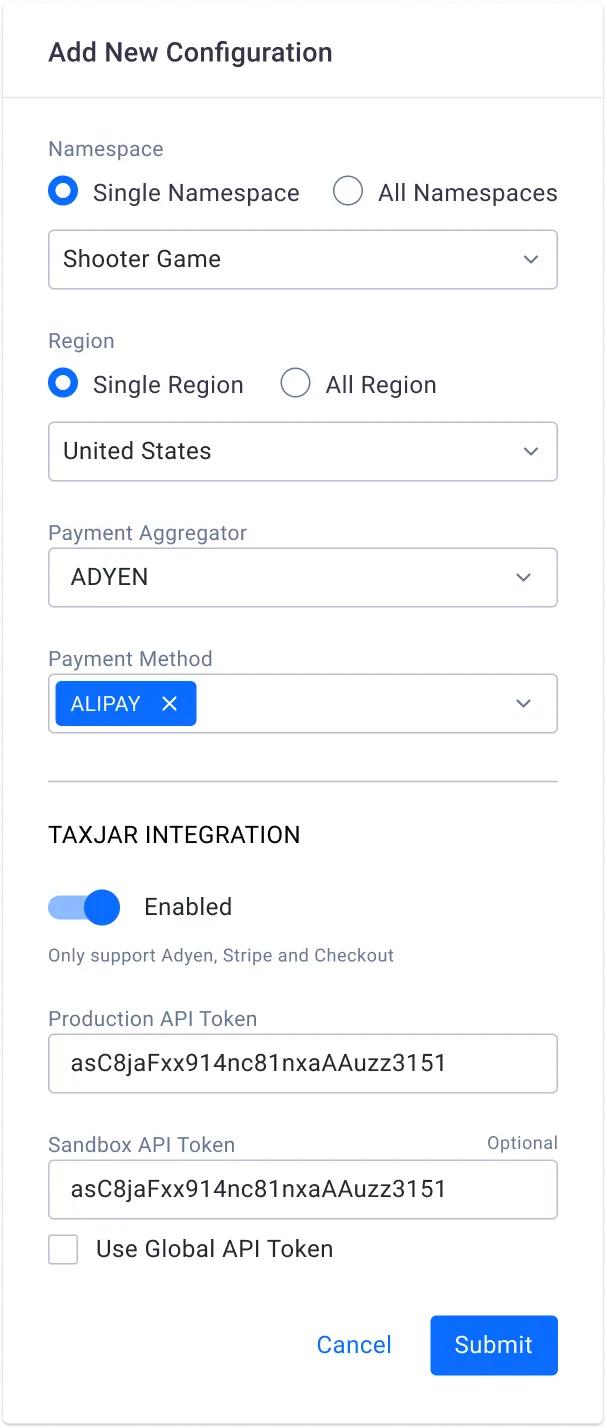
- Select the Single Namespace option and select the game namespace this configuration will apply to from the dropdown menu.
- Select the Region the payment configuration will apply to. For now, TaxJar can only be used for online purchases made in the US.
- Select the Payment Aggregator you're using from the dropdown menu.
- Select the Payment Methods you're using. This field is optional.
- Enable the TaxJar Integration option. The Production and Sandbox API Token fields will fill automatically based on your global TaxJar configuration if one exists. Change the Production API Token value to the token from the TaxJar account you want to use for this namespace. You can choose to use the global Sandbox API Token or use your own.
When you're done, click Submit.
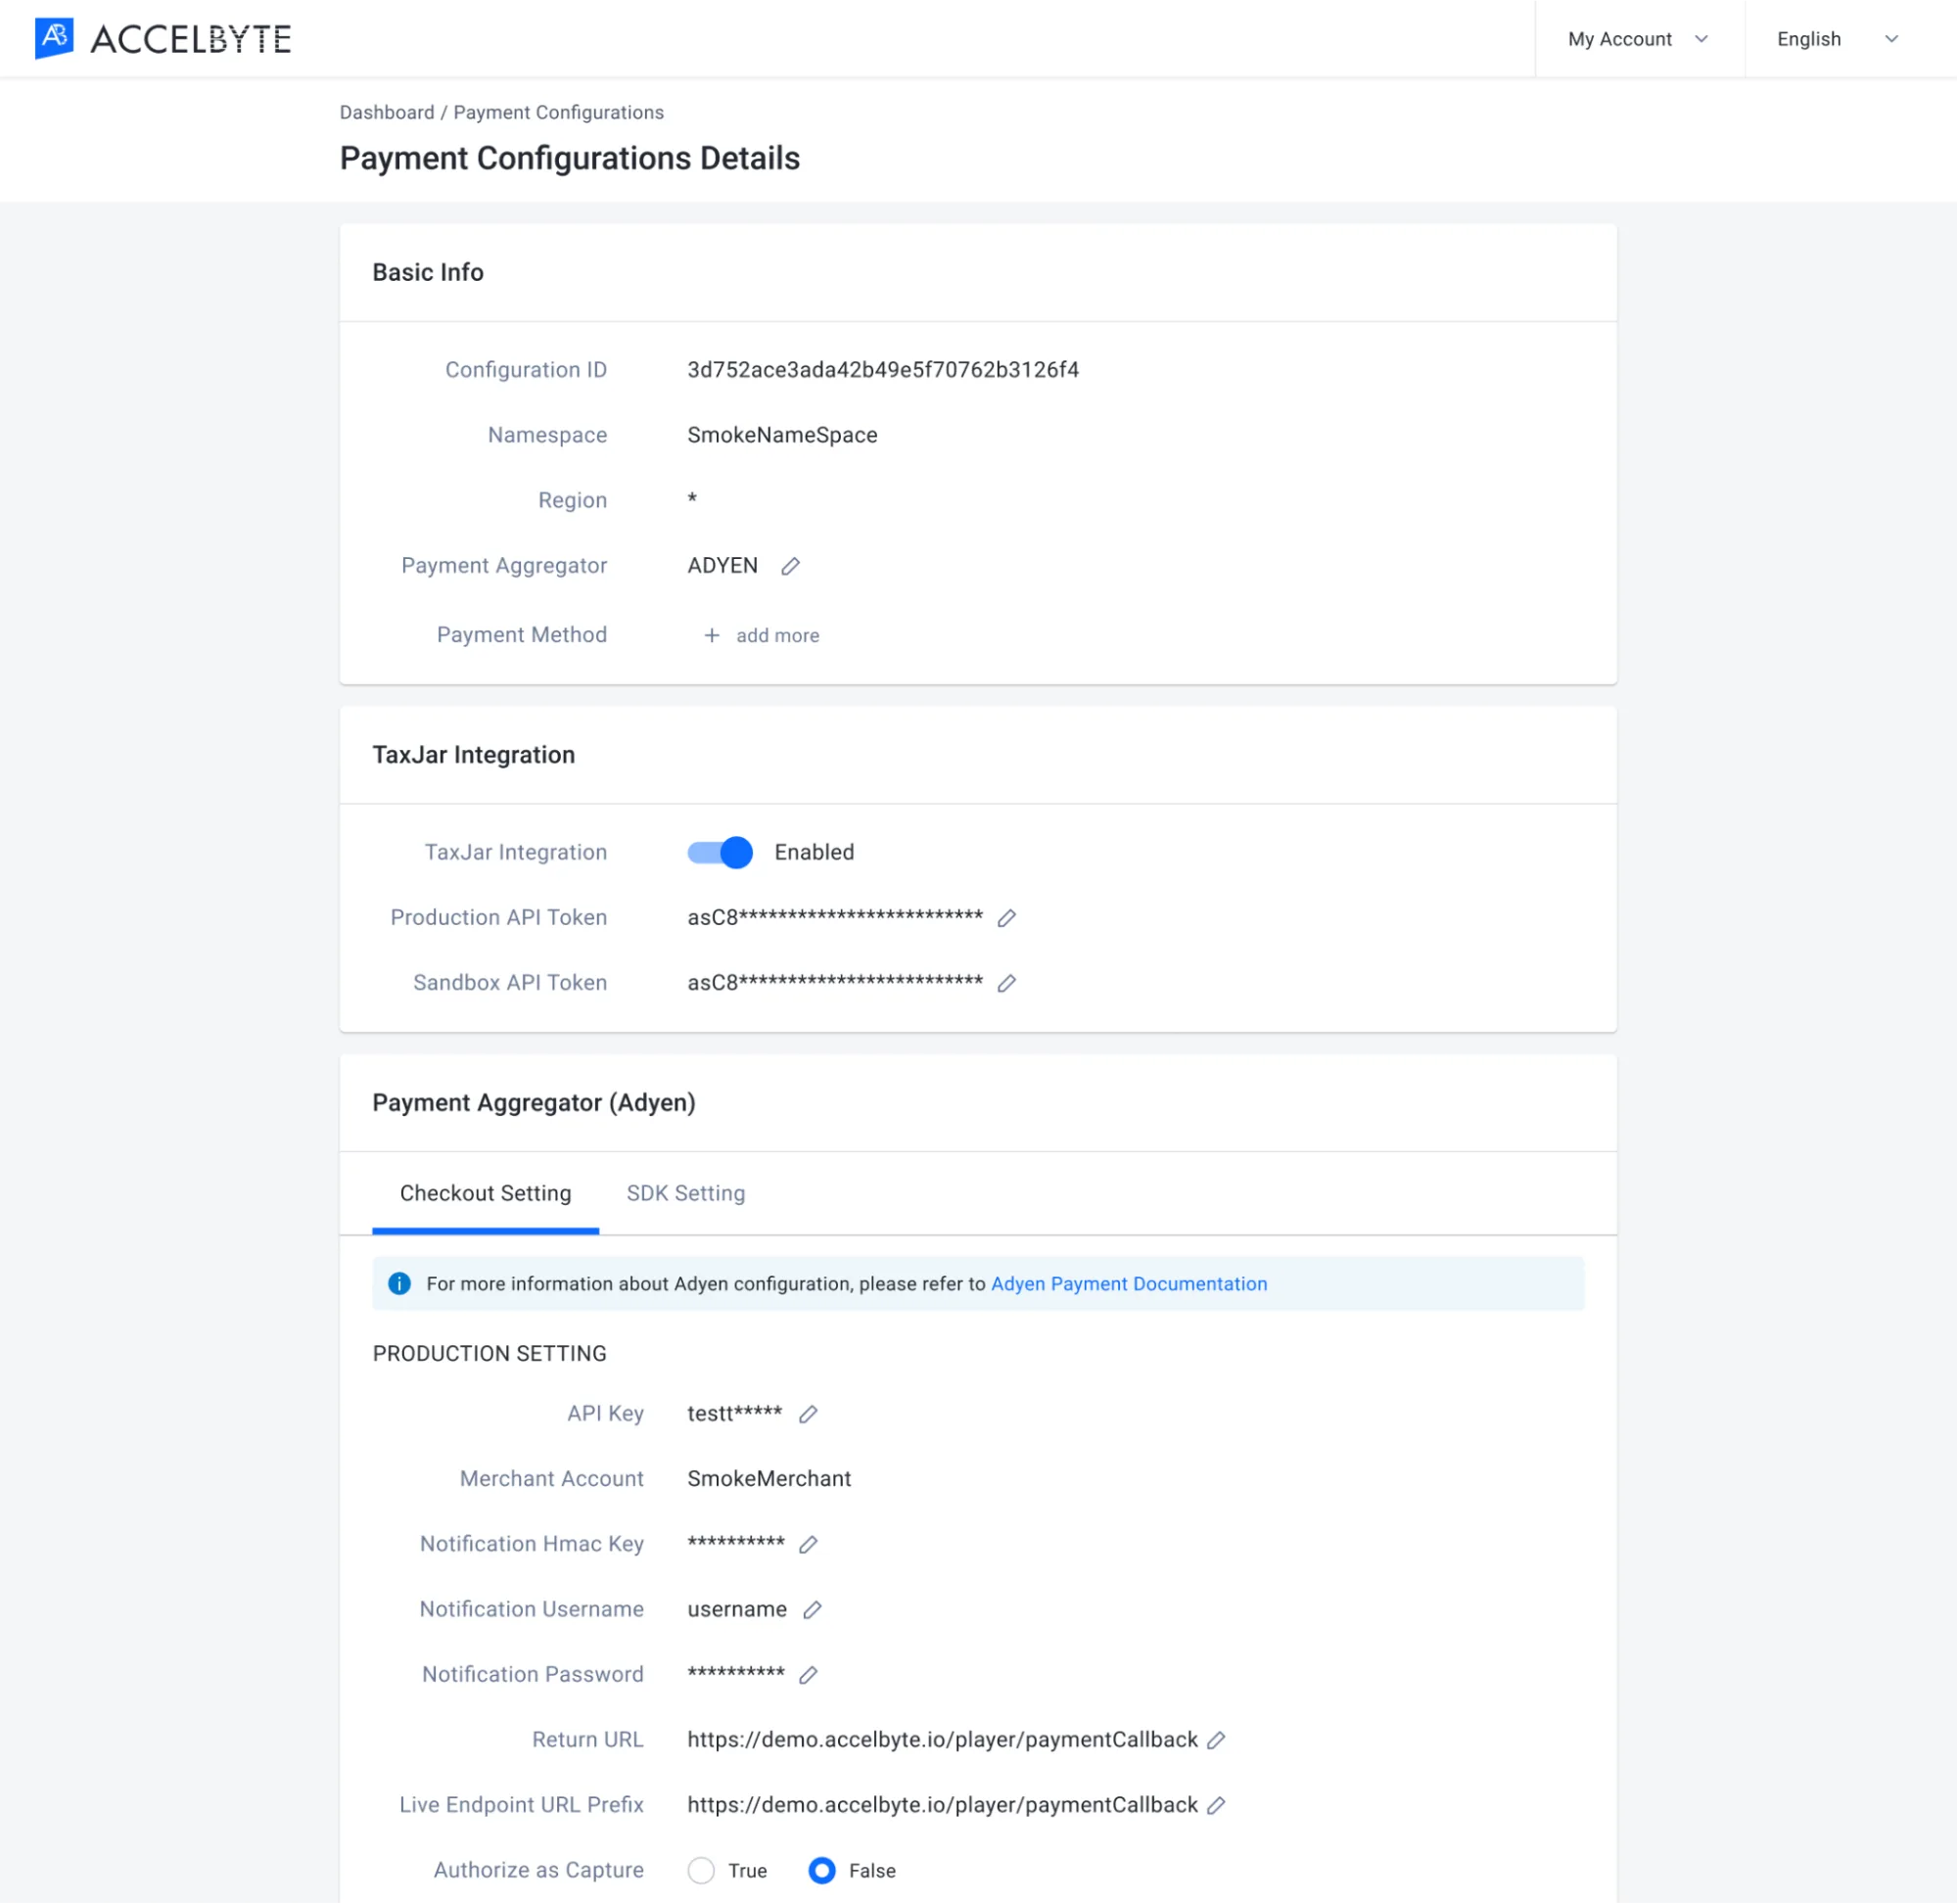
The specific configuration has been added to the Payment Configuration Details page.
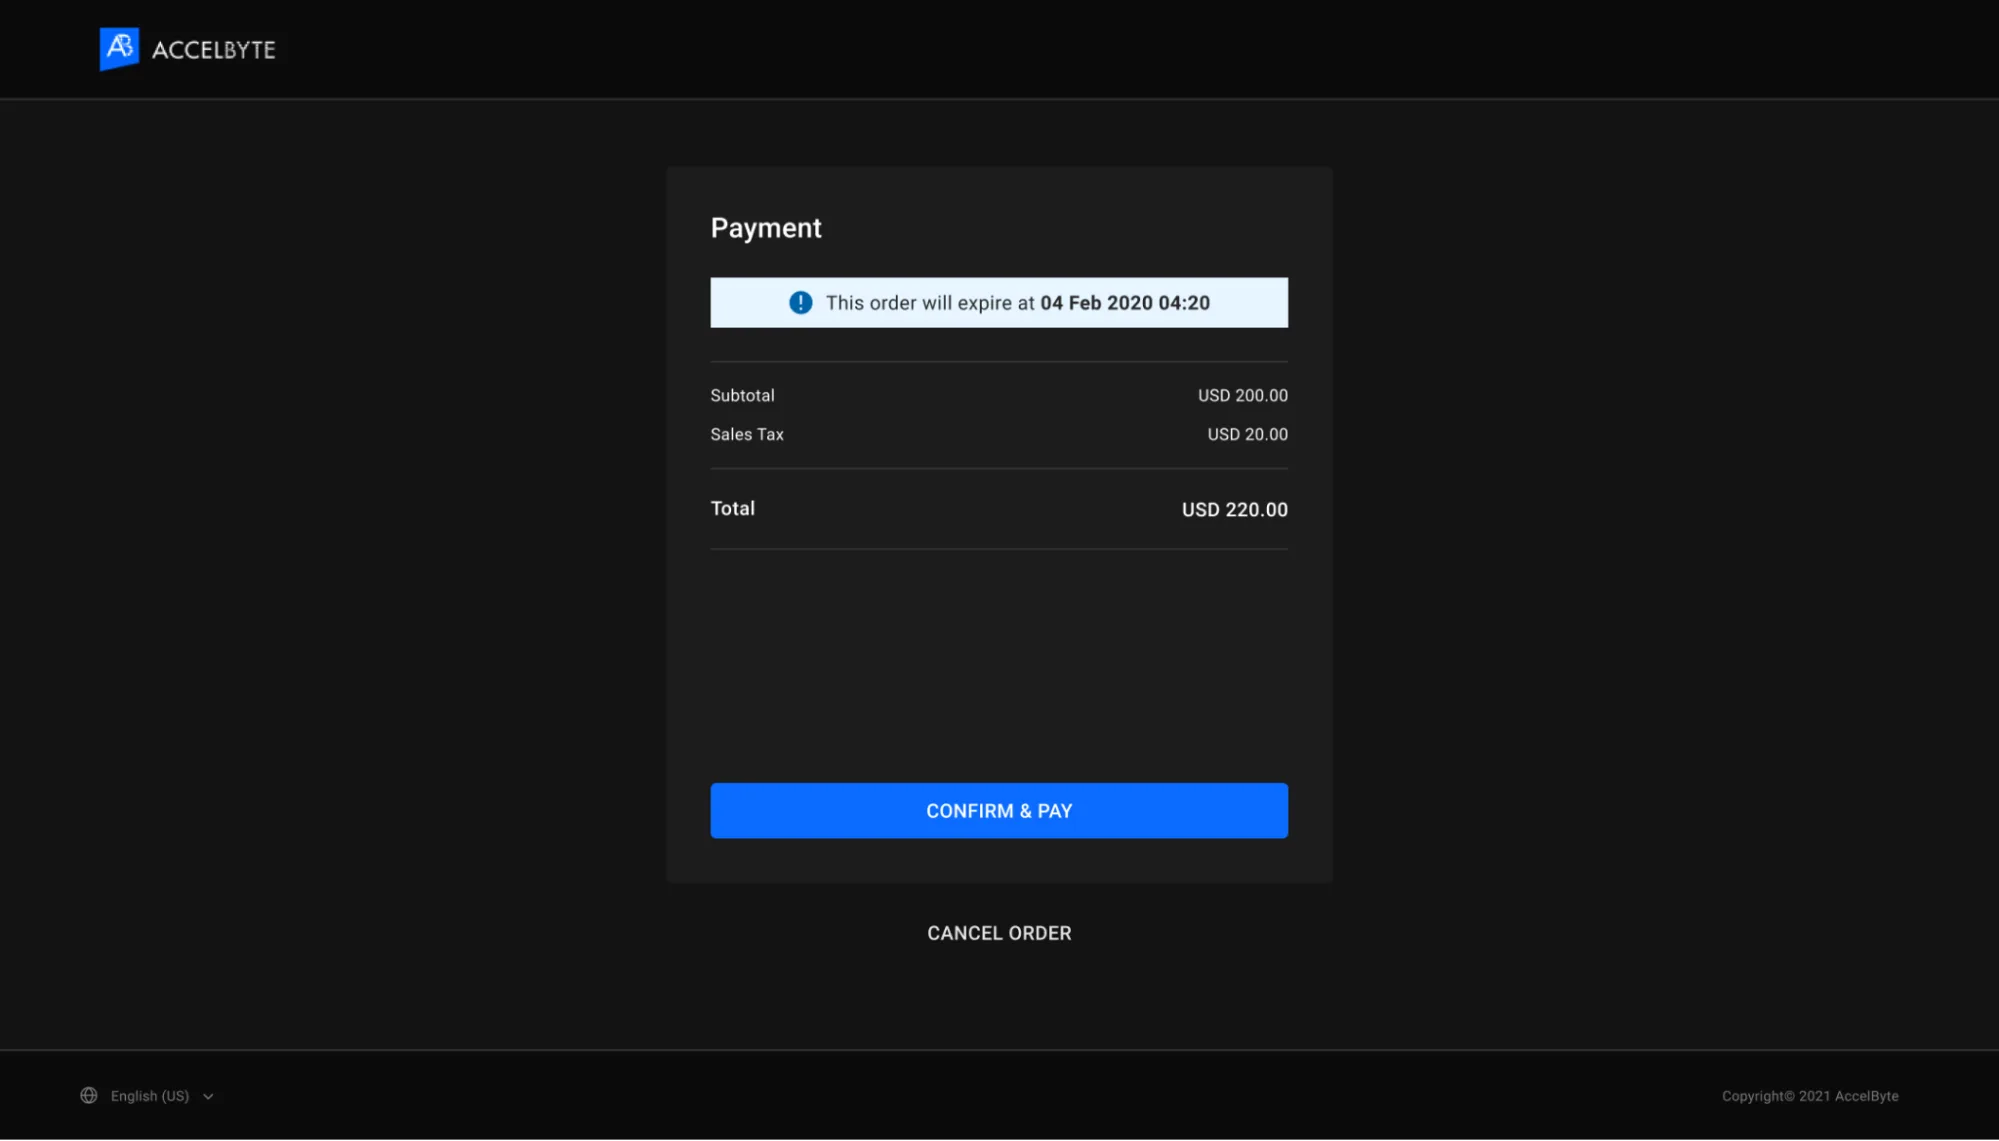
After setting up either a global or specific TaxJar configuration, your TaxJar account will be used to calculate and apply sales tax to online purchases made in your game and publishing platform.
-
Create a JSON file for the payment configuration. Any file name works. This example uses
payment-config.json:{
"namespace": "<YourGameNamespace>",
"region": "US",
"aggregate": "<PaymentAggregator>",
"specials": [],
"taxJarEnabled": true,
"useGlobalTaxJarApiToken": true
}namespace: the game namespace this configuration applies to.region: the region the configuration applies to. For now, TaxJar can only be used for online purchases made in the US.aggregate: the payment aggregator you use:ADYEN,CHECKOUT,NEONPAY,STRIPE, orXSOLLA.specials: the payment methods you use. This field is optional. Leave it as[]for none.taxJarEnabled: the TaxJar Integration option.useGlobalTaxJarApiToken:trueto use the global TaxJar API tokens. To use your own, set it tofalseand addtaxJarApiTokenandsandboxTaxJarApiTokento the file.
noteAGS turns TaxJar off for the configuration if the global TaxJar integration is not enabled.
-
Create the payment configuration:
ags platform payment-config create-provider --json @payment-config.jsonThe output shows the new configuration.
If you added your own TaxJar API tokens, delete the file after the command runs.