Admin Portal からマッチメイキングとセッションの問題をデバッグする方法
注釈:本資料はAI技術を用いて翻訳されています。
概要
このガイドでは、Admin Portal を通じてマッチメイキングとセッション関連の問題をトラブルシューティングするための包括的なアプローチを説明します。Matchmaking X-Ray、Session and Party History、Player Tracing などの診断ツールを使用して、チケットフローの監視、セッション動作の分析、プレイヤーアクティビティの追跡を行う方法を解説します。これらの手順に従うことで、問題を効率的に解決するか、さらなる調査に必要な情報を収集できます。
デバッグツール
Matchmaking X-Ray
A. Matchmaking X-Ray の概要
Matchmaking X-Ray は、マッチメイキングプロセスを詳細に分析するために使用される診断ツールです。チケットがどのようにマッチングされるか、適用されるルール、チーム構成を可視化します。これは、特定のプレイヤーが一緒にマッチングされる理由、またはされない理由を調査するのに特に役立ちます。
詳細については、Matchmaking X-Ray ガイド を参照してください。
B. Matchmaking X-Ray の要件
- 次のいずれかの識別子:Session ID、Match Pool、Ticket ID、または User ID
- 問題が発生した日付
C. Matchmaking X-Ray の使用方法
-
サイドバーから Multiplayer → Diagnostic & Utilities → Matchmaking X-Ray に移動します。
-
上部の Timeline タブに移動します。
-
Search by ドロップダウンからフィルターを選択し、関連する識別子(Session ID や Ticket ID など)を入力します。
-
問題が発生した日付を選択します。
-
Search アイコンをクリックして結果を取得します。

結果が表示されると、次の情報を確認できます:
- Ruleset: マッチメイキングプロセス中に使用された特定のルールセット。
- Match Pool: チケットがマッチングされたプールまたはグループ。
- Worker: チケットの処理を担当するマッチメイキングワーカー。
- Pod: マッチメイキングを処理するサービスインスタンス。
- Timestamp: マッチメイキングアクションが発生した正確な時刻。
-
結果の下部にある Tickets タブをクリックして、個々のチケットデータを確認します。
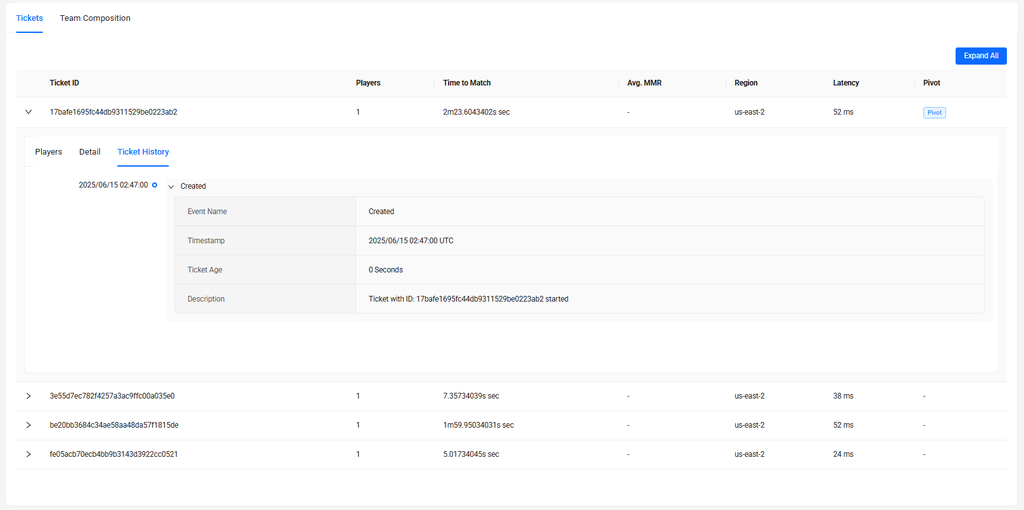
結果が表示されると、次の情報を確認できます:
- Number of Players per Ticket: 各チケットに含まれるプレイヤーの数。
- Ticket Age: 各チケットが作成されてからの期間。
- Average MMR: チケット内のプレイヤーの平均マッチメイキングレーティング。
- Region: マッチメイキング用に選択された地域。
- Latency: 各チケットと共に送信された Ping/レイテンシ値。
- Pivot Ticket: マッチメイキング中に基準点として使用されるプライマリチケット。
-
結果の下部にある Team Composition タブをクリックして、プレイヤーがチームにどのように分配されているかを理解します。
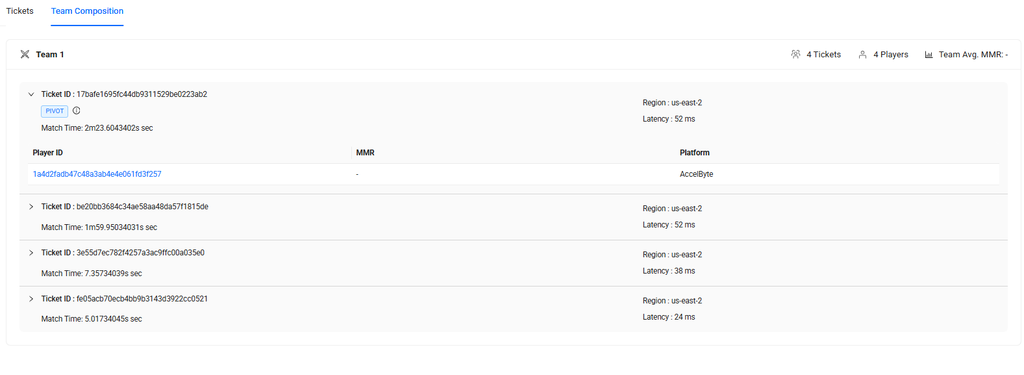
結果が表示されると、次の情報を確認できます:
- Average MMR: 各チーム内のプレイヤーの平均 MMR。
- Ticket IDs: マッチに関与する各チケットの一意の識別子。
- Pivot Ticket: チームを形成する際に基準として使用されるチケット。
- Ticket Age: 各チケットが作成された時刻。
- Region: 各パーティが選択した地域。
- Latency: 各プレイヤーまたはパーティのレイテンシ情報。
- User IDs: 各チケットに含まれるユーザー識別子。
- Platform: 各プレイヤーが使用するプラットフォーム。
- Total Tickets and Players Matched: マッチングされたチケットとプレイヤーの合計数の概要。
Session and Party History
A. Session and Party History の概要
このツールは、セッションまたはパーティセッションの履歴を観察および追跡するために使用されます。セッション/パーティ関連の問題をデバッグしたり、セッション/パーティ設定を検証したりするのに特に役立ちます。以下のセクションでは、Session History と Party History を個別に分解して、それぞれの特定の目的、使用方法、および関連データへのアクセス方法を説明します。
B. Session History
I. Session History の要件
- 次のいずれかの識別子:Session ID または User ID/ Member ID
II. Session History の使用方法
-
サイドバーから Multiplayer → Diagnostic & Utilities → Session and Party History に移動します。
-
Session and Party History ページで、デフォルトで Session タブに留まります。
-
Search by ドロップダウンから、持っているデータに応じて Session ID または User ID / Member ID のいずれかを選択します。
-
入力フィールドに値を入力し、Search アイコンをクリックして、一致するセッションレコードのリストを表示します。
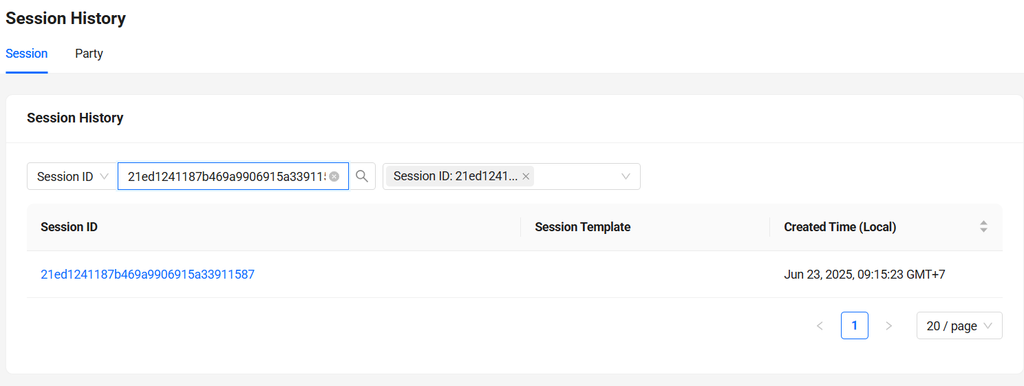
-
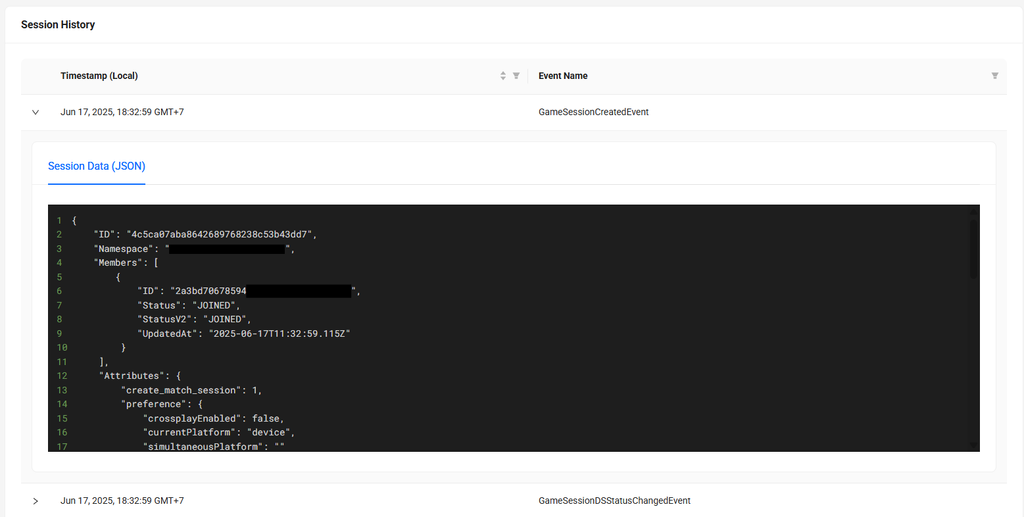
Session ID をクリックして、完全なセッションの詳細を表示します。
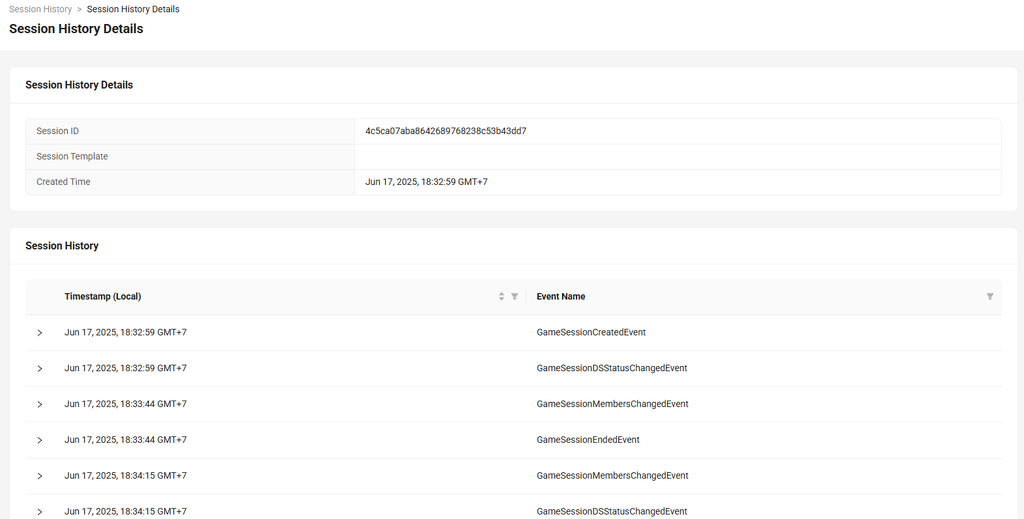
次のような情報が表示されます:
- Session ID: セッションの一意の識別子。
- Session Template: セッションの作成に使用されたテンプレート設定。
- Session Created Time: セッションが初期化された時刻。
- Event Timeline: セッション内で発生したイベントのリスト。
- Timestamps: 各イベントには記録された時刻があり、イベント間の順序と期間を分析できます。
-
左側の矢印アイコンを使用して各イベントを展開し、JSON 形式で詳細なセッションデータを確認できます。
C. Party History
I. Party History の要件
- 次のいずれかの識別子:Party ID または User ID/ Member ID
II. Party History の使用方法
-
サイドバーから Multiplayer → Diagnostic & Utilities → Session and Party History に移動します。
-
ページ上部にある Party タブに移動します。
-
Search by ドロップダウンから、Party ID または User ID / Member ID のいずれかを選択します。
-
適切な値を入力し、Search アイコンをクリックして、入力に一致するパーティセッションレコードを返します。

-
Party ID をクリックして、完全なパーティの詳細を表示します。
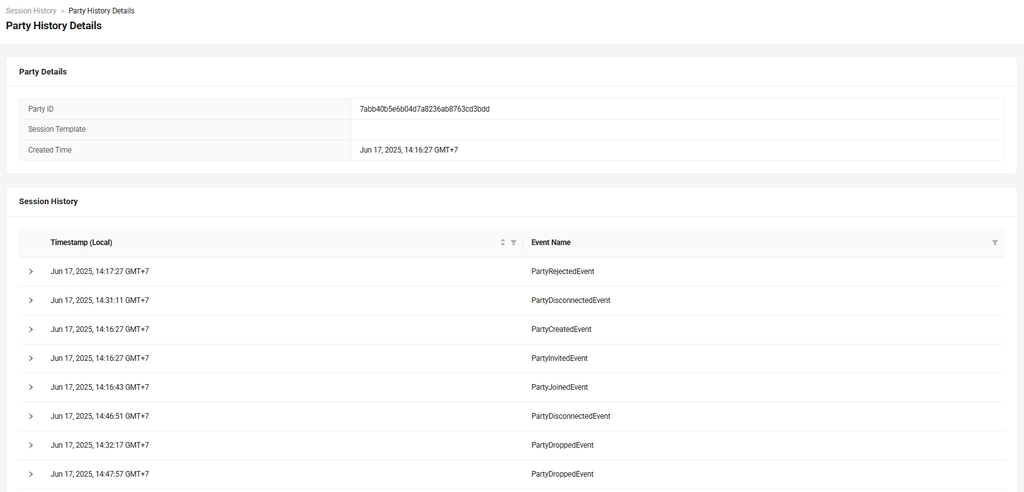
次のような情報が表示されます:
- Party ID: パーティの一意の識別子。
- Session Template: パーティの作成時に使用された Session Template。
- Party Created Time: パーティが作成された時刻。
- Event Timeline: セッション履歴と同様に、すべてのイベントが表示されます。
- Timestamps: イベント時刻は時系列順にリストされます。
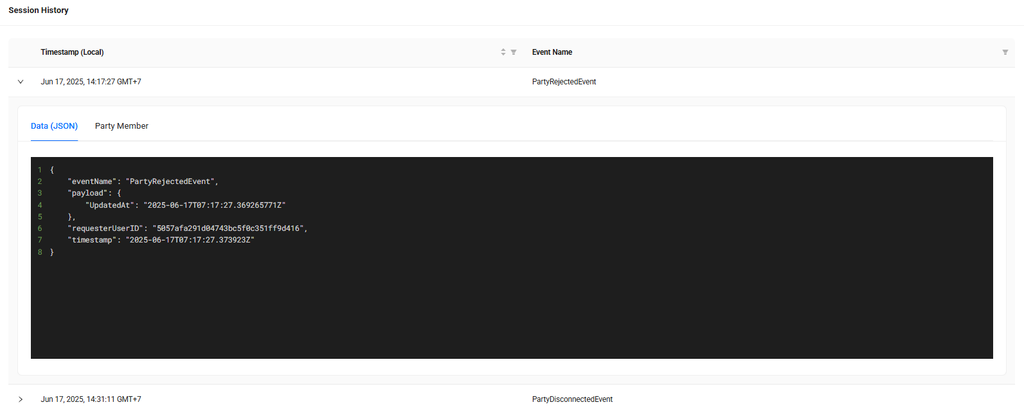
-
セッション履歴と同様に、左側の矢印をクリックして各イベントを展開し、追加の詳細を表示できます。
Player Tracing
A. Player Tracing の概要
Player Tracing は、プレイヤーの API 呼び出し履歴を追跡することで、プレイヤーのアクティビティを調査するために使用される診断ツールです。これは、アカウント関連の問題をデバッグしたり、プラットフォーム内でプレイヤーが実行した特定のアクションを追跡したりするのに特に役立ちます。
B. Player Tracing の要件
- 次のいずれかの識別子:Email、Display Name、User ID、Creation Date、Third Party Platform、または Public Code。
- 問題が発生した日付
C. Player Tracing の使用方法
-
サイドバーから Development Utilities → Player Tracing に移動します。
-
Search by ドロップダウンから方法を選択し(例:Email、User ID など)、持っている情報に基づいて関連する値を入力します。
-
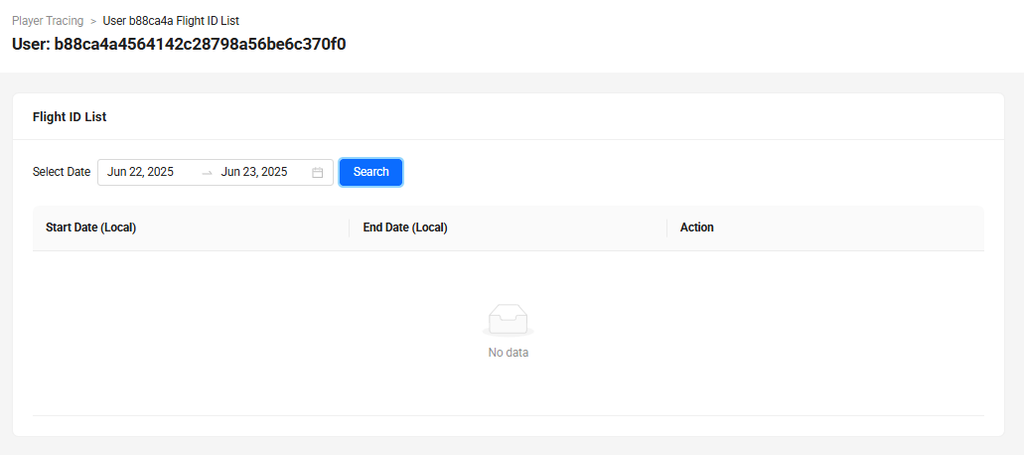
Search アイコンをクリックして、プレイヤーアクティビティの結果を取得します。
-
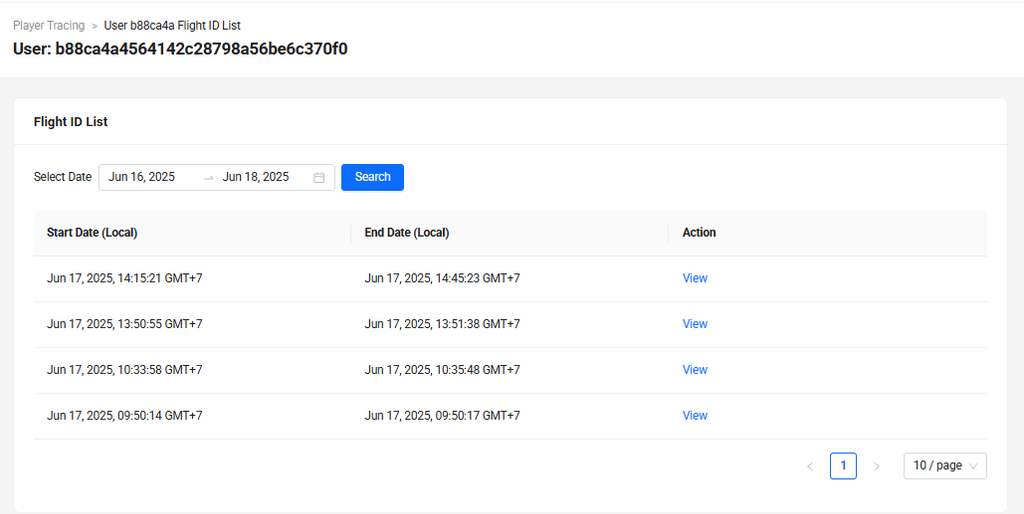
問題が発生した時刻に対応する日付を選択します。
-
結果が表示されたら、関連する行を見つけて View ボタンをクリックし、API 呼び出し履歴にアクセスします。
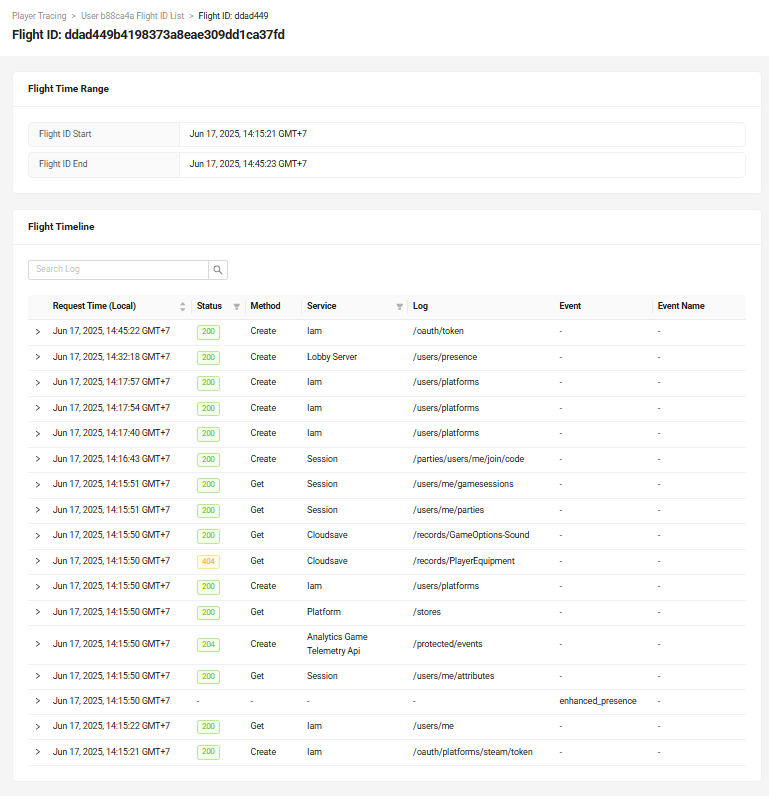
結果が表示されると、次の情報を確認できます:
- 各 API がトリガーされたタイムスタンプ
- 各呼び出しから返された HTTP ステータスコード(例:200、400)
- 使用された HTTP メソッド(例:GET、POST)
- リクエストを処理したサービス名
- 呼び出されたエンドポイント
- 呼び出しに関連するイベント
- 呼び出しによってトリガーされたイベント名
-
各 API 呼び出しの左側にある矢印アイコンをクリックして、エントリを展開し、詳細情報を表示することもできます。
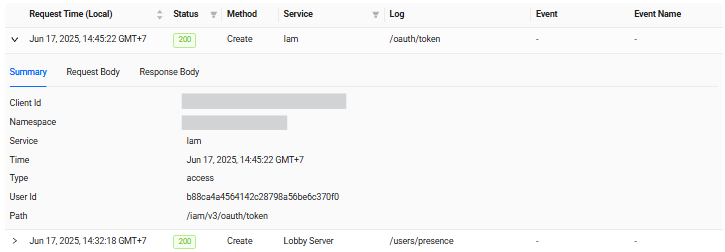
次のような情報が表示されます:
- Call Summary: Client ID、Namespace、タイムスタンプなど、呼び出しの基本情報を表示します。
- Request Payload: クライアントから送信されたデータを表示します。
- Response Data: サーバーから返されたデータを表示します。
ユースケース
1. 9 人の参加者でマッチメイキングが成功した後、プレイヤーがセッションに参加しない
A. 問題
4 人から 16 人を許可するように設定された Matchmaking Ruleset を使用して 9 人のプレイヤーでマッチメイキングを試みたところ、7 人のプレイヤーのみがゲームプレイセッションに正常に入りました。残りの 2 人のプレイヤーはマッチングされず、最終的にタイムアウトしました。
B. 調査
次の詳細があります:
- マッチメイキングの試行に関与した 9 つの User ID。
- 関連する Session ID。
この情報を使用して、マッチメイキングとセッションの問題の調査を開始できます。
-
Session History(Session ID 経由)
収集:
- セッションに正常に参加したプレイヤーのリスト。
- セッションが作成されたタイムスタンプ。
- Auto-Accept Session が無効になっている場合:招待されたすべてのプレイヤーが手動でセッションを受け入れて参加したかどうかを確認します。
-
Matchmaking X-Ray(Session ID 経由)
確認:
- ピボットプレイヤーまたはパーティチケット。
- ピボットチケットの経過時間。
- マッチメイキングプロセスに関与するすべての地域。
- プレイヤーごとのレイテンシ値。
- 各プレイヤーが使用するプラットフォーム。
-
Player Tracing(マッチングされなかったプレイヤーの User ID 経由)
確認:
- マッチが見つかりセッションが作成された後、プレイヤー側で何が発生したか。
- 成功したプレイヤーとマッチングされなかったプレイヤーを比較してプレイヤー API 呼び出しを確認。
- セッション参加または招待処理に関連するエラーまたは失敗した呼び出し。
考えられる原因と解決策
問題が発生する可能性のある典型的な理由は次のとおりです:
- プレイヤーが招待を受け取った後、セッションに参加しなかった これは、Session Template で Auto-Accept Session が無効になっている場合にのみ適用されます。
- セッションがすでに作成された後にプレイヤーがマッチメイキングを開始した
これは、Matchmaking Ruleset で
auto_backfillが false に設定されており、Session Template の Join-ability 設定が Closed の場合に適用されます。 - プレイヤーが異なる地域でマッチメイキングしている 地域の不一致により、プレイヤーが同じセッションにマッチングされない可能性があります。
- クロスプラットフォームプレイが有効になっている間、プレイヤーが異なるプラットフォームにいる Matchmaking Ruleset でクロスプラットフォームが許可されている場合でも、プラットフォームの互換性により問題が発生する可能性があります。
- その他の設定または接続の問題 ネットワークエラー、不正なクライアント実装、または誤って設定されたマッチメイキング/セッション設定などの追加要因も寄与する可能性があります。