Extend NoSQLデータベース
The Extend NoSQL Database is currently in closed alpha.
Overview
Extend NoSQL Database allows Extend Apps to store data in Amazon DocumentDB (with MongoDB compatibility) database. It provides a managed, scalable database solution that eliminates the complexity of setting up and maintaining your own database infrastructure. This allows developers to focus on building innovative features and functionality.
Extend NoSQL Database can be attached to all types of Extend Apps. This unlocks a wide range of use cases that require persistent data storage capabilities.
Provision Extend NoSQL Cluster
You can provision the Extend NoSQL cluster once you have been approved as a Closed Alpha tester. This action can be performed in the Publisher or Studio namespace level.
-
Go to the
Development Utilitiesmenu, and click theExtend Database Integrationmenu. Select the Extend NoSQL Database profile based on your needs then click theCreate NoSQL Databasebutton.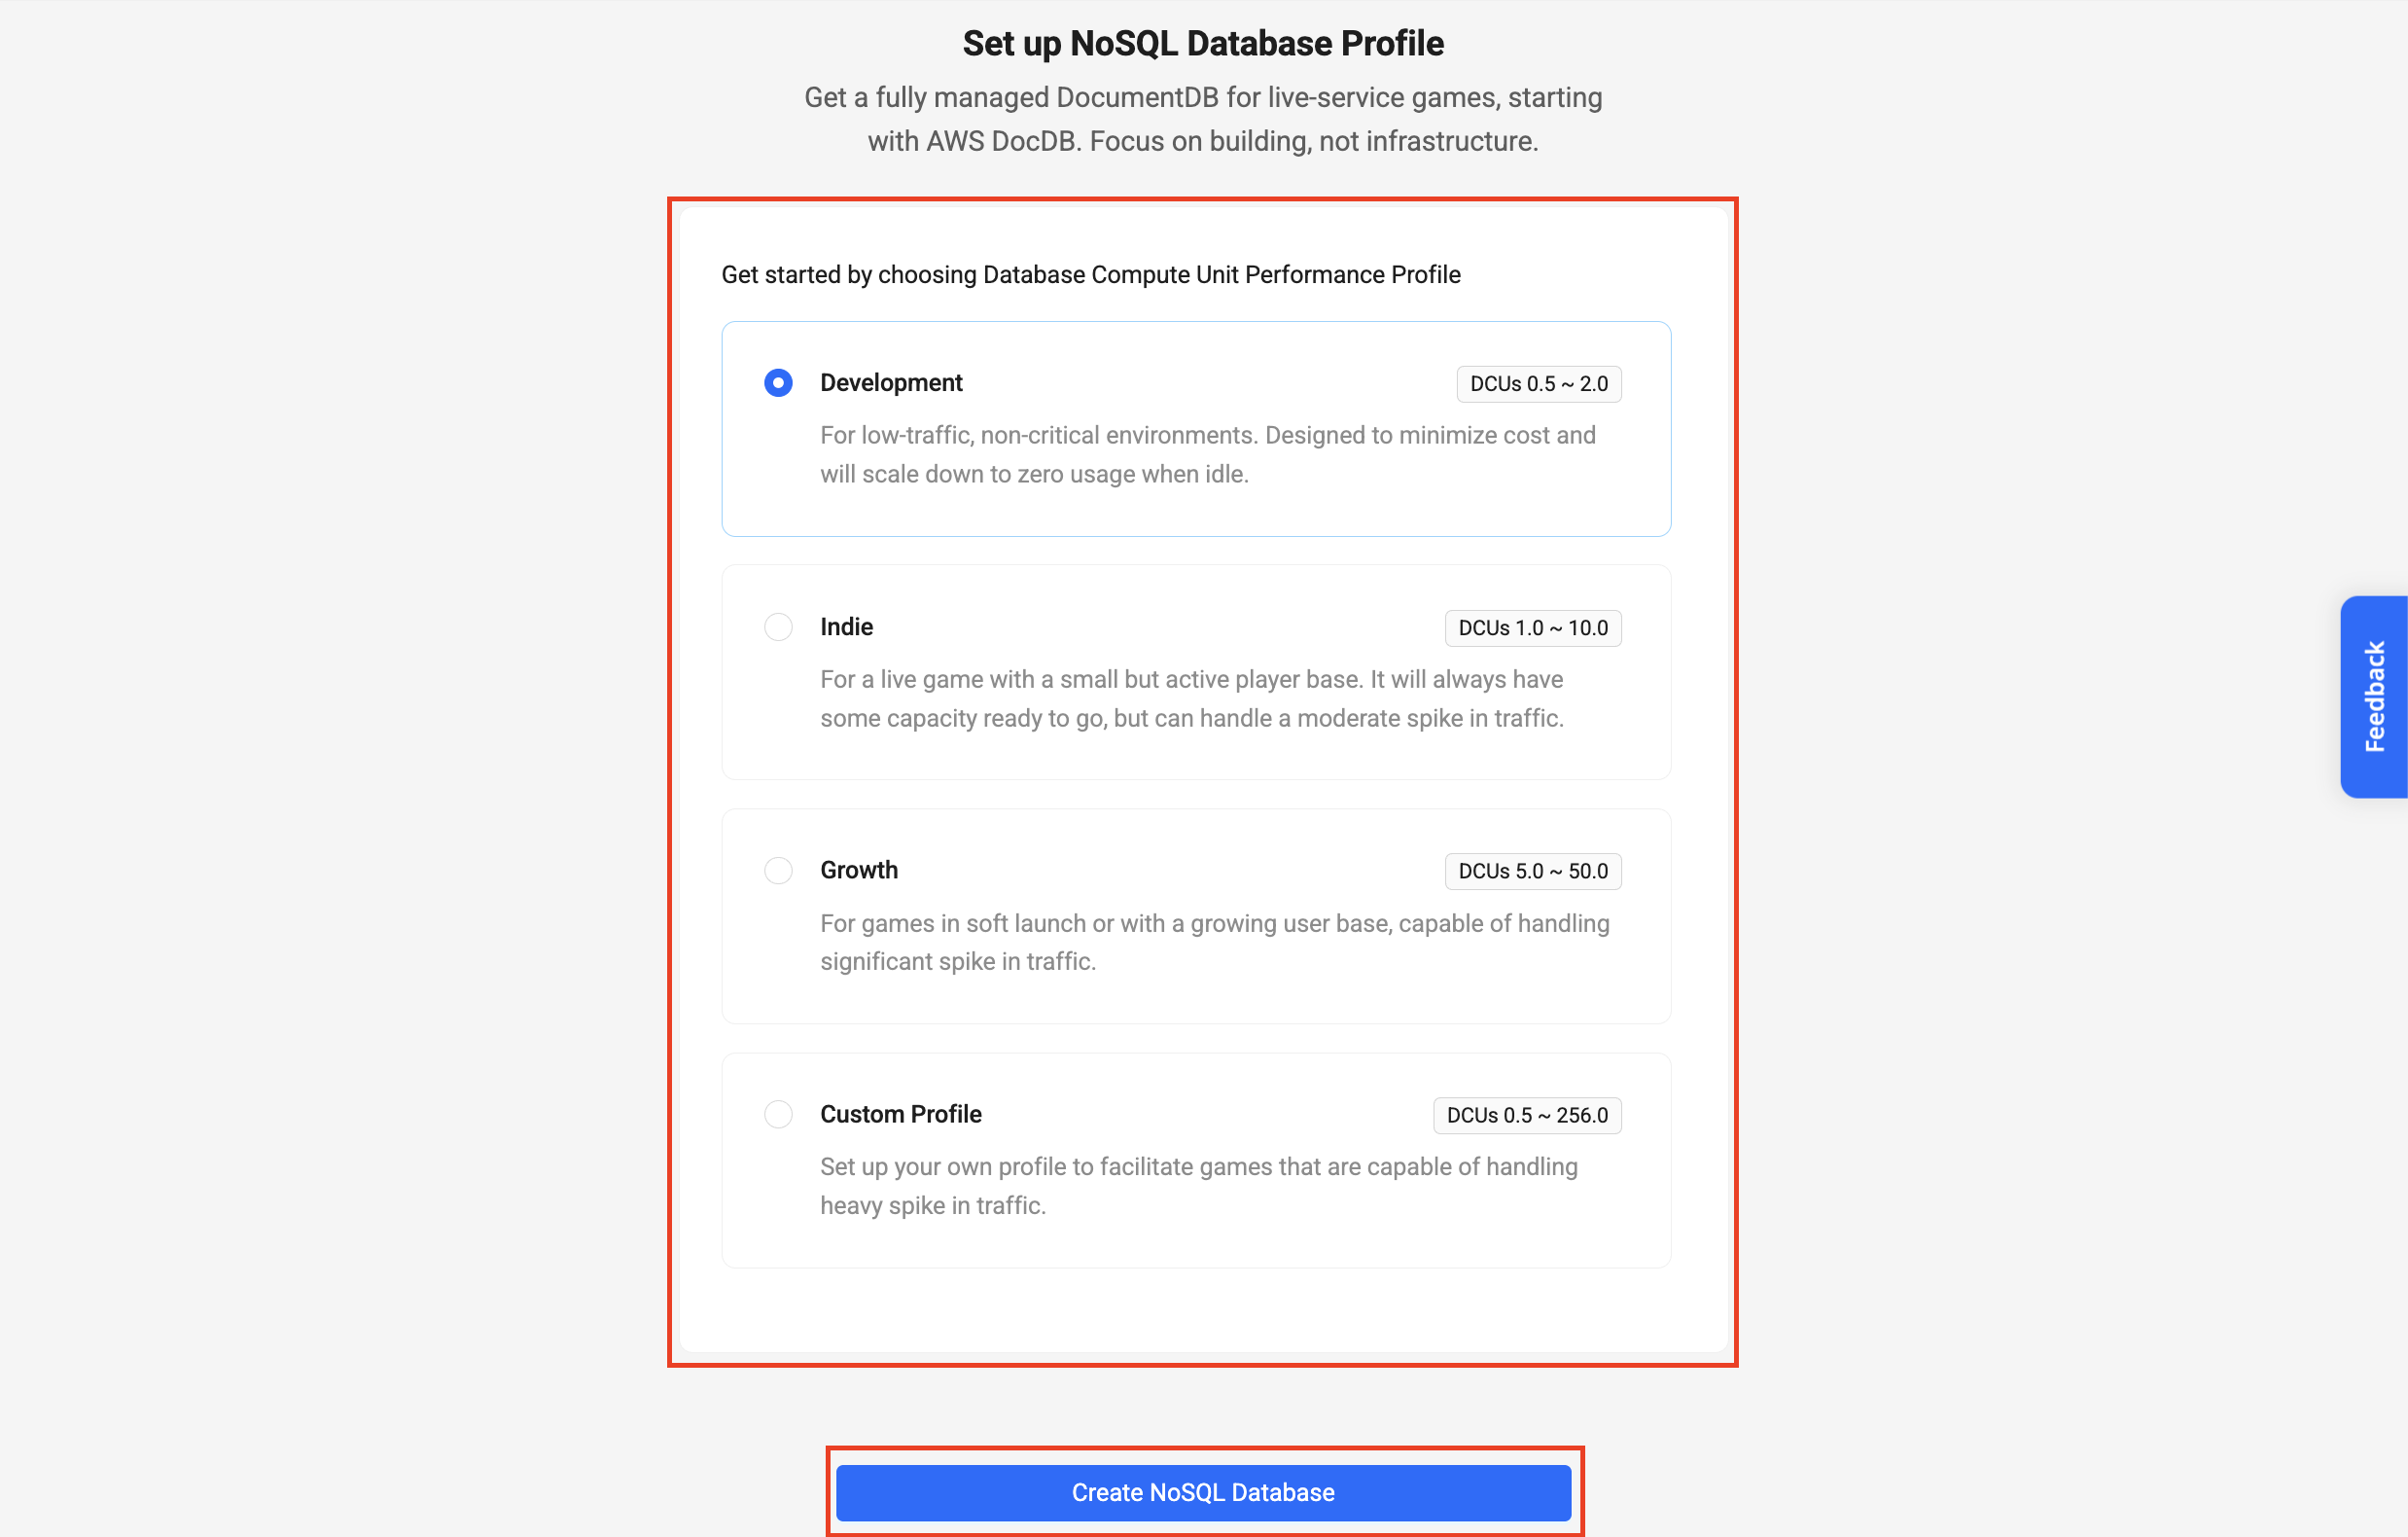
-
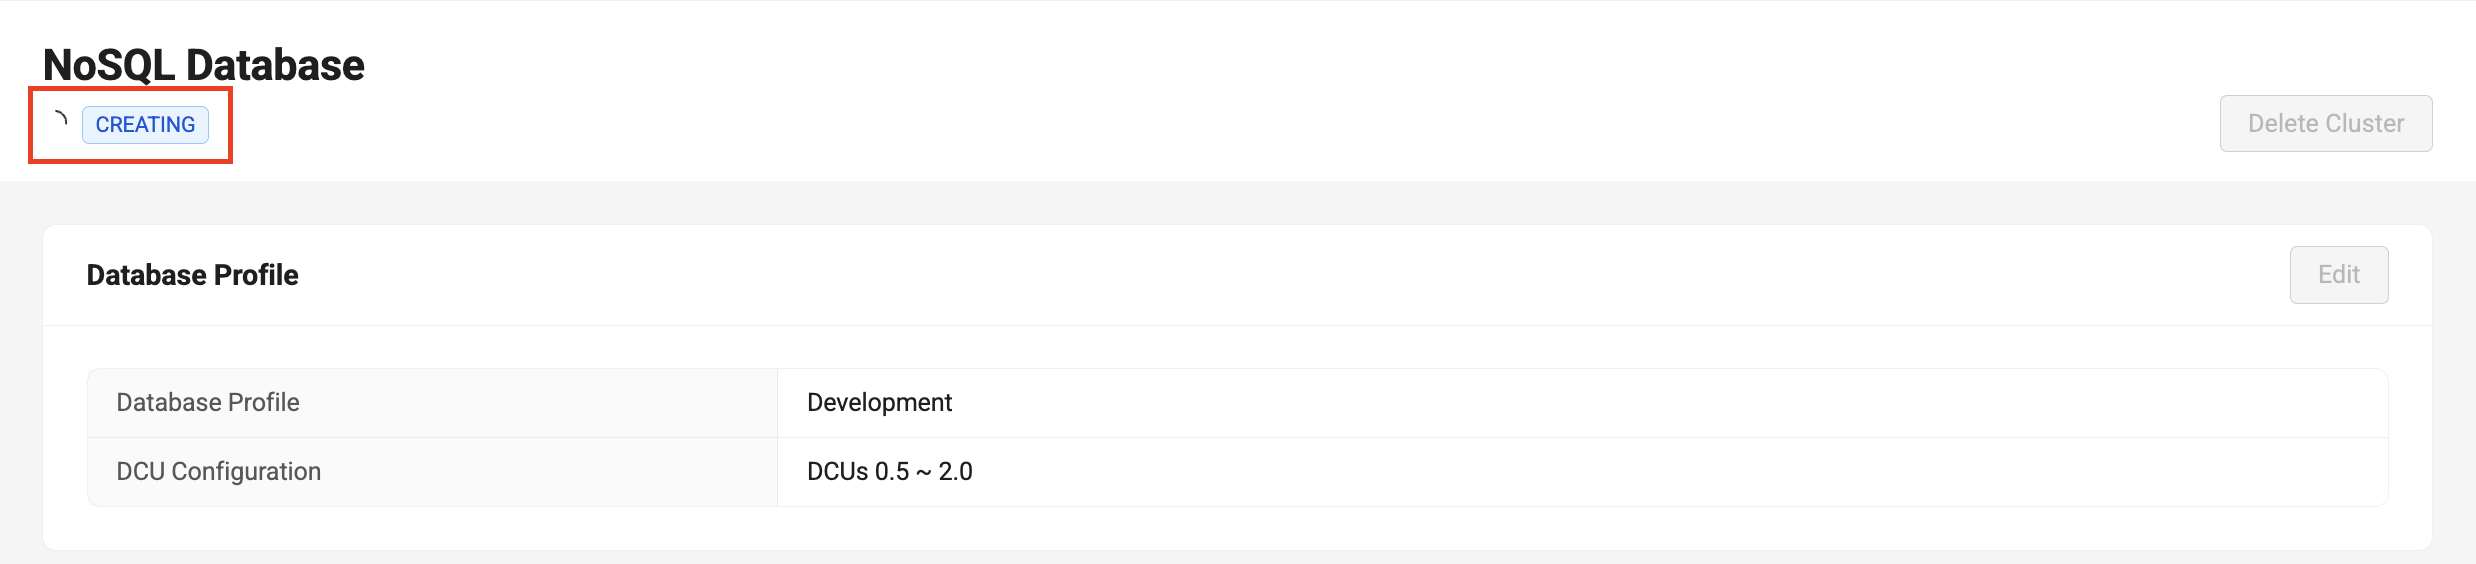
Wait for the cluster to be provisioned for a few minutes.
-
The Status will change to
Availableonce the cluster is provisioned.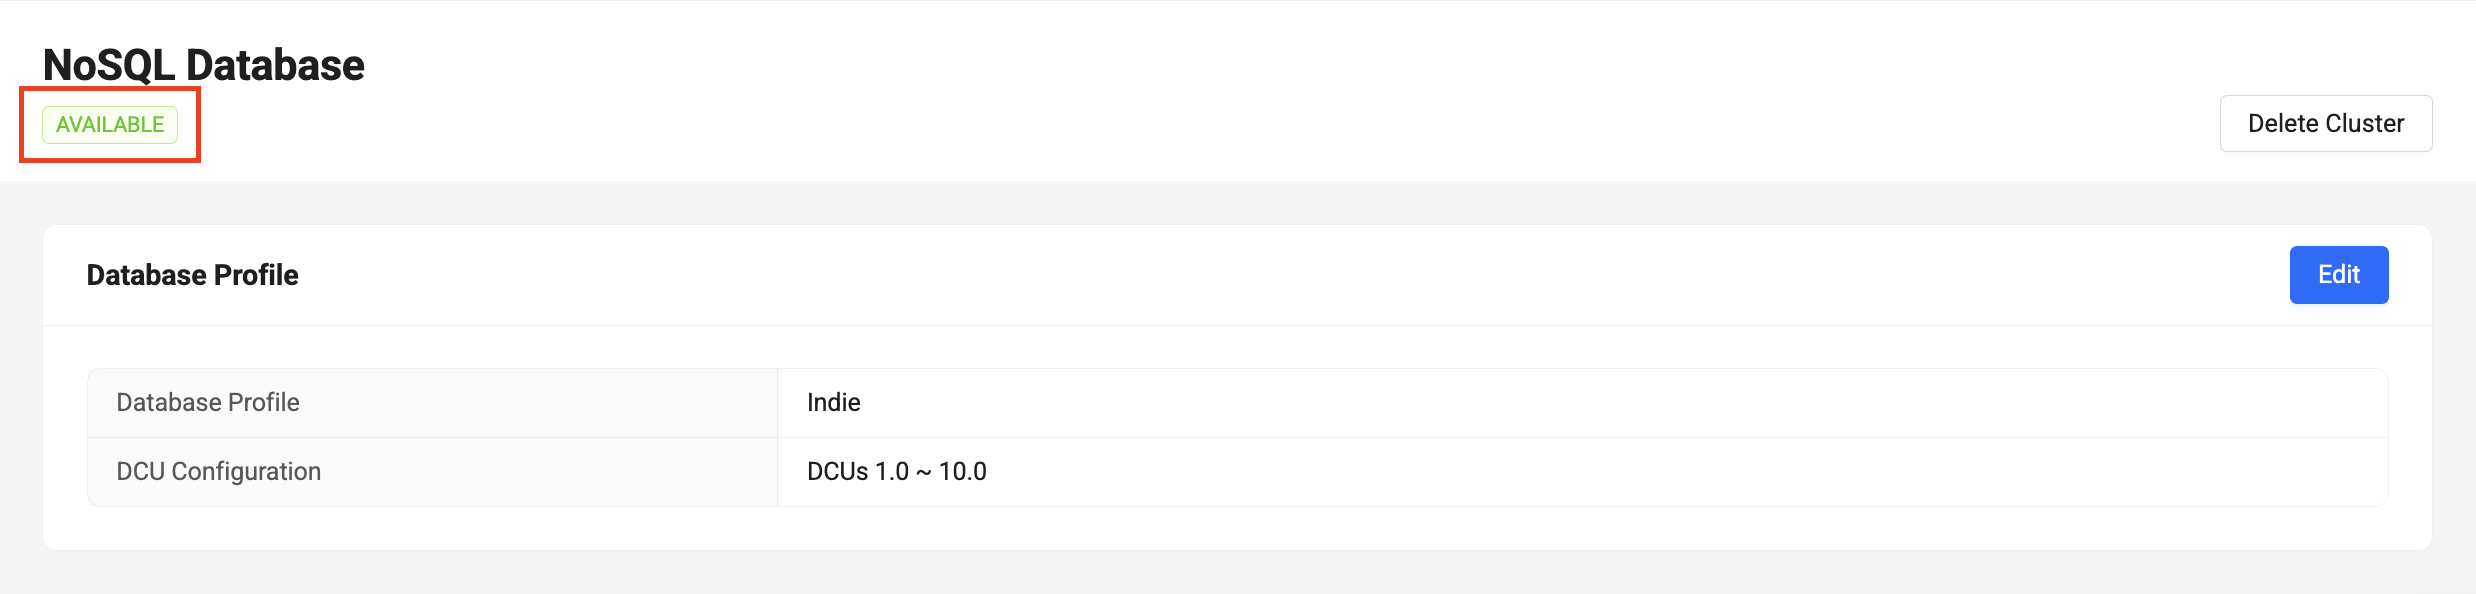
-
To integrate your Extend App with the Extend NoSQL Database, proceed to the
Setting up Extend NoSQL Database for your Extend Appsection.
Update Extend NoSQL Cluster Database Profile
You can update the database profile if you need to change the cluster size. This action can be performed in the Publisher or Studio namespace level.
-
In the
Extend Database Integrationmenu, click theEditbutton.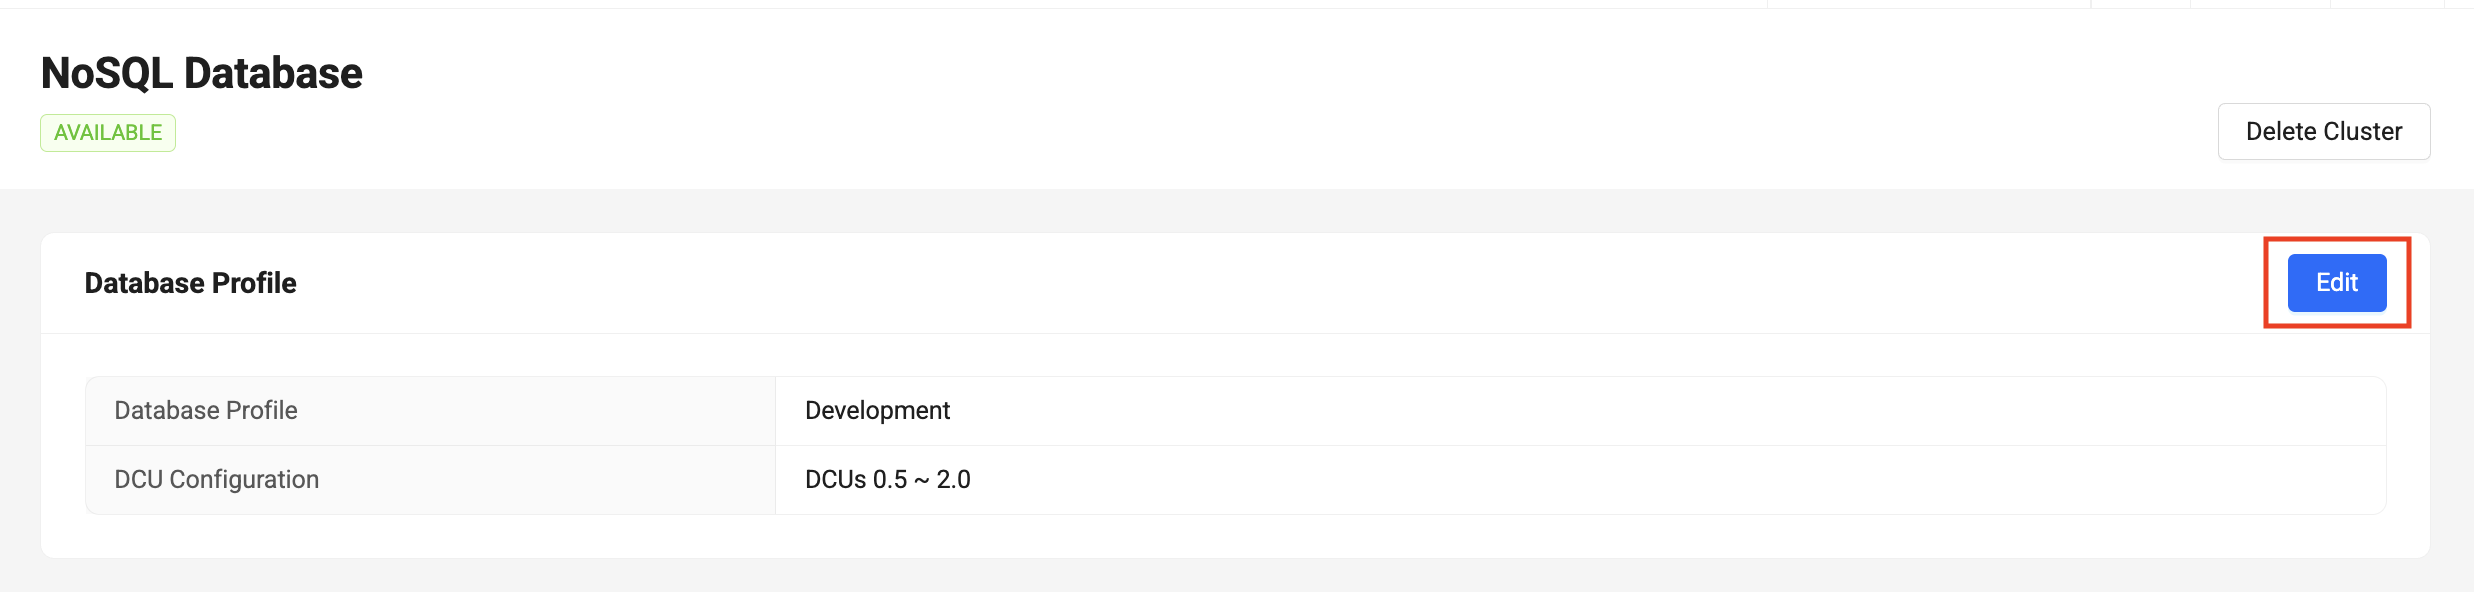
-
Select the Extend NoSQL Database profile based on your needs then click the
Updatebutton.
-
In the confirmation dialog, enter
Updateto confirm the update action and click theUpdatebutton.
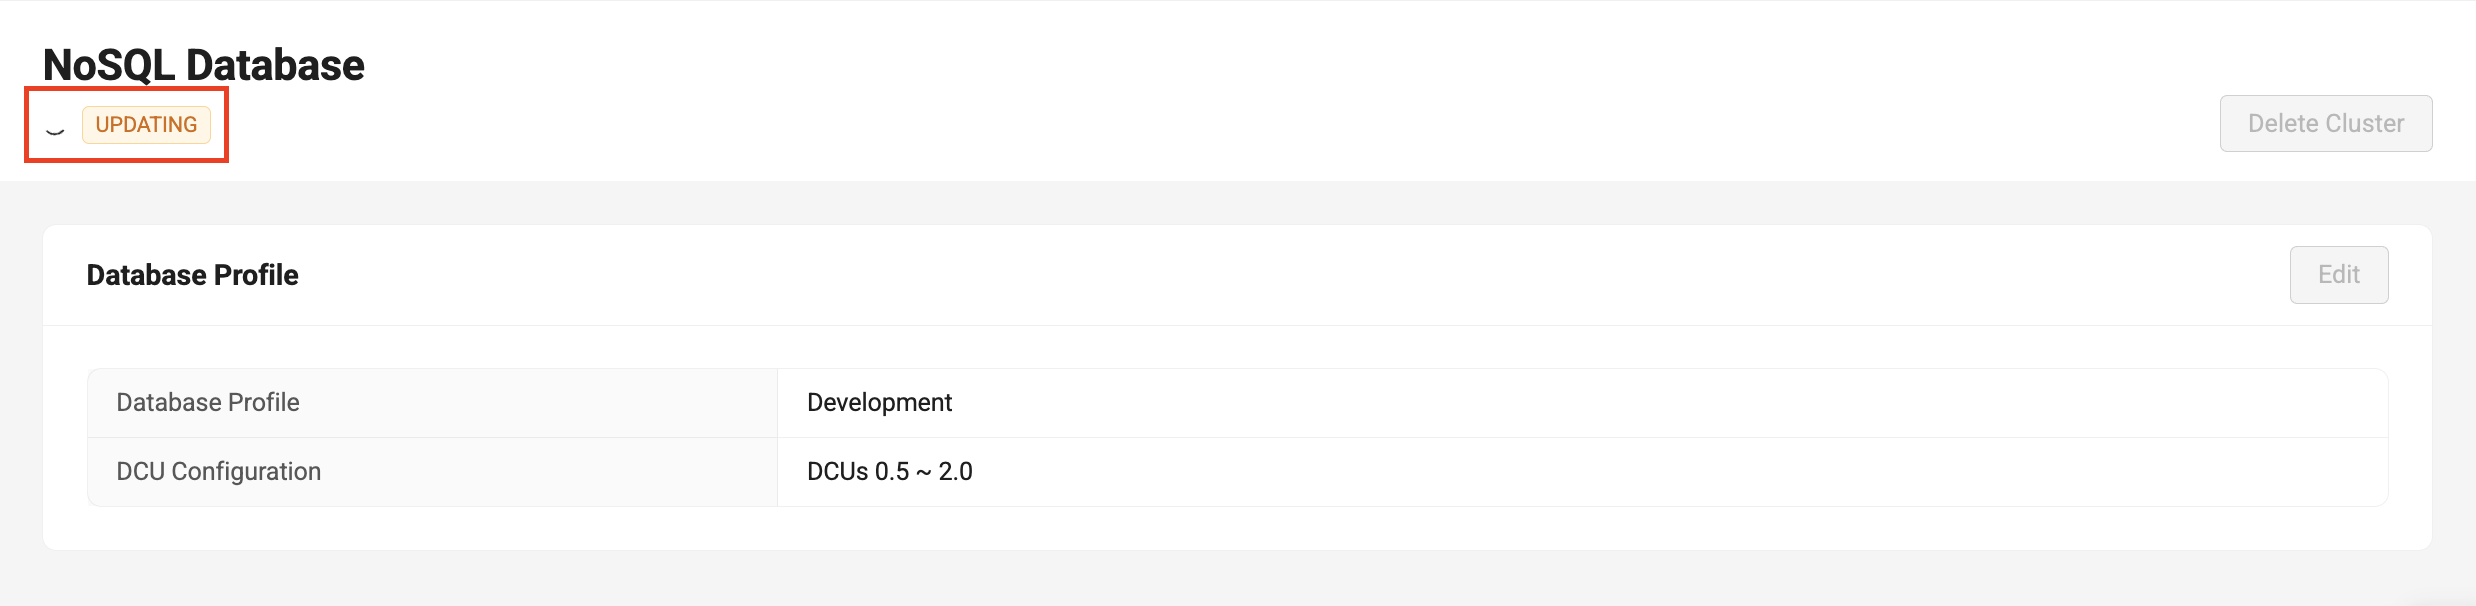
-
Wait for the cluster to be updated.
-
The Status will change to
Availableonce the cluster is updated.
Delete Extend NoSQL Cluster
You can delete the cluster when you no longer need it and it can only be deleted when it is in Available status. This action can be performed at the Publisher or Studio namespace level.
-
In the
Extend Database Integrationmenu, click theDelete Clusterbutton.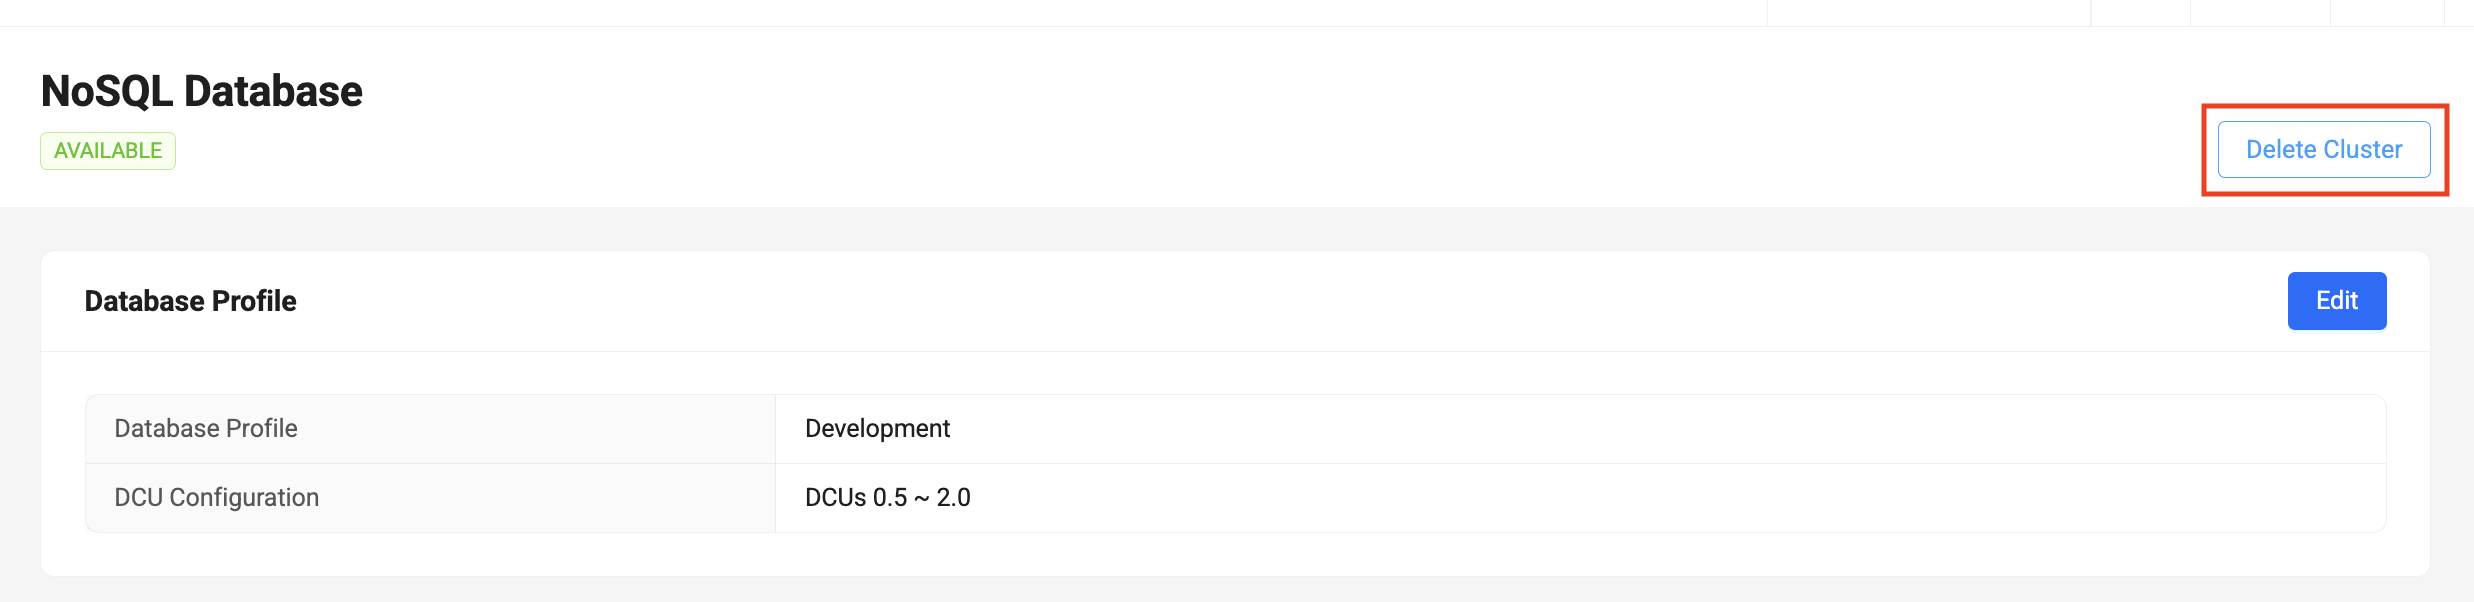
-
In the confirmation dialog, enter
Deleteto confirm the deletion and click theDelete Instancebutton.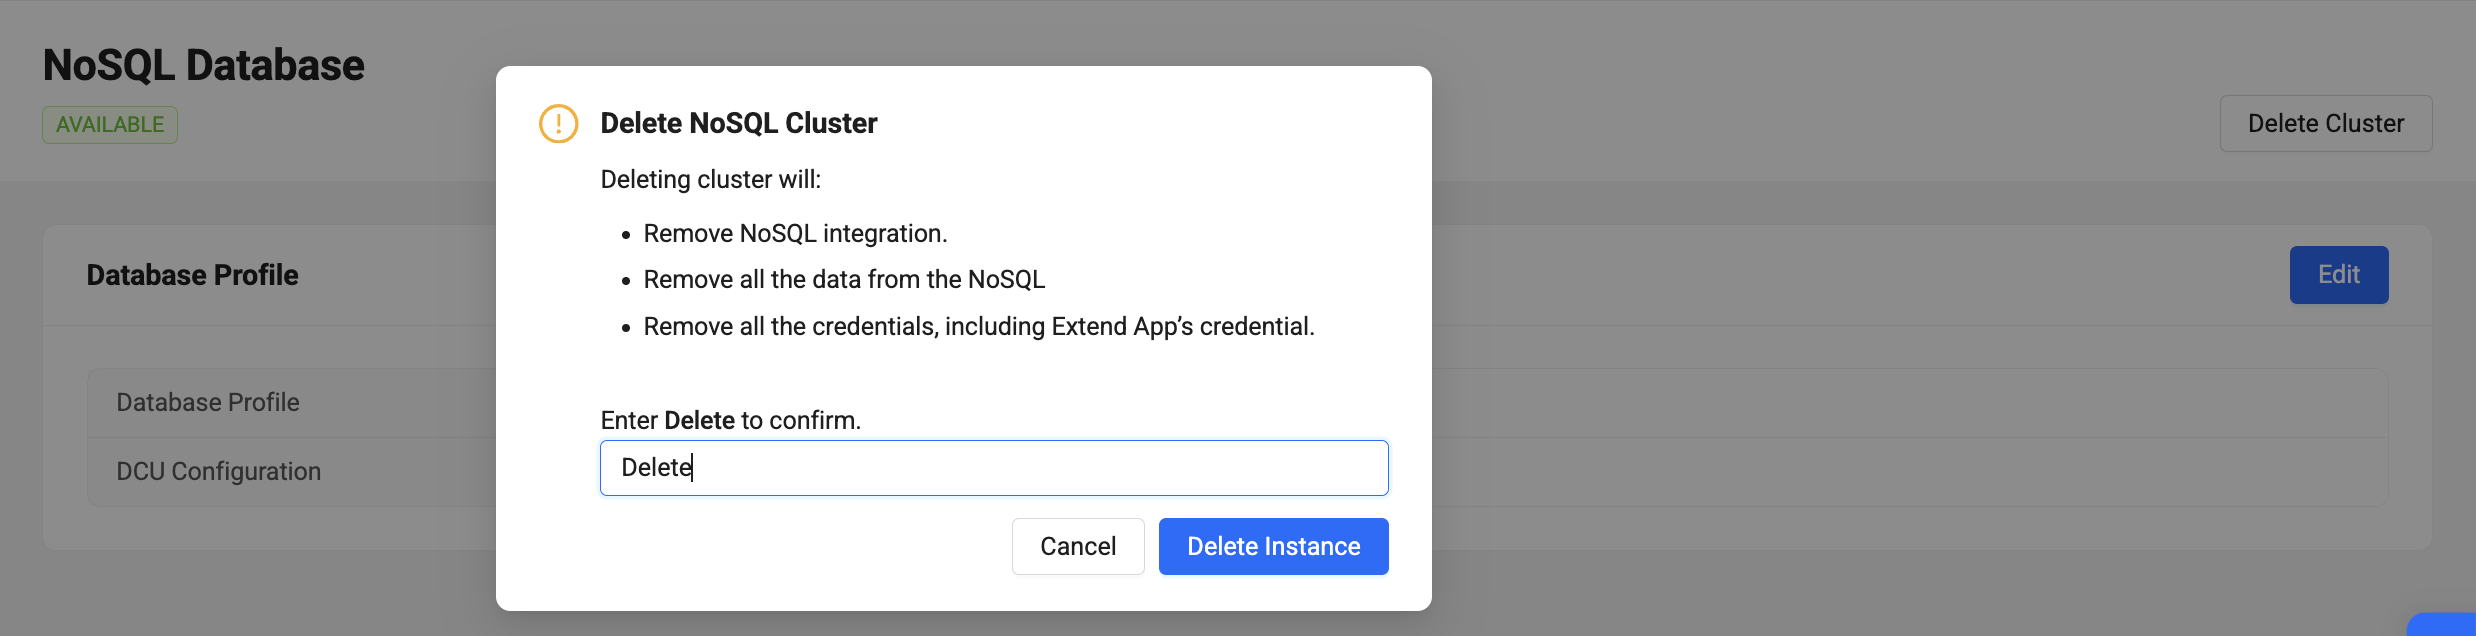
-
The page will be back to the initial
Extend Database Integrationpage once the cluster is deleted.
Setting up Extend NoSQL Database for your Extend App
This action can be performed in the Game namespace level and you can only create the database when the NoSQL cluster is in Available status.
-
In your Extend App details, switch to
NoSQL Databasetab, and click theAdd NoSQL Databasebutton.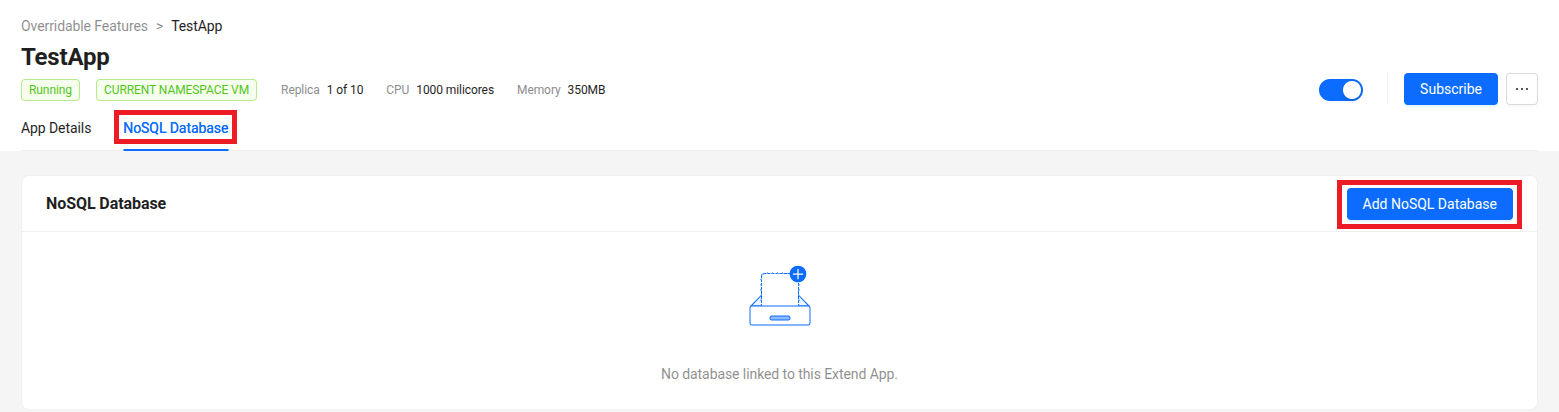
-
Enter your database name and password and click the
Addbutton.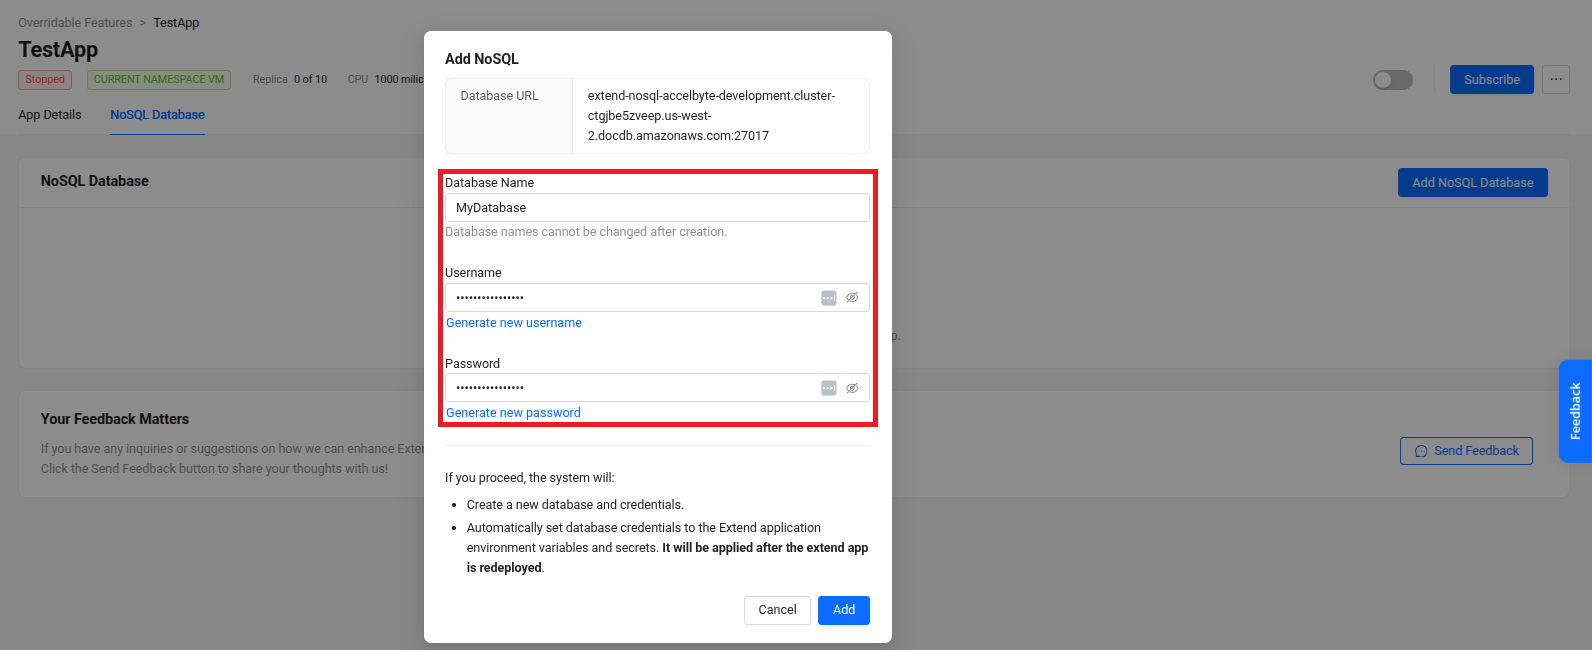
-
Take note of the information in the
Database Summarypage.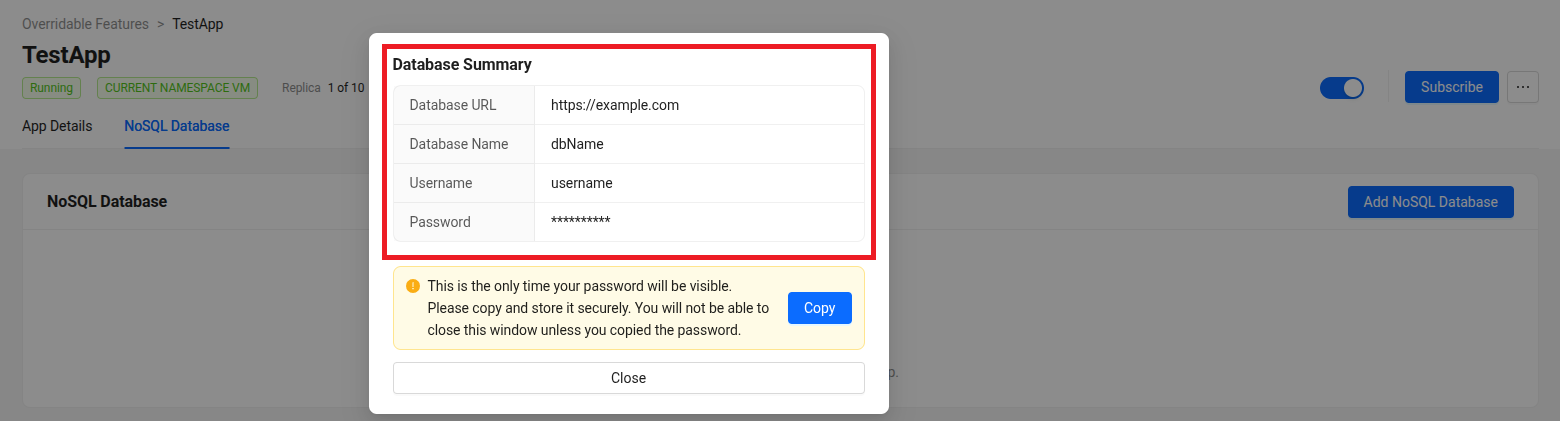
The database host, name, username, and password are automatically added to your Extend App secrets and variables as
DOCDB_HOST,DOCDB_DATABASE_NAME,DOCDB_USERNAME, andDOCDB_PASSWORD, respectively.
Connecting your Extend App to Extend NoSQL Database
-
Add MongoDB v2 driver to your Extend App.
- Go
Run the following
go getcommand to get the latest version of MongoDB driver.go get go.mongodb.org/mongo-driver/v2/mongoIt is recommended to run the
go mod tidycommand afterward.go mod tidy -
Configure the MongoDB v2 driver to connect to the NoSQL Database. Use the
DOCDB_HOST,DOCDB_USERNAME,DOCDB_PASSWORDandDOCDB_CA_CERT_FILE_PATHenvironment variables to construct the connection string.- Go
import (
    ...
    "go.mongodb.org/mongo-driver/v2/mongo"
    "go.mongodb.org/mongo-driver/v2/mongo/options"
    ...
)

...

docdbHost := os.Getenv("DOCDB_HOST")
docdbUsername := os.Getenv("DOCDB_USERNAME")
docdbPassword := os.Getenv("DOCDB_PASSWORD")
docdbCaCertFilePath := os.Getenv("DOCDB_CA_CERT_FILE_PATH")

connectionString := fmt.Sprintf("mongodb://%s:%s@%s/?tls=true&tlsCAFile=%s", docdbUsername, docdbPassword, docdbHost, docdbCaCertFilePath)

client, err := mongo.Connect(options.Client().
    ApplyURI(connectionString).
    SetRetryWrites(false).
    SetMinPoolSize(5).
    SetMaxPoolSize(30))

...importantFor compatibility with Amazon DocumentDB,
SetRetryWritesmust be set tofalse.importantTLS is enabled by default on the cluster. The option
tlsmust be set totrue. The TLS certificate is automatically added and is exposed byDOCDB_CA_CERT_FILE_PATHenvironment variable. -
Connect to the MongoDB database and use it to insert, update, find, or delete documents. Use the
DOCDB_DATABASE_NAMEenvironment variable for the database name.- Go
...

docdbDatabaseName := os.Getenv("DOCDB_DATABASE_NAME")

database := client.Database(docdbDatabaseName)

...ヒントTo learn how to insert, update, find, or delete documents, check out the public documentation here.
Accessing the Extend NoSQL Database through Extend TCP Tunneling
You can connect to your Extend NoSQL Database from a local development environment using Extend TCP Tunneling via the Extend Helper CLI. You can only perform this action when the NoSQL cluster is in Available status.
-
Make sure the Extend Helper CLI is set up. Then add the following permission to the IAM client you use with it.
- For AGS Private Cloud customers:
ADMIN:NAMESPACE:{namespace}:EXTEND:TUNNEL [READ]
- For AGS Shared Cloud customers:
- Extend > TCP Tunneling (Read)
- For AGS Private Cloud customers:
-
Copy the
Resource Nameinformation from theNoSQL Databasetab.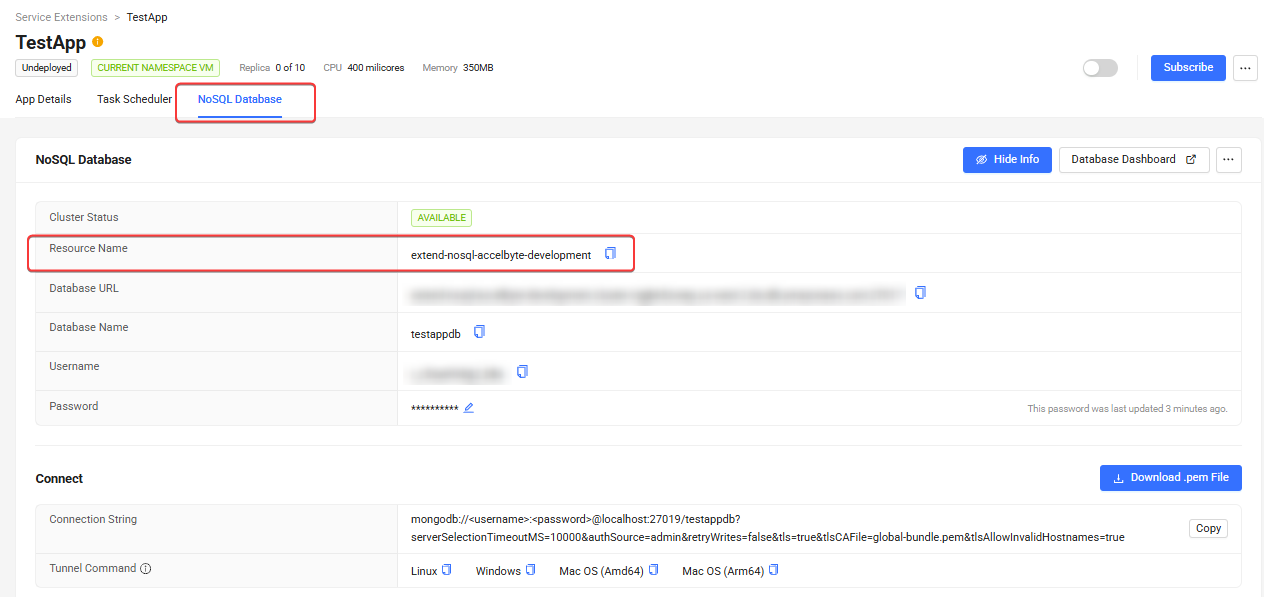
-
Start Extend TCP Tunneling to the Extend NoSQL Database using Extend Helper CLI. Pass the
Resource Nameinformation from step 2 as the--resource-nameoption parameter.extend-helper-cli tunnel --resource-name <Resource Name> --namespace <namespace> --local-port <port>importantAuthentication may fail if your system clock is not synchronized. Please ensure your local time is accurate before executing the command.
ヒントYou can also copy the full command from the
Tunnel Commandinformation in theNoSQL Databasetab. -
Make sure you have downloaded the AWS DocumentDB TLS certificate from
https://truststore.pki.rds.amazonaws.com/global/global-bundle.pem(TLS is enabled and requires the certificate to connect). -
Use your MongoDB client (such as MongoDB Compass, Studio 3T, or mongosh) to connect to the Extend NoSQL Database through the local port you specified in step 3. Use your database name, username, and password from the information you noted when setting up the database. The connection string should look like the following.
mongodb://<username>:<password>@localhost:<port>/<database-name>?serverSelectionTimeoutMS=10000&tls=true&tlsCAFile=<path-to-certs-file>&tlsAllowInvalidHostnames=trueimportantMake sure to include
serverSelectionTimeoutMS=10000option in the connection string. Otherwise, you may have trouble connecting. You may also try to use a bigger value than 10000 if you still have a problem connecting.The option
tlsAllowInvalidHostnames=trueis used to allow TLS connected via localhost.
Samples
The sample Extend App below is an Extend Service Extension guild service that stores its data in Extend NoSQL Database.
- Go
git clone https://github.com/AccelByte/extend-service-extension-with-mongodb-go.git
Observability
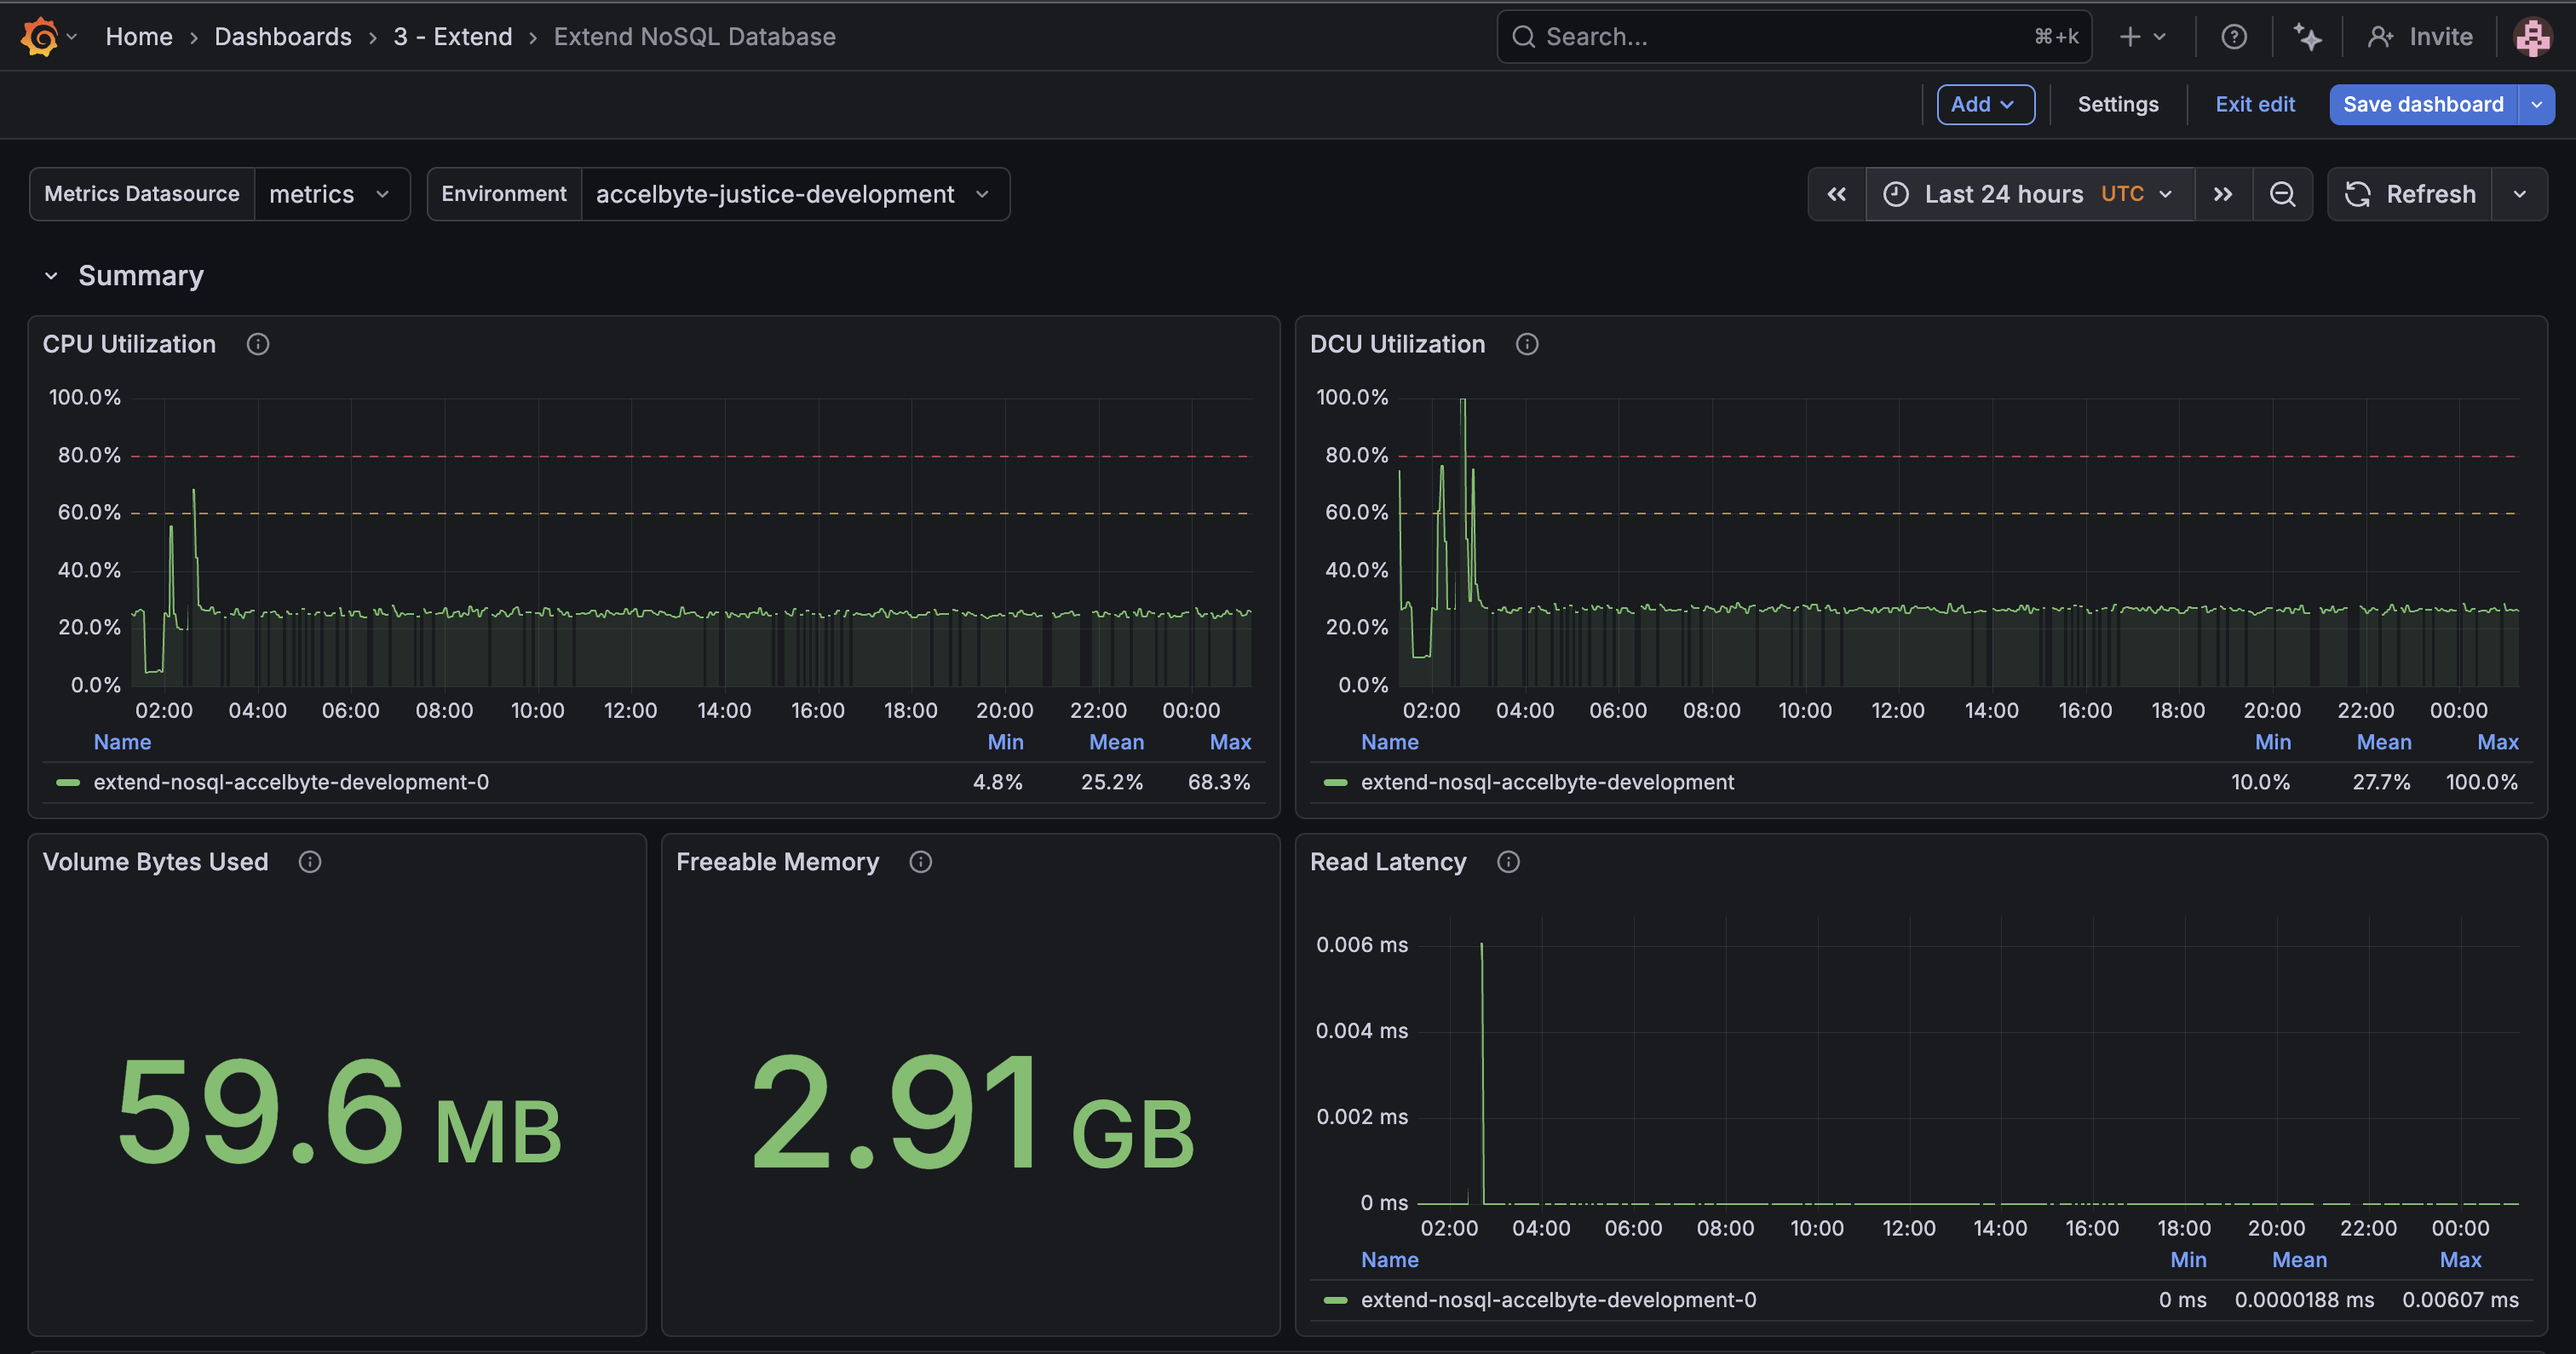
You can monitor your NoSQL cluster performance through a Grafana Cloud dashboard. The dashboard provides panels displaying key performance metrics including CPU utilization, latency, IOPS, database connections, etc, allowing you to identify bottlenecks and optimize your application's database usage.
-
In
NoSQL Databasetab, and click theDatabase Dashboardbutton.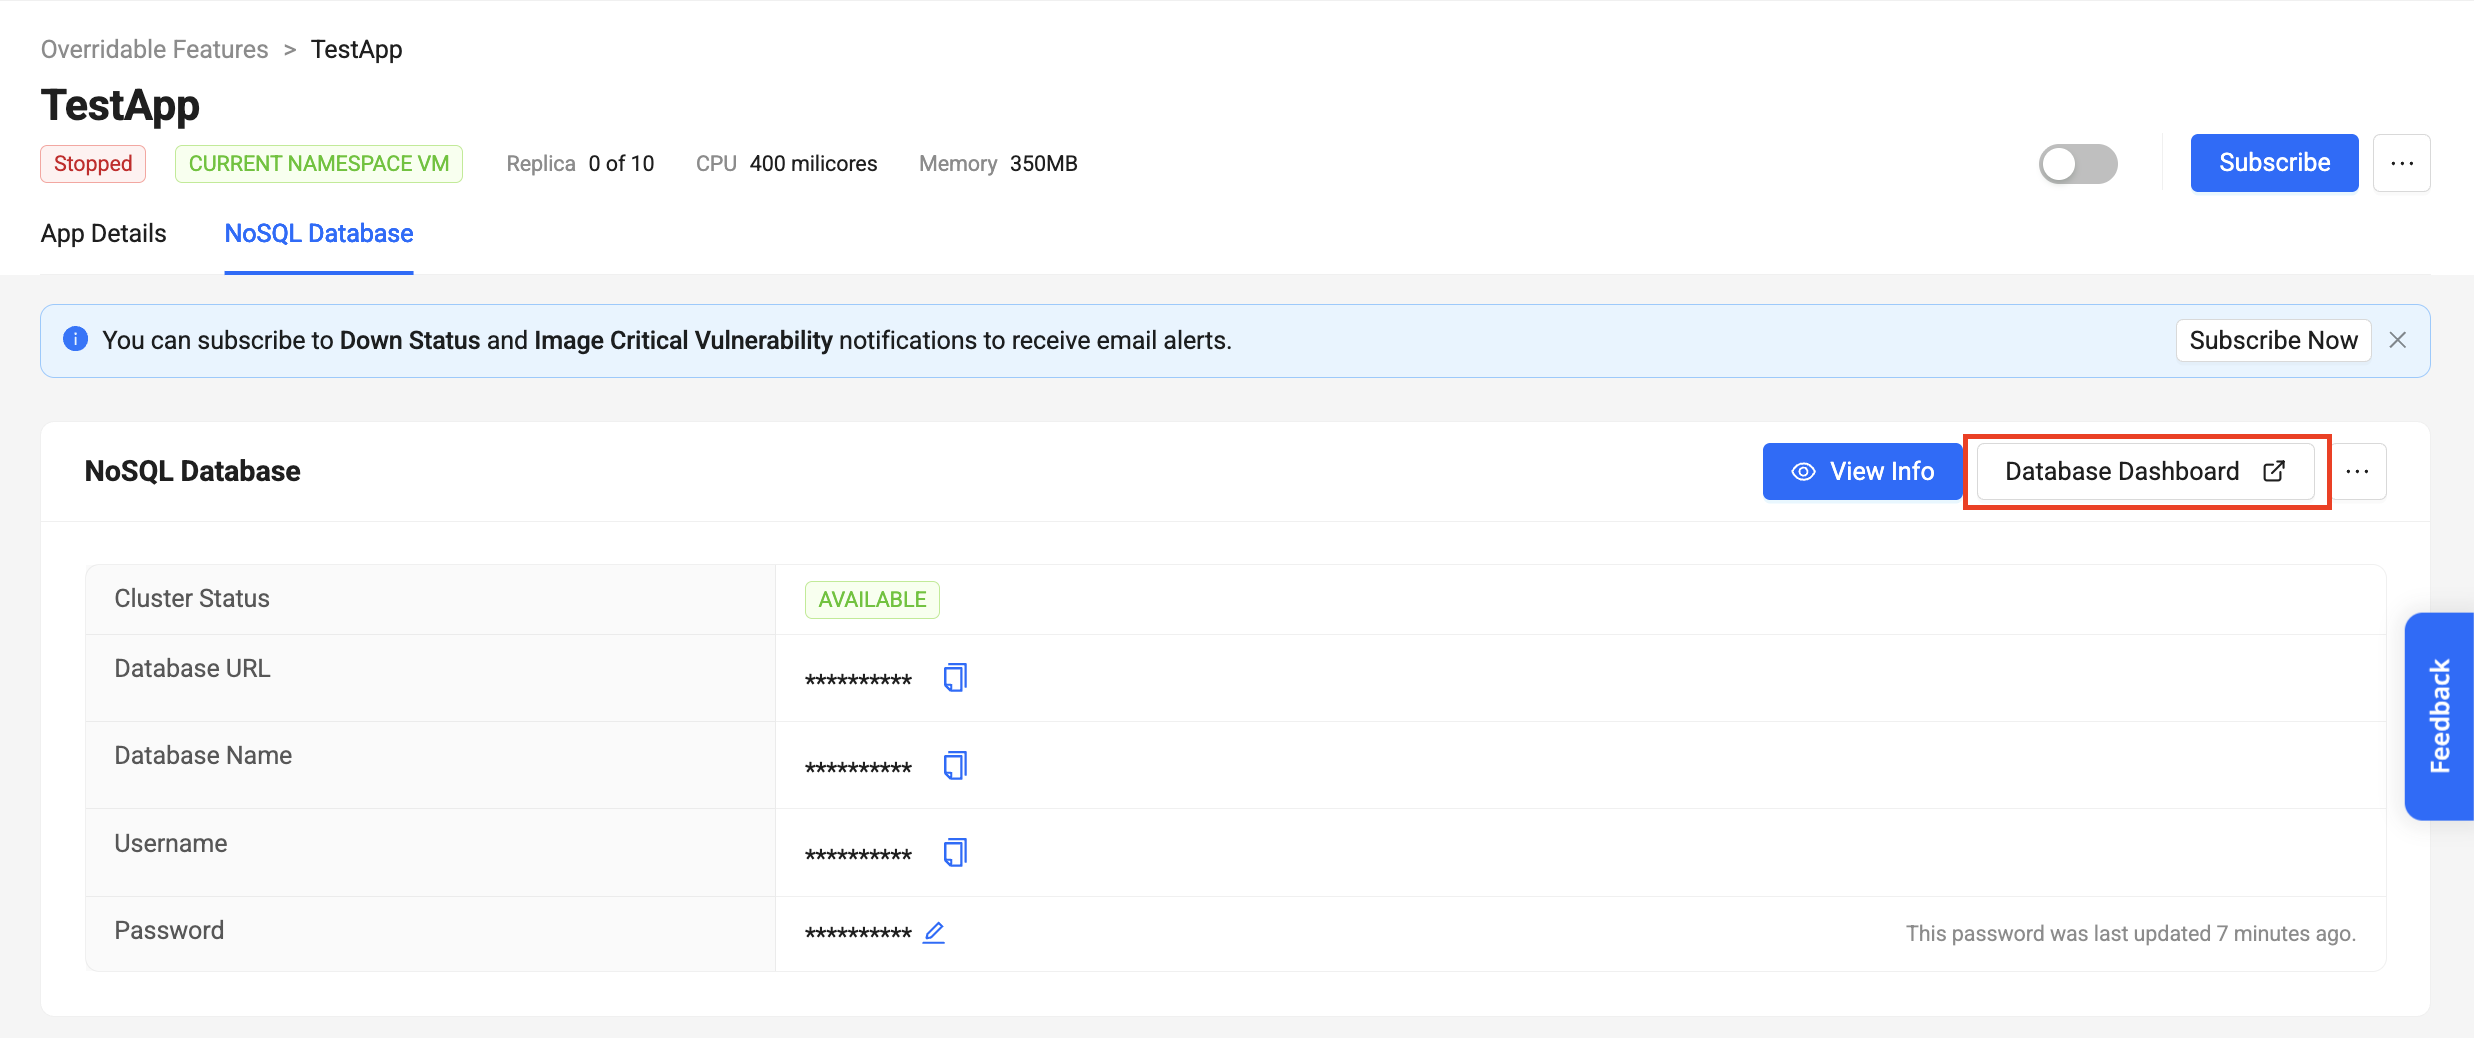
-
It will open a new tab with the Grafana Cloud Login page. Login with AccelByte credentials by clicking the
Sign in with Admin Portalbutton.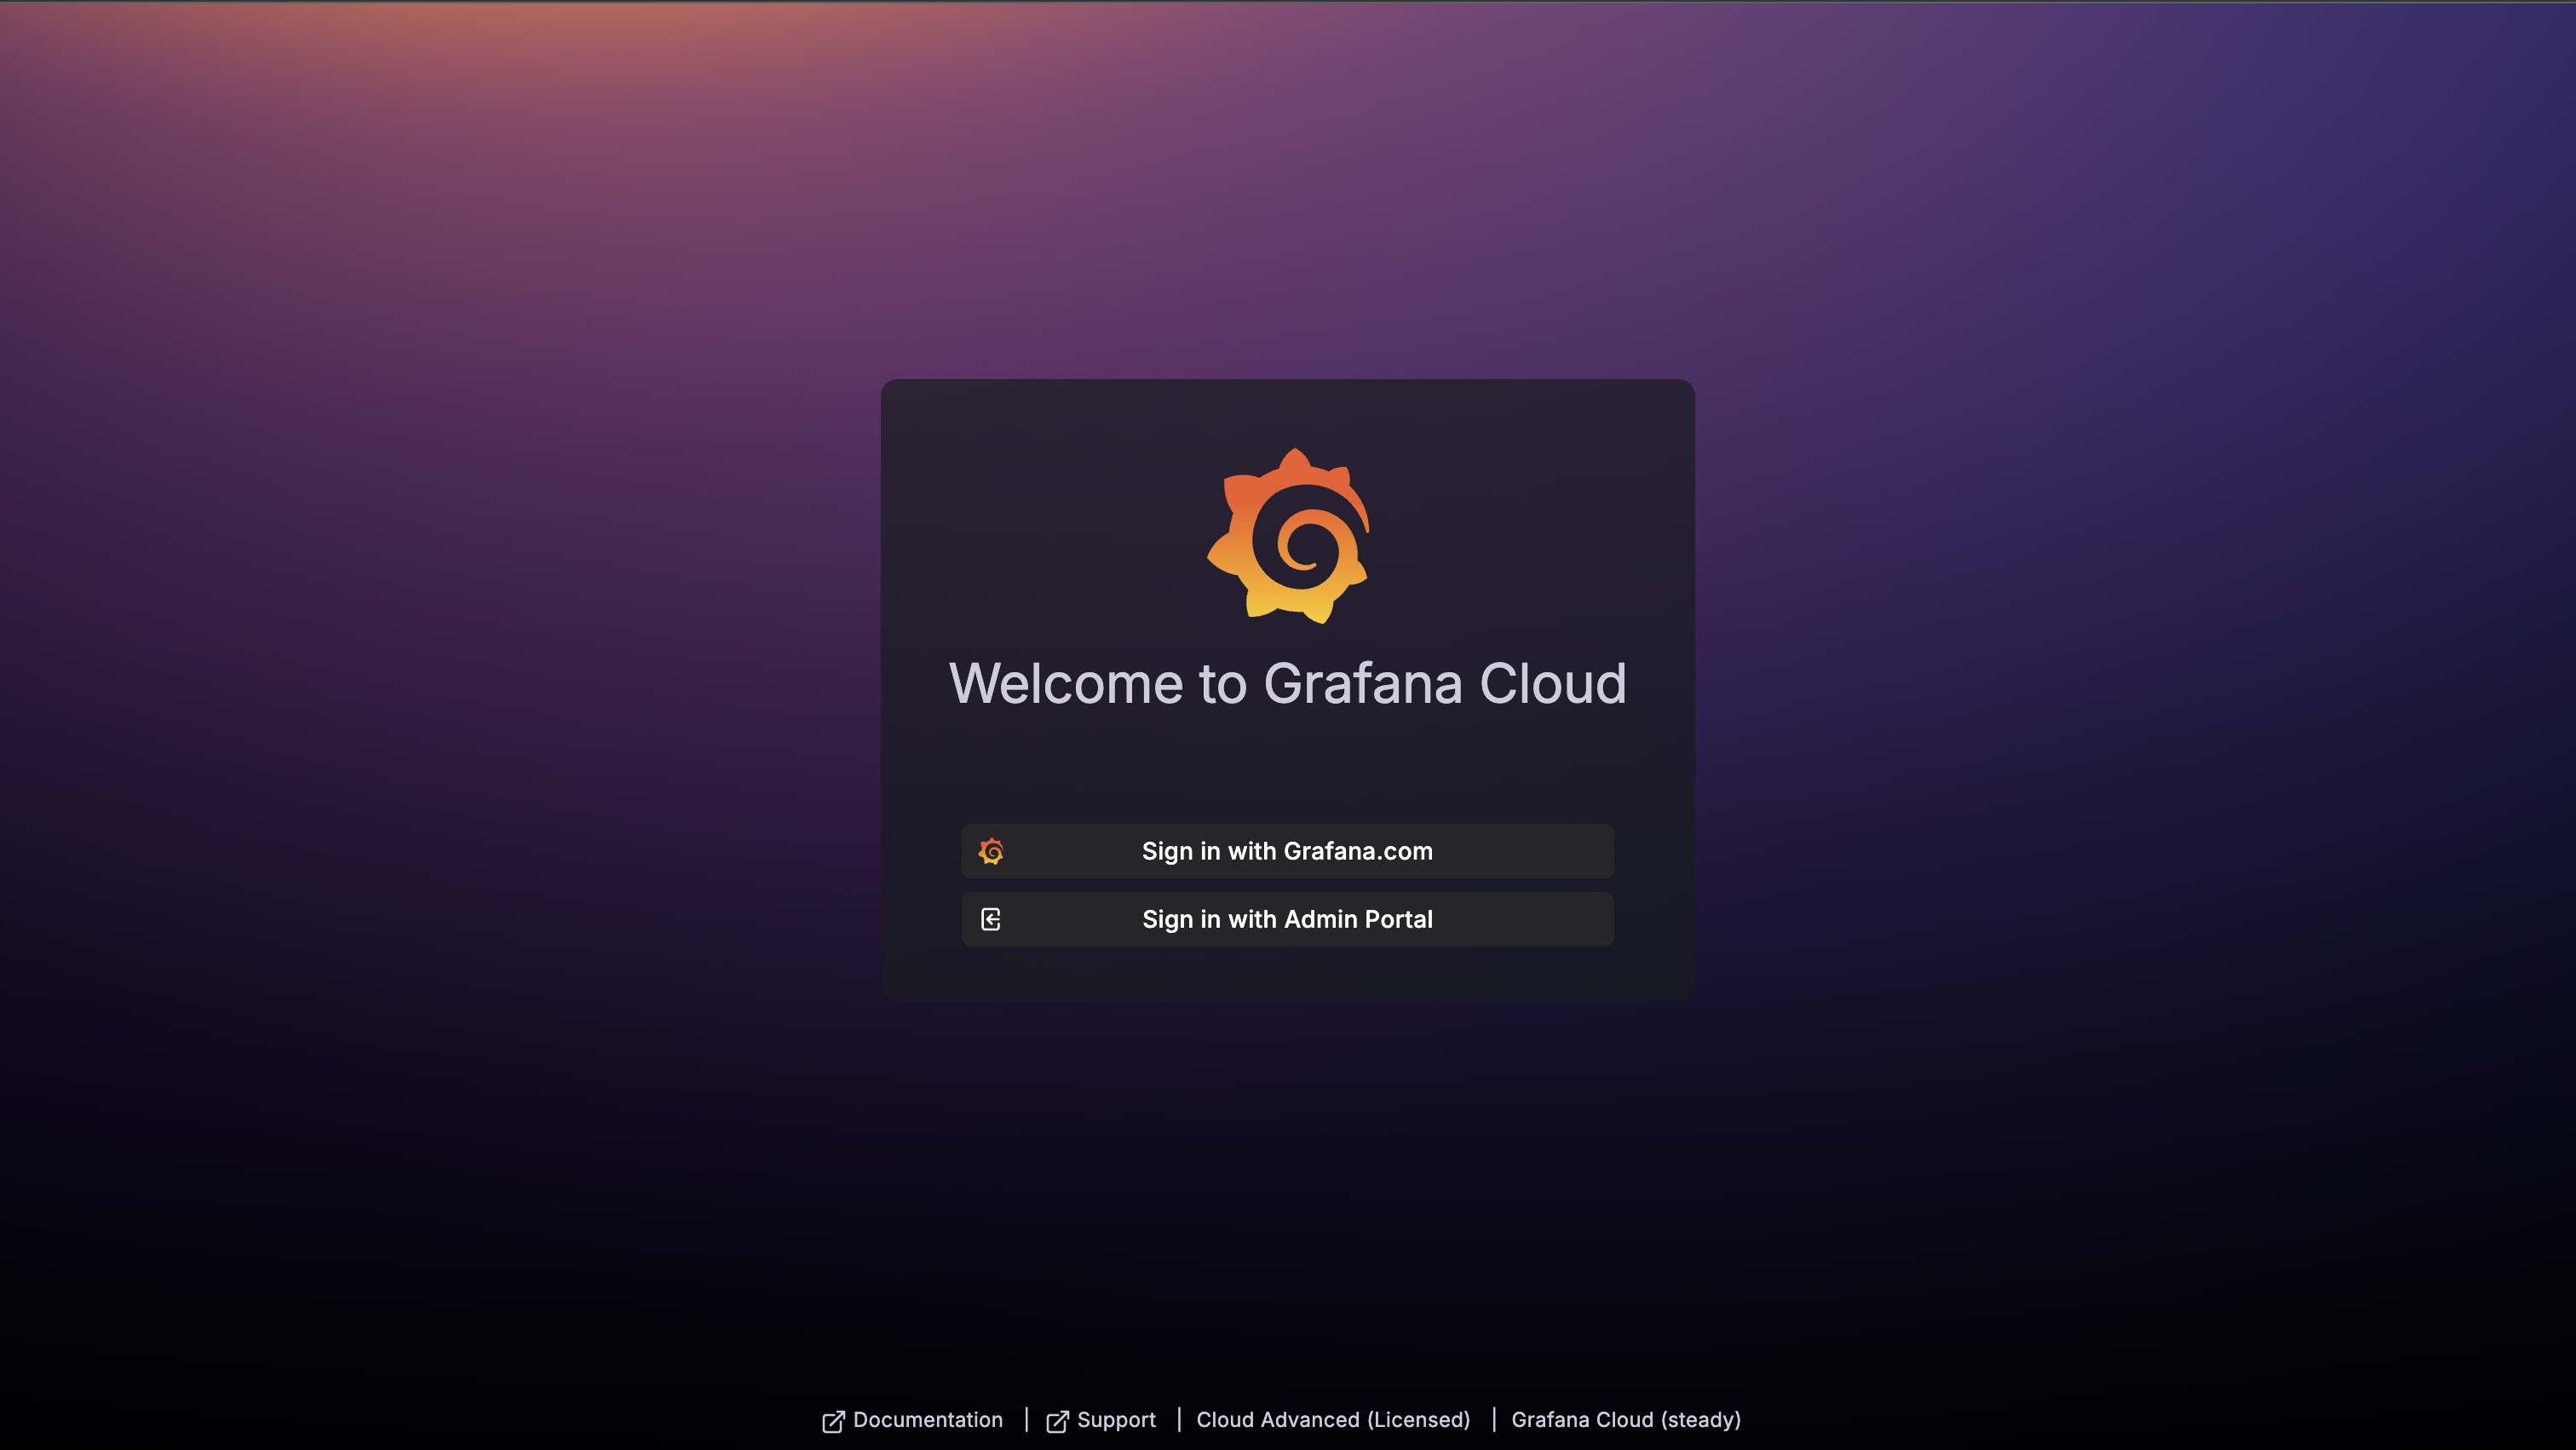
-
Once you are logged in, you will see the dashboard.