エンタイトルメントを管理する
Overview
The AccelByte Gaming Services (AGS) Entitlements service manages individual player ownership of items that they have purchased or otherwise received. You can use Entitlements to grant or revoke instances of items to or from players. Item creation and configuration is handled in Stores.
There are two types of entitlements:
- Durable entitlements: are non-stackable and permanent. They do not disappear after use. Examples of durable entitlements include, game skins, weapons, unlockable characters, and many other possibilities.
- Consumables: disappear after use. Consumables can be stackable or non-stackable; multiple stackable items will be under the same entitlement whereas multiple non-stackable items will each have their own entitlement, even if they result from identical items. Examples of consumable entitlements include: ammo, potions, and food.
Entitlement management lets you see the entitlement history of a particular player, or the player who owns a particular entitlement.
This article walks you through how to:
- Grant an Entitlement to a Player
- Search for a Player's Entitlements
- Disable a Player's Entitlement
- Enable a Player's Entitlement
- Revoke a Player's Entitlement
- List a Player's Entitlement History
Prerequisites
- Access to the AGS Admin Portal
- You have created the appropriate namespaces
Grant an entitlement to a player
-
On the Admin Portal sidebar, go to Commerce > Entitlements > User Entitlements.
-
On the User Entitlements page, click on the Grant Item button.
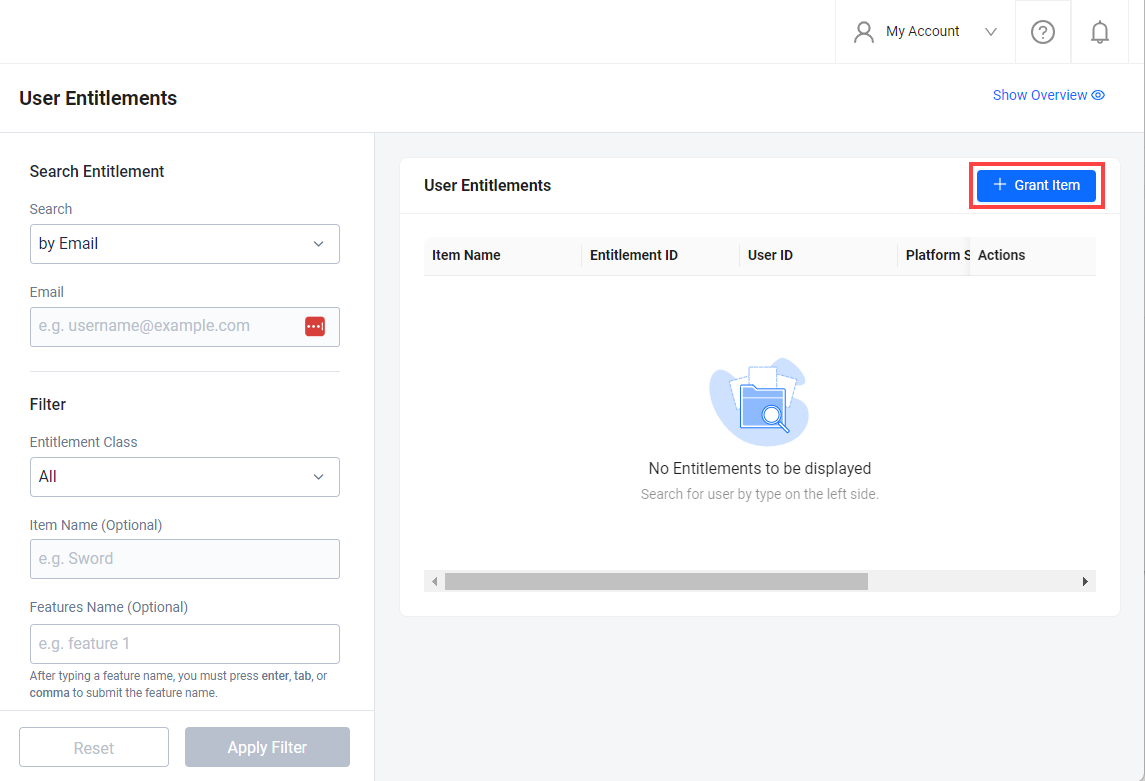
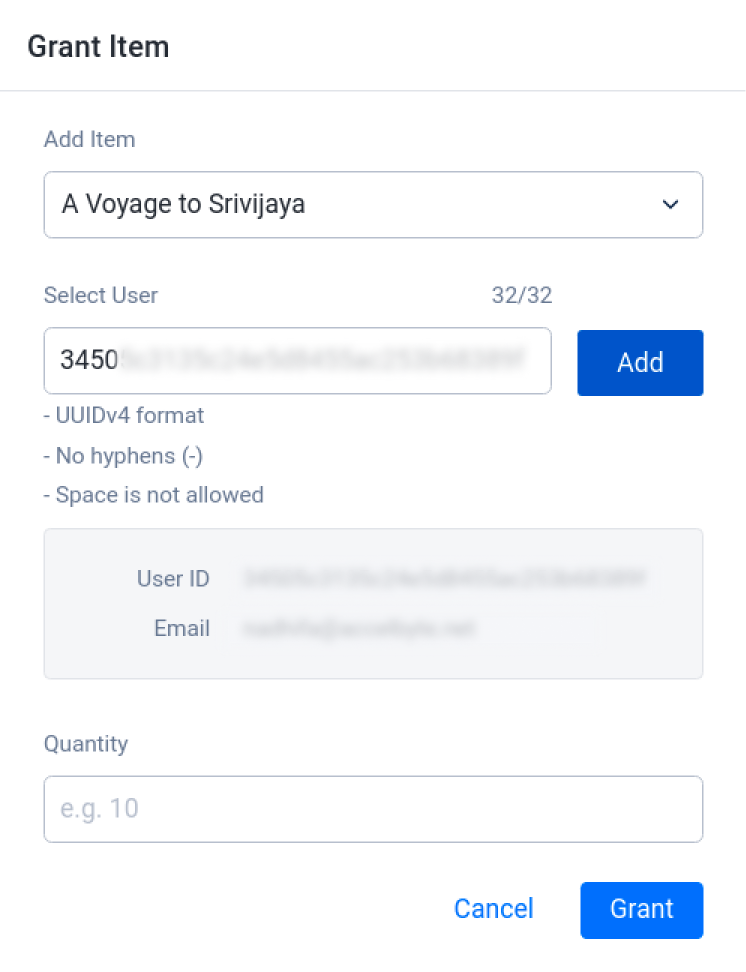
The Grant Item form will open.
-
Fill in the required fields:
- In the Add Item field, search for the item you want to grant to a player.
- Input the User ID of the player that you want to grant an entitlement to, in the Select User field. Then, click Add.
- Input the Quantity of the item you want to grant to the player.
-
Once you have completed all the fields, click the Grant button. The new entitlement will be granted to the player and will appear in the player's account.
Search for a player's entitlements
-
On the Admin Portal sidebar, go to Commerce > Entitlements > User Entitlements.
-
On the User Entitlements page, search for a player using their email address, user ID, or full entitlement ID.
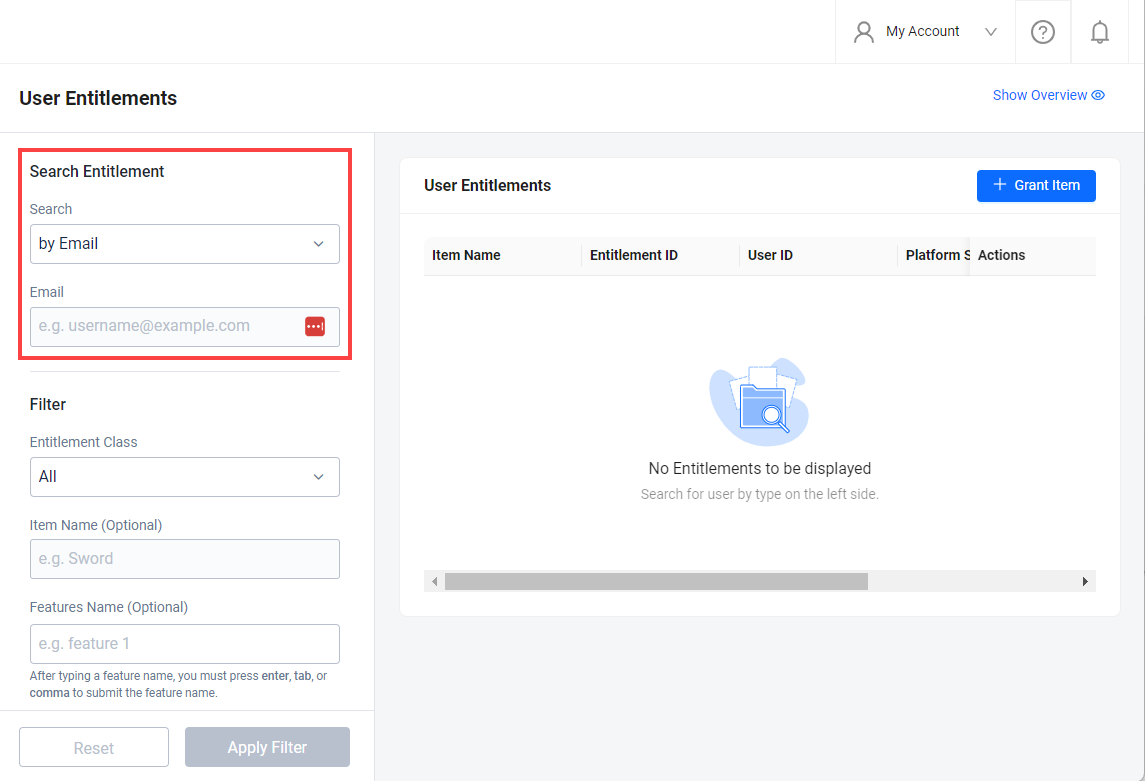
The "Full Entitlement ID" search option will show the specific entitlement based on the entitlement ID which will display the user ID of the owning player
-
(Optional) Apply filters to your search if you're searching using the player's user ID or email address. You can filter the results based on the Entitlement Class and Features Name.
-
Entitlement Class: filters results based on their item type. You can choose All, App, Entitlement, Code, Subscription, Media, Option Box, and Loot Box.
注記The Entitlement option in the Entitlement Class field gives you the option to choose an item type other than App, Code, Subscription, Media, or Option Box. To read more about item types, refer to the Monetization guide.
-
Features Name: filter results based on their features. You can enter multiple feature names by pressing Enter then adding another feature. To read more about adding feature names, including adding a feature to an item, see Set up a store.
-
Disable a player's entitlement
-
On the Admin Portal sidebar, go to Commerce > Entitlements > User Entitlements.
-
On the User Entitlements page, search for the player using their email address, user ID, or full entitlement ID.
-
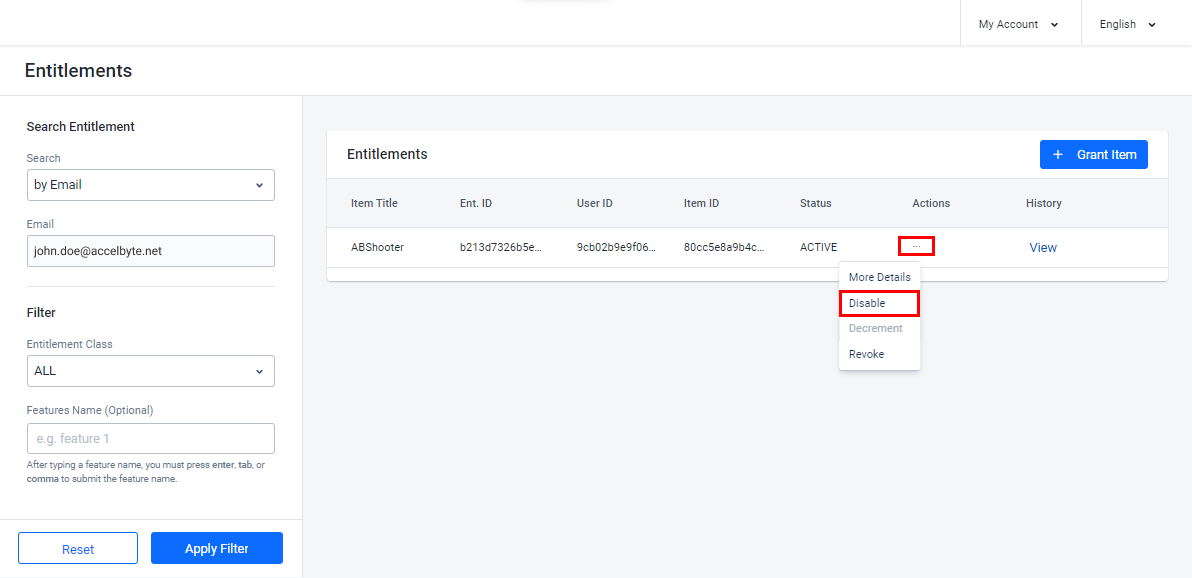
In the selected record, click the More Actions (...) icon under the Action column, then click Disable.
-
The Disable Entitlement form will open. Click Confirm.
The Status of the item will be changed to Inactive in the Admin Portal, and the item will be hidden from the player and unusable by them.

Enable a player's entitlement
-
On the Admin Portal sidebar, go to Commerce > Entitlements > User Entitlements.
-
On the User Entitlements page, search for the player using their email address, user ID, or full entitlement ID.
-
In the selected record, click the More Actions (...) icon under the Action column, then click Enable.

-
The Enable Entitlement form will open. Click Confirm.
The Status of the item will be changed to Active in the Admin Portal and the item will be again usable by the player.

Revoke a player's entitlement
-
On the Admin Portal sidebar, go to Commerce > Entitlements > User Entitlements.
-
On the User Entitlements page, search for the player using their email address, user ID, or full entitlement ID.
-
In the selected record, click the More Actions (...) icon under the Action row, and then click Revoke.
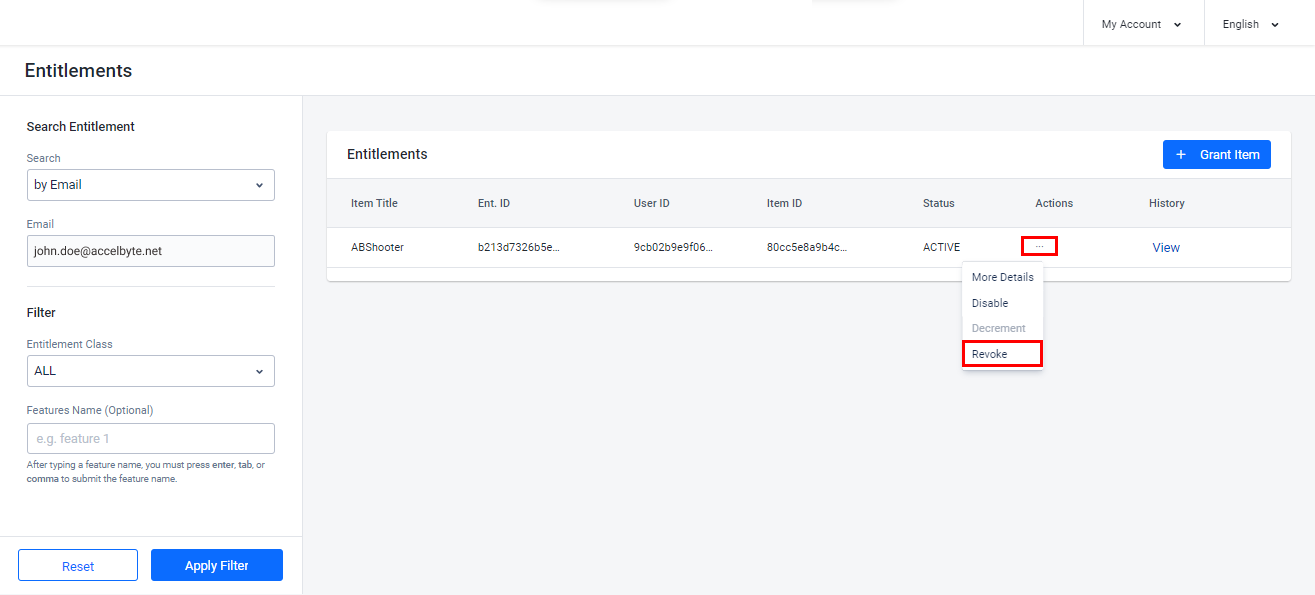
-
The Revoke Entitlement form appears. Click Confirm.
In the Admin Portal, the Status of the item will be changed to Revoked and the item will be removed from the player's account.
List a Player's Entitlement History
Entitlement history is a list of the historical status of an entitlement. For example , it was initially granted and later revoked. You can see the history of a player's entitlements through the AGS Admin Portal. To do so, follow the steps below:
-
On the Admin Portal sidebar, go to Commerce > Entitlements > User Entitlements.
-
On the User Entitlements page, search for the player using their email address, user ID, or full entitlement ID.
-
Choose the record you want to view from the list of entitlements by clicking View.
-
The Entitlement History pop-up displays the entitlement history in descending order.
Implement Entitlements with the SDKs
An entitlement is granted automatically when a player places an order for an item. The entitlement is added to their account.
Check a player's entitlements
This section covers how to check the entitlements of players with and without subscriptions.
For players with a subscription
If your game or platform offers a subscription to your players, you can use the following code to check a player's entitlements and subscription plan.
- Unreal SDK
- Unity SDK
- C# Extend SDK
- Go Extend SDK
- Java Extend SDK
- Python Extend SDK
FApiClientPtr ApiClient = AccelByteOnlineSubsystemPtr->GetApiClient("key");

FString EntitlementName = "Entitlement";
FString ItemId = "ItemId";
TArray<FString> Features = { "feature1" };
int Offset = 0;
int Limit = 20;
ApiClient->Entitlement.QueryUserEntitlements(EntitlementName, ItemId, Offset, Limit
        , THandler<FAccelByteModelsEntitlementPagingSlicedResult>::CreateLambda(
    [=](const FAccelByteModelsEntitlementPagingSlicedResult& Result)
    {
        UE_LOG(LogTemp Log, TEXT("    Success"));
    })
, FErrorHandler::CreateLambda([](int32 ErrorCode, const FString& ErrorMessage)
            {
                    UE_LOG(LogTemp, Error, TEXT("Error. Code: %d, Reason: %s"), ErrorCode, *ErrorMessage)
            }
, EAccelByteEntitlementClass::NONE
, EAccelByteAppType::NONE);
var entitlements = AccelByteSDK.GetClientRegistry().GetApi().GetEntitlement();

string entitlementName = "Entitlement";
string itemId = "ItemId";
string[] features = new string[] { "feature1" };
int offset = 0;
int limit = 20;

entitlements.QueryUserEntitlements(entitlementName, itemId, offset, limit, result =>
{
    if (result.IsError)
    {
        // Handle API failure or error here
        Debug.Log($"Error: {result.Error.Message}");
        return;
    }

    // Handle API success here
},
EntitlementClazz.NONE,
EntitlementAppType.NONE,
features);
string entitlementName = "<entitlement>";
string itemId = "<item-id>";
string[] features = new[] { "feature1" };
string userId = "<user-id>";

var response = sdk.Platform.Entitlement.QueryUserEntitlementsOp
    .SetEntitlementName(entitlementName)
    .SetItemId(new List<string>() { itemId })
    .SetFeatures(new List<string>(features))
    .SetOffset(0)
    .SetLimit(20)
    .Execute(sdk.Namespace, userId);
if (response != null)
{
    //do something if success
}
entitlementService := &platform.EntitlementService{
    Client:          factory.NewPlatformClient(&repository.ConfigRepositoryImpl{}),
    TokenRepository: &repository.TokenRepositoryImpl{},
}
namespace := "mygame"
userId := "myuserid"
entitlementName := "entitlementName"
features := []string{"feature1"}
itemId := []string{"itemId"}
limit := int32(20)
offset := int32(0)
input := &entitlement.QueryUserEntitlementsParams{
    Namespace:        namespace,
    UserID:           userId,
    EntitlementName:  &entitlementName,
    Features:         features,
    ItemID:           itemId,
    Limit:            &limit,
    Offset:           &offset,
}
result, err := entitlementService.QueryUserEntitlementsShort(input)
final Entitlement entitlementWrapper = new Entitlement(sdk);
String entitlementName = "<entitlement>";
List<String> itemId = Arrays.asList("<item-id>");
List<String> features = Arrays.asList("feature1");
String userId = "<user-id>";
EntitlementPagingSlicedResult response;
try {
    response = entitlementWrapper.queryUserEntitlements(QueryUserEntitlements.builder()
        .namespace("<namespace>")
        .userId(userId)
        .entitlementName(entitlementName)
        .itemId(itemId)
        .features(features)
        .offset(0)
        .limit(20)
        .build());
} catch (Exception e) {
    // Do something when failed
    return;
}

if (response == null) {
    // Null response from server
} else {
  // Do something if success
}
import accelbyte_py_sdk.api.platform as platform_service

result, error = platform_service.public_query_user_entitlements(
    entitlement_name="entitlementName",
    features=["feature1"],
    item_id="itemId",
    limit=20,
    offset=0,
    namespace=namespace,  # optional, gets the value from the global instance if unspecified
    sdk=sdk,  # optional, gets the global instance  if unspecified
)
if error:
    exit(error)
For players without a subscription
If you don't offer subscriptions, you can use the following code to check a player's entitlements. To get all of the player's entitlements, set the EntitlementName and ItemId to "" (i.e., an empty string).
- Unreal SDK
- Unity SDK
- C# Extend SDK
- Go Extend SDK
- Java Extend SDK
- Python Extend SDK
FApiClientPtr ApiClient = AccelByteOnlineSubsystemPtr->GetApiClient("key");

FString EntitlementName = "";
FString ItemId = "";
int32 Offset = 0;
int32 Limit = 20;

ApiClient->Entitlement.QueryUserEntitlements(EntitlementName, ItemId, Offset, Limit,
THandler<FAccelByteModelsEntitlementPagingSlicedResult>::CreateWeakLambda(this, [](const FAccelByteModelsEntitlementPagingSlicedResult& Result)
{
      UE_LOG(LogTemp, Log, TEXT("Query User Entitlements Success!"));
}),
FErrorHandler::CreateWeakLambda(this, [](int32 ErrorCode, const FString& ErrorMessage)
{
    UE_LOG(LogTemp, Error, TEXT("Query User Entitlements Failed, Error Code: %d Error Message: %s"), ErrorCode, *ErrorMessage);
}),
EAccelByteEntitlementClass::NONE,
EAccelByteAppType::NONE
);
var entitlements = AccelByteSDK.GetClientRegistry().GetApi().GetEntitlement();

string entitlementName = "";
string itemId = "";
int offset = 0;
int limit = 20;

entitlements.QueryUserEntitlements(entitlementName, itemId, offset, limit, result =>
{
    if (result.IsError)
    {
        // Handle API failure or error here
        Debug.Log($"Error: {result.Error.Message}");
        return;
    }

    // Handle API success here
},
EntitlementClazz.NONE,
EntitlementAppType.NONE);
string userId = "<user-id>";

var response = sdk.Platform.Entitlement.QueryUserEntitlementsOp
    .SetOffset(0)
    .SetLimit(20)
    .Execute(sdk.Namespace, userId);
if (response != null)
{
    //do something if success
}
entitlementService := &platform.EntitlementService{
    Client:          factory.NewPlatformClient(&repository.ConfigRepositoryImpl{}),
    TokenRepository: &repository.TokenRepositoryImpl{},
}
namespace := "mygame"
userId := "myuserid"
limit := int32(20)
offset := int32(0)
input := &entitlement.QueryUserEntitlementsParams{
    Namespace:        namespace,
    UserID:           userId,
    Limit:            &limit,
    Offset:           &offset,
}
result, err := entitlementService.QueryUserEntitlementsShort(input)
final Entitlement entitlementWrapper = new Entitlement(sdk);
String userId = "<user-id>";
EntitlementPagingSlicedResult response;
try {
    response = entitlementWrapper.queryUserEntitlements(QueryUserEntitlements.builder()
        .namespace("<namespace>")
        .userId(userId)
        .features(features)
        .offset(0)
        .limit(20)
        .build());
} catch (Exception e) {
    // Do something when failed
    return;
}

if (response == null) {
    // Null response from server
} else {
    // Do something if success
}
import accelbyte_py_sdk.api.platform as platform_service

result, error = platform_service.public_query_user_entitlements(
    limit=20,
    offset=0,
    namespace=namespace,  # optional, gets the value from the global instance if unspecified
    sdk=sdk,  # optional, gets the global instance  if unspecified
)
if error:
    exit(error)
The response object from QueryUserEntitlements() contains an array of entitlement info that includes all entitlement-related IDs. This includes EntitlementId, ItemId and SKUId. These IDs can later be used to get item or specific entitlement information.
In some cases, we recommend using the SKU-related functions if you have your own item ID that isn't namespace and environment dependent. You can define the SKU ID manually in the Admin Portal, unlike ItemId which is generated automatically. See our Create an Item documentation for more details.
Check redeemed items in entitlements
To check redeemed items, you can call getUserEntitlementById from the Entitlement API. The response includes itemSnapshot which contains detailed information regarding the redeemed item. When the entitlement is a result of a redeem code process, the entitlement source shown in the response should be ``REDEEM_CODE`.
- Unreal SDK
- Unity SDK
- C# Extend SDK
- Go Extend SDK
- Java Extend SDK
- Python Extend SDK
FString EntitlementId = "EntitlementId"
FApiClientPtr ApiClient = AccelByteOnlineSubsystemPtr->GetApiClient("key");

ApiClient->Entitlement.Entitlement.GetUserEntitlementById(EntitlementId, THandler<FAccelByteModelsEntitlementInfo>::CreateLambda([](const FAccelByteModelsEntitlementInfo& Result)
        {
            UE_LOG(LogTemp, Log, TEXT("The redeemed item ID: %s with name %s"), *Result.ItemId, *Result.ItemSnapshot.Name);
        }), FErrorHandler::CreateLambda([](int32 Code, const FString& Message){}));
var entitlements = AccelByteSDK.GetClientRegistry().GetApi().GetEntitlement();

string entitlementId = "entitlementId";

entitlements.GetUserEntitlementById(entitlementId, result =>
{
    if (result.IsError)
    {
        // Handle API failure or error here
        Debug.Log($"Error: {result.Error.Message}");
        return;
    }

    // Handle API successful here
});
string entitlementId = "entitlementId";
string userId = "<user-id>";

var response = sdk.Platform.Entitlement.PublicGetUserEntitlementOp
    .Execute(entitlementId, sdk.Namespace, userId);
if (response != null)
{
    //do something if success
}
entitlementService := &platform.EntitlementService{
    Client:          factory.NewPlatformClient(&repository.ConfigRepositoryImpl{}),
    TokenRepository: &repository.TokenRepositoryImpl{},
}
entitlementId := "entitlementId"
namespace := "mygame"
userId := "myuserid"
input := &entitlement.PublicGetUserEntitlementParams{
    EntitlementID: entitlementId,
    Namespace:     namespace,
    UserID:        userId,
}
result, err := entitlementService.PublicGetUserEntitlementShort(input)
final Entitlement entitlementWrapper = new Entitlement(sdk);
String userId = "<user-id>";
String entitlementId = "entitlementId";
EntitlementInfo response;
try {
    response = entitlementWrapper.publicGetUserEntitlement(PublicGetUserEntitlement.builder()
        .namespace("<namespace>")
        .userId(userId)
        .entitlementId(entitlementId)
        .build());
} catch (Exception e) {
    // Do something when failed
    return;
}

if (response == null) {
    // Null response from server
} else {
    // Do something if success
}
import accelbyte_py_sdk.api.platform as platform_service

result, error = platform_service.public_get_user_entitlement(
    entitlement_id="entitlementId",
    namespace=namespace,  # optional, gets the value from the global instance if unspecified
    sdk=sdk,  # optional, gets the global instance  if unspecified
)
if error:
    exit(error)
Get user entitlements by SKU
This function is not yet supported by our SDKs, but the endpoint is available in the API.
Third-party item entitlement synchronization
This section covers how to synchronize entitlements in third-party platforms.
Apple
To synchronize Apple entitlements, use this function:
- Unreal SDK
- Unity SDK
- C# Extend SDK
- Go Extend SDK
- Java Extend SDK
- Python Extend SDK
FApiClientPtr ApiClient = AccelByteOnlineSubsystemPtr->GetApiClient("key");

// Log in with Apple account
FString AppleAuthToken = "Token-from-apple";
ApiClient->User.LoginWithOtherPlatform(EAccelBytePlatformType::Apple, AppleAuthToken), FVoidHandler::CreateLambda([&]()
{
  UE_LOG(LogTemp, Log, TEXT("    Success"));
  // Do something when successful
}), FErrorHandler::CreateLambda([&](int32 ErrorCode, const FString& ErrorMessage)
{
  UE_LOG(LogTemp, Error, TEXT("    Error. Code: %d, Reason: %s"), ErrorCode, *ErrorMessage);
  // Do something when an error occurs
}));

...

// Sync Apple item entitlement
bSyncDone = false;
FAccelByteModelsPlatformSyncMobileApple SyncReqApple;
SyncReqApple.ProductId = "testProductIdInvalid";
SyncReqApple.TransactionId = "testTransactionIdInvalid";
SyncReqApple.ReceiptData = "testReceiptDataInvalid";
SyncReqApple.ExcludeOldTransactions = true;
SyncReqApple.Region = "ID";
SyncReqApple.Language = "en";
ApiClient->Entitlement.SyncMobilePlatformPurchaseApple(SyncReqApple
    , FVoidHandler::CreateLambda(
        [=]()
        {
            UE_LOG(LogTemp, Log, TEXT("    Success"));
        })
    , FErrorHandler::CreateLambda(
        [](int32 ErrorCode, const FString& ErrorMessage)
        {
            UE_LOG(LogAccelByteEcommerceTest, Log, TEXT("Error. Code: %d, Reason: %s"), ErrorCode, *ErrorMessage);
        })
    );
User user = AccelByteSDK.GetClientRegistry().GetApi().GetUser();

// Log in with Apple account
string AppleAuthCode = "apple-auth-code";
Result loginAppleResults = null;
user.LoginWithOtherPlatform(PlatformType.Apple, AppleAuthCode, result =>
{
    loginAppleResults = result;
});

...

var entitlements = AccelByteSDK.GetClientRegistry().GetApi().GetEntitlement();

var platformSyncMobileApple = new PlatformSyncMobileApple()
{
    excludeOldTransactions = false,
    language = "en",
    productId = "testProductId",
    receiptData = "testReceiptData",
    region = "US",
    transactionId = "testTransactionId"
};

entitlements.SyncMobilePlatformPurchaseApple(platformSyncMobileApple, result =>
{
    if (result.IsError)
    {
        // Handle API failure or error here
        Debug.Log($"Error: {result.Error.Message}");
        return;
    }

    // Handle API success here
});
string appleAuthCode = "<apple-auth-code>";
string userId = "<user-id>";

//login using apple auth code
sdk.LoginPlatform("apple", appleAuthCode);

sdk.Platform.IAP.PublicFulfillAppleIAPItemOp
    .SetBody(new AppleIAPReceipt()
    {
        ExcludeOldTransactions = false,
        Language = "en",
        ProductId = "<test-product-id>",
        ReceiptData = "<test-receipt-data>",
        Region = "US",
        TransactionId = "<test-transaction-id>"
    })
    .Execute(sdk.Namespace, userId);
tokenRepository  := auth.DefaultTokenRepositoryImpl()
configRepository := auth.DefaultConfigRepositoryImpl()
oAuth20Service := &iam.OAuth20Service{
    Client:           factory.NewIamClient(auth.DefaultConfigRepositoryImpl()),
    ConfigRepository: configRepository,
    TokenRepository:  tokenRepository,
}
authCode := "myauthcode"
inputLogin := &o_auth2_0.PlatformTokenGrantV3Params{
    DeviceID:       nil,
    PlatformID:     "apple",
    PlatformToken:  &authCode,
}
oAuth20Service.LoginPlatform(inputLogin)

iapService := &platform.IAPService{
    Client:          factory.NewPlatformClient(&repository.ConfigRepositoryImpl{}),
    TokenRepository: &repository.TokenRepositoryImpl{},
}
namespace := "mygame"
userId := "myuserid"
productId := "myproductid"
receiptData := "myreceiptdata"
transactionId := "mytransactionid"
body := platformclientmodels.AppleIAPReceipt {
    ExcludeOldTransactions: false,
    Language: "en",
    ProductID: &productId,
    ReceiptData: &receiptData,
    Region: "US",
    TransactionID: &transactionId,
}
input := &iap.PublicFulfillAppleIAPItemParams{
    Body:      &body,
    Namespace: namespace,
    UserID:    userId,
}
err := iapService.PublicFulfillAppleIAPItemShort(input)
final AccelByteSDK sdk = new AccelByteSDK(httpClient, tokenRepository, configRepository);
...
String appleAuthCode = "<apple-auth-code>";
String userId = "<user-id>";

// Login using apple auth code
final boolean isLoginOk = sdk.loginPlatform("apple", appleAuthCode);
if (isLoginOk) {
    final IAP iapWrapper = new IAP(sdk);
    try {
        AppleIAPReceipt reqBody = AppleIAPReceipt.builder()
            .excludeOldTransactions(false)
            .language("en")
            .productId("<test-product-id>")
            .receiptData("<test-receipt-data>")
            .region("US")
            .transactionId("<test-transaction-id>")
            .build();
        iapWrapper.publicFulfillAppleIAPItem(PublicFulfillAppleIAPItem.builder()
            .namespace("<namespace>")
            .userId(userId)
            .body(reqBody)
            .build());
    } catch (Exception e) {
        // Do something when failed
        return;
    }

    if (response == null) {
        // Null response from server
    } else {
        // Do something if success
    }
}
import accelbyte_py_sdk.api.platform as platform_service
import accelbyte_py_sdk.api.platform.models as platform_models

result, error = platform_service.public_fulfill_apple_iap_item(
    body=platform_models.AppleIAPReceipt()
        .with_product_id("testProductId")
        .with_receipt_id("testReceiptData")
        .with_transaction_id("testTransactionId")
        .with_exclude_old_transactions(false)
        .with_language("en")
        .with_region("US"),
    user_id="********************************",
    namespace=namespace,  # optional, gets the value from the global instance if unspecified
    sdk=sdk,  # optional, gets the global instance  if unspecified
)
if error:
    exit(error)
Google
To synchronize Google entitlements, use this function:
- Unreal SDK
- Unity SDK
- C# Extend SDK
- Go Extend SDK
- Java Extend SDK
- Python Extend SDK
FApiClientPtr ApiClient = AccelByteOnlineSubsystemPtr->GetApiClient("key");
// Log in with Google account
FString GoogleAuthToken = "Token-from-Google";
ApiClient->User.LoginWithOtherPlatform(EAccelBytePlatformType::Google, GoogleAuthToken ), FVoidHandler::CreateLambda([&]()
{
  UE_LOG(LogTemp, Log, TEXT("    Success"));
  // Do something when successful
}), FErrorHandler::CreateLambda([&](int32 ErrorCode, const FString& ErrorMessage)
{
  UE_LOG(LogTemp, Error, TEXT("    Error. Code: %d, Reason: %s"), ErrorCode, *ErrorMessage);
  // Do something when an error occurs
}));

...

FAccelByteModelsItemInfo itemInfo;
ApiClient->Item.GetItemBySku(TEXT("sku-number")
  , TEXT("en")
  , TEXT("US")
  , THandler<FAccelByteModelsItemInfo>::CreateLambda(
     [=](const FAccelByteModelsItemInfo& Response)
     {
        itemInfo = Response;
     })
  ,FErrorHandler::CreateLambda(
     [&bGetItemDone](int32 ErrorCode, const FString& ErrorMessage)
     {
        UE_LOG(LogTemp, Log, TEXT("Error. Code: %d, Reason: %s"), ErrorCode, *ErrorMessage);
     })
  );

...

FAccelByteModelsPlatformSyncMobileGoogle SyncReqGoogle;
SyncReqGoogle.OrderId = TEXT("test-OrderId");
SyncReqGoogle.PackageName = TEXT("test-packageName");
SyncReqGoogle.ProductId = TEXT("testProductId");
SyncReqGoogle.PurchaseTime = 0;
SyncReqGoogle.PurchaseToken = TEXT("test.PurchaseToken");
if (bGetItemSuccess == true && itemInfo.EntitlementType == EAccelByteEntitlementType::DURABLE)
{
  SyncReqGoogle.AutoAck = true;
}
else
{
  SyncReqGoogle.AutoAck = false;
}
SyncReqGoogle.Region = TEXT("ID");
SyncReqGoogle.Language = TEXT("en");

if (!GoogleConfig.ApplicationName.IsEmpty())
{
  ApiClient->Entitlement.SyncMobilePlatformPurchaseGooglePlay(SyncReqGoogle
     , THandler<FAccelByteModelsPlatformSyncMobileGoogleResponse>::CreateLambda(
        [&bSyncDone](FAccelByteModelsPlatformSyncMobileGoogleResponse const& response)
        {
           UE_LOG(LogTemp, Log, TEXT("    Success"));
           if (response.NeedConsume)
               UE_LOG(LogTemp, Log, TEXT("The item is consumable"));
           if (!response.NeedConsume)
               UE_LOG(LogTemp, Log, TEXT("The item is durable"));
        })
     , FErrorHandler::CreateLambda(
        [&bSyncDone](int32 ErrorCode, const FString& ErrorMessage)
        {
           bSyncDone = true;
           UE_LOG(LogTemp, Log, TEXT("Error. Code: %d, Reason: %s"), ErrorCode, *ErrorMessage);
        })
     );
}
Follow the code implementation steps in our Unity SDK guide for Google Play.
string authCode = "<google-auth-code>";
string userId = "<user-id>";

//login using google auth code
sdk.LoginPlatform("google", authCode);


//item entitlement type from google play store
string itemEntitlementType = "DURABLE";

bool autoAckValue = (itemEntitlementType == "DURABLE");

var response = sdk.Platform.IAP.PublicFulfillGoogleIAPItemOp
    .SetBody(new GoogleIAPReceipt()
    {
        OrderId = "<test-order-id>",
        PackageName = "<test-package-name>",
        ProductId = "<test-product-id>",
        Language = "en",
        Region = "US",
        PurchaseTime = 160388387672672,
        PurchaseToken = "<test-purchase-token>",
        AutoAck = autoAckValue

    })
    .Execute(sdk.Namespace, userId);
if (response != null)
{
    //do something if success
}
tokenRepository  := auth.DefaultTokenRepositoryImpl()
configRepository := auth.DefaultConfigRepositoryImpl()
oAuth20Service := &iam.OAuth20Service{
    Client:           factory.NewIamClient(auth.DefaultConfigRepositoryImpl()),
    ConfigRepository: configRepository,
    TokenRepository:  tokenRepository,
}
authCode := "myauthcode"
inputLogin := &o_auth2_0.PlatformTokenGrantV3Params{
    DeviceID:       nil,
    PlatformID:     "google",
    PlatformToken:  &authCode,
}
oAuth20Service.LoginPlatform(inputLogin)

iapService := &platform.IAPService{
    Client:          factory.NewPlatformClient(&repository.ConfigRepositoryImpl{}),
    TokenRepository: &repository.TokenRepositoryImpl{},
}
namespace := "mygame"
userId := "myuserid"
orderId := "myorderid"
packageId := "mypackagename"
productId := "myproductid"
purchaseTime := int64(160388387672672)
purchaseToken := "mypurchasetoken"
body := platformclientmodels.GoogleIAPReceipt {
    OrderID: &orderId,
    PackageName: &packageId,
    ProductID: &productId,
    Language: "en",
    Region: "US",
    PurchaseTime: &purchaseTime,
    PurchaseToken: &purchaseToken,
    AutoAck: true,

}
input := &iap.PublicFulfillGoogleIAPItemParams{
    Body:      &body,
    Namespace: namespace,
    UserID:    userId,
}
result, err := iapService.PublicFulfillGoogleIAPItemShort(input)
final AccelByteSDK sdk = new AccelByteSDK(httpClient, tokenRepository, configRepository);
...
String authCode = "<google-auth-code>";
String userId = "<user-id>";

// Login using google auth code
final boolean isLoginOk = sdk.loginPlatform("google", authCode);
if (isLoginOk) {
    final IAP iapWrapper = new IAP(sdk);

    //item entitlement type from google play store
    String itemEntitlementType = "DURABLE";
    boolean autoAckValue = (itemEntitlementType == "DURABLE");

    GoogleReceiptResolveResult response;
    try {
        GoogleIAPReceipt reqBody = GoogleIAPReceipt.builder()
            .orderId("<test-order-id>")
            .packageName("<test-package-name>")
            .productId("<test-product-id>")
            .language("en")
            .region("US")
            .purchaseTime(160388387672672)
            .purchaseToken("<test-purchase-token>")
            .autoAck(autoAckValue)
            .build();
        response = iapWrapper.publicFulfillGoogleIAPItem(PublicFulfillGoogleIAPItem.builder()
            .namespace("<namespace>")
            .userId(userId)
            .body(reqBody)
            .build());
    } catch (Exception e) {
        // Do something when failed
        return;
    }

    if (response == null) {
        // Null response from server
    } else {
        // Do something if success
    }
}
import accelbyte_py_sdk.api.platform as platform_service
import accelbyte_py_sdk.api.platform.models as platform_models

result, error = platform_service.public_fulfill_google_iap_item(
    body=platform_models.GoogleIAPReceipt()
        .with_order_id("testOrderId")
        .with_package_name("testPackageName")
        .with_product_id("testProductId")
        .with_purchase_time(0)
        .with_purchase_token("testPurchaseToken")
        .with_auto_ack(false)
        .with_language("en")
        .with_region("US"),
    user_id="********************************",
    namespace=namespace,  # optional, gets the value from the global instance if unspecified
    sdk=sdk,  # optional, gets the global instance  if unspecified
)
if error:
    exit(error)
Twitch
To synchronize Twitch entitlements, use this function:
- Unreal SDK
- Unity SDK
- C# Extend SDK
- Go Extend SDK
- Java Extend SDK
- Python Extend SDK
FString TwitchAuthToken = "Token-from-twitch";
FApiClientPtr ApiClient = AccelByteOnlineSubsystemPtr->GetApiClient("key");

// Log in with Apple account
ApiClient->User.LoginWithOtherPlatform(EAccelBytePlatformType::Twitch, TwitchAuthToken), FVoidHandler::CreateLambda([&]()
{
  UE_LOG(LogTemp, Log, TEXT("    Success"));
  // Do something when successful
}), FErrorHandler::CreateLambda([&](int32 ErrorCode, const FString& ErrorMessage)
{
  UE_LOG(LogTemp, Error, TEXT("    Error. Code: %d, Reason: %s"), ErrorCode, *ErrorMessage);
  // Do something when an error occurs
}));

...

// Sync Twitch entitlement
FAccelByteModelsTwitchDropEntitlement model;
model.GameId = TEXT("123456"); // Your gameId
model.Region = TEXT("US");
model.Language = TEXT("en-US");
ApiClient->Entitlement.SyncTwitchDropEntitlement(model,
  FVoidHandler::CreateLambda([&]()
  {
    UE_LOG(LogTemp, Log, TEXT("    Success"));
    // Do something when successful
  }),FErrorHandler::CreateLambda([&](int32 ErrorCode, const FString& ErrorMessage)
  {
    UE_LOG(LogTemp, Warning, TEXT("    Error. Code: %d, Reason: %s"),   ErrorCode, *ErrorMessage);
    // Do something when an error occurs
  }));
User user = AccelByteSDK.GetClientRegistry().GetApi().GetUser();

// Log in with Twitch account
string twitchAuthToken = "twitch-auth-token";
Result loginTwitch = null;
user.LoginWithOtherPlatform(PlatformType.Twitch, twitchAuthToken, result =>
{
    loginTwitch = result;
});

...

var entitlements = AccelByteSDK.GetClientRegistry().GetApi().GetEntitlement();

var twitchDropSyncReq = new TwitchDropSync()
{
    gameId = "testGameId",
    language = "en",
    region = "US"
};

entitlements.SyncTwitchDropItem(twitchDropSyncReq, result =>
{
    if (result.IsError)
    {
        // Handle API failure or error here
        Debug.Log($"Error: {result.Error.Message}");
        return;
    }

    // Handle API success here
});
string authToken = "<token-from-twitch>";

//login using twitch auth token
sdk.LoginPlatform("twitch", authToken);

var response = sdk.Platform.IAP.SyncTwitchDropsEntitlementOp
    .SetBody(new TwitchSyncRequest()
    {
        GameId = "<test-game-id>",
        Language = "en",
        Region = "US",
    })
    .Execute(sdk.Namespace);
if (response != null)
{
    //do something if success
}
tokenRepository  := auth.DefaultTokenRepositoryImpl()
configRepository := auth.DefaultConfigRepositoryImpl()
oAuth20Service := &iam.OAuth20Service{
    Client:           factory.NewIamClient(auth.DefaultConfigRepositoryImpl()),
    ConfigRepository: configRepository,
    TokenRepository:  tokenRepository,
}
authCode := "myauthcode"
inputLogin := &o_auth2_0.PlatformTokenGrantV3Params{
    DeviceID:       nil,
    PlatformID:     "google",
    PlatformToken:  &authCode,
}
oAuth20Service.LoginPlatform(inputLogin)

iapService := &platform.IAPService{
    Client:          factory.NewPlatformClient(&repository.ConfigRepositoryImpl{}),
    TokenRepository: &repository.TokenRepositoryImpl{},
}
namespace := "mygame"
body := platformclientmodels.TwitchSyncRequest {
    GameID: "mygameid",
    Language: "en",
    Region: "US",
}
input := &iap.SyncTwitchDropsEntitlementParams{
    Body:      &body,
    Namespace: namespace,
}
result, err := iapService.SyncTwitchDropsEntitlementShort(input)
final AccelByteSDK sdk = new AccelByteSDK(httpClient, tokenRepository, configRepository);
...
String authToken = "<token-from-twitch>";
//login using twitch auth token
final boolean isLoginOk = sdk.loginPlatform("twitch", authToken);
if (isLoginOk) {
    final IAP iapWrapper = new IAP(sdk);
    List<TwitchSyncResult> response;
    try {
        TwitchSyncRequest reqBody = TwitchSyncRequest.builder()
            .gameId("<test-game-id>")
            .language("en")
            .region("US")
            .build();
        response = iapWrapper.syncTwitchDropsEntitlement(SyncTwitchDropsEntitlement.builder()
            .namespace("<namespace>")
            .body(reqBody)
            .build());
    } catch (Exception e) {
        // Do something when failed
        return;
    }

    if (response == null) {
        // Null response from server
    } else {
        // Do something if success
    }
}
import accelbyte_py_sdk.api.platform as platform_service
import accelbyte_py_sdk.api.platform.models as platform_models

result, error = platform_service.sync_twitch_drops_entitlement_1(
    body=platform_models.TwitchSyncRequest()
        .with_game_id("testGameId")
        .with_language("en")
        .with_region("US"),
    user_id="********************************",
    namespace=namespace,  # optional, gets the value from the global instance if unspecified
    sdk=sdk,  # optional, gets the global instance  if unspecified
)
if error:
    exit(error)