設定の移行のワークフロー
Overview
This article walks you through the configuration migration workflow on the AccelByte Gaming Services (AGS) Admin Portal.
Configuration migration workflow
The configuration migration process consists of three stages:

-
Export configurations: configuration is extracted from the source namespace or environment. This stage can be broken down into four steps:
-
Diffing process: Comprehensive review of the configuration changes before the import process is executed. See Diffing.
-
Import configuration: Once the configuration is successfully exported and the state changes are confirmed, the import jobs will start working.
By following these three fundamental steps, the configuration migration simplifies the process of replicating configuration across namespaces or environments, allowing game developers to ensure consistency and efficiency.
Step 1: Start the configuration migration wizard
The configuration migration wizard can be accessed on the Admin Portal in two ways:
-
On the Namespaces list page: click on the Migrate dropdown and select one of the two options:
- Migrate Namespace to migrate the namespace to an existing namespace.
- Migrate to a New Namespace to migrate to a new namespace. Note that this option is only available if your account has permission to create a new namespace.

-
From the Configuration Migration menu on the Admin Portal: on the AGS Admin Portal, open the Configuration Migration menu. The Migration History page appears. Then, click on the Start Migrate button.
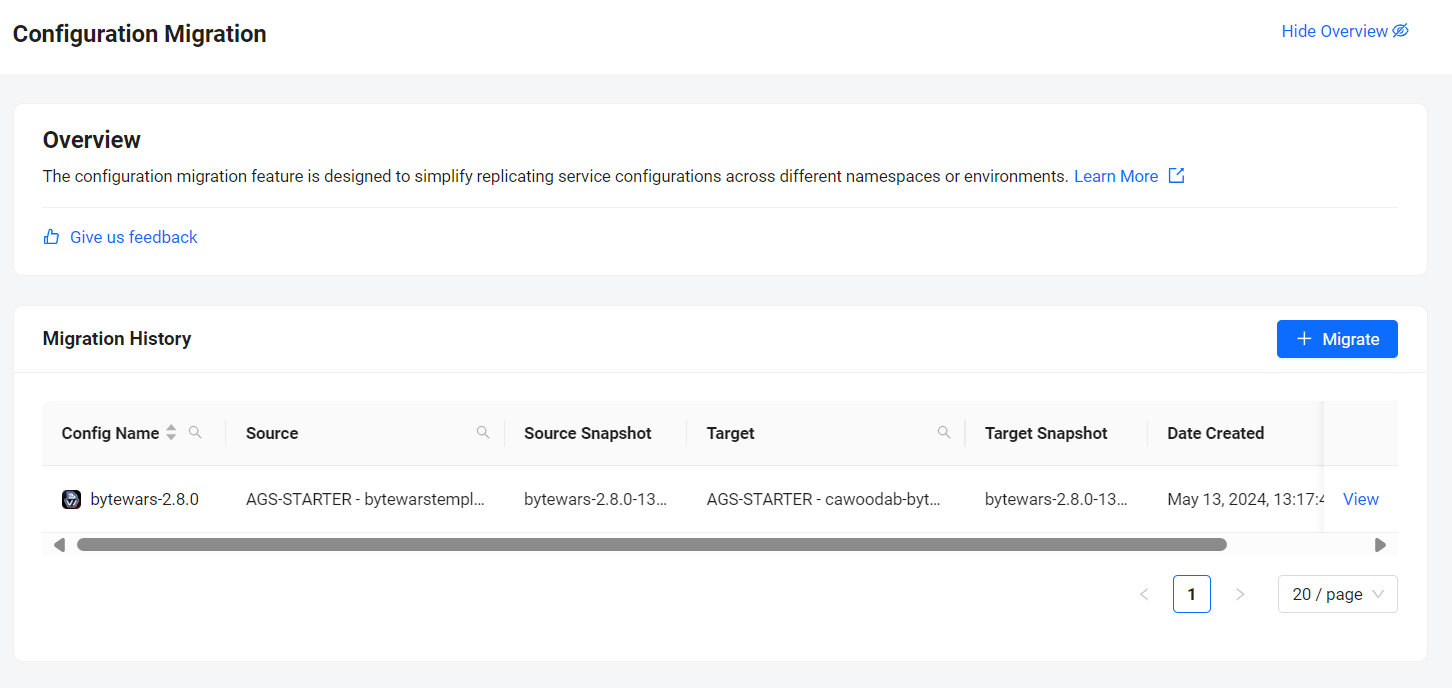
The Configuration Migration form appears. To continue, proceed to Step 2: Select source.
Step 2: Select source
After starting the configuration migration wizard, you will be prompted to select the migration source and the services to be exported on the Select Source section of the Configuration Migration form.
Follow these steps:
-
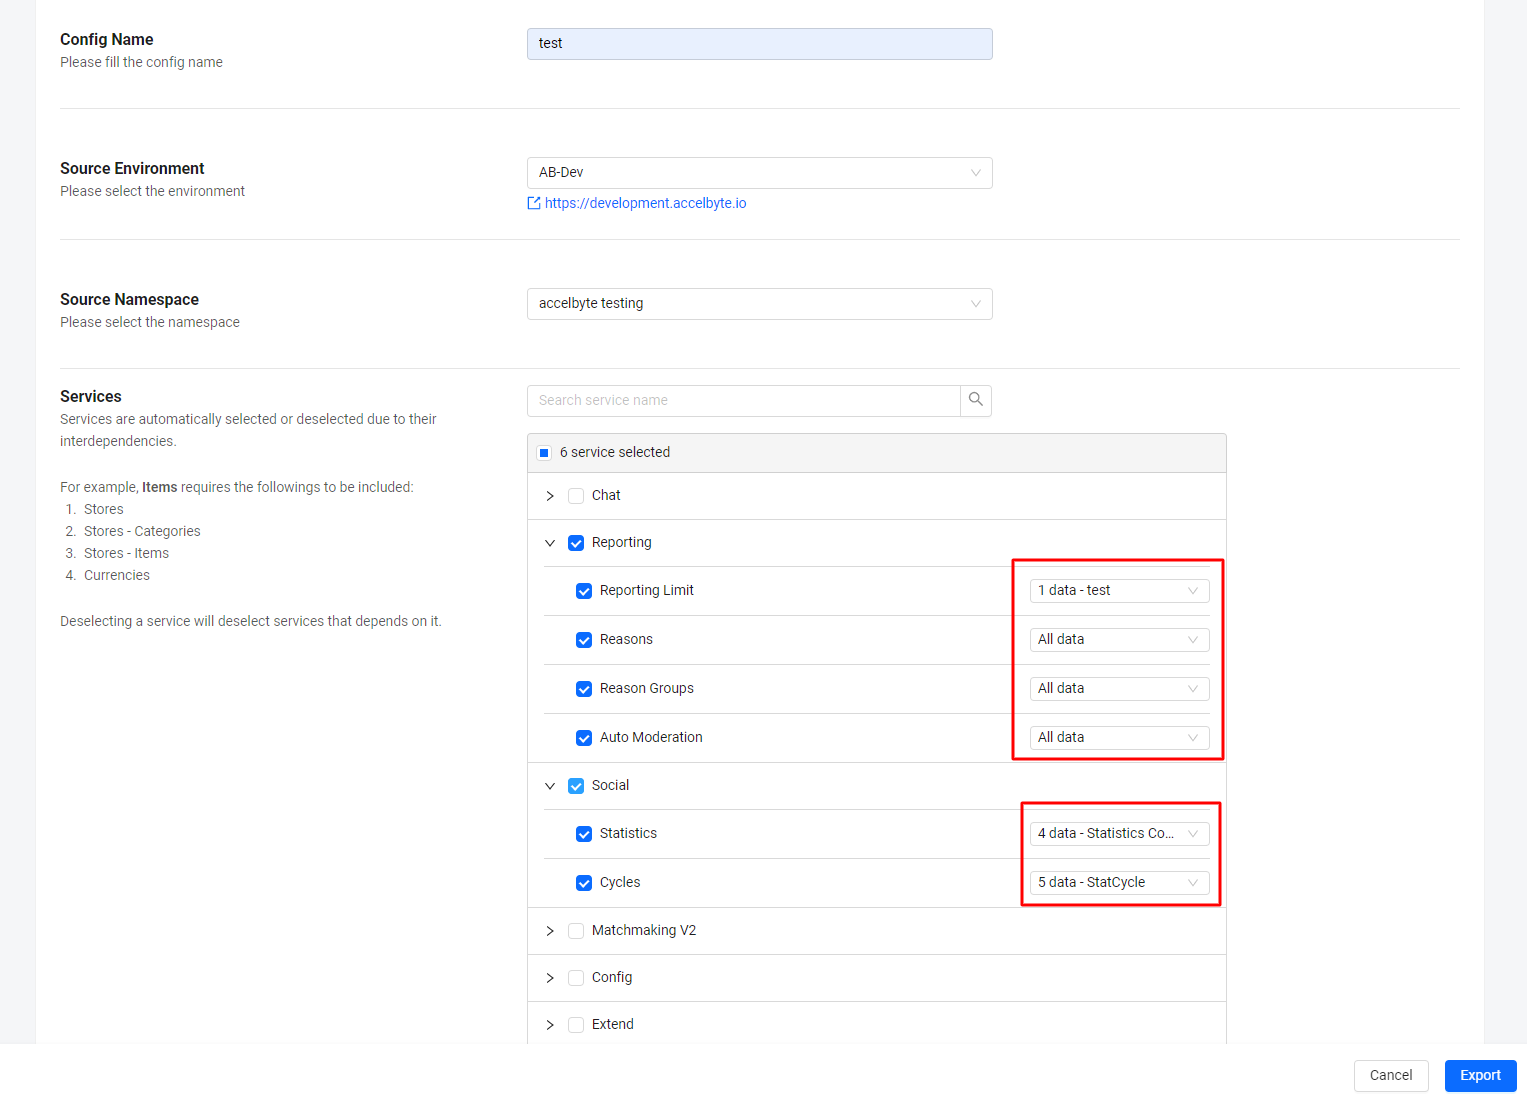
In the Config Name field, type in a name for the migration. You can use alphanumeric characters.
-
In the Source Environment and Source Namespace fields, select the environment and namespace that will be the source of the migration. After selecting the source environment and namespace, the Services list will be populated with the existing services in the source. Under the Source Environment field, a link to your selected environment will also appear. Click on it to view the environment in a new tab.
-
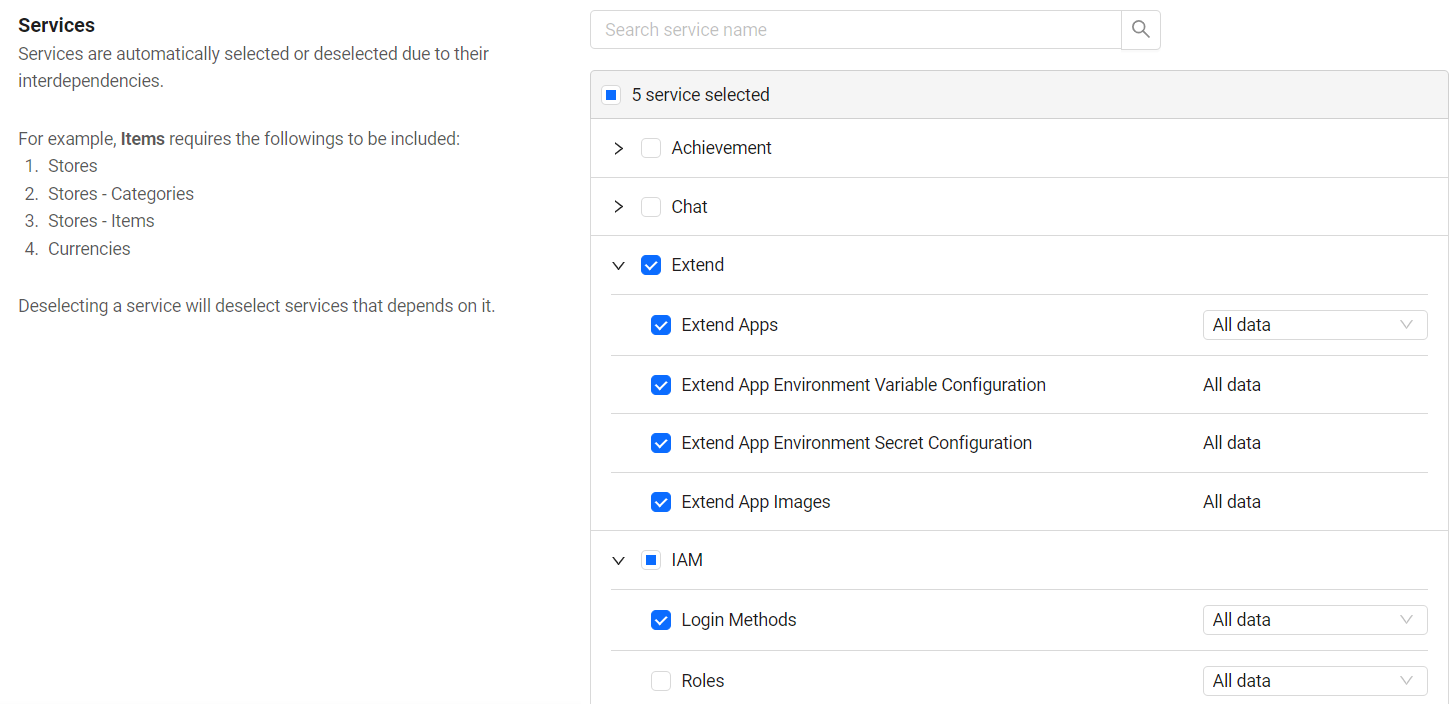
On the Services list, select the services and modules you want to include in the migration. You have two options when selecting which configuration data to export from service modules:
-
All data: use this option to export all of the configuration data from the service module.
-
An export rule: if available in the service module, use an export rule to only export pre-selected data from the service module. In the following example, an export rule named "Virtual Currency Only" is available for selection in the Currency module of the Commerce service. If selected, the export rule will only export the Virtual currency configuration data from the service module.
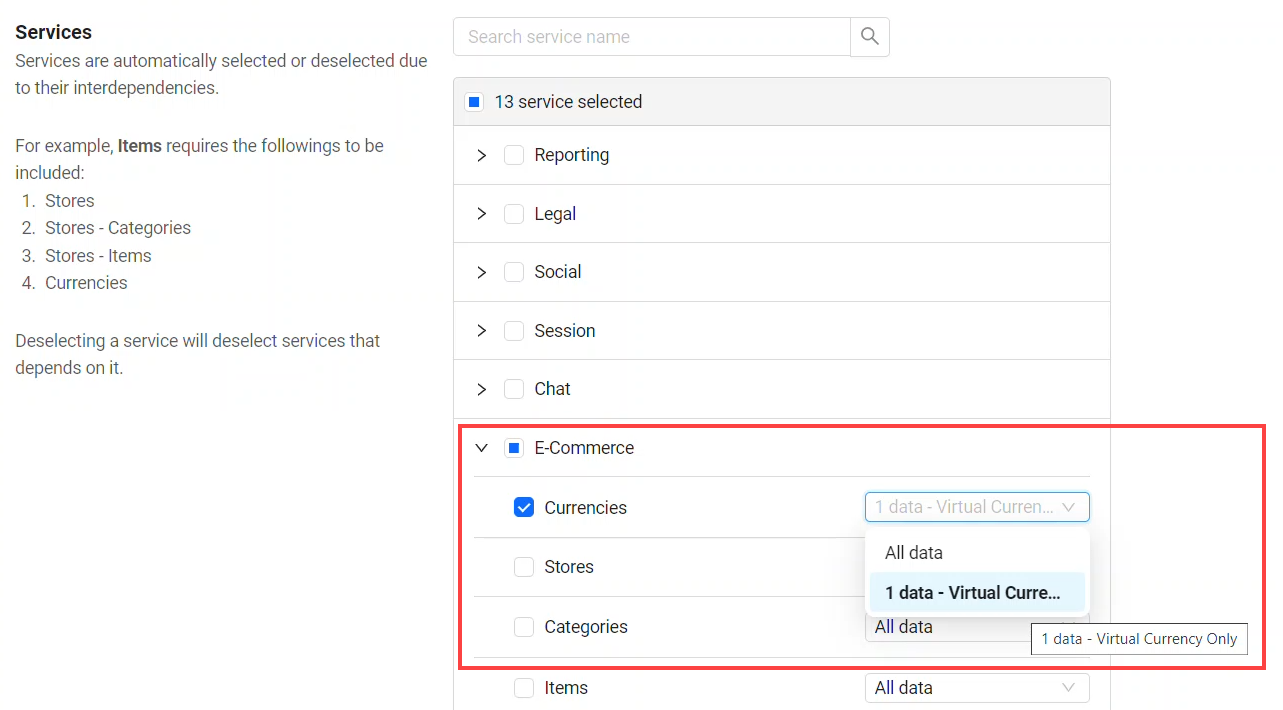
To learn more about export rules, see Export rule.
注記- If you select a service that works with or depends on another service, the checkbox for the latter service will be automatically selected.
- If Extend apps are included in the migration, there are additional configuration options you can do during this stage. For more information, refer to Guidelines for migrating Extend apps.
-
-
Click Export to go to the Export Summary section. To continue, proceed to Step 3: Export Summary.
Step 3: Export Summary
In this step, the migration wizard exports the services you selected in Step 2: Select Source.
To prevent disrupting the export process, do not refresh the page or navigate to another page while the wizard runs.
The export may result in one of the following scenarios:
-
Export Test Successful. All the selected services have been successfully exported and are ready for import. You can review also have the option to download a snapshot of the environment with the selected services.
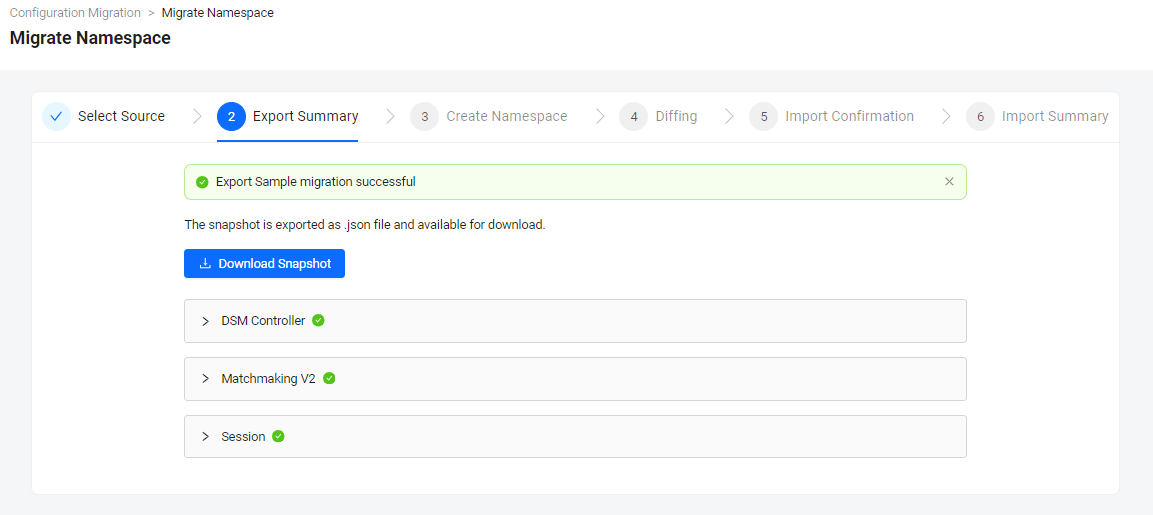
Click Continue to go to the Select Target or Create Namespace section.
-
Failed to export some services. In this scenario, some of your selected services cannot be exported due to specific errors.
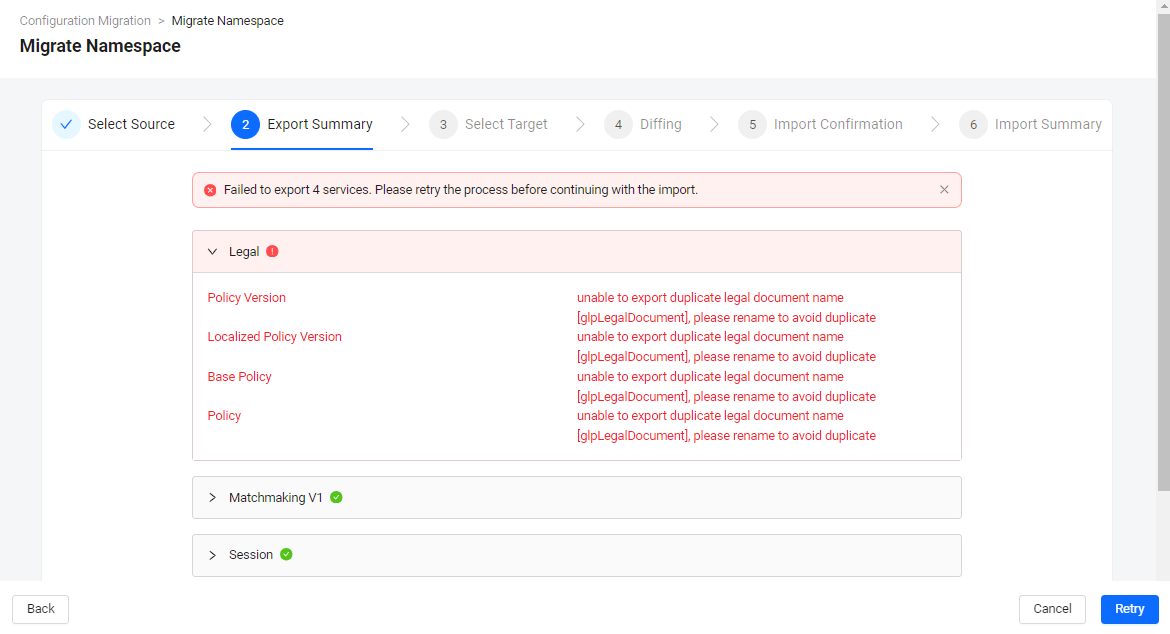
To resolve this, expand each service that failed the export (highlighted in red). You will see a list of specific errors that need to be resolved in the source namespace. Address and resolve the errors in the source namespace. Afterward, click Retry to retry the export. Once the export is successful, click Continue to go to the Select Target or Create Namespace section.
To continue, proceed to Step 4: Select Target or Create Namespace.
Step 4: Select Target or Create Namespace
Depending on your selected migration action in Step 1: Start the configuration migration wizard, you will be prompted to select an existing namespace or create a new namespace as the target of the migration.
- Select Target (Existing namespace)
- Create Namespace
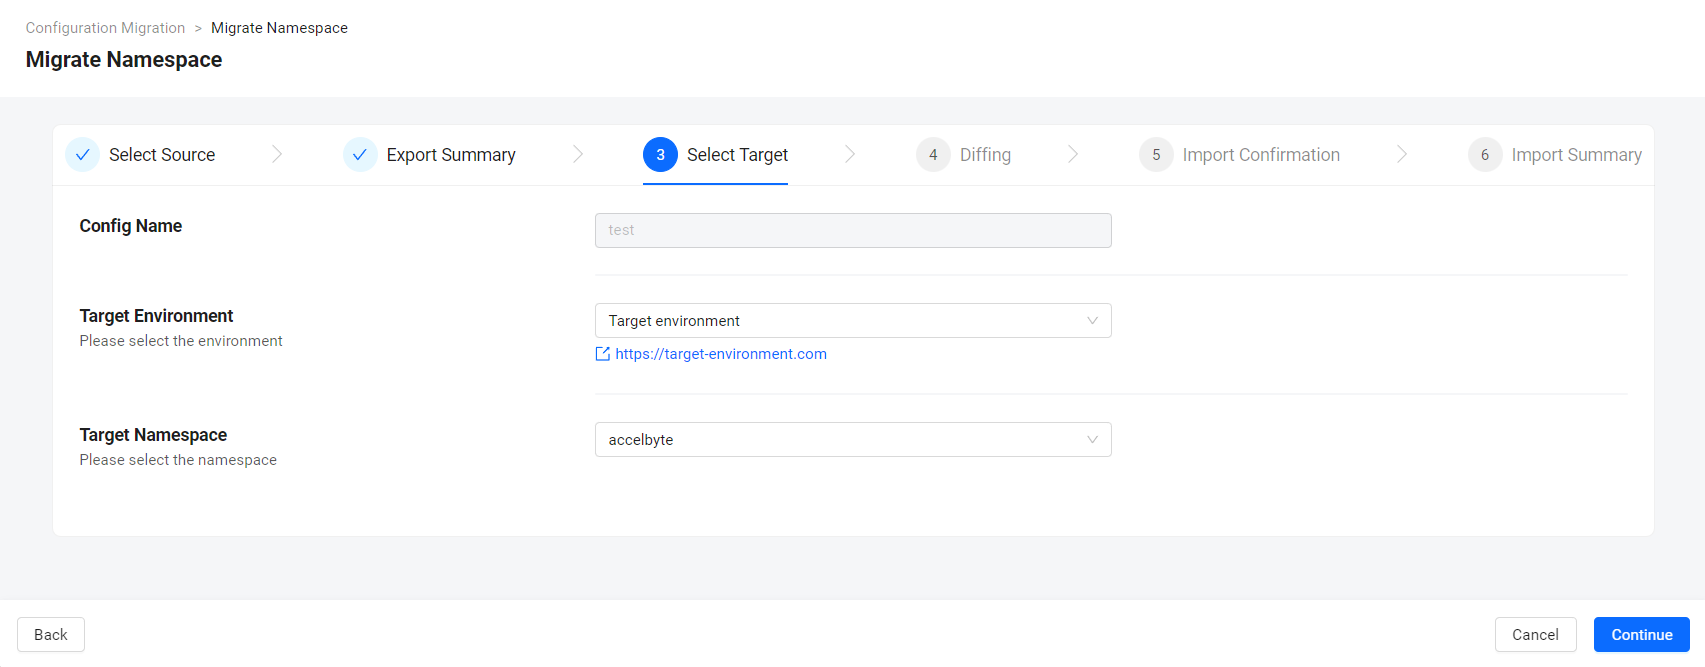
To select the target environment and namespace of the migration, fill in the required information:
- Target Environment: This will be the target of the environment of the migration. You will see the list of available environments that you can pick as a target of migration.
- Target Namespace: This will be the target of the namespace of the migration. You will see the list of namespaces that you can pick for the target namespace of the migration.
Click Continue to go to the Diffing section. Proceed to Step 5: Diffing.
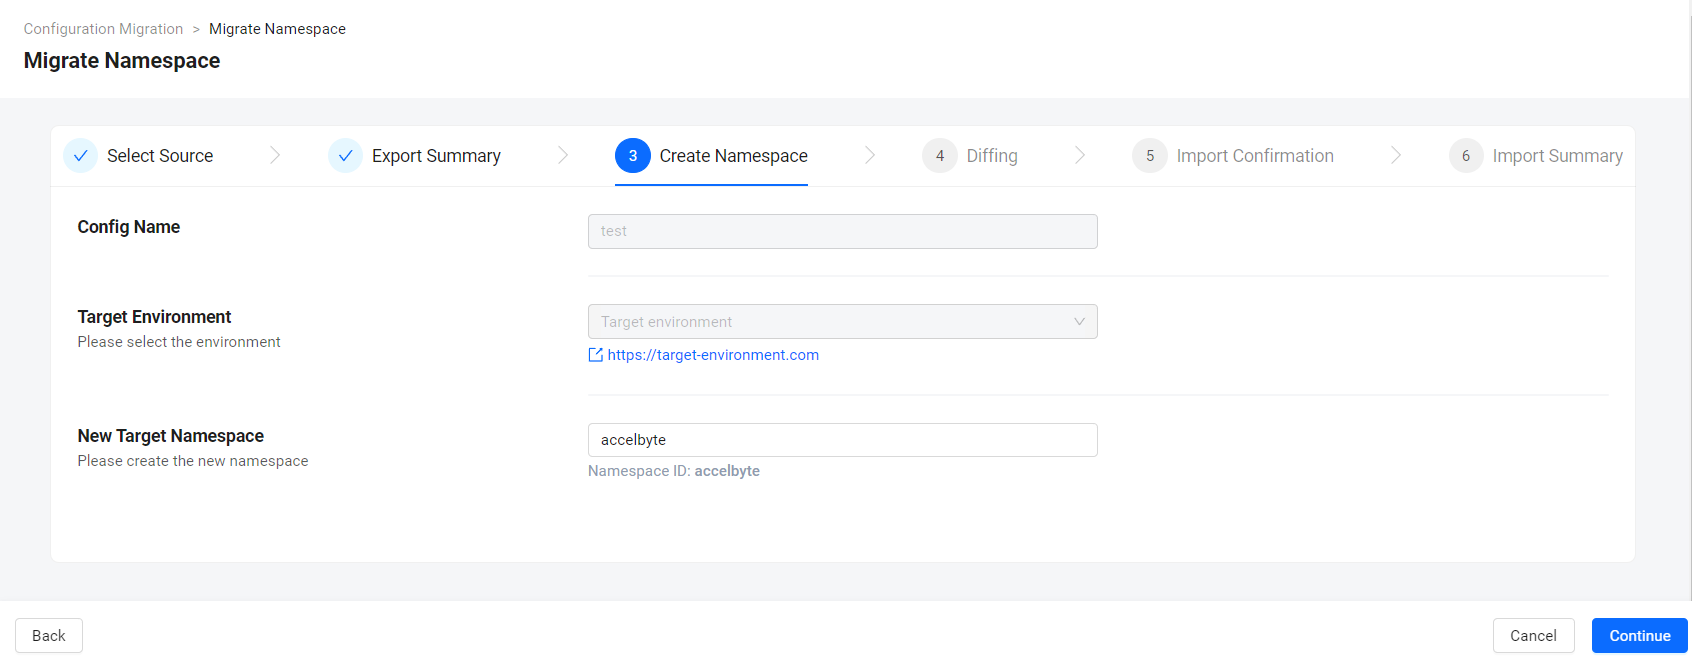
In the New Target Namespace field, type in a name for the new namespace. Then, click Continue to proceed to the Diffing section. Proceed to Step 5: Diffing.
Step 5: Diffing
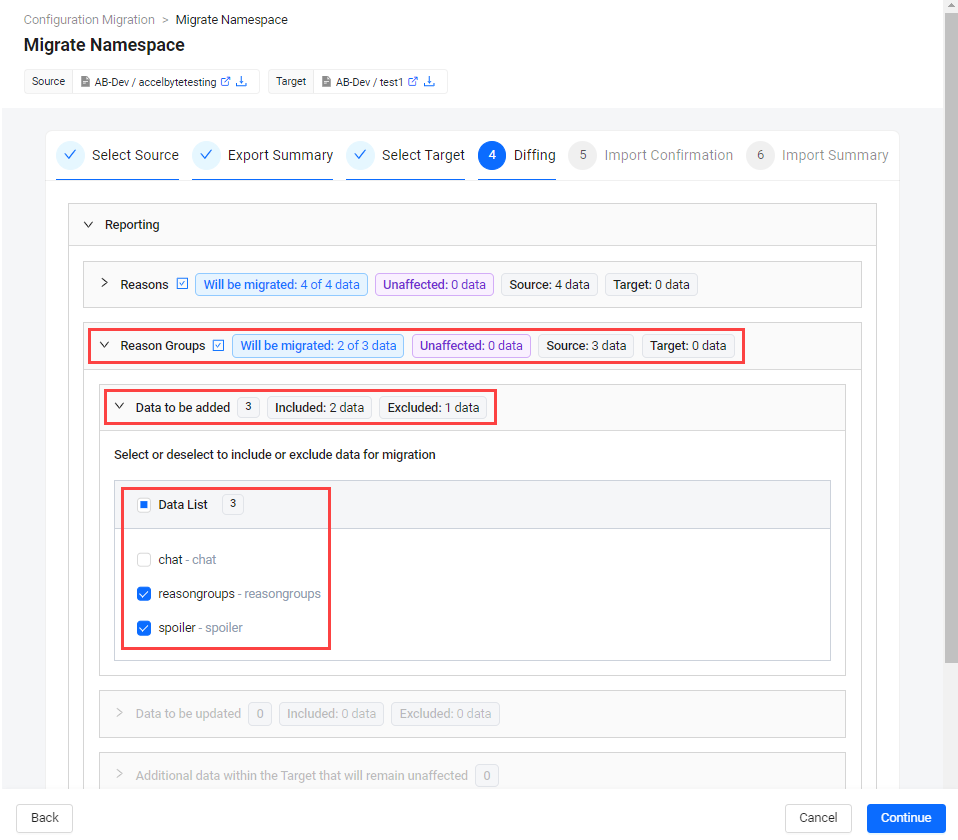
In the Diffing section, you can compare the migration data against against the current configuration data in the target namespace. You can review the data that will be added, updated, and additional data within the target namespace that will remain unaffected.
You also have the option to deselect data changes that you don't want to include in the import. To do this, expand the service to view its modules and data list.
- Some services may be marked with a blue i (info) icon. This indicates that there are important messages related to the service or module for you to review before you proceed.
- If Extend apps are included in the migration, refer to the Guidelines for migrating Extend apps section to learn how to configure each Extend module.
After reviewing the configuration and ensured that the proper import data have been selected, click Continue to go to the Import Confirmation section.
Step 6: Import Confirmation

This is the last import confirmation step. You have the option to download the snapshots from the source and target namespaces. The downloaded files contain all the services exported both namespaces.
Click Import to start the import process. You will be redirected to the Import Summary section.
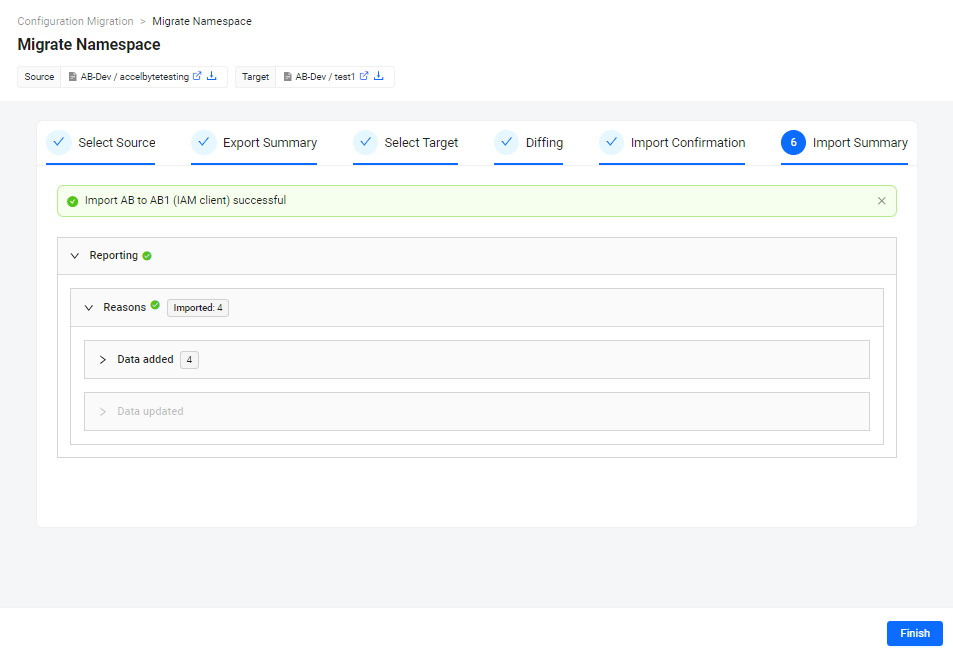
Step 7: Import Summary
To prevent disrupting the import process, do not refresh the page or navigate to another page while the wizard runs.
The import may result in one of the following scenarios:
-
Import is successful. The import process has finished successfully. On the Import Summary page, you can check the details of the imported data in each service. Click on the Finish button to complete the process.
-
Import process failed. In this scenario, some data couldn't be imported due to specific errors.
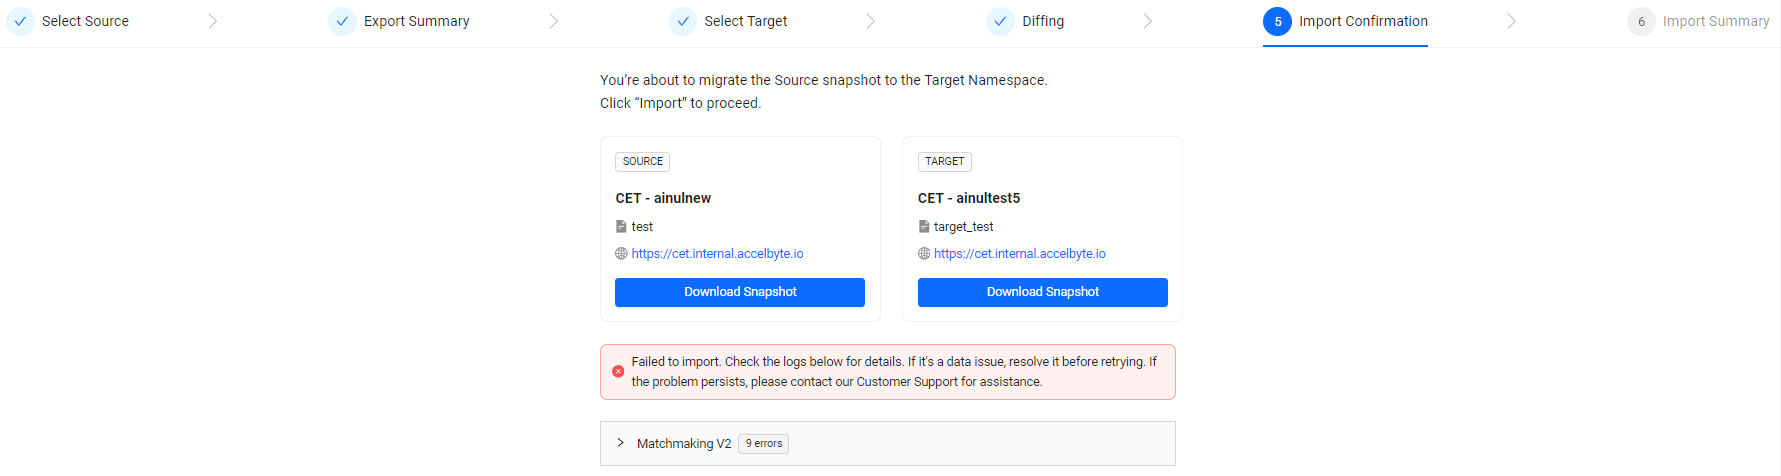
To resolve this, expand each service that failed the import (highlighted in red). You will see a list of specific errors that need to be resolved in the source namespace. Address and resolve the errors in the target namespace. Afterward, click Retry to retry the import. Once the import is successful, click Finish to complete the process.
The migration will be added to the Configuration Migration history.
Guidelines for migrating Extend apps
If Extend apps are included in the migration, the Select Source and the Diffing steps provide additional configuration options as follows:
Select source stage
Expand the Extend service and select the modules you want included in the migration. By default, the following modules are automatically selected:
- Extend Apps
- Extend App Images
- Extend App Environment Variable Configuration
- Extend App Environment Secret Configuration
Diffing stage
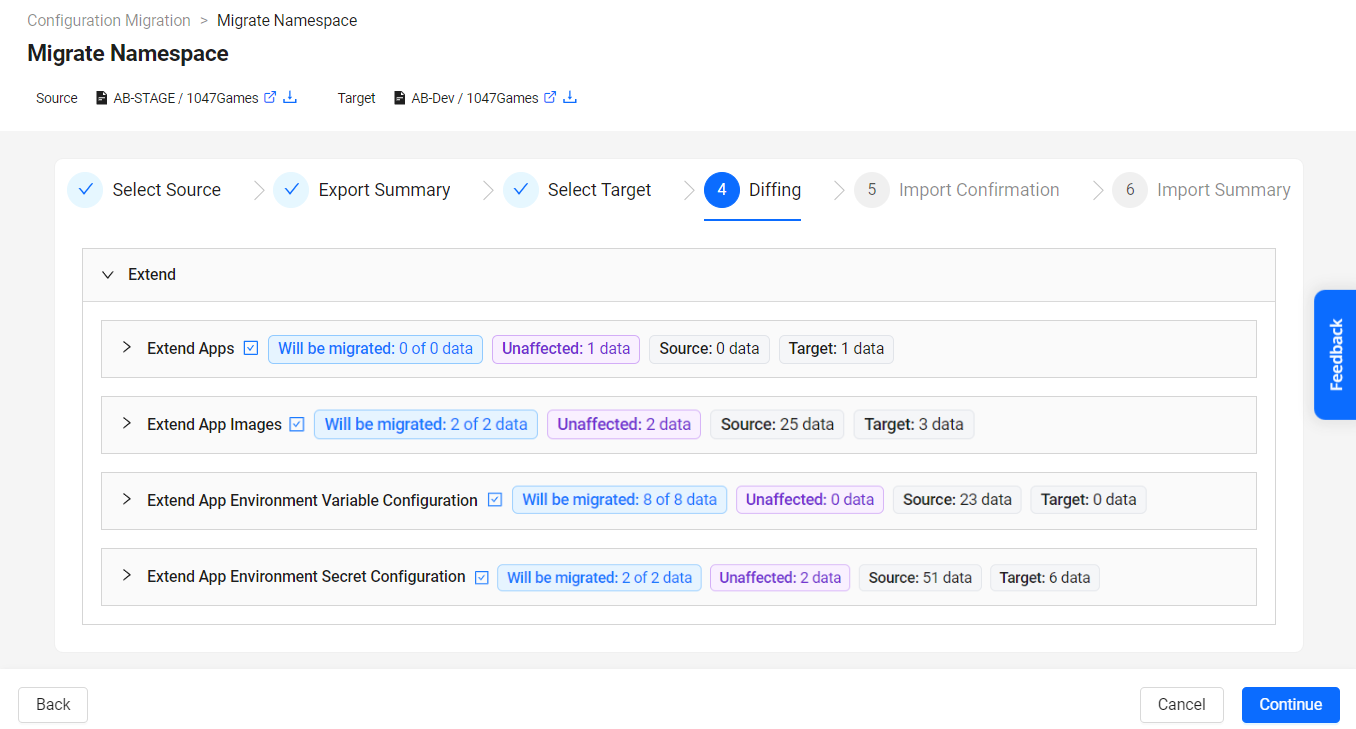
In this step, the migration data in each Extend module can be configured as follows:
If any of the source's Extend apps have matching names with those in the target namespace, they will be considered as matching apps even if they have different app IDs. The matching apps in the target namespace will be updated based on the apps in the source with the same name.
Extend Apps
Data to be added
This section shows the Extend apps from the source namespace that do not have a match in the target namespace and will therefore be created there. Select the apps you want to migrate by checking their corresponding checkboxes. By default, the environment variables and secrets of the selected apps are included in the migration, but you can modify these in the target namespace later on.
Data to be updated
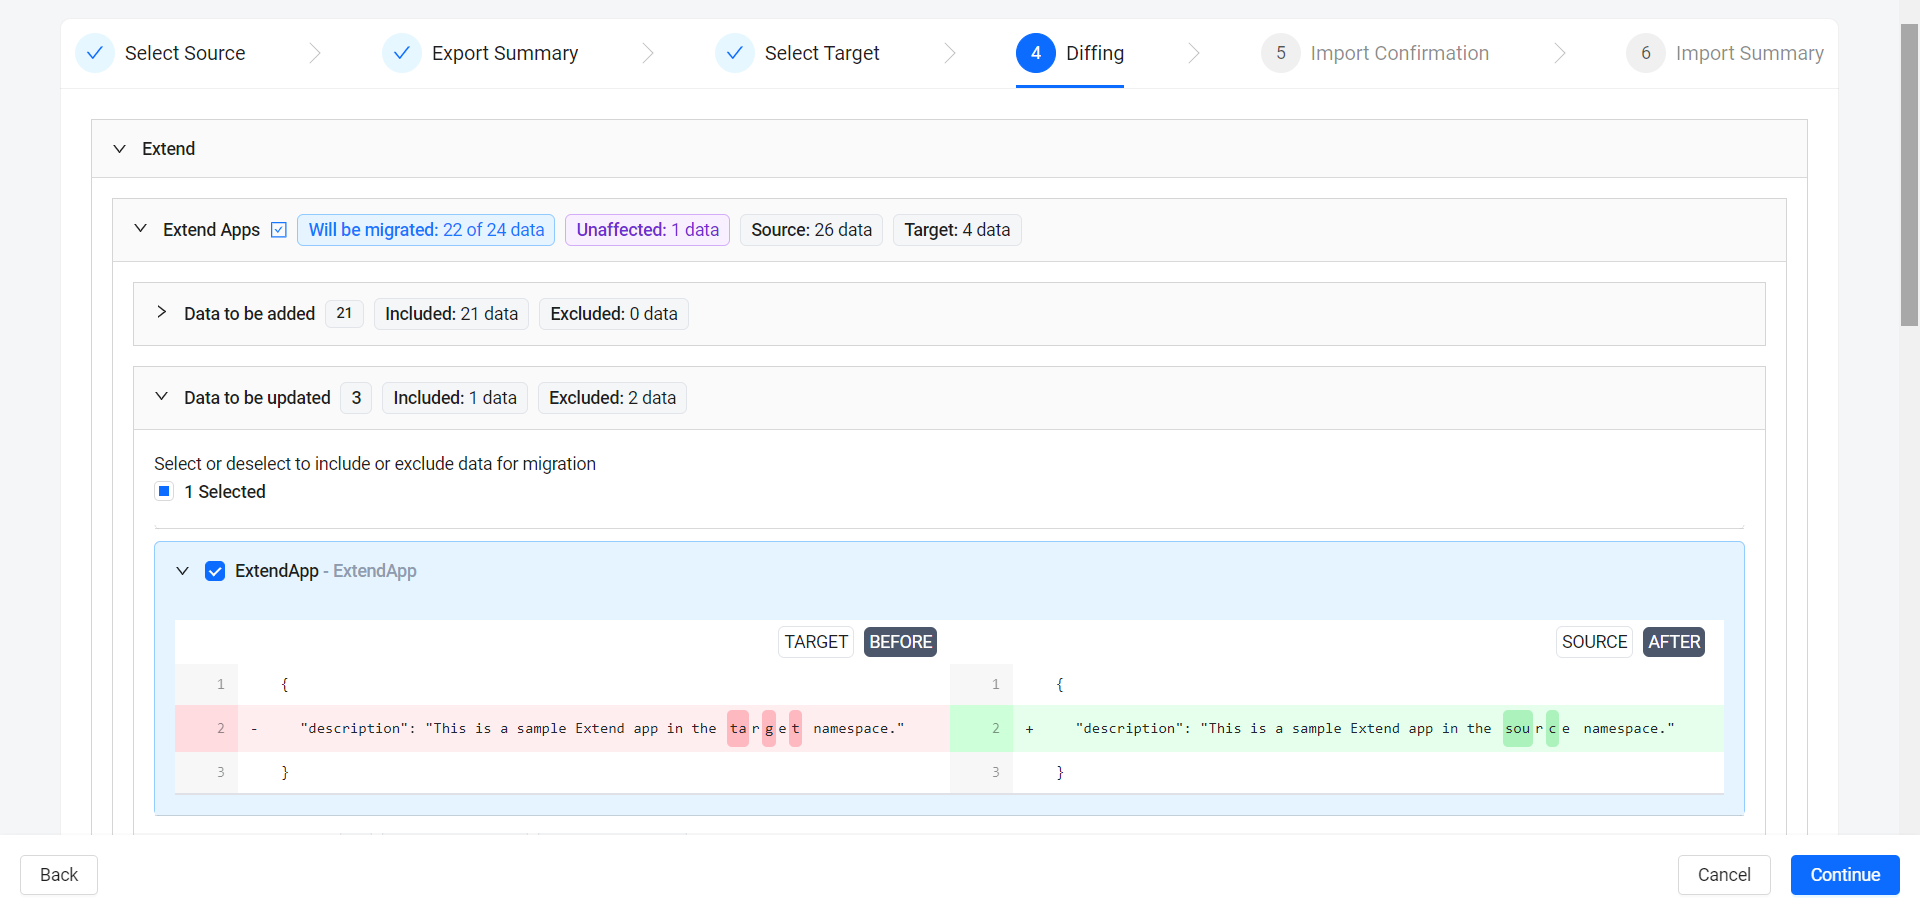
This section shows the Extend apps that match between the source and target namespaces. In this section, only the app descriptions can be updated. You can accept or reject the description from the source namespace by selecting or de-selecting each the corresponding checkboxes of each app name.
Additional data within the Target that will remain unaffected
This sections shows the existing Extend apps in the target namespace that do not match any apps from the source namespace and will therefore remain unchanged by the migration.
Extend App Images
This module shows image versions from matching apps between the target and source. When no matching apps are found, this module is typically disabled from the configuration and will show that zero data will be migrated or affected.
Configure the app images in each section as follows:
For sample purposes, the steps in this section use one matching Extend app in both namespaces and refer to it as "Extend App A."
Data to be added
This section shows the image versions from the source's Extend App A that do not exist in the target's Extend App A. Select the image versions you want to add to the target app.
Additional data within the Target that will remain unaffected
This sections shows the app images that will not be affected by the migration, which are:
- Image versions that exist both in the source's and target's Extend App A based on matching image tags.
- Image versions in the target's Extend App A that do not exist in the source's Extend App A.
Extend App Environment Variable Configuration
This module is configurable when there are matching apps in both the source and target namespaces. If no matches are found, the module is disabled and will indicate that no data will be migrated or affected.
Configure environment variables in each section as follows:
For sample purposes, the steps in this section use one matching Extend app in both namespaces and refer to it as "Extend App A."
Data to be added
This section shows environment variables from the source's Extend App A that do not exist in the target's Extend App A. Select the variables you want to add to the target's Extend App A.
Data to be updated
Because source and target environments often have different configurations, avoid migrating the following:
AB_BASE_URLAB_NAMESPACEBASE_PATHENABLE_REQUEST_SIZE_LIMITOTEL_EXPORTER_ZIPKIN_ENDPOINTOTEL_METRICS_EXPORTEROTEL_PROPAGATORSOTEL_SERVICE_NAMEOTEL_TRACES_EXPORTER
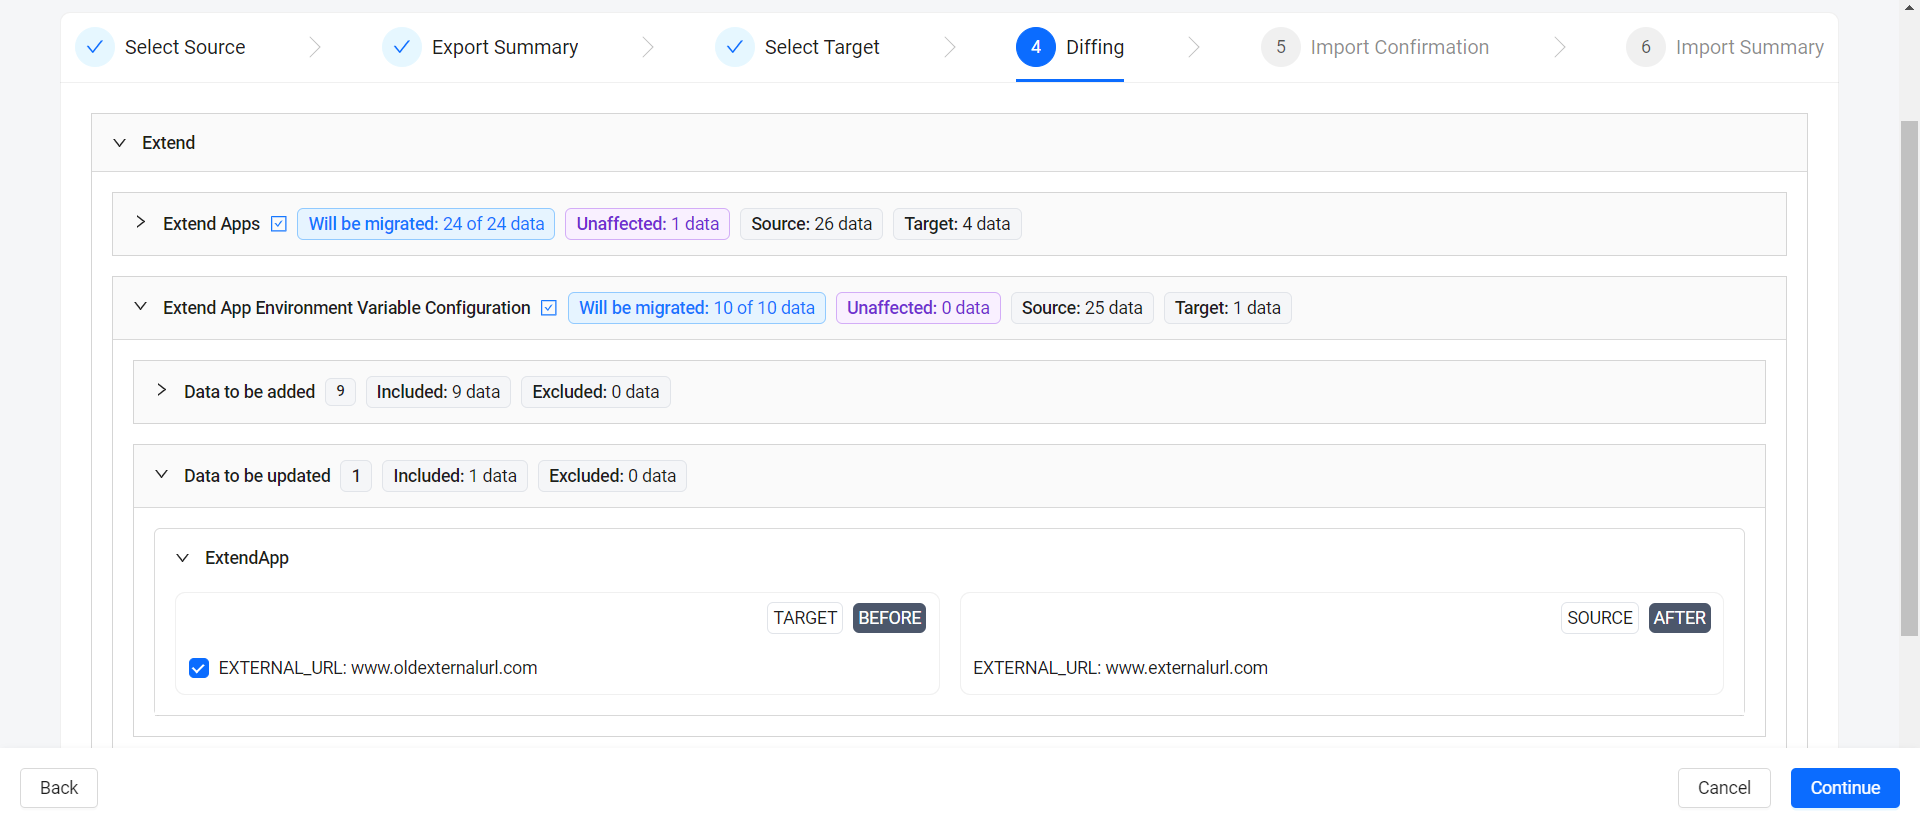
This section shows environment variables that exist in both source's and target's Extend App A but have different values. You can accept or reject updates from the source's Extend App A by selecting or deselecting the checkboxes next to each variable.
Additional data within the Target that will remain unaffected
This section shows the environment variables that will not be affected by the migration, which are:
- Environment variables in the target's Extend App A that match those in the source's Extend App A with similar values.
- Environment variables in the target's Extend App A that do not exist in the source's Extend App A.
Extend App Environment Secret Configuration
This module shows environment secret data from matching apps between the target and source. When no matching apps are found, this module is typically disabled from the configuration and will show that zero data will be migrated or affected.
Configure environment variables in each section as follows:
For sample purposes, the steps in this section use one matching Extend app in both namespaces and refer to it as "Extend App A."
Data to be added
This section shows environment secrets from the source's Extend App A that do not exist in the target's Extend App A. Select the secrets you want to add to the target's Extend App A.
Data to be updated
Do not migrate AB_CLIENT_ID and AB_CLIENT_SECRET as these credentials are typically specific to the source and target environments and may not be compatible between them.
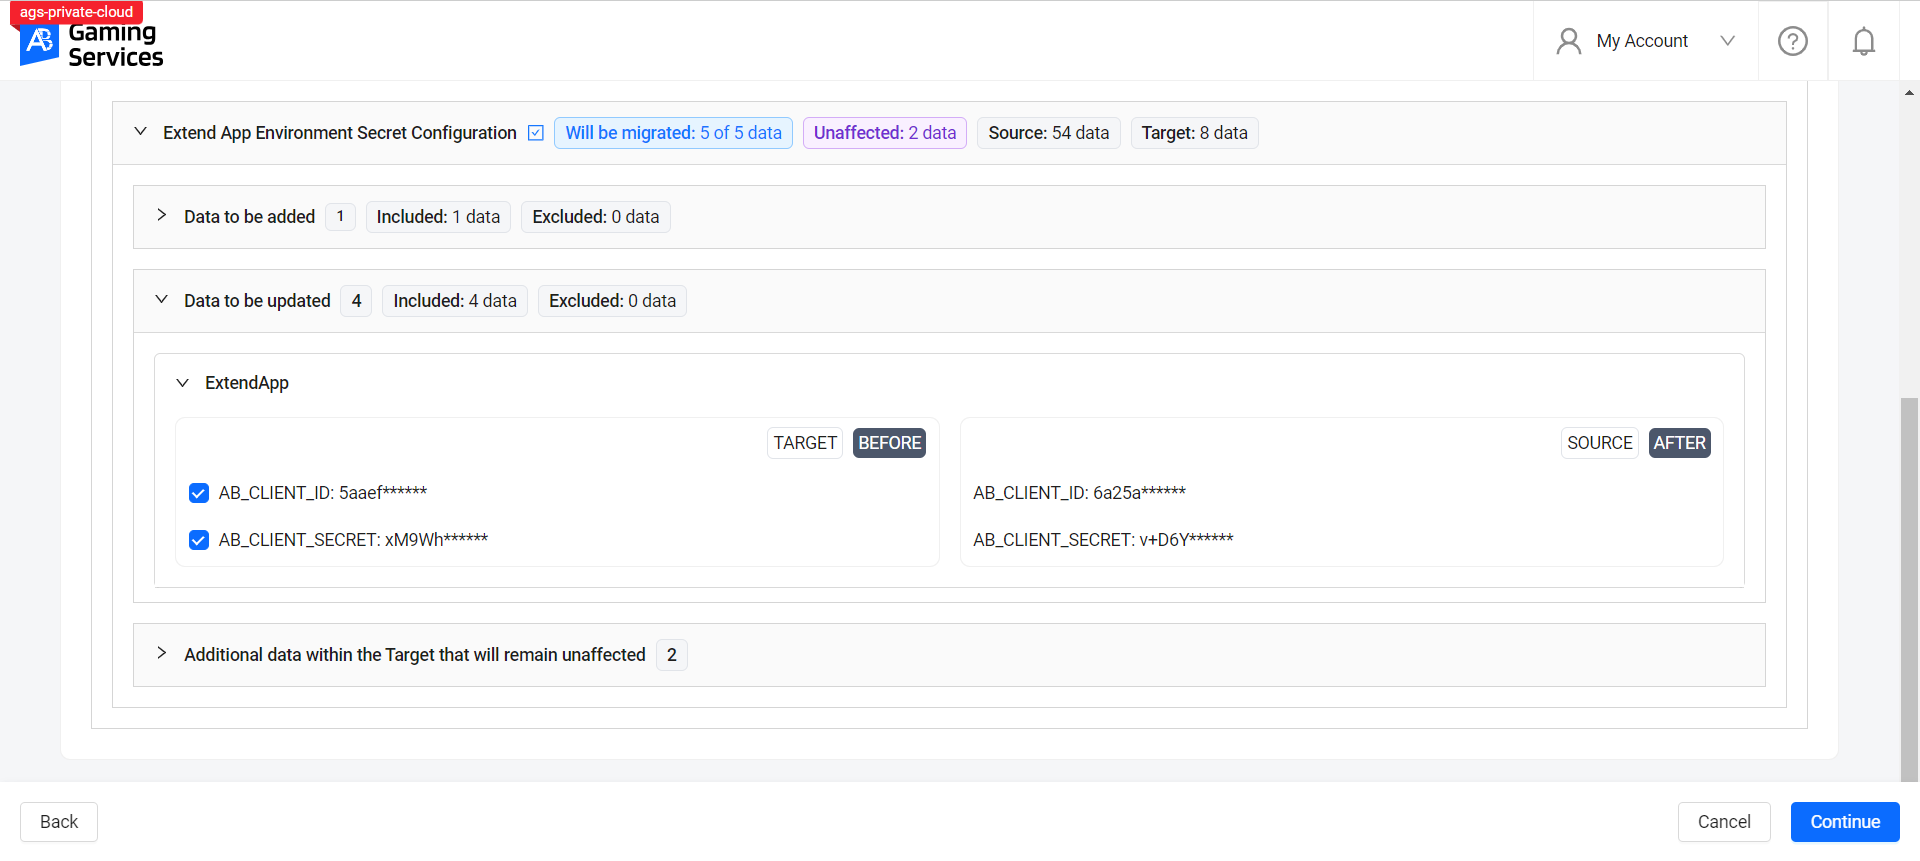
This section shows environment secrets that exist in both source's and target's Extend App A but have different values. You can accept or reject updates from the source's Extend App A by selecting or deselecting the checkboxes next to each secret.
Additional data within the Target that will remain unaffected
This section shows the environment secrets that will not be affected by the migration, which are:
- Environment secrets in the target's Extend App A that match those in the source's Extend App A with similar values.
- Environment secrets in the target's Extend App A that do not exist in the source's Extend App A.