Manage user accounts and licenses
Overview
AccelByte Development Toolkit (ADT) offers a variety of user roles and licenses, each with specific permissions tailored to different user needs.
| License Tier | Available Roles | Price |
|---|---|---|
| Basic | User and QA | Free |
| Standard | User and QA | $25 per seat/month |
| Power | Developer and Administrator | $60 per seat/month |
For more information about ADT licenses, visit the AccelByte pricing page for ADT.
This article provides information on how to manage user accounts and licenses in ADT Web and ADT Hub.
Role-specific permissions
| Role | License Tier | Permissions |
|---|---|---|
| User | Basic | View and subscribe to build channels. |
| Schedule automatic download and deployment to dev kits. | ||
| View and join organized playtests; automatically download and launch the required build. | ||
| Report bugs, feedback, or other issues from inside the game (with screenshots, video, and annotations). | ||
| Access to Legacy Build downloads. | ||
| Standard | All User (Basic) permissions. | |
| Access to Smart Build downloads and additional features such as diff cache for performance optimization. | ||
| QA | Basic | All User (Basic) permissions. |
| Access to all builds on the Versions page. | ||
| Standard | All QA (Basic) permissions. | |
| Access to Smart Build downloads and additional features such as diff cache for performance optimization. | ||
| Developer | Power | All QA (Standard) permissions. |
| Group builds logically by platform and use case. | ||
| Control who has access to the build channel. | ||
| Review crash dumps and performance metrics to assess the game’s overall performance. | ||
| Schedule playtests for other users to join and specify which builds to use for playtests. | ||
| All game-level settings. | ||
| Administrator | Power | Full access. |
Prerequisite
You must have Administrator role to access the Account Management page in ADT Web.
Add users to your game project
In ADT Web, click on your publisher namespace, then click on Account Management. The Account Management page appears.
On the Account Management page, click on the Add New dropdown, and then do one of the following:
- Manually add accounts
- Add accounts using a CSV file
- From the dropdown, click on Add account manually.
- On the "Add New Account" pop-up form that appears, provide the user name and email of the new user, then select which user role will be assigned to them.
- (Optional) To add more users, click +Add More.
- To add the new users, click Add. The new users are added to your namespace.
importantYour CSV file should include the following fields, in this order: Display Name, Email, and Role. Before you import, ensure that the list of accounts in the file is in the correct order and matches the required fields.
From the dropdown, click on Import account from CSV file.
On the file explorer window, open your CSV file. The "Import Account From CSV File" pop-up window appears, showing the data from your CSV file.
Verify that the data on the fields are accurate, then click Confirm Add. The new users are added to your namespace.
ADT automatically sends new users an invitation email containing a login link for them.
Administrators need to set up integrations for third-party single sign-on (SSO) apps, such as Google, Okta, and Microsoft Azure. Once the integration is completed, administrators can assign the role for every new user who log in to ADT. For Google sign-ins, administrators can set the roles for each registered domain.
Change a user's license tier
- In ADT Web, click on your publisher namespace, then click on Account Management. The Account Management page appears.
- From the users list, find the user with the license you want to change. Then, click their corresponding License dropdown and select the license you want to assign to the user. A confirmation message appears.
- Click Confirm on the confirmation message. The user's new license immediately takes effect.
Reset user password
- In ADT Web, click on your publisher namespace, then click on Account Management. The Account Management page appears.
- From the list of users on the Account Management page, find the user with the password you want to reset, then click on the user's corresponding ellipsis menu and click on Edit. The Edit Account form appears.
- On the Edit Account form, click on Reset password and again on the confirmation message. ADT automatically sends the user an email containing a reset password link, which expires after five minutes.
Delete users
You can delete users one at a time or by batch.
Delete a single user
- In ADT Web, click on your publisher namespace, then click on Account Management. The Account Management page appears.
- From the list of users on the Account Management page, find the user you want to delete, then click on the user's corresponding ellipsis menu and click on Delete and again on the confirmation message. The account will is immediately deleted.
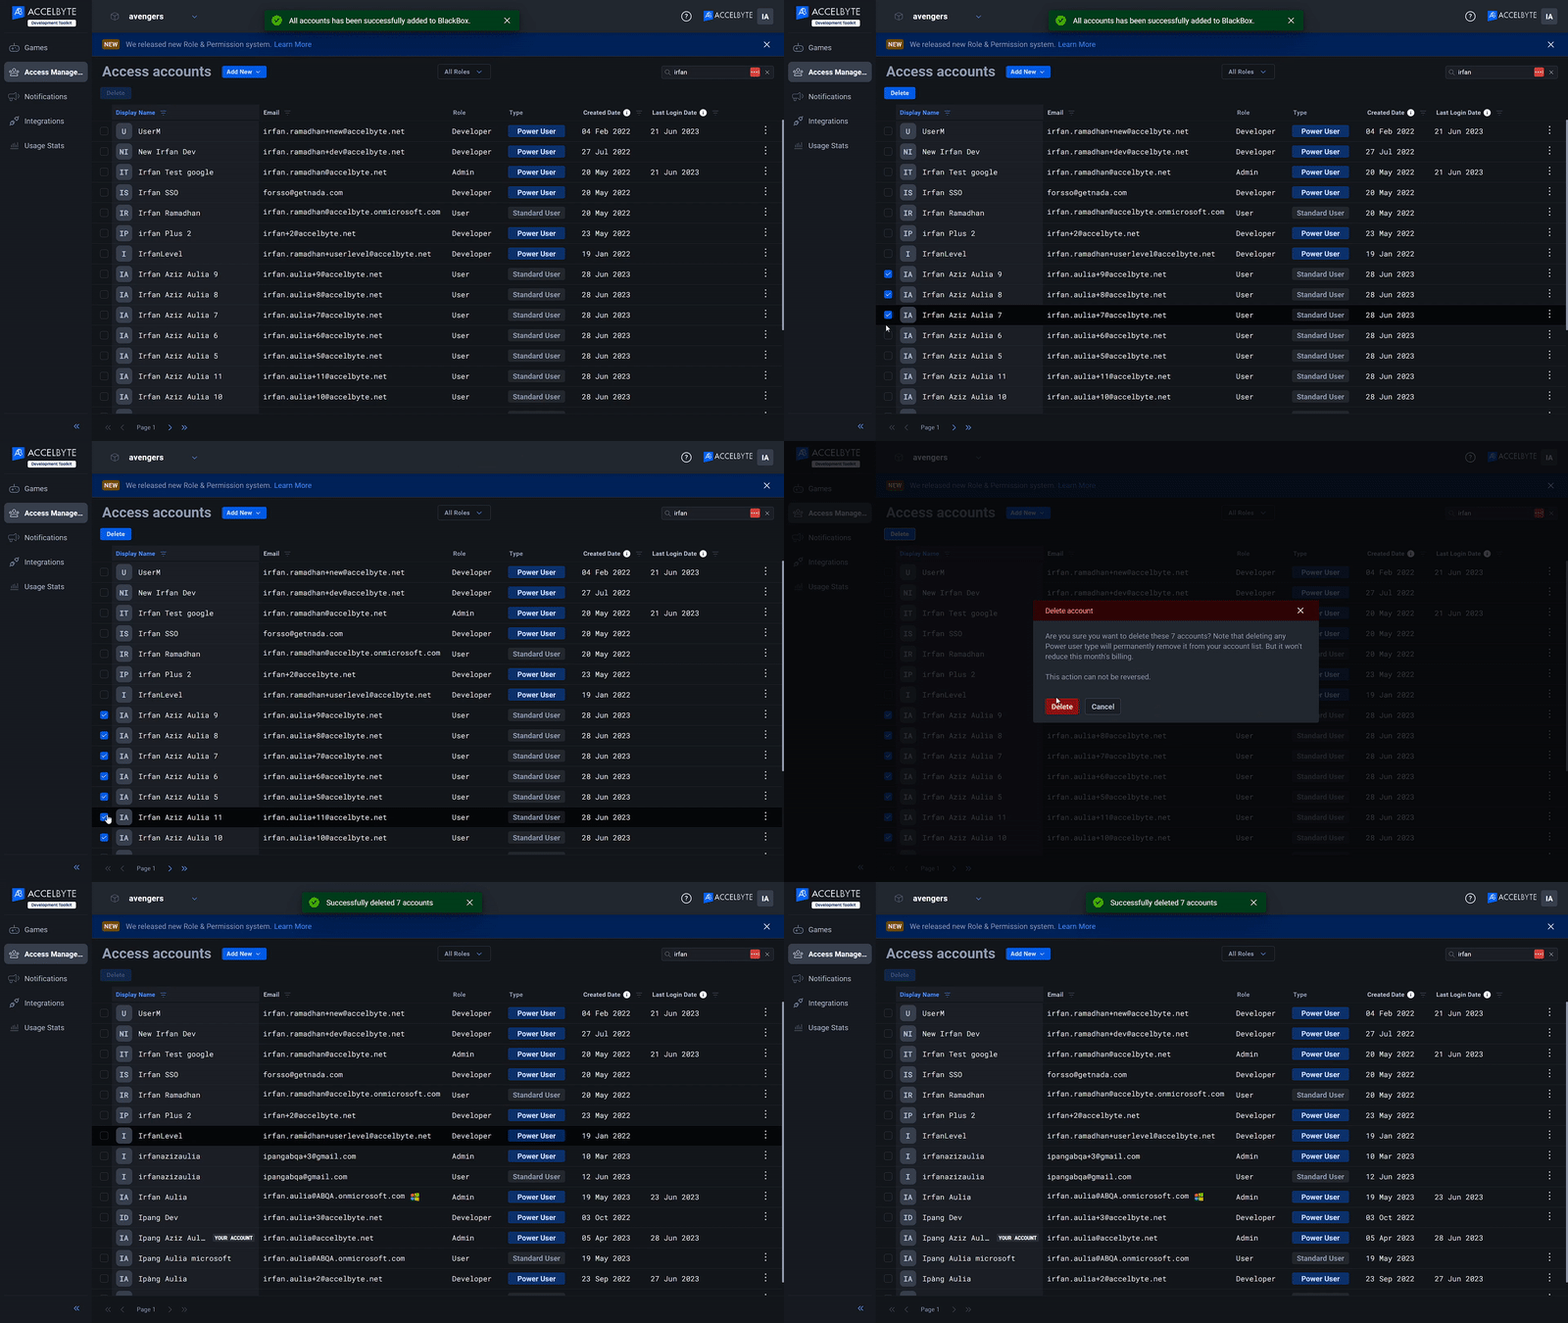
Delete users by batch
In ADT Web, click on your publisher namespace, then click on Account Management. The Account Management page appears.
From the list of users on the Account Management page, tick the checkbox of the users you want to delete. The Delete button on the top-left of the page will be enabled.
Click on Delete and again on the confirmation message. The selected accounts are immediately deleted.

Deleted administrators and developer (Power license users) will still be included in the billed accounts of the month they are deleted in.