Add local cache server
Overview
With the AccelByte Development Toolkit (ADT) Local Cache Server, studios can add a download cache to ADT Hub, which greatly reduces their download needs during development build distribution. It does this by intelligently caching initial downloads of builds, then intercepting further downloads of the same build from S3 and providing them from a local cache instead.
Prerequisites
Hardware specifications
Minimum requirements for ADT Hub Local Cache Server setup:
-
Memory: 4 GB
-
CPU: 2 cores
-
Fast SSD for cache storage (NVMe M.2)
-
Fast ethernet network
Software specifications
Before you can set up the ADT Hub local cache server, follow these steps.
-
Install Ubuntu/Ubuntu Server >= 20.04. Note that this is not tested with other OS versions yet.
-
Install Docker >= v20.10 (API version 1.41).
-
Install the Local Cache Installer. Local Cache is an add-on you can request from AccelByte.
-
Optional. Prepare a directory for the cache target, which can be a folder or mounted disk drive (e.g
/mnt/volume1/cache). -
Optional. Set the permissions of the cache target as
755.
- Set up your firewall to allow the machine to listen to a specific port (e.g
8080)
Install the Local Cache Server
There are two ways to install the Local Cache Server: Interactive Mode and Command Line Mode, as described below.
Install the Local Cache Server in interactive mode
To install the Local Cache Server, follow these steps:
-
Execute the following command:
./local-cache-setup install -i -
Complete the requested information.
-
Cache Retention: how long to keep the cache (default: 12h)
-
Port: the local cache server port to serve (default: 80)
-
Number of workers: how many workers to serve (default: 8, usually same as the number of CPU cores)
-
Cache Mount: The location of your cache directory (default:
none) (optional field) -
Namespace: Than namespace of your game.
-
GameIDs: (optional field)
Cache Retention(12h) :
Port(80) :
Number of worker(8) :
Cache Mount() : <CACHE_DIRECTORY> (optional)
Namespace() : <YOUR_NAMESPACE> (required)
GameIDs() : <PRIORITY_GAME_ID> (optional)
Installation will complete.
2021/12/21 15:23:04 prepare docker...
2021/12/21 15:23:04 writing config file...
2021/12/21 15:23:04 copy executable....
2021/12/21 15:23:04 installing service...
2021/12/21 15:23:04 blackbox local cache installed
-
Install the Local Cache Server in command line mode
To install the Local Cache Server in command line mode, enter these fields and their values on the command line:
-
-i, --install-dir: Target installation directory, default-
-p, --port: Local cache server port to be served -
-w, --workerLocal cache server worker -
-r, --retentionLocal cache server retention -
-c, --cache-mountLocal cache mount directoryFor example:
#!/bin/sh

./ABYLocalCacheServerSetup install --port 8080 --worker 8 --retention 12h --cache-mount /home/cache
-
Configurable time intervals for auto-retention
Time intervals for auto-retention can be defined in various units, including milliseconds (ms), seconds (s), minutes (min), hours (h), and days (d). These units are denoted by the following suffixes:
| Prefix | Time |
|---|---|
| ms | milliseconds |
| s | seconds |
| m | minutes |
| h | hours |
| d | days |
| w | weeks |
| M | months, 30 days |
| y | years, 365 days |
For defining time intervals exceeding a single unit, a combination of units (milliseconds, seconds, minutes, hours, and days) is permissible. These units should be listed in descending order of significance, separated by spaces. For example, "1h 30m" denotes the same duration as "90m" or "5400s." While the system can interpret values without a unit as seconds, explicitly specifying the unit is always recommended for enhanced clarity.
Start the local cache server
The local cache server starts automatically after the installation process is successful.
Check the status of the local cache server
Follow these steps to check the status of the Local Cache Server:
-
Execute the following:
./local-cache-setup status -
Make sure the service is running (if it's not running check the install procedure again)
2021/12/23 10:50:49 service is running.
/docker-entrypoint.sh: /docker-entrypoint.d/ is not empty, will attempt to perform configuration
/docker-entrypoint.sh: Looking for shell scripts in /docker-entrypoint.d/
/docker-entrypoint.sh: Launching /docker-entrypoint.d/10-listen-on-ipv6-by-default.sh
10-listen-on-ipv6-by-default.sh: info: Getting the checksum of /etc/nginx/conf.d/default.conf
10-listen-on-ipv6-by-default.sh: info: Enabled listen on IPv6 in /etc/nginx/conf.d/default.conf
/docker-entrypoint.sh: Launching /docker-entrypoint.d/20-envsubst-on-templates.sh
20-envsubst-on-templates.sh: Running envsubst on /etc/nginx/templates/nginx.conf.template to /etc/nginx/nginx.conf
/docker-entrypoint.sh: Launching /docker-entrypoint.d/30-tune-worker-processes.sh
/docker-entrypoint.sh: Configuration complete; ready for start up
Check that the local cache server is running
To check if your local cache server is running:
-
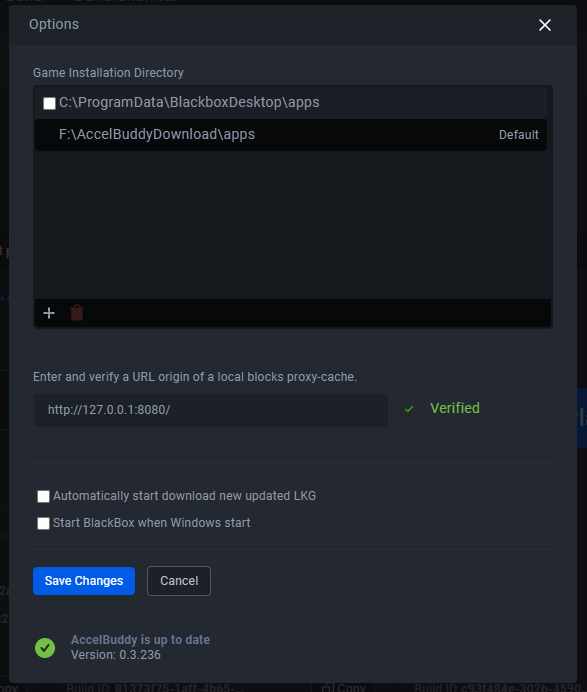
Log in to ADT Web.
-
Click the Settings icon on the top right corner of your display.
-
Fill the proxy-cache text field with your Cache Server IP address.
-
Click the Verify button. When the IP address is found, a green Verified message displays.
-
Click the Save Changes button.

Troubleshooting
Cache is not working - I tried to download the same binary twice with the same internet speed
-
Check your local cache server to ensure it allows user
systemd-journalto rename the file. -
Try giving your local cache server folder 777 permission.
-
Change your local cache server folder's owner to something other than the root.
Cannot connect to the local cache server
Check your firewall, make sure it has access to the port that you specified during the installation process.
Download speed is still slow
A number of factors can affect download speed:
-
Ensure you have a fast SSD on the server for cache storage.
-
Ensure the connection between your computer and the local cache server uses Gigabit Ethernet (1 Gbps).
-
Try to increase your memory on the local cache server.