Get started with session manager customization
Overview
The Session Override feature allows you to customize the logic of the Session service through a dedicated gRPC server. This functionality enables developers to implement tailored session management strategies, enhancing flexibility and control over game and party sessions. This feature helps you define specific behaviors for session creation, updates, and deletions, ensuring that your unique requirements are met while maintaining seamless integration with the existing session service feature.
This article walks you through the workflow of creating and using a simple custom session override to manage the session data in the following events:
OnSessionCreated: the operation when the game session is being created for the first time.OnSessionUpdated: the operation when there is an update or modification to the game session.OnSessionDeleted: the operation when the game session is marked as deleted.OnPartyCreated: the operation when the party session is being created for the first time.OnPartyUpdated: the operation when there is an update or modification to the party session.OnPartyDeleted: the operation when the party session is marked as deleted.
Prerequisites
- Go
Windows 11 WSL2 or Linux Ubuntu 22.04 or macOS 14+ with the following tools installed:
a. Bash
On Windows WSL2 or Linux Ubuntu:
bash --version

GNU bash, version 5.1.16(1)-release (x86_64-pc-linux-gnu)
...
On macOS:
bash --version

GNU bash, version 3.2.57(1)-release (arm64-apple-darwin23)
...
b. Make
On Windows WSL2 or Linux Ubuntu:
To install from the Ubuntu repository, run
sudo apt update && sudo apt install make.make --version
GNU Make 4.3
...On macOS:
make --version

GNU Make 3.81
...
c. Docker (Docker Desktop 4.30+/Docker Engine v23.0+)
On Linux Ubuntu:
- To install from the Ubuntu repository, run
sudo apt update && sudo apt install docker.io docker-buildx docker-compose-v2. - Add your user to the
dockergroup:sudo usermod -aG docker $USER. - Log out and log back in to allow the changes to take effect.
- To install from the Ubuntu repository, run
On Windows or macOS:
Follow Docker's documentation on installing the Docker Desktop on Windows or macOS.
docker version

...
Server: Docker Desktop
   Engine:
   Version:          24.0.5
...
d. Go v1.22 (or later)
Follow Go's installation guide to install Go.
go version

go version go1.22.0 ...
e. Curl
On Windows WSL2 or Linux Ubuntu:
To install from the Ubuntu repository, run
sudo apt update && sudo apt install curl.curl --version
curl 7.81.0 (x86_64-pc-linux-gnu)
...On macOS:
curl --version

curl 8.4.0 (x86_64-apple-darwin23.0) ...
...
f. Jq
On Windows WSL2 or Linux Ubuntu:
To install from the Ubuntu repository, run
sudo apt update && sudo apt install jq.jq --version
jq-1.6
...On macOS:
To install using Homebrew, run
brew install jq.jq --version
jq-1.7.1
g. Postman
- Use the available binary from Postman.
h. ngrok
- Follow ngrok's installation guide.
- Use the available binary from extend-helper-cli.
- Access to the AGS Admin Portal environment.
- Base URL:
<your environment's domain URL>- Example for AGS Shared Cloud customer:
https://spaceshooter.prod.gamingservices.accelbyte.io - Example for AGS Private Cloud customer:
https://dev.customer.accelbyte.io
- Example for AGS Shared Cloud customer:
- Create a game namespace if you don't have one yet. Take note of the namespace ID.
- Create an OAuth Client with
confidentialclient type. Keep theClient IDandClient Secret.
- Base URL:
Clone the app template
- Go
git clone https://github.com/AccelByte/session-manager-grpc-plugin-server-go.git
Set up, run, and test an Extend app
This section covers how to set up, build, run, and then test an Extend app.
Set up the Extend app
To run the sample custom functions of an Extend app, follow these steps:
Create a docker compose
.envfile by copying the content of the.env.templatefile.noteThe host OS environment variables have higher precedence compared to the
.envfile variables. If the variables in the.envfile do not seem to take effect properly, check if there are host OS environment variables with the same name. For more details, refer to Docker's documentation about the docker compose environment variables precedence.Fill in the required environment variables in
.envfile as shown below:AB_BASE_URL=https://test.accelbyte.io # Base URL of AccelByte Gaming Services environment
AB_CLIENT_ID='xxxxxxxxxx' # Client ID from the Prerequisites section
AB_CLIENT_SECRET='xxxxxxxxxx' # Client Secret from the Prerequisites section
AB_NAMESPACE='xxxxxxxxxx' # Namespace ID from the Prerequisites section
PLUGIN_GRPC_SERVER_AUTH_ENABLED=false # Enable or disable access token validationnoteIn this app template,
PLUGIN_GRPC_SERVER_AUTH_ENABLEDistrueby default. If it is set tofalse, thegRPC servercan be invoked without theAccelByte Gaming Servicesaccess token. This option is provided for development purposes only. It is recommended to enablegRPC serveraccess token validation in the production environment.
Build the Extend app
To build this app template, run the following command:
make build
Run the Extend app
To (build and) run this app template in a container, run the following command:
docker compose up --build
If the docker app is running, we can access it using the port that has been configured in the docker-compose file. For example, in our sample gRPC server app:
...
services:
 app:
   build: .
   ports:
     - "8080:8080"
     - "6565:6565"
...
Two ports are being exposed and the format is host_port:container_port.
- "8080:8080": This maps port 8080 on your host machine to port 8080 in the container. This means that accessing
http://localhost:8080on your host will route the traffic to port 8080 inside theappcontainer. - "6565:6565": This maps port 6565 on the host to port 6565 in the container, allowing access to whatever service is running on that port in the container.
Test the Extend app
You can test the Extend app in a local development environment or with AGS.
Test in a local development environment
Before testing, make sure PLUGIN_GRPC_SERVER_AUTH_ENABLED is set to false. Otherwise, the gRPC request will be rejected by the gRPC server.
The custom functions in this app template can be tested locally using Postman. To test the Extend app using Postman, follow these steps:
Run the
dependency servicesby following theREADME.mdin the grpc-plugin-dependencies repository.warningMake sure to start dependency services with mTLS disabled for now: mTLS is currently not supported by AGS, but support for it will be added soon to improve security. If mTLS is enabled, the gRPC client calls without mTLS will be rejected.
Use the following command to run this
gRPC serverapp template:docker compose up --buildIn Postman, create a new
gRPC requestand enterlocalhost:10000as the server URL. This configuration essentially accesses thegRPC serverthrough anEnvoyproxy independency services. For more information, refer to Postman's documentation on creating gRPC requests.In Postman, continue by selecting the
OnSessionCreatedgRPC call method and click the Invoke button, this will start the stream connection to the gRPC server.Still in Postman, continue sending parameters to specify the number of players in a match by copying the sample JSON below and clicking
Send.{
"session": {
"session": {
"id": "sessionid",
"is_active": true,
"namespace": "namespace",
"created_by": "created_by"
}
}
}The expected response when successful is for the session to be returned back but will add attribute fields like below:
{
"session": {
   "session": {
         "id": "sessionid",
         "is_active": true,
         "namespace": "namespace",
         "created_by": "created_by",
         "attributes": {
            "SAMPLE": "value from GRPC server"
         }
      }
   }
}
Test with AGS
To test the app template, which runs locally with AGS, the gRPC server needs to be connected to the internet. To do this without requiring public IP, you can use ngrok.
Run this
gRPC serverapp template by using the following command:docker compose up --buildSign in to ngrok and get your
authtokenfrom the ngrok dashboard.In this app template root directory, expose the
gRPC serverport in the local development environment to the internet by running the following command:make ngrok NGROK_AUTHTOKEN=xxxxxxxxxxxTake note of the
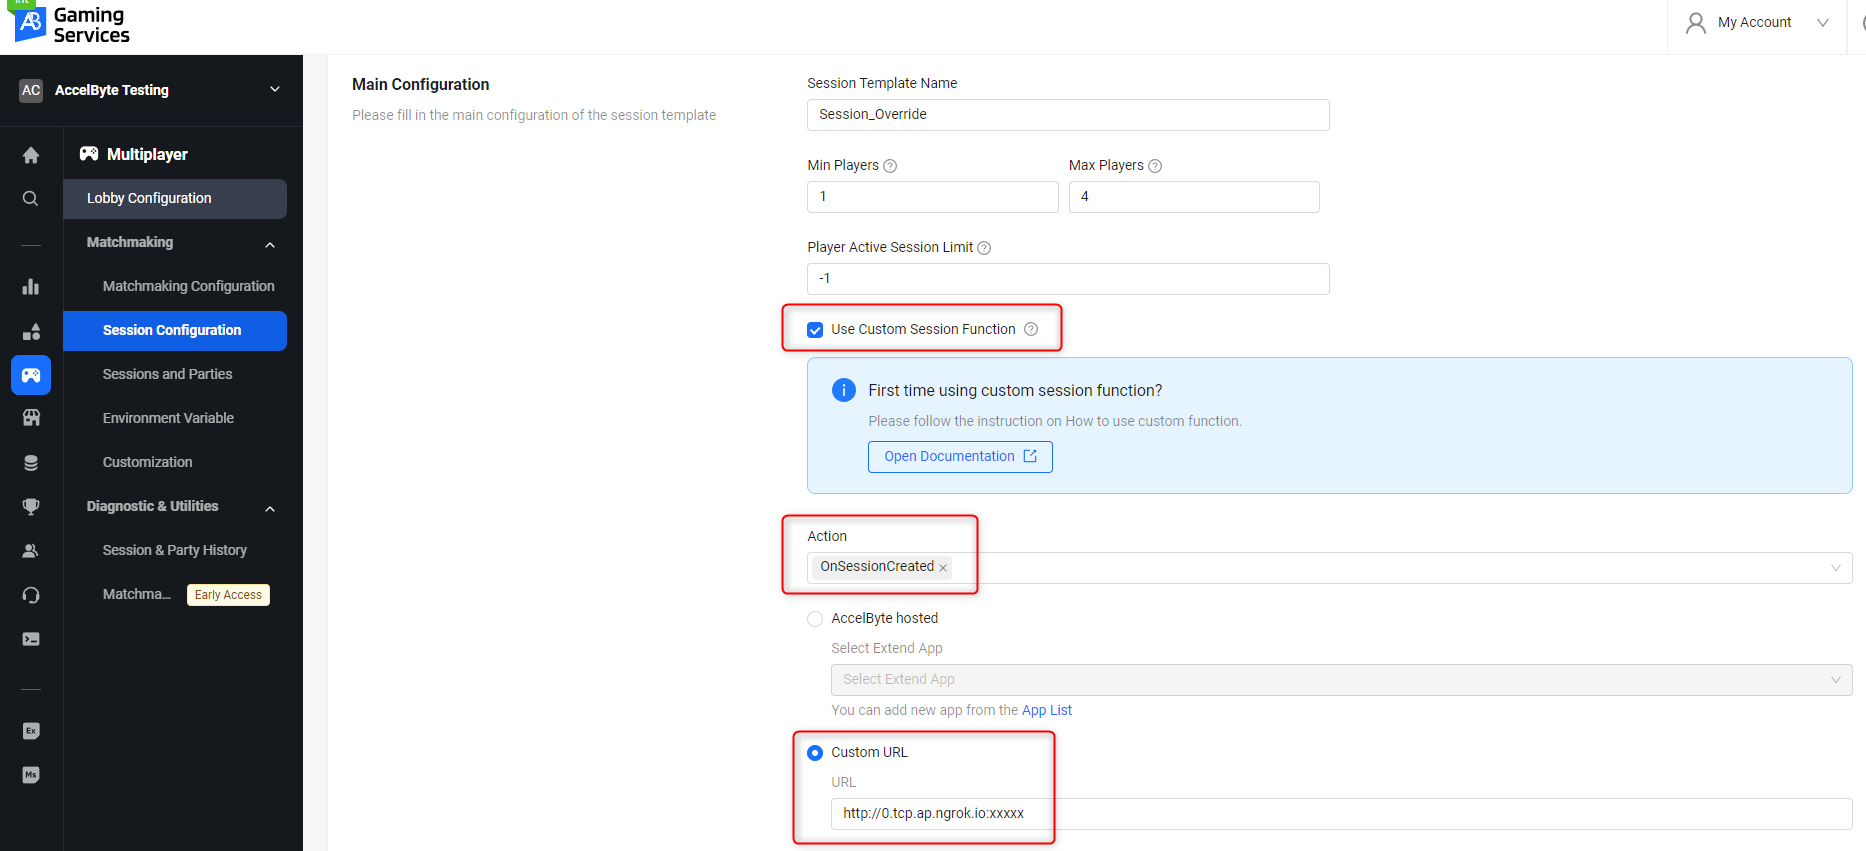
ngrokforwarding URL, e.g.,http://0.tcp.ap.ngrok.io:xxxxx.In the Admin Portal, go to the namespace where the Extend app is in and create a session template:
- On the sidebar menu, go to Multiplayer > Matchmaking > Session Configuration.
- Click on the Add Session Template button. Fill in the required information. For more information, see Create and configure session templates.
- Ensure that you enable the Use Custom Session Function option and choose OnSessionCreated as the action for the session template.
- Select the Custom URL option and use the ngrok forwarding URL from step 3.
- Finish creating the session template.
Create a game session via the Session endpoint with the following JSON body:
{
   "configurationName": "<your-session-template>"
}
Check the result in the Admin portal > Multiplayer > Sessions and Parties. Check the details of the session created in step 5. The session should contain the attributes with the
SAMPLEkey and its value from the GRPC server.{
...
"id": "e99542476f924d5aa5166a3d83932056",
"namespace": "<your-namespace>",
"createdAt": "2024-09-19T01:50:10.999Z",
"attributes": {
"SAMPLE": "value from GRPC server"
},
...
}
Deploy in AGS
Deploying an Extend app in AGS involves the following steps in the Admin Portal:
- Create the Extend app.
- Upload the Extend app.
- Configure the Extend app.
- Deploy the Extend app.
- Set AGS to use the Extend app.
Create the Extend app
- In the AGS Admin Portal, go to the namespace where you wish to create your Extend Override app.
- On the sidebar menu, under ADD-ONS, go to Extend > Override.
- On the Overridable Feature page, click on the + Create New button.
- On the Create App form, provide a name and description (optional) for your Extend app.
- Click Create. Your new Extend app is added to the Overridable Feature app list.
Upload the Extend app
Set up an OAuth Client for extend-helper-cli.Create an OAuth Client with
confidentialclient type and containing the following permission:- For AGS Private Cloud customers:
ADMIN:NAMESPACE:{namespace}:EXTEND:REPOCREDENTIALS[READ]ADMIN:NAMESPACE:{namespace}:EXTEND:APP[READ]
- For AGS Shared Cloud customers:
- Extend > Extend app image repository access (Read)
- Extend > App (Read)
Keep a copy of the
Client IDandClient Secret.- For AGS Private Cloud customers:
Copy the extend-helper-cli command to perform docker login on the Extend app details page under Repository Authentication Command.

Export the required environment variables and perform docker login using extend-helper-cli. Run this command:
- Linux
- Windows (WSL2)
- macOS
# Your AGS environment base URL, e.g., https://spaceshooter.prod.gamingservices.accelbyte.io, https://dev.accelbyte.io, etc.
export AB_BASE_URL='https://xxxxxxxxxx'
# Client ID of OAuth Client for extend-helper-cli (from step 1)
export AB_CLIENT_ID='xxxxxxxxxx'
# Client Secret of OAuth Client for extend-helper-cli (from step 1)
export AB_CLIENT_SECRET='xxxxxxxxxx'

# The command to perform docker login (from step 2)
./extend-helper-cli-linux_amd64 dockerlogin --namespace <game namespace> --app <app name> --login
# Your AGS environment base URL, e.g., https://spaceshooter.prod.gamingservices.accelbyte.io, https://dev.accelbyte.io, etc.
export AB_BASE_URL='https://xxxxxxxxxx'
# Client ID of OAuth Client for extend-helper-cli (from step 1)
export AB_CLIENT_ID='xxxxxxxxxx'
# Client Secret of OAuth Client for extend-helper-cli (from step 1)
export AB_CLIENT_SECRET='xxxxxxxxxx'
# The command to perform docker login (from step 2)
./extend-helper-cli-linux_amd64 dockerlogin --namespace <game namespace> --app <app name> --login# Your AGS environment base URL, e.g., https://spaceshooter.prod.gamingservices.accelbyte.io, https://dev.accelbyte.io, etc.
export AB_BASE_URL='https://xxxxxxxxxx'
# Client ID of OAuth Client for extend-helper-cli (from step 1)
export AB_CLIENT_ID='xxxxxxxxxx'
# Client Secret of OAuth Client for extend-helper-cli (from step 1)
export AB_CLIENT_SECRET='xxxxxxxxxx'
# The command to perform docker login (from step 2)
./extend-helper-cli-darwin_amd64 dockerlogin --namespace <game namespace> --app <app name> --loginimportantWe recommend running the above commands in a separate terminal and in a different working directory than the Extend app project. This is to reduce the chances of the extend-helper-cli picking up the environment variables for the Extend app project instead.
The output of a successful login looks similar to the following:
INFO[0000] signing in to https://dev.accelbyte.io
INFO[0001] getting docker credentials...
WARNING! Your password will be stored unencrypted in /home/xyz-abc/.docker/config.json.
Configure a credential helper to remove this warning. See
https://docs.docker.com/engine/reference/commandline/login/#credentials-store

Login SucceededimportantIf you get the following error, refer to Troubleshooting: Docker login fails for troubleshooting steps .
Error saving credentials: error storing credentials - err: exit status 1, out: `error storing credentials - err: exit status 1, out: `The stub received bad data.`Upload the Extend app container image to AGS using
extend-helper-cli image-uploadcommand. You can specify your extend app project by using-wparameter. For image tag, you can put v0.0.1. For example:- Linux
- Windows (WSL2)
- macOS
./extend-helper-cli-linux_amd64 image-upload -n <game namespace> -a <app name> -w <extend app source dir> -t <image tag>./extend-helper-cli-linux_amd64 image-upload -n <game namespace> -a <app name> -w <extend app source dir> -t <image tag>./extend-helper-cli-darwin_amd64 image-upload -n <game namespace> -a <app name> -w <extend app source dir> -t <image tag>infoYou can use the
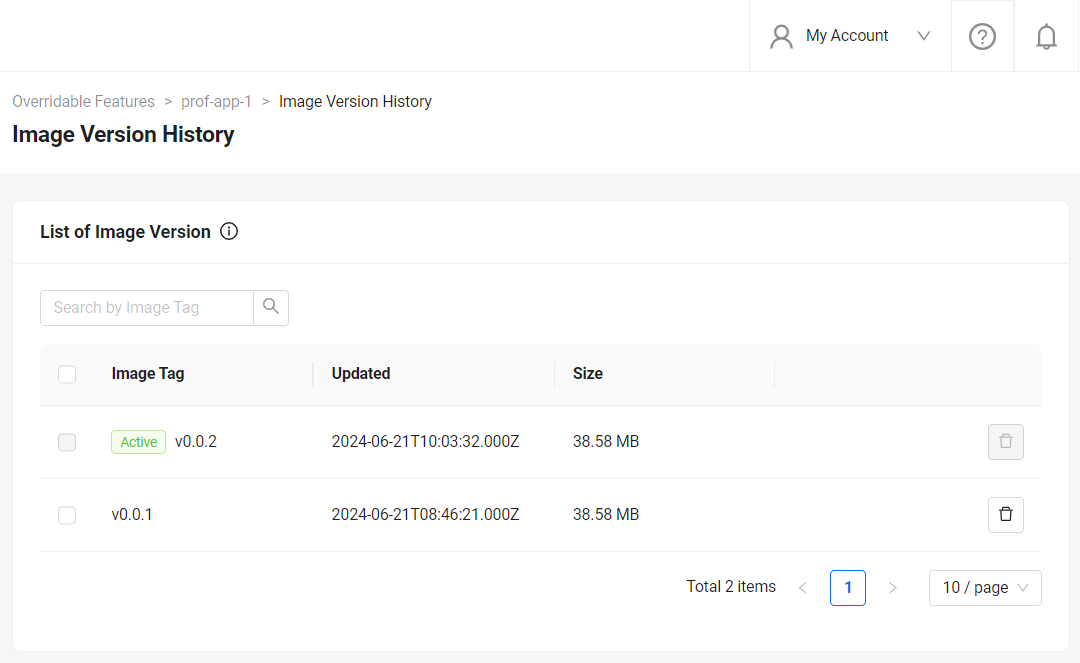
--loginparameter to log in and upload the image simultaneously using a single command. Refer to the extend-helper-cli README text for more details.If your images are successfully uploaded, you will see an image with version v0.0.1 on the Image Version History page.
Configure the Extend app
Before deploying the Extend app that you uploaded, you must configure the environment variables required by the Extend app. In the app's details page, set the following environment variables with the same values that you used to run and test the Extend app locally.
AB_CLIENT_IDAB_CLIENT_SECRET
If your Extend Override app is based on app templates before release v2024.02.13, make sure to set PLUGIN_GRPC_SERVER_AUTH_ENABLED environment variable to true. Otherwise, the access token validation in the Extend app is disabled and your Extend app may be accessed without a valid access token.
Since release v2024.02.13**, PLUGIN_GRPC_SERVER_AUTH_ENABLED in Extend Override app templates is set to true by default. The access token validation can only be disabled when PLUGIN_GRPC_SERVER_AUTH_ENABLED is explicitly set to false. To align with this, all new Extend apps created through the Admin Portal will not have PLUGIN_GRPC_SERVER_AUTH_ENABLED environment variable set by default. Previously, PLUGIN_GRPC_SERVER_AUTH_ENABLED=false is added on all new Extend apps created through the Admin Portal.
Deploy the Extend app
To deploy the Extend app, click Deploy Latest Image. Wait until the app status updates to RUNNING, which indicates that your Extend app is successfully deployed.
Set AGS to use the Extend app
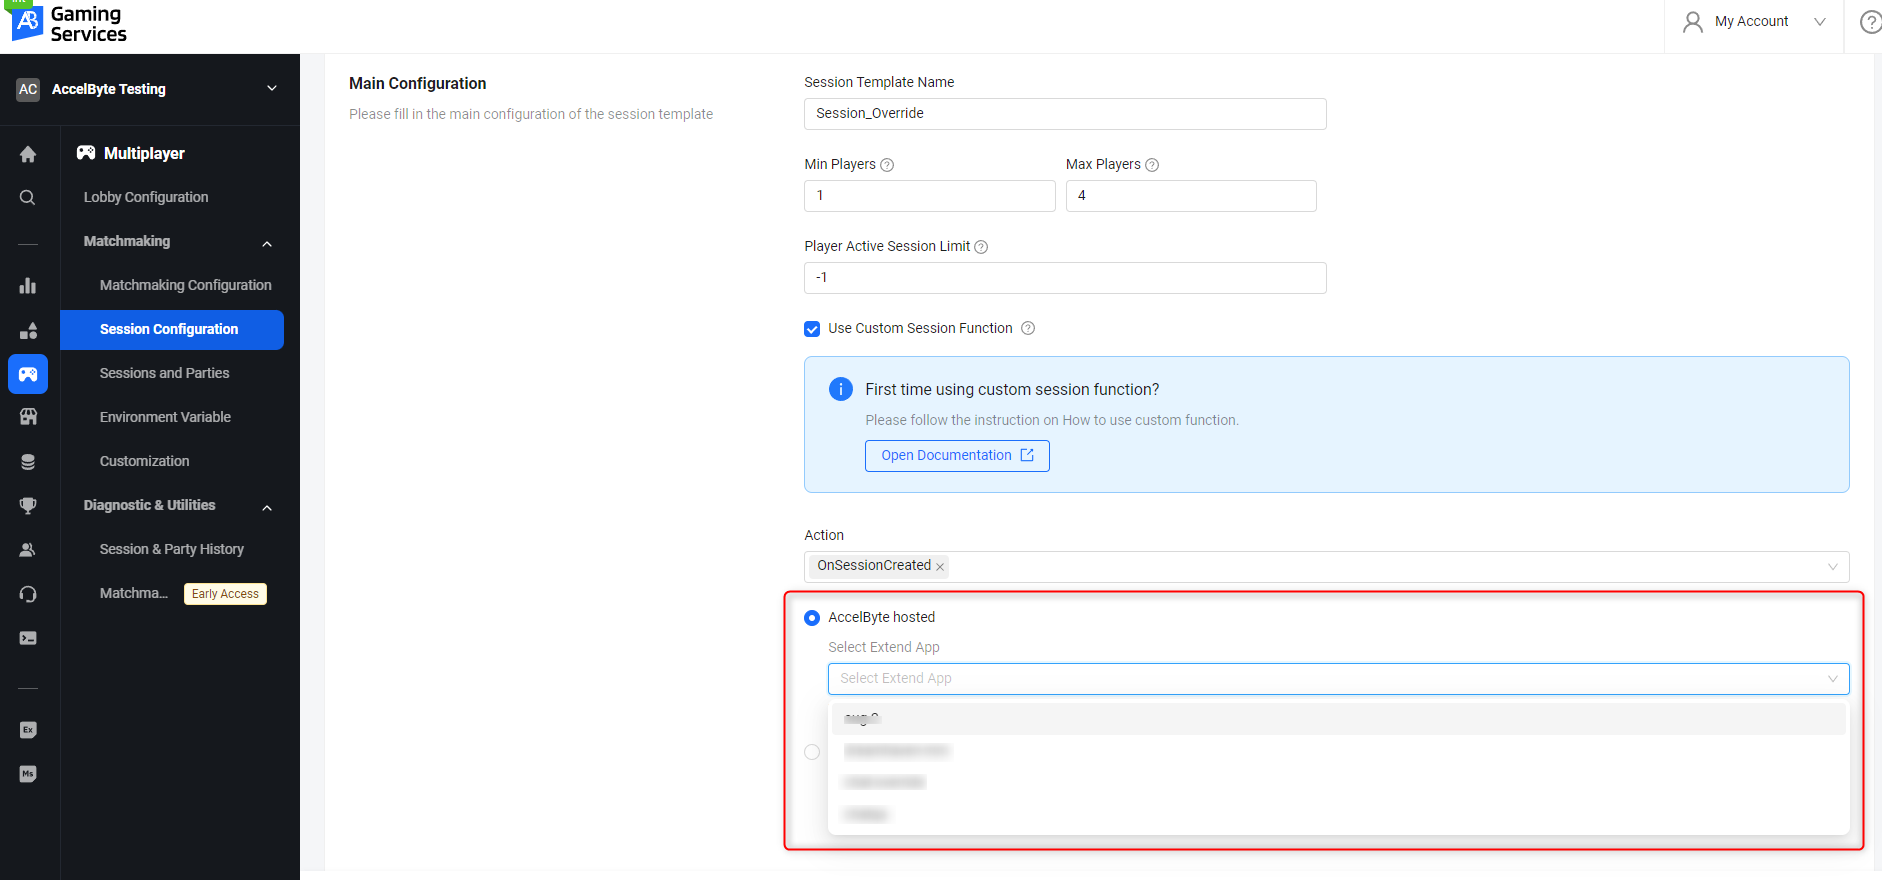
In the AGS Admin Portal, go to the namespace you wish to use to create your custom function. On the Admin Portal sidebar, click on Multiplayer > Matchmaking > Session Configuration. On the Session Configurations page, click on the Add Session Template button. When you create your session template, make sure to check the “Use Custom Session Function” selection. Choose the AccelByte Hosted option and select the name of the Extend App you created. Then, click Save to create the new session template.
Next step
Proceed to modify this app template and create your own Extend Override app for session function. See Introduction to custom session data management with session manager for more details.