Set up Meta Quest as an identity provider
Overview
This guide helps verified Meta Quest developers to connect Meta Quest Accounts to AccelByte Gaming Services (AGS). You may need to set up additional features within Meta Quest services. For more information about setting up Meta Quest services, we recommend contacting your Meta representative and reviewing Meta Quest documentation.
This guide is intended for public use and contains limited information due to confidentiality. We recommend you refer to the full confidential guide first. Contact your AccelByte Technical Producer to request a copy of the guide.
Goals
- Enable the Meta Quest authentication method for your game with the AGS SDK.
- Enable the Meta Quest authentication method for your publisher website with the AGS Player Portal.
Prerequisites
Web login integration
- You must have a verified Meta Quest Developer account.
- You have an AGS Admin Portal account to set up authentication and manage permissions.
- If you have not done so already, set up a Publisher Namespace for your Player Portal and Launcher.
- You have a Player Portal.
- To follow the AGS CLI steps, install the AGS CLI and sign in with an account that has access to these features. See Install and sign in. The examples use a Bash shell.
In-game login integration
- You must have a verified Meta Quest Developer account.
- For Unreal Engine, you need to have the OnlineSubsystem Oculus plugin activated.
- For Unity, you need the Oculus Unity Integration. You can find that in Oculus Integration | Integration | Unity Asset Store.
- You have an AccelByte Admin Portal account to set up authentication and manage permissions.
- If you have not done so already, set up a Game Namespace for your game.
- You have a Unity or Unreal Engine game project with the latest version of the AccelByte Game SDK imported.
- Familiarity with AGS Identity and Access Management (IAM) Clients.
- To follow the AGS CLI steps, install the AGS CLI and sign in with an account that has access to these features. See Install and sign in. The examples use a Bash shell.
Set up Meta Quest
Set up Meta Quest application
Set up the Meta Quest application on your Meta Quest developer account. Follow Meta's Create an App Page guide.
Meta Quest request platform feature
After you finish creating the application, request a data use checkup to get access to certain user data, such as user ID, user profile, and avatar. Follow the Submitting a DUC Guide steps on Meta's Data User Checkup guide.
If you have trouble setting up on the Meta Quest Developer Portal, contact customer support to request a copy of the available guide from AccelByte.
Set up Meta Quest login method
Web login
Web login integration is currently unavailable in AGS Public Cloud and is only supported in AGS Private Cloud.
To enable your players to log in to your Player Portal using their Meta Quest accounts, follow these steps:
- Admin Portal
- AGS CLI
-
In the AGS Admin portal, go to your publisher namespace.
-
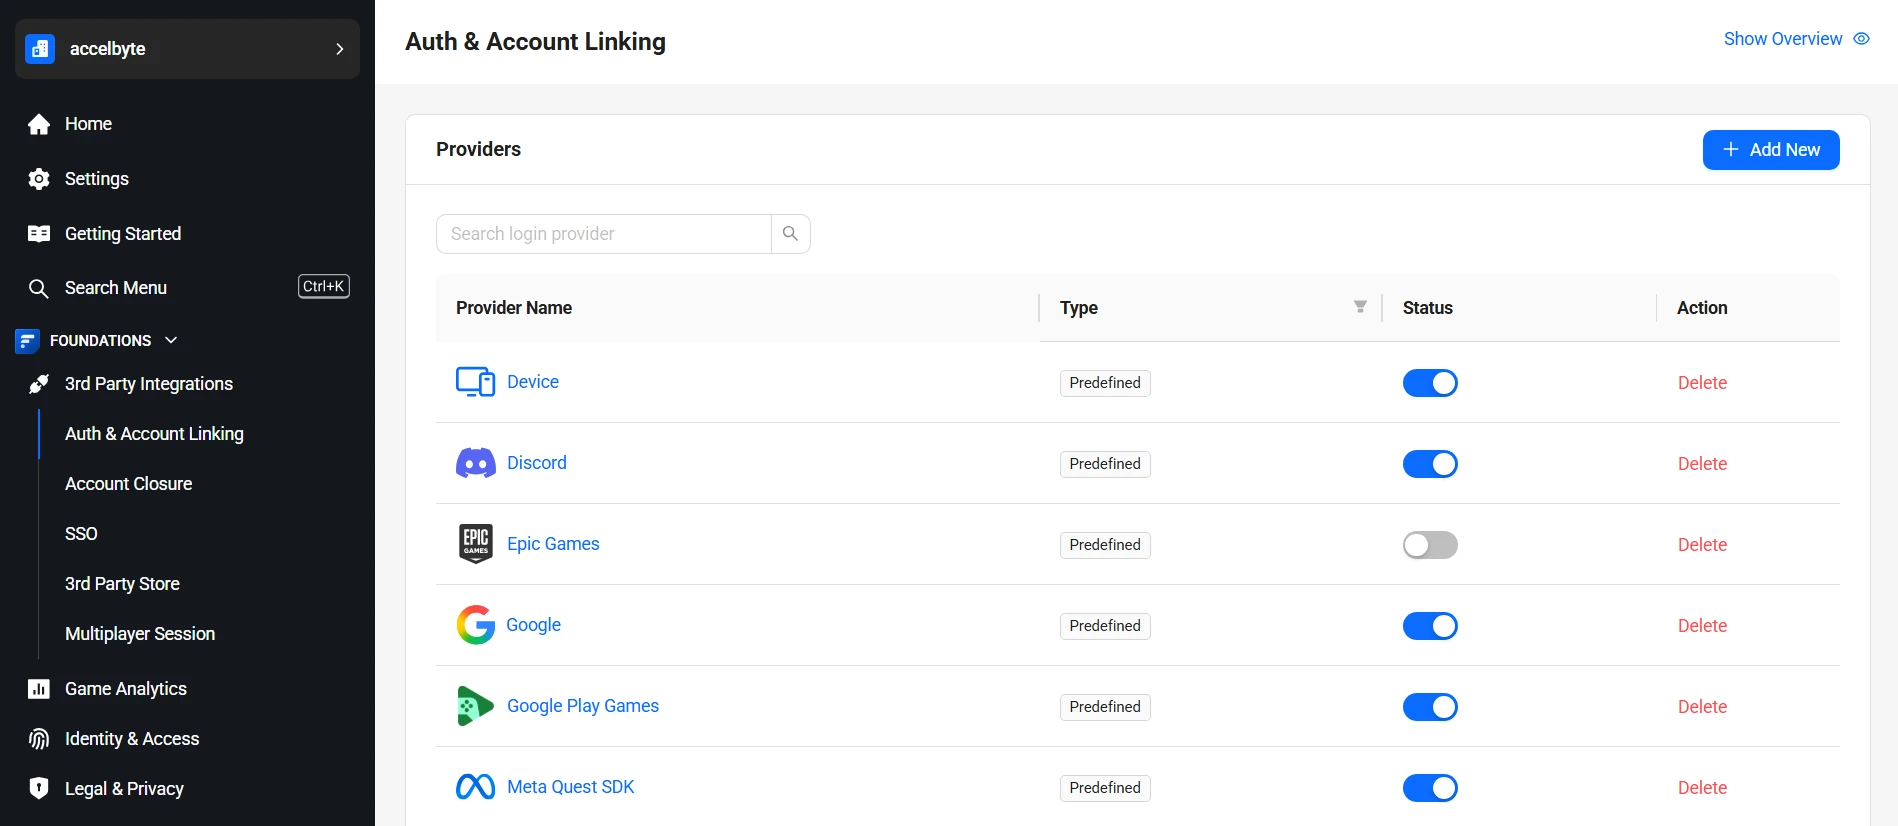
On the sidebar menu, go to Foundations > 3rd Party Integrations > Auth & Account Linking.
-
On the Auth & Account Linking page, click + Add New button.
-
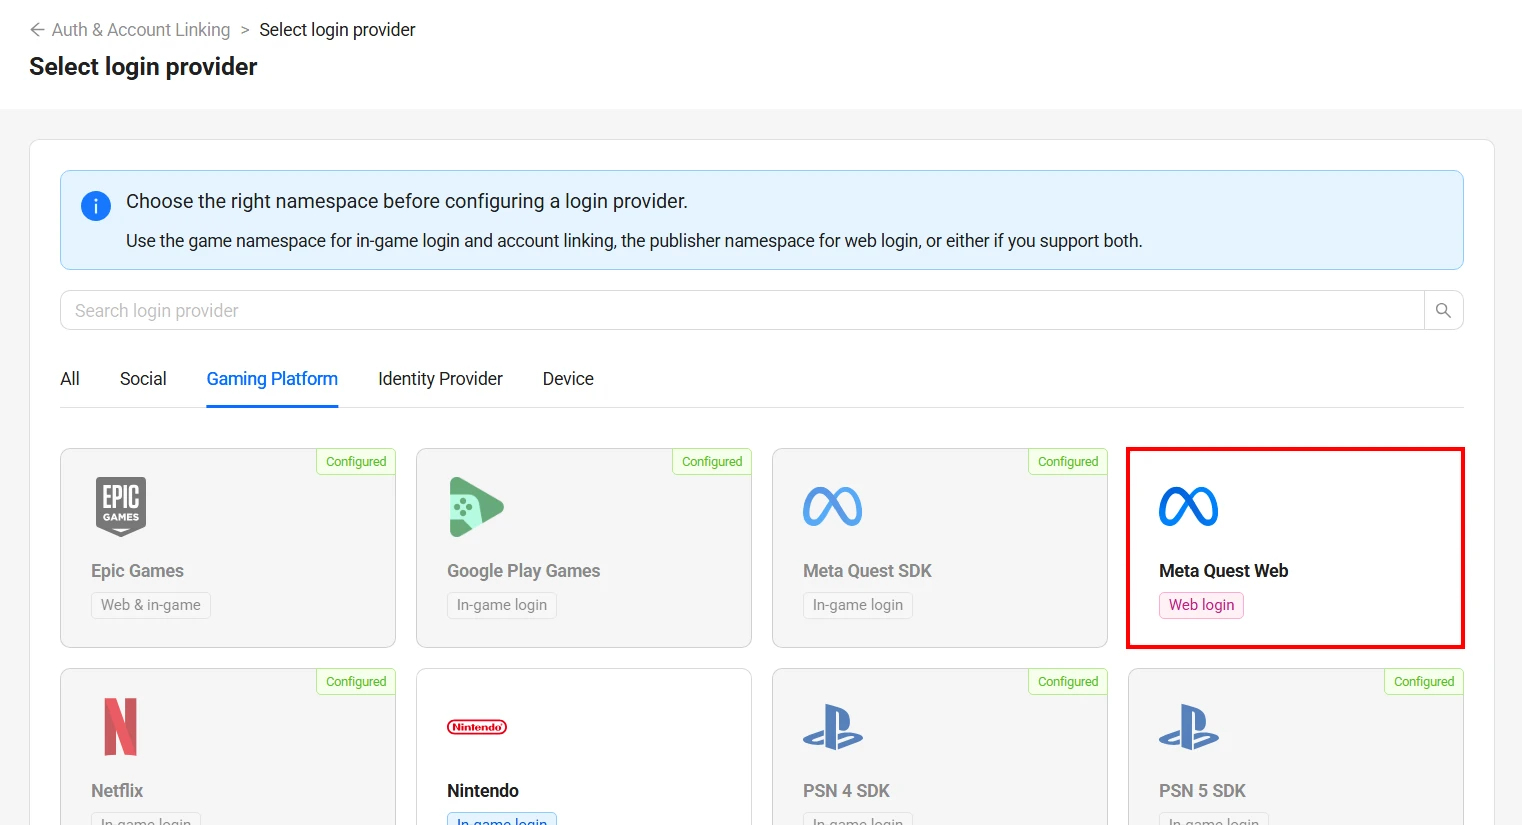
On the Select login provider page, from the Gaming Platform tab, select Meta Quest Web.
-
The Set Up Meta Quest Web login provider dialog appears.
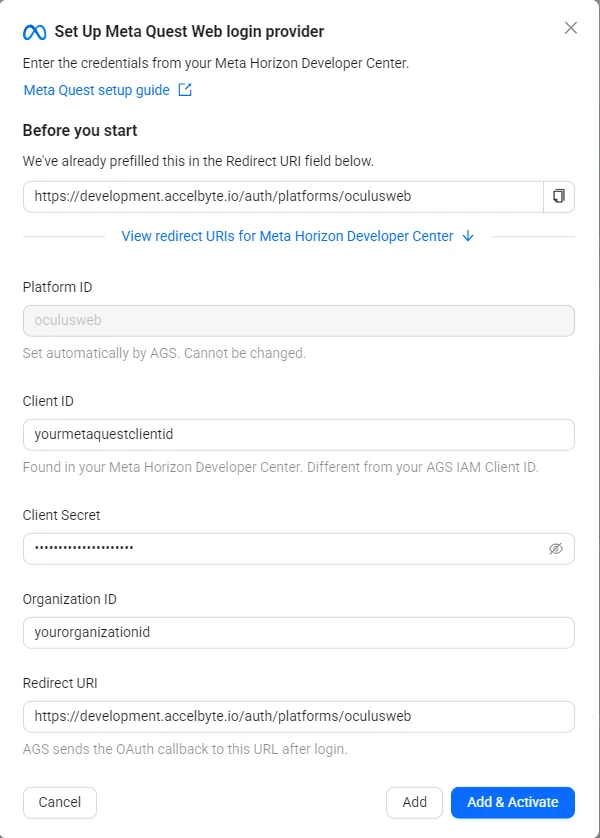
Fill in the following fields:
- Platform ID:
oculusweb. Set automatically. Cannot be changed. - Client ID: Your Meta Quest App ID.
- Client Secret: Your Meta Quest App Secret.
- Organization ID: Your Meta Quest Organization ID.
- Redirect URI:
<BASE_URL>/auth/platforms/oculusweb. Replace<BASE_URL>with your domain address, e.g.,https://development.accelbyte.io.importantRegister the following as allowed redirect URIs in your Meta Quest developer console (
<BASE_URL>is your domain address and<Namespace>is your publisher namespace):<BASE_URL>/auth/platforms/oculusweb<BASE_URL>/iam/v3/public/namespaces/<Namespace>/users/me/platforms/oculusweb/web/link/establish(used for account linking)<BASE_URL>/iam/v3/public/namespaces/<Namespace>/users/me/platforms/oculusweb/web/reauth/establish(used for GDPR re-authentication processes)
- Platform ID:
-
Click Add & Activate to create and activate the provider in one step. Alternatively, click Add to create without activating.
-
Create a JSON file with the provider's settings. Any file name works. This example uses
oculusweb.json:{
"ClientId": "<YourMetaQuestAppId>",
"Secret": "<YourMetaQuestAppSecret>",
"OrganizationId": "<YourMetaQuestOrganizationId>",
"RedirectUri": "<BaseURL>/auth/platforms/oculusweb",
"IsActive": true
}ClientIdandSecret: your Meta Quest App ID and App Secret.OrganizationId: your Meta Quest Organization ID.RedirectUri: replace<BaseURL>with your domain address, such ashttps://development.accelbyte.io. Register the redirect URIs listed in the Admin Portal tab in your Meta Quest developer console.IsActive:trueadds and activates the provider, like Add & Activate.falseadds it without activating it, like Add.
-
Add the provider. Replace
<YourPublisherNamespace>with your publisher namespace. After@, pass the path to your JSON file:ags iam platform-credentials create --namespace <YourPublisherNamespace> --platform-id oculusweb --json @oculusweb.jsonThe file contains your App Secret, so delete it after the command runs.
Edit a login provider
- Admin Portal
- AGS CLI
-
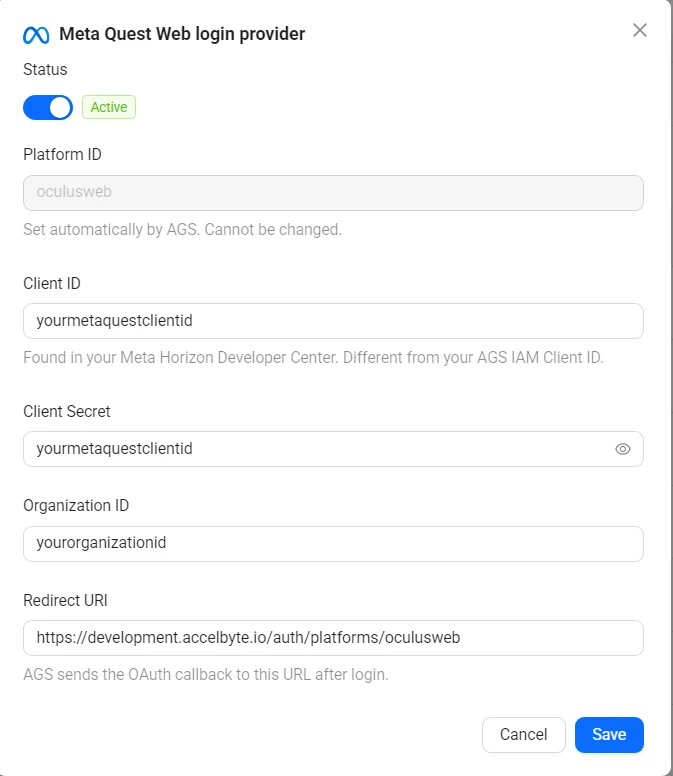
On the Auth & Account Linking page, click the Meta Quest Web entry.
-
A dialog appears with the provider's configuration. Update the fields as needed.
-
Use the Status toggle at the top to activate or deactivate the provider.
-
Click Save.
-
Check the provider's current settings:
ags iam platform-credentials get --namespace <YourPublisherNamespace> --platform-id oculusweb -
Send only the fields you want to change. Fields you leave out keep their current values. For example, to deactivate the provider:
ags iam platform-credentials update --namespace <YourPublisherNamespace> --platform-id oculusweb --json '{"IsActive": false}'To activate it, send
{"IsActive": true}. To change the App Secret, put{"Secret": "<NewMetaQuestAppSecret>"}in a JSON file instead, pass it with--json @<FileName>, and delete the file after the command runs.
In-game login
To enable your players to log in from in-game using their Meta Quest accounts, follow these steps. The Meta Quest SDK provider is available in game namespaces on both Public Cloud and Private Cloud.
- Admin Portal
- AGS CLI
-
In the AGS Admin portal, go to your game namespace.
-
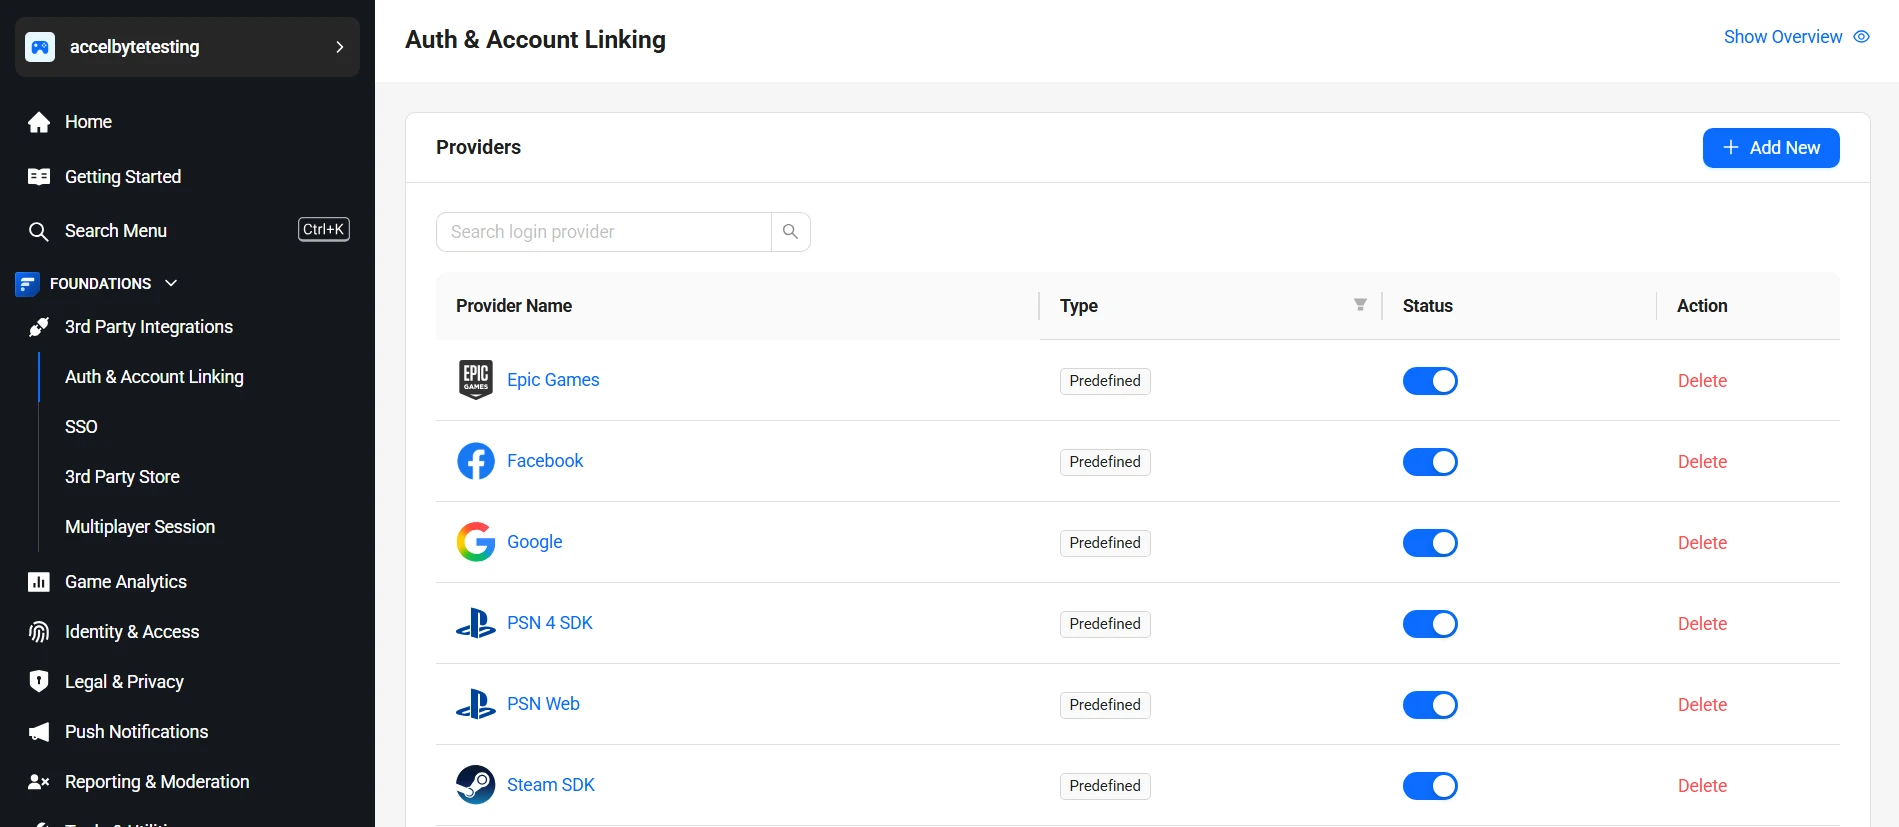
On the sidebar menu, go to Foundations > 3rd Party Integrations > Auth & Account Linking.
-
On the Auth & Account Linking page, click + Add New button.
-
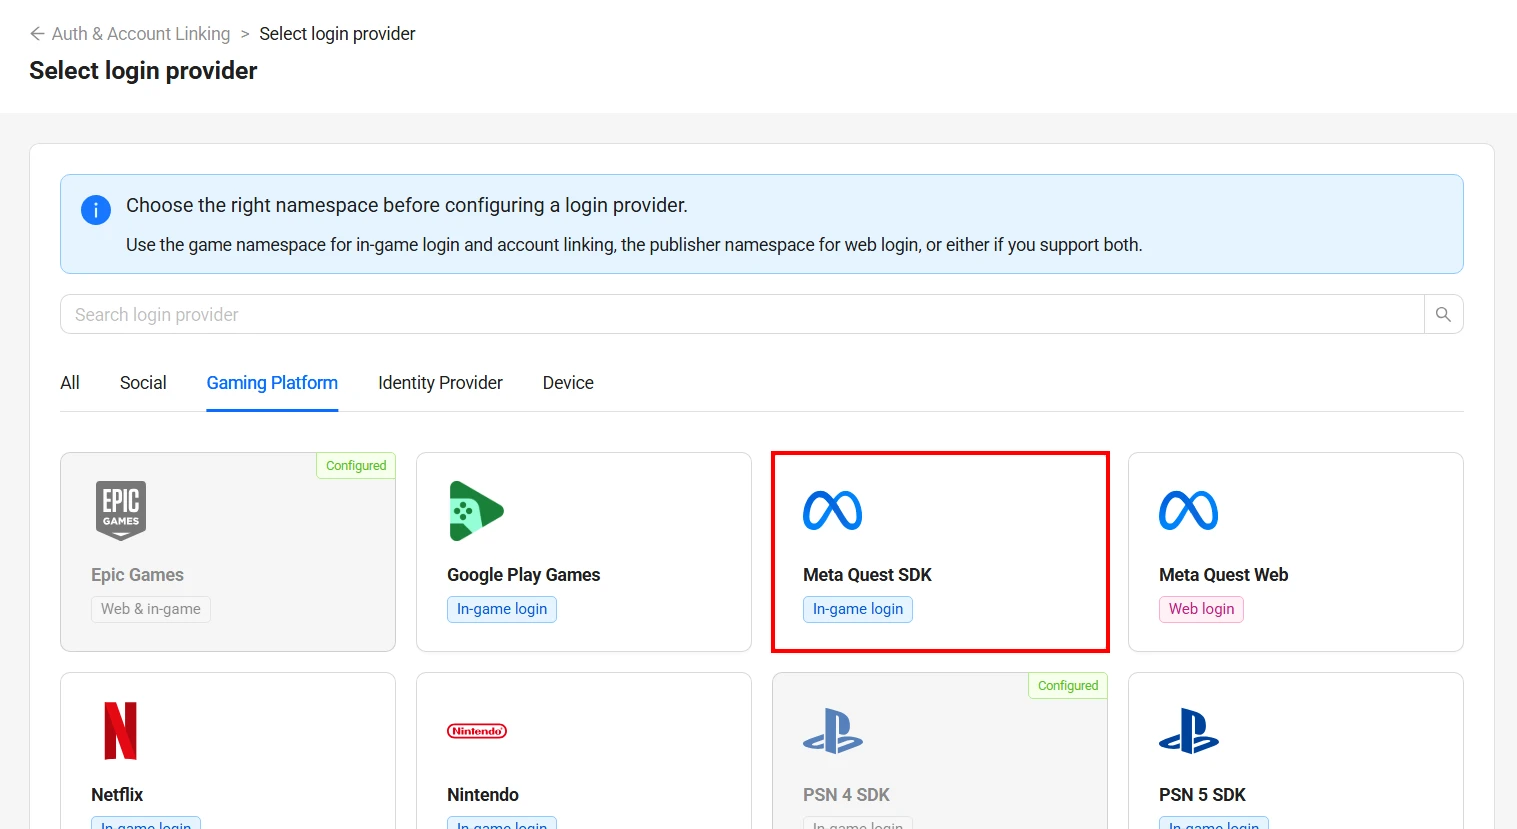
On the Select login provider page, from the Gaming Platform tab, select Meta Quest SDK.
-
The Set Up Meta Quest SDK login provider dialog appears.
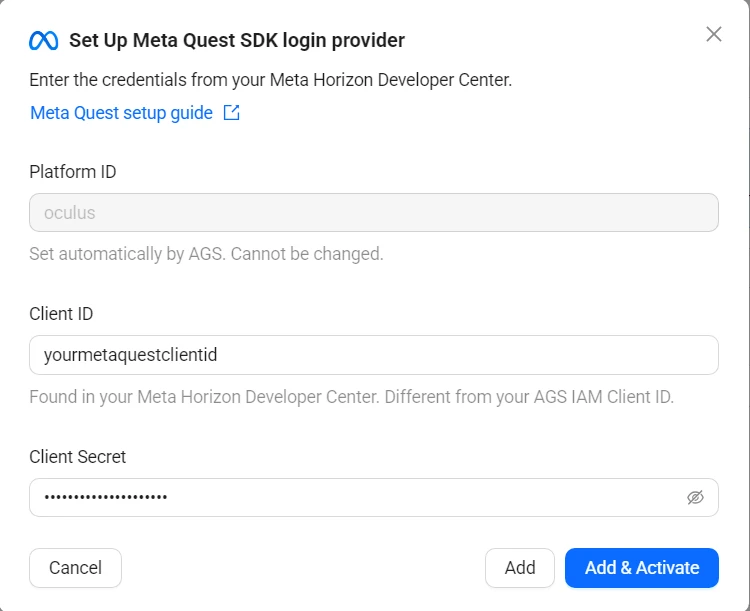
Fill in the following fields:
- Platform ID:
oculus. Set automatically. Cannot be changed. - Client ID: Your Meta Quest App ID.
- Client Secret: Your Meta Quest App Secret.
- Platform ID:
-
Click Add & Activate to create and activate the provider in one step. Alternatively, click Add to create without activating.
-
Create a JSON file with the provider's settings. Any file name works. This example uses
oculus.json:{
"ClientId": "<YourMetaQuestAppId>",
"Secret": "<YourMetaQuestAppSecret>",
"IsActive": true
}ClientIdandSecret: your Meta Quest App ID and App Secret.IsActive:trueadds and activates the provider, like Add & Activate.falseadds it without activating it, like Add.
-
Add the provider. Replace
<YourGameNamespace>with your game namespace. After@, pass the path to your JSON file:ags iam platform-credentials create --namespace <YourGameNamespace> --platform-id oculus --json @oculus.jsonThe file contains your App Secret, so delete it after the command runs.
Edit a login provider
- Admin Portal
- AGS CLI
-
On the Auth & Account Linking page, click the Meta Quest SDK entry.
-
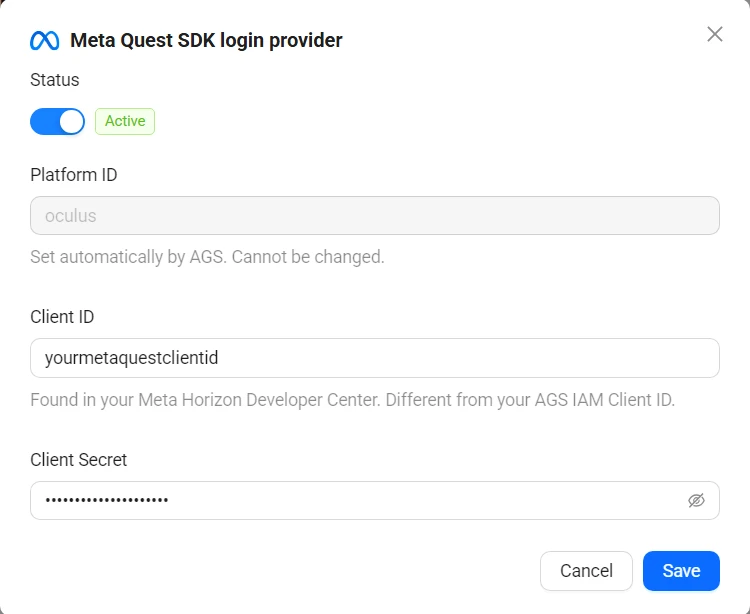
A dialog appears with the provider's configuration. Update the fields as needed.
-
Use the Status toggle at the top to activate or deactivate the provider.
-
Click Save.
-
Check the provider's current settings:
ags iam platform-credentials get --namespace <YourGameNamespace> --platform-id oculus -
Send only the fields you want to change. Fields you leave out keep their current values. For example, to deactivate the provider:
ags iam platform-credentials update --namespace <YourGameNamespace> --platform-id oculus --json '{"IsActive": false}'To activate it, send
{"IsActive": true}. To change the App Secret, put{"Secret": "<NewMetaQuestAppSecret>"}in a JSON file instead, pass it with--json @<FileName>, and delete the file after the command runs.
Create an IAM client
An IAM client is a representation of the game client that you want to release on your target platform. Learn more about IAM Clients in Manage access control for applications.
In-game login integration
The setup for each game engine is different. Follow the steps applicable to your game engine.
- Unreal Engine Instructions
- Unity Engine Instructions
Unreal in-game login integration
You can integrate Meta Quest to sign in with AccelByte SDK to enable your players to log in to games with Meta Quest credentials.
Unreal Engine preparation and configuration
Add dependency
-
Add public dependency modules called OnlineSubsystem, OnlineSubsystemOculus, and
LibOvrPlatformto yourBuild.csfile. These dependencies are needed for your project to use the Oculus online subsystem from Unreal Engine.public ABThirdPartyLogin(ReadOnlyTargetRules Target) : base(Target)
{
PCHUsage = PCHUsageMode.UseExplicitOrSharedPCHs;
PublicDependencyModuleNames.AddRange(new string[] { "Core", "CoreUObject", "Engine", "InputCore", "OnlineSubsystem", "OnlineSubsystemUtils",
"OnlineSubsystemOculus","LibOVRPlatform",
"Sockets", "Networking", "InputCore", "AccelByteUe4Sdk", "Json", "JsonUtilities", "Http", "WebSockets"
});
PrivateDependencyModuleNames.AddRange(new string[] { });
PrivateDependencyModuleNames.Add("OnlineSubsystem"); -
You also need to add
OnlineSubsystemOculusinsideTutorialProject.Target.csandTutorialProjectEditor.Target.cs.public ABThirdPartyLoginTarget( TargetInfo Target) : base(Target)
{
Type = TargetType.Game;
DefaultBuildSettings = BuildSettingsVersion.V2;
ExtraModuleNames.AddRange( new string[] { "ABThirdPartyLogin", "OnlineSubsystem", "AccelByteUe4Sdk", "OnlineSubsystemOculus" } );
}public ABThirdPartyLoginEditorTarget( TargetInfo Target) : base(Target)
{
Type = TargetType.Editor;
DefaultBuildSettings = BuildSettingsVersion.V2;
ExtraModuleNames.AddRange( new string[] { "ABThirdPartyLogin", "OnlineSubsystem", "AccelByteUe4Sdk", "OnlineSubsystemOculus" } );
}
Unreal Engine project setting for Meta Quest
Inside your DefaultEngine.ini file, you need to add several variables of Meta Quest configuration. You need this configuration to open the project. By default, Meta Quest initiates automatically. If you develop a rift app, make sure you're using RiftAppId=[YourAppId]. Otherwise, you can use OculusAppId=[YourAppId].
[OnlineSubsystem]
DefaultPlatformService=Oculus

[OnlineSubsystemOculus]
bEnabled=true
RiftAppId=[YourAppId]
Unreal Engine sample code implementation
Learn how to integrate Meta Quest Login Integration into your game with our SDK. Our logic is to override a player's login when they log in with Meta Quest and use the AGS platform to provide services our SDK can access.
The project uses Meta Quest as a platform so players can log in with Meta Quest credentials.
To obtain AccelByteOnlineSubsystemPtr used in snippet, follow this guide.
-
Ensure you call the online identity function for getting platform_tokens once Meta Quest does an entitlement pass.
const IOnlineSubsystem* OnlineSubsystem = IOnlineSubsystem::Get();
if (OnlineSubsystem == nullptr)
{
FString Message = TEXT("Cannot login with no online subsystem set!");
UE_LOG(LogTemp, Warning, TEXT("%s"), *Message);
OnActionInfoUpdated.Broadcast(Message);
return;
}

const IOnlineIdentityPtr OnlineIdentity = OnlineSubsystem->GetIdentityInterface();
if (!OnlineIdentity.IsValid())
{
FString Message = TEXT("Could not retrieve identity interface from native subsystem.");
UE_LOG(LogTemp, Warning, TEXT("%s"), *Message);
OnActionInfoUpdated.Broadcast(Message);
return;
} -
Once the system retrieves the platform_token, it uses the token to call the AccelByte
loginWithOtherPlatformAPI. The code looks like this:const FOnLoginCompleteDelegate NativeLoginComplete = FOnLoginCompleteDelegate::CreateLambda([=]
(int32 LocalUserNum, bool bWasSuccessful, const FUniqueNetId& UserId, const FString& Error) {
UE_LOG(LogTemp, Warning, TEXT("OnLoginComplete %s : %s"), bWasSuccessful ? TEXT("Success") : TEXT("Fail"), *Error);
FString Message = FString::Printf(TEXT("OnLoginComplete %s : %s"), bWasSuccessful ? TEXT("Success") : TEXT("Fail"), *Error);
OnActionInfoUpdated.Broadcast(Message);
if (bWasSuccessful)
{
auto OculusUserId = OnlineIdentity->GetUniquePlayerId(0);
auto GenAuth = OnlineIdentity->GetAuthToken(LocalPlayer->GetControllerId());
const FString PlatformToken = (TEXT("%s:%s"), OculusUserId, GenAuth);
UE_LOG(LogTemp, Warning, TEXT("PlatformToken : %s"), *PlatformToken);
OnActionInfoUpdated.Broadcast(FString::Printf(TEXT("PlatformToken : %s"), *PlatformToken));
auto ApiClient = AccelByteOnlineSubsystemPtr->GetApiClient(TEXT("YOUR_KEY"));
auto UserApi = ApiClient->GetUserApi().Pin();
UserApi->LoginWithOtherPlatform(EAccelBytePlatformType::Oculus, PlatformToken, OnLoginSuccessDelegate, OnLoginErrorDelegate);
UE_LOG(LogTemp, Warning, TEXT("Request LoginWithOtherPlatform"));
OnActionInfoUpdated.Broadcast(TEXT("Request LoginWithOtherPlatform"));
}
});
OnlineIdentity->AddOnLoginCompleteDelegate_Handle(LocalPlayer->GetControllerId(), NativeLoginComplete);
const bool bWaitForDelegate = OnlineIdentity->Login(LocalPlayer->GetControllerId(), FOnlineAccountCredentials());
if (!bWaitForDelegate)
{
FString Message = TEXT("The online subsystem couldn't login");
UE_LOG(LogTemp, Warning, TEXT("%s"), *Message);
OnActionInfoUpdated.Broadcast(Message);
}noteThe
platform_tokenfor Meta Quest Authentication is<oculus_user_id>:<nonce_value>.Ensure you are calling the right platform in this code:
EAccelBytePlatformType::Oculus.UserApi->LoginWithOtherPlatform(EAccelBytePlatformType::Oculus, PlatformToken, OnLoginSuccessDelegate, OnLoginErrorDelegate);
Sample code testing
Launch arguments
Launch your project by running it in the editor, or use this executable command with the Command Prompt or Powershell.
"[[PathToUE5Folder]]\Epic Games\UE_5.0\Engine\Binaries\Win64\UnrealEditor.exe]" "[PathToProjectFolder]\TestingUnreal\ABThirdPartyLogin\ABThirdPartyLogin.uproject" -skipcompile -game
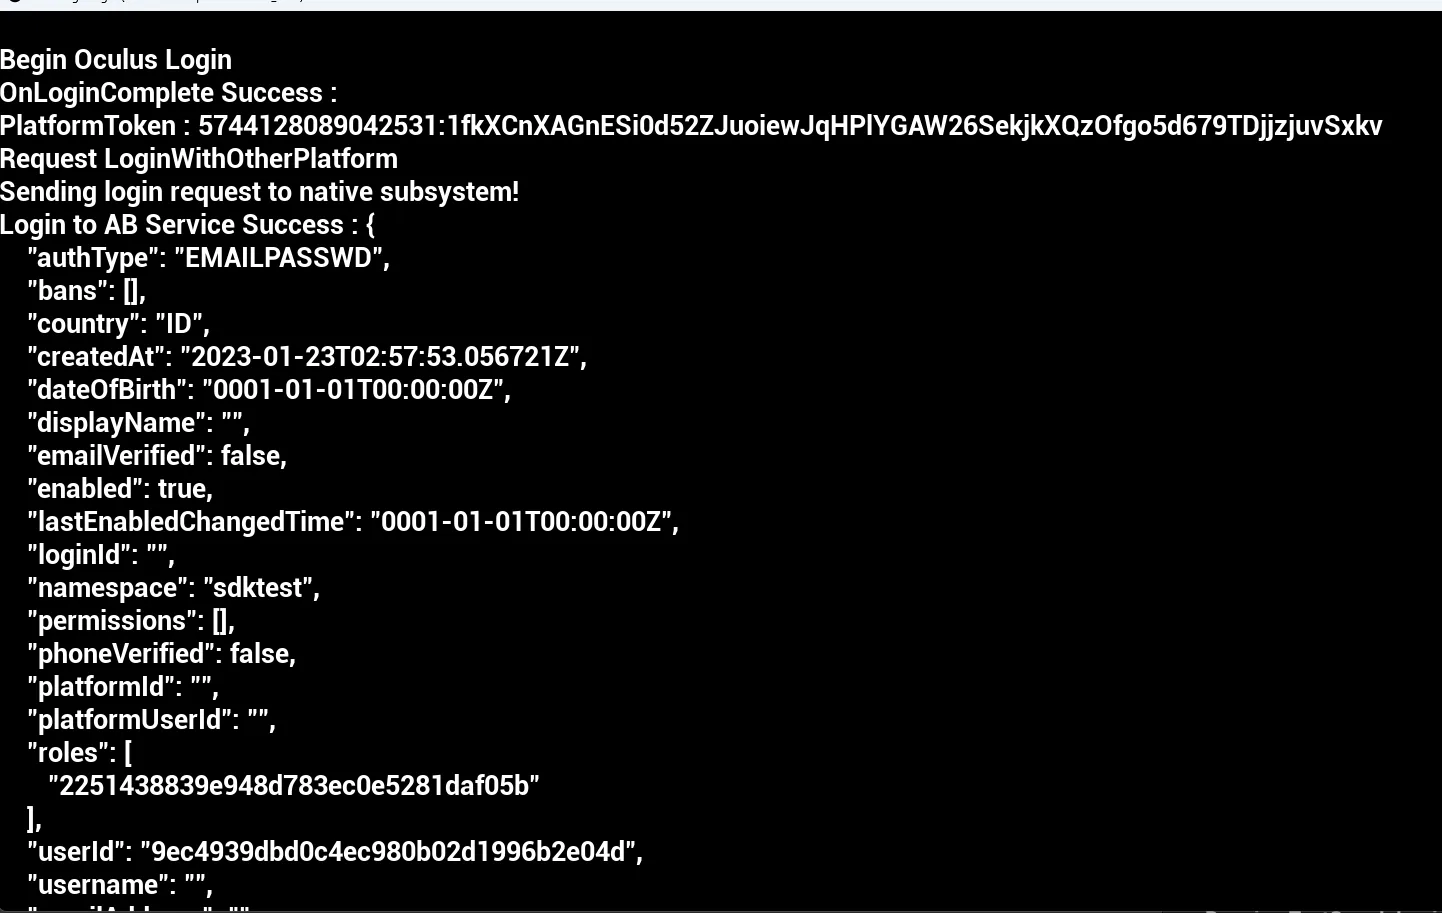
The image below shows a successful login to our test app using a Meta Quest account.
Unity in-game login integration
When you integrate your Meta Quest account to sign in with AccelByte SDK, your players can log in to games using their Meta Quest credentials.
Unity preparation and configuration
-
Add AccelByte Unity SDK to your Unity project.
-
Add the Unity Oculus Integration Asset from the Unity Asset Store.
-
Ensure you install and list Unity assets.
Unity sample code implementation
Add the AccelByte Unity SDK and Oculus Integration Asset, then follow these steps:
-
Create and name an empty script.
-
Open your script in the Editor and add this code, which checks the entitlement before getting the user ID and nonce:
void Awake()
{
try
{
    Core.Initialize();// getting oculus APP ID
    Entitlements.IsUserEntitledToApplication().OnComplete(EntitlementCallback);// if entitlement pass will automatically return callback
    Users.GetLoggedInUser().OnComplete(getUserCallback);//to generate userId
    Users.GetUserProof().OnComplete(userProofCallback);//to generate UserNonce
}
catch (UnityException e)
{
    Debug.LogError("Platform failed to initialize due to exception.");
    Debug.LogException(e);
    // Immediately quit the application.
    UnityEngine.Application.Quit();
}
}

// Called when the Meta Quest Platform completes the async entitlement check request and a result is available.
void EntitlementCallback(Message msg)
{
if (msg.IsError) // User failed entitlement check
{
    // Implements a default behavior for an entitlement check failure -- log the failure and exit the app.
    Debug.LogError("You are NOT entitled to use this app.");
    UnityEngine.Application.Quit();
}
else // User passed entitlement check
{
    // Log the succeeded entitlement check for debugging.
    Debug.Log("You are entitled to use this app.");
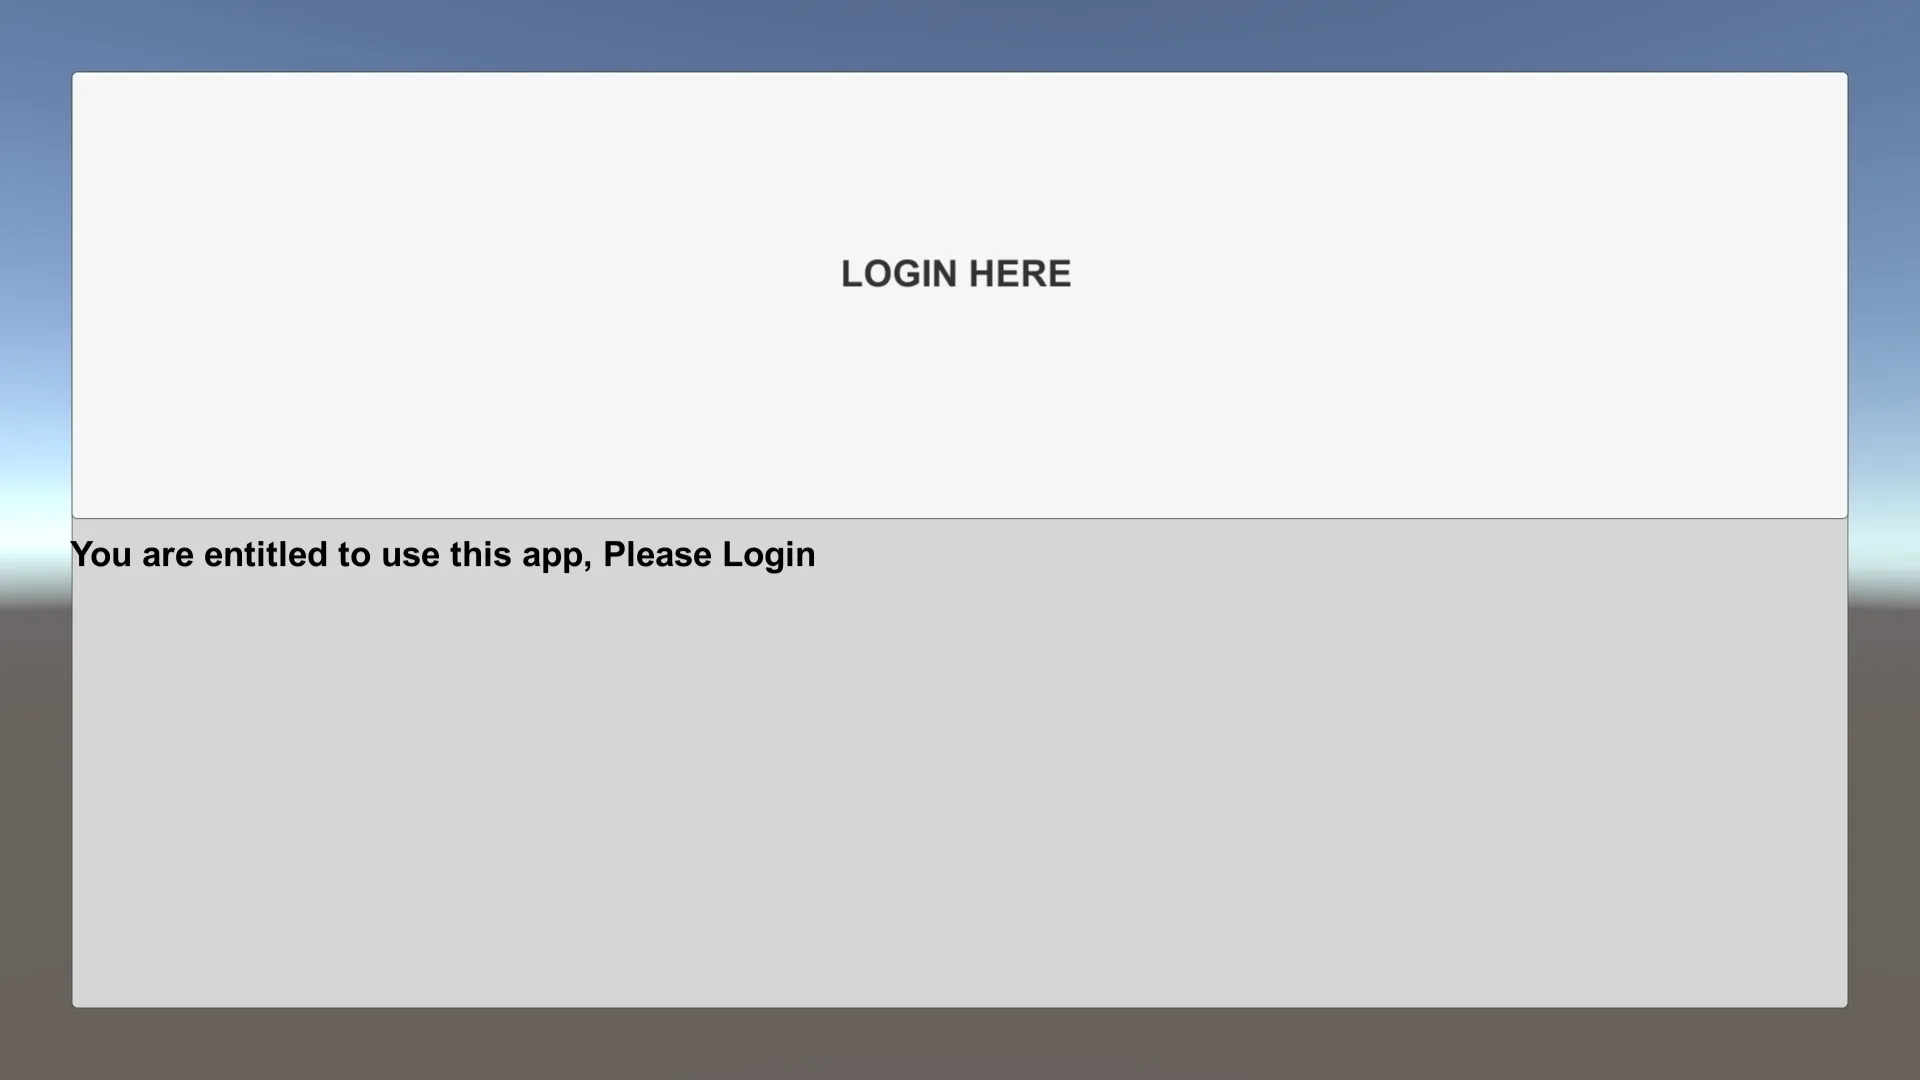
    LoginStatus.text = "You are entitled to use this app, Please Login";
}
}
void getUserCallback(Message<Models.User> msg)
{
if (!msg.IsError)
{
    Models.User user = msg.Data;
    userId = user.ID.ToString();
    Debug.Log(
        $"user : {user} ");
}
else
{
    Models.Error error = msg.GetError();
}
}

void userProofCallback(Message<UserProof> msg)
{
if (!msg.IsError)
{
    UserProof userNonce = msg.Data;
    nonce = userNonce.Value;
    Debug.Log(
        $"userNonce : {userNonce} ");
}
else
{
    Models.Error error = msg.GetError();
}

} -
Open Oculus Tab > Platform - Edit Setting, then fill in the App Id field.
-
The script continues to run this function.
public void OnLoginClick()
{
OculusLoginButton.interactable = false;
LoginStatus.text = "Logging in...";

var apiClient = AccelByteSDK.GetClientRegistry().GetApi();
var user = apiClient.GetUser();

// oculus token
string oculusToken = userId + ":" + nonce;

Result<TokenData, OAuthError> loginResult = null;
user.LoginWithOtherPlatform(PlatformType.Oculus, oculusToken,
    (Result<TokenData, OAuthError> loginResult) =>
    {
        if (loginResult.IsError)
        {
            //If we error, grab the Error Error and Description to print in the Log
            Debug.Log(
                $"Login failed : {loginResult.Error.error} Description : {loginResult.Error.error_description}");
            //Set the Status Text to display the Error if there is any
            LoginStatus.text =
                $"Login failed : {loginResult.Error.error} Description : {loginResult.Error.error_description}";
        }
        else
        {
            Debug.Log($"Login successful : {loginResult.Value.ToJsonString()}");

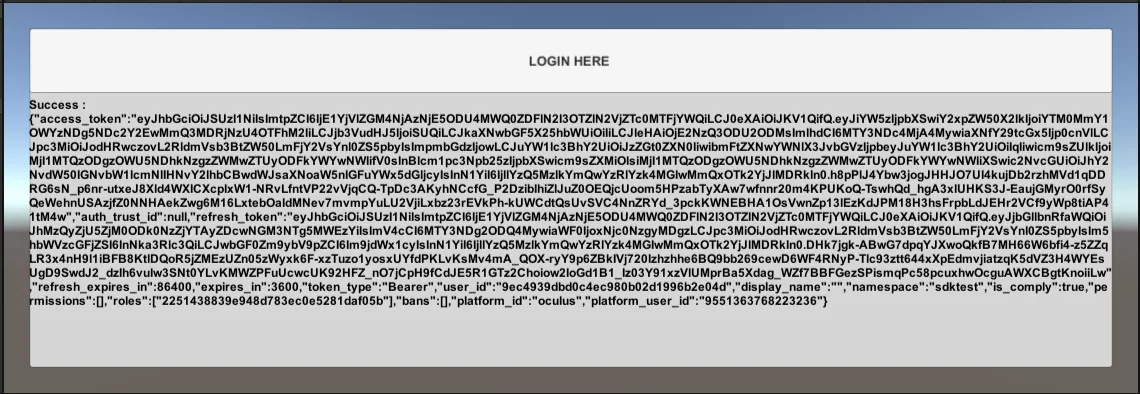
            LoginStatus.text = $"Success : {loginResult.Value.ToJsonString()} ";
        }

        //Enable interaction with the Button again
        OculusLoginButton.interactable = true;
    });

}noteThe
platform_tokenfor Meta Quest Authentication is<oculus_user_id>:<nonce_value>. -
The function sends a request to the AccelByte endpoint with the Meta Quest platform type and returns a callback.
Sample code testing
Now you can build and run your project. The image below shows a successful login using a Meta Quest Account and our test app.
Note
There are two types of user ids in Meta Quest:
- app scoped id: unique ID per application, different for the same application on different devices, can be avoid by app grouping, in the same app grouping, new users will have the same app scoped id, for games that want to share user data between devices, please put the apps in the same app group.
- organization scoped id: unique per organization, allows different apps within the same organization to identify the user.
For AGS account link, we use organization scoped id so that we can identify the same Meta Quest account regardless of the apps within this organization.
We also utilize the app scoped id for some features like IAP.
You can get the app scoped id by an AGS user id with this endpoint.
You can get the AGS user account by the app scoped id with this endpoint.