Meta Quest をアイデンティティプロバイダーとして設定する
注釈:本資料はAI技術を用いて翻訳されています。
概要
このガイドでは、認証済みの Meta Quest 開発者が Meta Quest アカウントを AccelByte Gaming Services (AGS) に接続する方法を説明します。Meta Quest サービス側で追加機能の設定が必要になる場合があります。Meta Quest サービスの設定について詳しくは、Meta の担当者に問い合わせるとともに、Meta Quest のドキュメントを確認することをお勧めします。
このガイドは公開利用を目的としており、機密性の関係で限られた情報のみを含んでいます。まず完全な機密ガイドを参照することをお勧めします。ガイドのコピーをリクエストするには、AccelByte のテクニカルプロデューサーにお問い合わせください。
目標
- AGS SDK を使用して、ゲームで Meta Quest 認証方式を有効にします。
- AGS Player Portal を使用して、パブリッシャーウェブサイトで Meta Quest 認証方式を有効にします。
前提条件
Web ログイン統合
- 認証済みの Meta Quest Developer アカウントが必要です。
- 認証を設定し、権限を管理するための AGS Admin Portal アカウントが必要です。
- まだ行っていない場合は、Player Portal と Launcher のパブリッシャーネームスペースを設定してください。
- Player Portal が必要です。
- AGS CLI の手順に従う場合は、AGS CLI をインストールし、これらの機能へのアクセス権を持つアカウントでサインインしてください。詳細については、インストールとサインインを参照してください。例では Bash シェルを使用しています。
インゲームログイン統合
- 認証済みの Meta Quest Developer アカウントが必要です。
- Unreal Engine の場合、OnlineSubsystem Oculus プラグインを有効化する必要があります。
- Unity の場合、Oculus Unity Integration が必要です。Oculus Integration | Integration | Unity Asset Store から入手できます。
- 認証を設定し、権限を管理するための AccelByte Admin Portal アカウントが必要です。
- まだ行っていない場合は、ゲーム用のゲームネームスペースを設定してください。
- 最新バージョンの AccelByte Game SDK がインポートされた Unity または Unreal Engine のゲームプロジェクトが必要です。
- AGS Identity and Access Management (IAM) クライアントに関する知識が必要です。
- AGS CLI の手順に従う場合は、AGS CLI をインストールし、これらの機能へのアクセス権を持つアカウントでサインインしてください。詳細については、インストールとサインインを参照してください。例では Bash シェルを使用しています。
Meta Quest を設定する
Meta Quest アプリケーションを設定する
Meta Quest 開発者アカウントで Meta Quest アプリケーションを設定します。Meta の Create an App Page ガイドに従ってください。
Meta Quest でプラットフォーム機能をリクエストする
アプリケーションの作成が完了したら、ユーザー ID、ユーザープロフィール、アバターなどの特定のユーザーデータにアクセスするために、データ使用チェックアップ (DUC) をリクエストします。Meta の Data User Checkup ガイドにある Submitting a DUC Guide の手順に従ってください。
Meta Quest Developer Portal での設定がうまくいかない場合は、カスタマーサポートに問い合わせて、AccelByte が提供しているガイドのコピーをリクエストしてください。
Meta Quest ログイン方式を設定する
Web ログイン
Web ログイン統合は現在 AGS Public Cloud では利用できず、AGS Private Cloud でのみサポートされています。
プレイヤーが Meta Quest アカウントを使用して Player Portal にログインできるようにするには、次の手順に従います。
- Admin Portal
- AGS CLI
-
AGS Admin Portal で、パブリッシャーネームスペースに移動します。
-
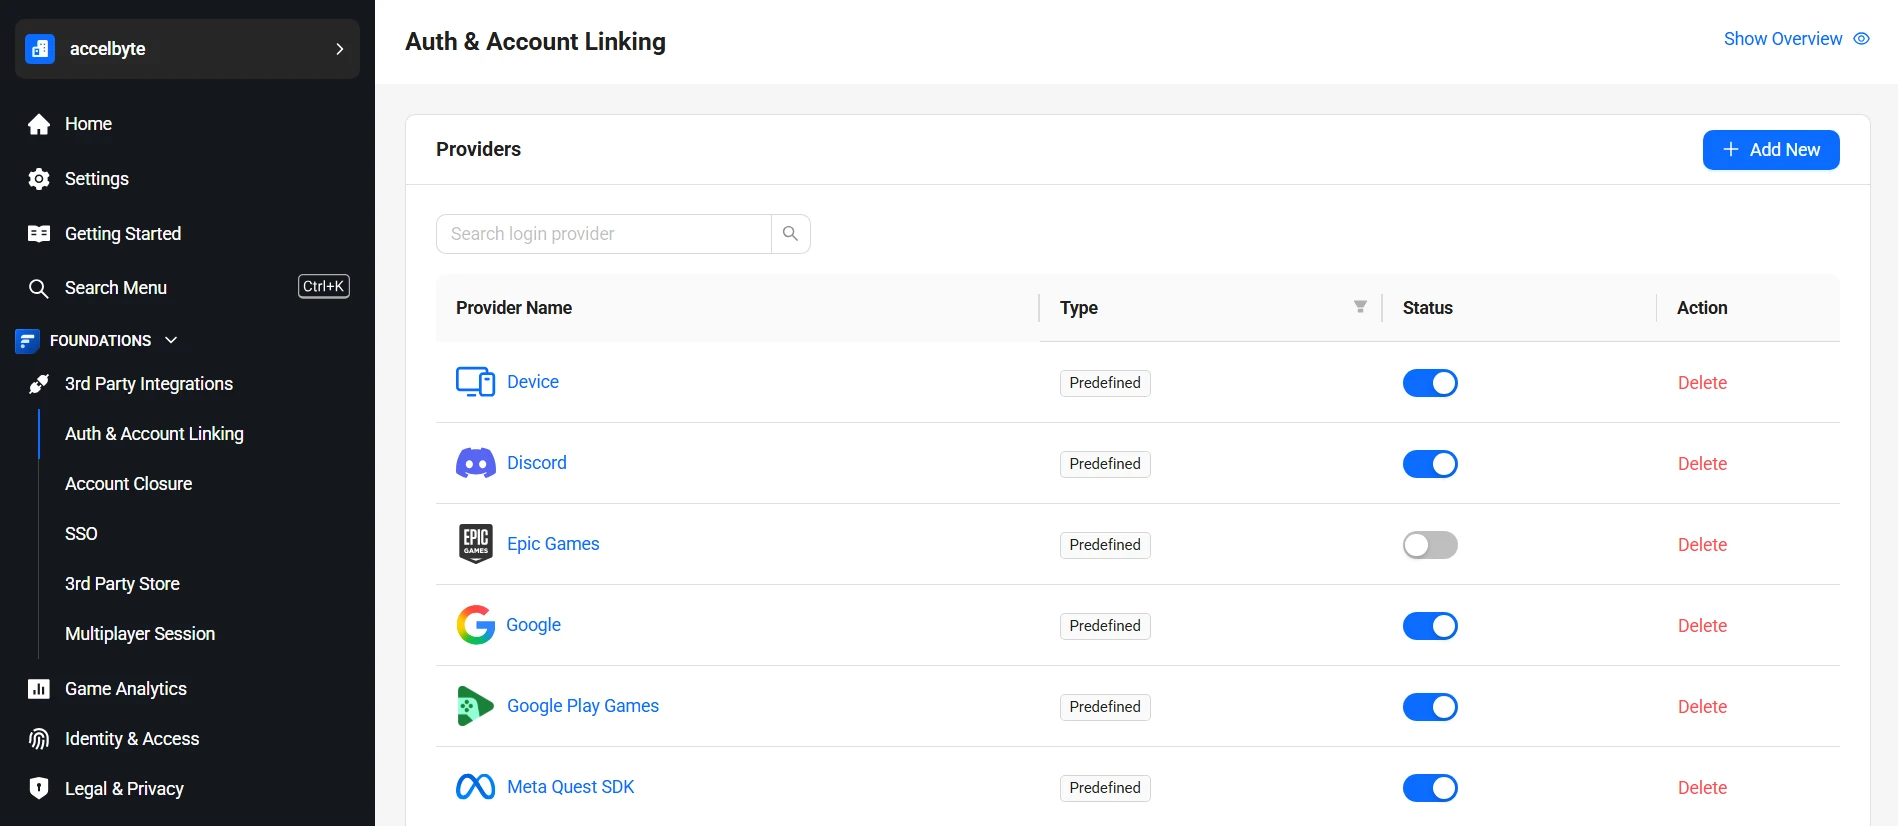
サイドバーメニューで、Foundations > 3rd Party Integrations > Auth & Account Linking に移動します。
-
Auth & Account Linking ページで、+ Add New ボタンをクリックします。
-
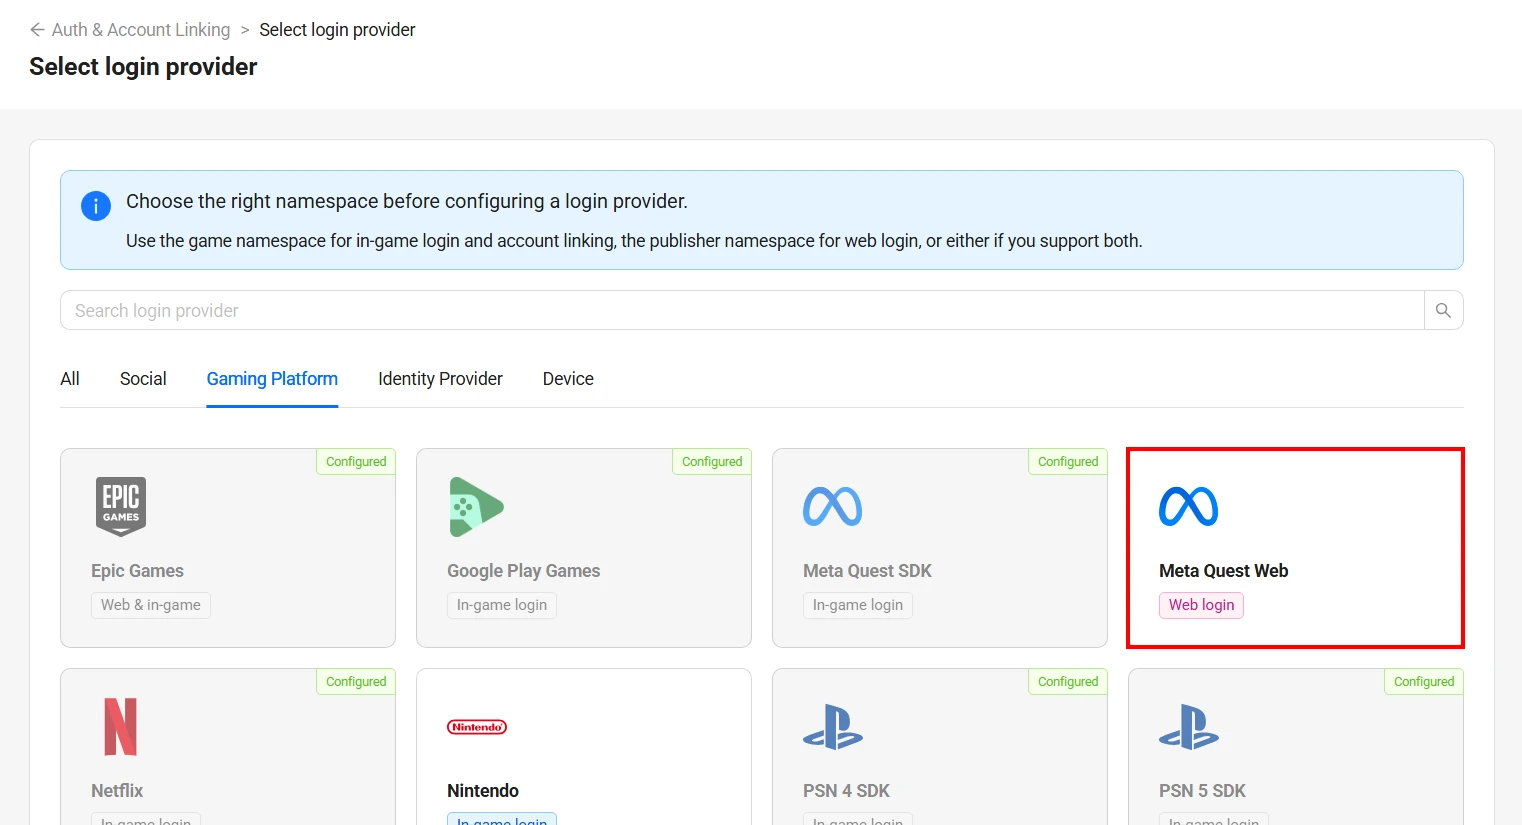
Select login provider ページで、Gaming Platform タブから Meta Quest Web を選択します。
-
Set Up Meta Quest Web login provider ダイアログが表示されます。
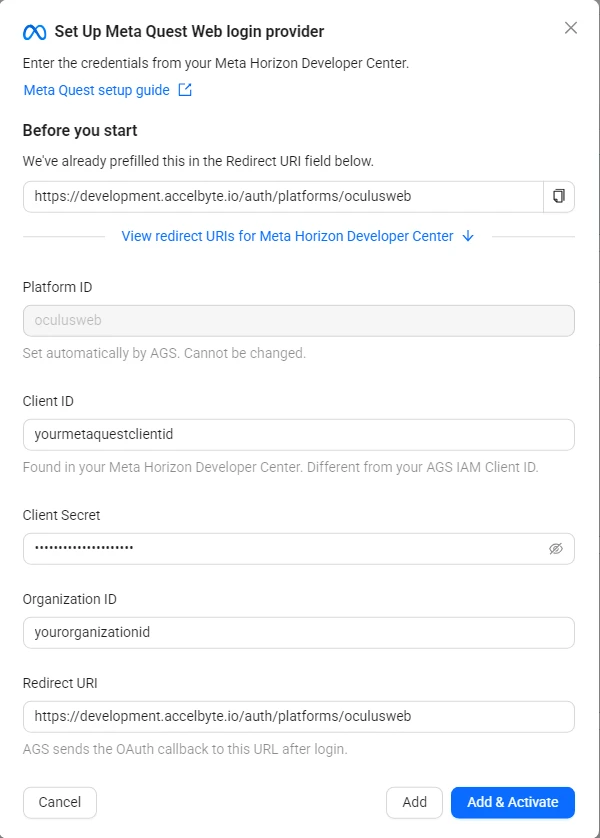
以下のフィールドを入力します。
- Platform ID:
oculusweb。自動的に設定されるため、変更できません。 - Client ID: Meta Quest の App ID。
- Client Secret: Meta Quest の App Secret。
- Organization ID: Meta Quest の Organization ID。
- Redirect URI:
<BASE_URL>/auth/platforms/oculusweb。<BASE_URL>は自社のドメインアドレス(例:https://development.accelbyte.io)に置き換えます。important以下の URI を Meta Quest developer console に許可済みリダイレクト URI として登録してください(
<BASE_URL>は自社のドメインアドレス、<Namespace>はパブリッシャーネームスペースです)。<BASE_URL>/auth/platforms/oculusweb<BASE_URL>/iam/v3/public/namespaces/<Namespace>/users/me/platforms/oculusweb/web/link/establish(アカウント連携に使用)<BASE_URL>/iam/v3/public/namespaces/<Namespace>/users/me/platforms/oculusweb/web/reauth/establish(GDPR の再認証プロセスに使用)
- Platform ID:
-
Add & Activate をクリックすると、プロバイダーの作成と有効化を一度に行えます。有効化せずに作成する場合は、Add をクリックします。
-
プロバイダーの設定を記述した JSON ファイルを作成します。ファイル名は任意です。この例では
oculusweb.jsonを使用します。{
"ClientId": "<YourMetaQuestAppId>",
"Secret": "<YourMetaQuestAppSecret>",
"OrganizationId": "<YourMetaQuestOrganizationId>",
"RedirectUri": "<BaseURL>/auth/platforms/oculusweb",
"IsActive": true
}ClientIdとSecret: Meta Quest の App ID と App Secret。OrganizationId: Meta Quest の Organization ID。RedirectUri:<BaseURL>を自社のドメインアドレス(例:https://development.accelbyte.io)に置き換えます。Admin Portal タブに記載されている URI を、Meta Quest developer console に許可済みリダイレクト URI として登録してください。IsActive:trueを指定すると、Add & Activate と同様にプロバイダーを追加して有効化します。falseを指定すると、Add と同様に有効化せずに追加します。
-
プロバイダーを追加します。
<YourPublisherNamespace>をパブリッシャーネームスペースに置き換えます。@の後には JSON ファイルのパスを指定します。ags iam platform-credentials create --namespace <YourPublisherNamespace> --platform-id oculusweb --json @oculusweb.jsonこのファイルには App Secret が含まれているため、コマンドの実行後に削除してください。
ログインプロバイダーを編集する
- Admin Portal
- AGS CLI
-
Auth & Account Linking ページで、Meta Quest Web のエントリをクリックします。
-
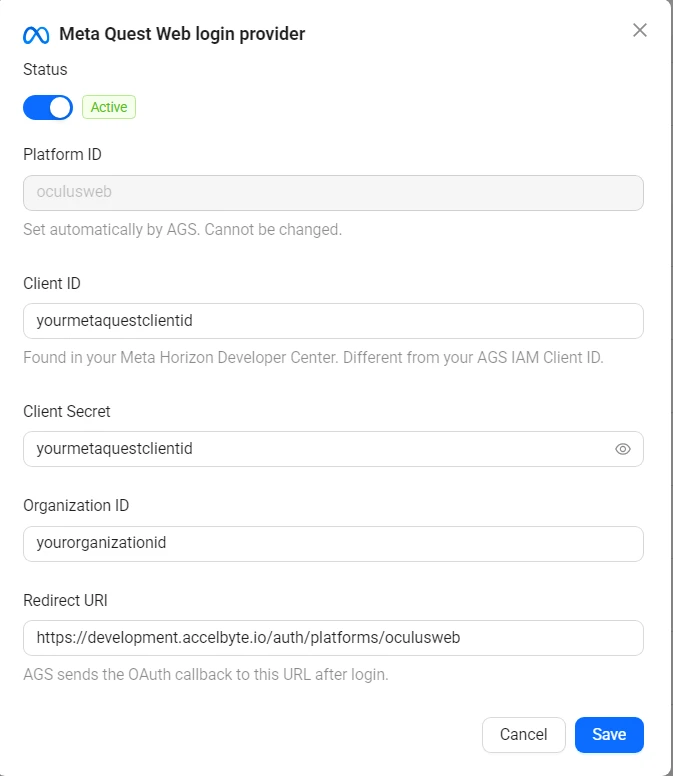
プロバイダーの設定内容を表示するダイアログが表示されます。必要に応じてフィールドを更新します。
-
上部にある Status トグルを使用して、プロバイダーを有効化または無効化します。
-
Save をクリックします。
-
プロバイダーの現在の設定を確認します。
ags iam platform-credentials get --namespace <YourPublisherNamespace> --platform-id oculusweb -
変更したいフィールドのみを送信します。省略したフィールドは現在の値が維持されます。たとえば、プロバイダーを無効化するには次のようにします。
ags iam platform-credentials update --namespace <YourPublisherNamespace> --platform-id oculusweb --json '{"IsActive": false}'有効化するには、
{"IsActive": true}を送信します。App Secret を変更する場合は、コマンドラインに直接指定せず、{"Secret": "<NewMetaQuestAppSecret>"}を JSON ファイルに記述して--json @<FileName>で渡し、コマンドの実行後にそのファイルを削除してください。
インゲームログイン
プレイヤーがインゲームから Meta Quest アカウントを使用してログインできるようにするには、次の手順に従います。Meta Quest SDK プロバイダーは、Public Cloud と Private Cloud の両方のゲームネームスペースで利用できます。
- Admin Portal
- AGS CLI
-
AGS Admin Portal で、ゲームネームスペースに移動します。
-
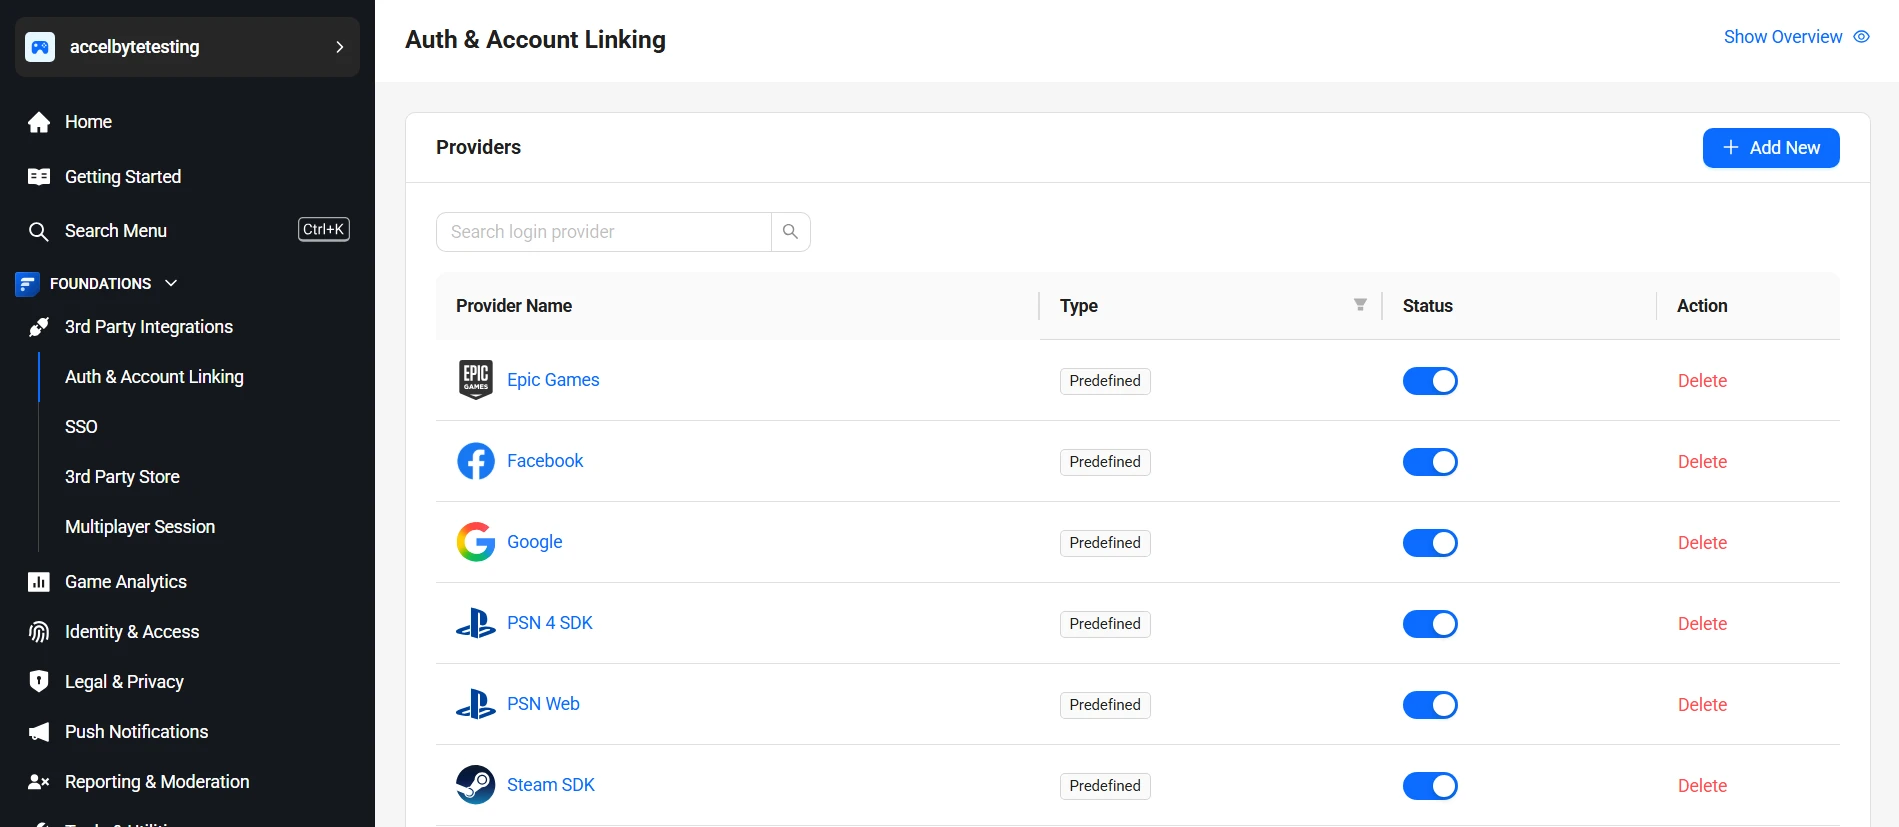
サイドバーメニューで、Foundations > 3rd Party Integrations > Auth & Account Linking に移動します。
-
Auth & Account Linking ページで、+ Add New ボタンをクリックします。
-
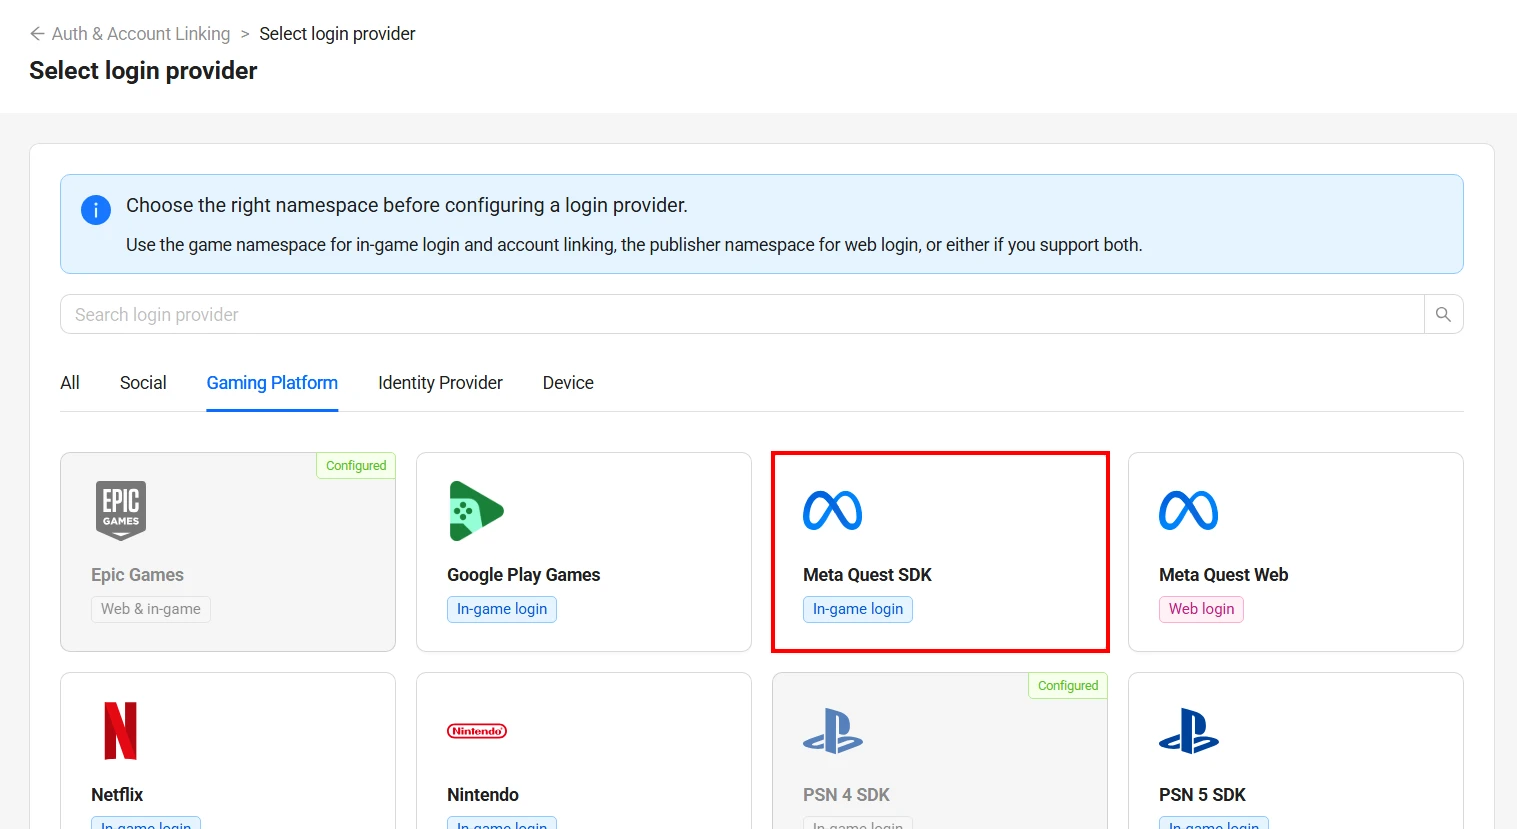
Select login provider ページで、Gaming Platform タブから Meta Quest SDK を選択します。
-
Set Up Meta Quest SDK login provider ダイアログが表示されます。
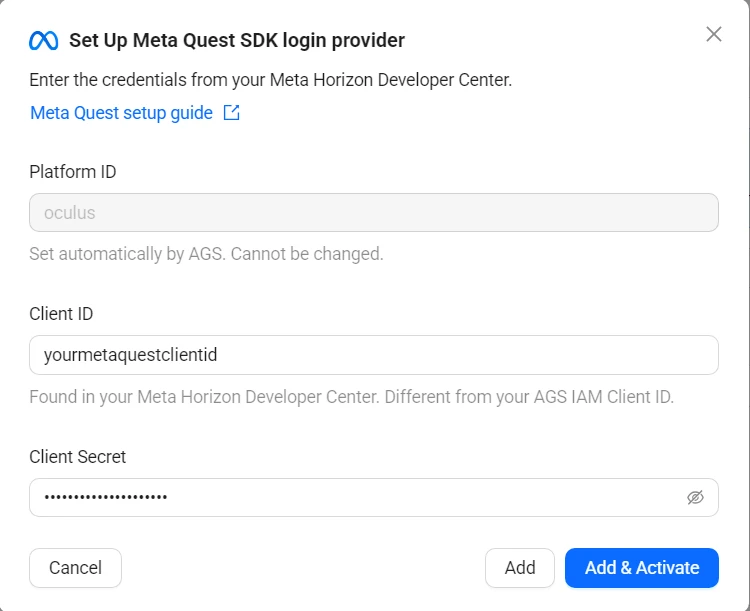
以下のフィールドを入力します。
- Platform ID:
oculus。自動的に設定されるため、変更できません。 - Client ID: Meta Quest の App ID。
- Client Secret: Meta Quest の App Secret。
- Platform ID:
-
Add & Activate をクリックすると、プロバイダーの作成と有効化を一度に行えます。有効化せずに作成する場合は、Add をクリックします。
-
プロバイダーの設定を記述した JSON ファイルを作成します。ファイル名は任意です。この例では
oculus.jsonを使用します。{
"ClientId": "<YourMetaQuestAppId>",
"Secret": "<YourMetaQuestAppSecret>",
"IsActive": true
}ClientIdとSecret: Meta Quest の App ID と App Secret。IsActive:trueを指定すると、Add & Activate と同様にプロバイダーを追加して有効化します。falseを指定すると、Add と同様に有効化せずに追加します。
-
プロバイダーを追加します。
<YourGameNamespace>をゲームネームスペースに置き換えます。@の後には JSON ファイルのパスを指定します。ags iam platform-credentials create --namespace <YourGameNamespace> --platform-id oculus --json @oculus.jsonこのファイルには App Secret が含まれているため、コマンドの実行後に削除してください。
ログインプロバイダーを編集する
- Admin Portal
- AGS CLI
-
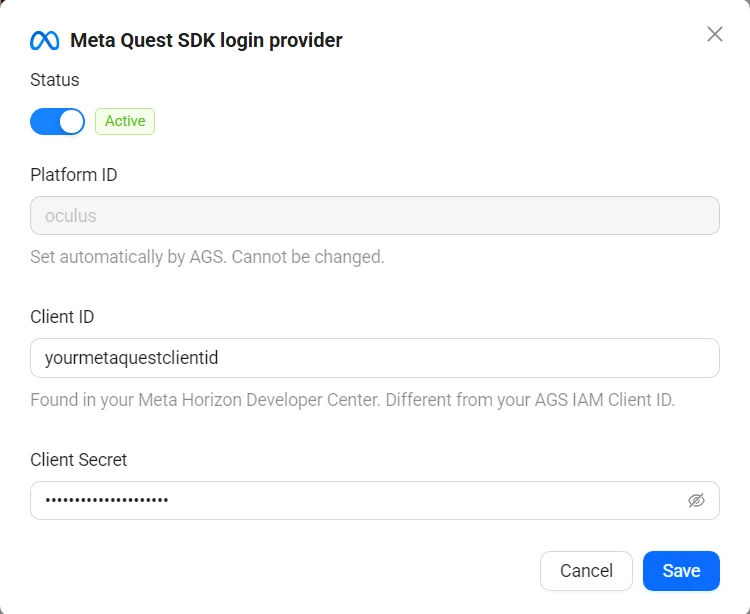
Auth & Account Linking ページで、Meta Quest SDK のエントリをクリックします。
-
プロバイダーの設定内容を表示するダイアログが表示されます。必要に応じてフィールドを更新します。
-
上部にある Status トグルを使用して、プロバイダーを有効化または無効化します。
-
Save をクリックします。
-
プロバイダーの現在の設定を確認します。
ags iam platform-credentials get --namespace <YourGameNamespace> --platform-id oculus -
変更したいフィールドのみを送信します。省略したフィールドは現在の値が維持されます。たとえば、プロバイダーを無効化するには次のようにします。
ags iam platform-credentials update --namespace <YourGameNamespace> --platform-id oculus --json '{"IsActive": false}'有効化するには、
{"IsActive": true}を送信します。App Secret を変更する場合は、コマンドラインに直接指定せず、{"Secret": "<NewMetaQuestAppSecret>"}を JSON ファイルに記述して--json @<FileName>で渡し、コマンドの実行後にそのファイルを削除してください。
IAM クライアントを作成する
IAM クライアントは、対象プラットフォームでリリースしたいゲームクライアントを表すものです。IAM クライアントの詳細については、アプリケーションのアクセス制御を管理するを参照してください。
インゲームログイン統合
セットアップはゲームエンジンごとに異なります。使用しているゲームエンジンに適用される手順に従ってください。
- Unreal Engine Instructions
- Unity Engine Instructions
Unreal インゲームログイン統合
Meta Quest を AccelByte SDK のサインインと統合することで、プレイヤーは Meta Quest の認証情報でゲームにログインできるようになります。
Unreal Engine の準備と設定
依存関係を追加する
-
Build.csファイルに、OnlineSubsystem、OnlineSubsystemOculus、LibOvrPlatformというパブリック依存関係モジュールを追加します。これらの依存関係は、プロジェクトが Unreal Engine の Oculus オンラインサブシステムを使用するために必要です。public ABThirdPartyLogin(ReadOnlyTargetRules Target) : base(Target)
{
PCHUsage = PCHUsageMode.UseExplicitOrSharedPCHs;
PublicDependencyModuleNames.AddRange(new string[] { "Core", "CoreUObject", "Engine", "InputCore", "OnlineSubsystem", "OnlineSubsystemUtils",
"OnlineSubsystemOculus","LibOVRPlatform",
"Sockets", "Networking", "InputCore", "AccelByteUe4Sdk", "Json", "JsonUtilities", "Http", "WebSockets"
});
PrivateDependencyModuleNames.AddRange(new string[] { });
PrivateDependencyModuleNames.Add("OnlineSubsystem"); -
TutorialProject.Target.csとTutorialProjectEditor.Target.csの中にもOnlineSubsystemOculusを追加する必要があります。public ABThirdPartyLoginTarget( TargetInfo Target) : base(Target)
{
Type = TargetType.Game;
DefaultBuildSettings = BuildSettingsVersion.V2;
ExtraModuleNames.AddRange( new string[] { "ABThirdPartyLogin", "OnlineSubsystem", "AccelByteUe4Sdk", "OnlineSubsystemOculus" } );
}public ABThirdPartyLoginEditorTarget( TargetInfo Target) : base(Target)
{
Type = TargetType.Editor;
DefaultBuildSettings = BuildSettingsVersion.V2;
ExtraModuleNames.AddRange( new string[] { "ABThirdPartyLogin", "OnlineSubsystem", "AccelByteUe4Sdk", "OnlineSubsystemOculus" } );
}
Meta Quest 用の Unreal Engine プロジェクト設定
DefaultEngine.ini ファイルに、Meta Quest 設定用の変数をいくつか追加する必要があります。プロジェクトを開くには、この設定が必要です。デフォルトでは、Meta Quest は自動的に初期化されます。Rift アプリを開発する場合は、RiftAppId=[YourAppId] を使用していることを確認してください。それ以外の場合は、OculusAppId=[YourAppId] を使用できます。
[OnlineSubsystem]
DefaultPlatformService=Oculus

[OnlineSubsystemOculus]
bEnabled=true
RiftAppId=[YourAppId]
Unreal Engine のサンプルコード実装
ここでは、AGS SDK を使用して Meta Quest ログイン統合をゲームに組み込む方法を説明します。ここでのロジックは、プレイヤーが Meta Quest でログインした際にそのログインをオーバーライドし、AGS プラットフォームを通じて SDK がアクセスできるサービスを提供するというものです。
このプロジェクトは Meta Quest をプラットフォームとして使用しているため、プレイヤーは Meta Quest の認証情報でログインできます。
スニペットで使用されている AccelByteOnlineSubsystemPtr を取得するには、このガイドに従ってください。
-
Meta Quest のエンタイトルメントチェックに合格したら、
platform_tokenを取得するために、オンラインアイデンティティインターフェースの関数を必ず呼び出してください。const IOnlineSubsystem* OnlineSubsystem = IOnlineSubsystem::Get();
if (OnlineSubsystem == nullptr)
{
FString Message = TEXT("Cannot login with no online subsystem set!");
UE_LOG(LogTemp, Warning, TEXT("%s"), *Message);
OnActionInfoUpdated.Broadcast(Message);
return;
}
const IOnlineIdentityPtr OnlineIdentity = OnlineSubsystem->GetIdentityInterface();
if (!OnlineIdentity.IsValid())
{
FString Message = TEXT("Could not retrieve identity interface from native subsystem.");
UE_LOG(LogTemp, Warning, TEXT("%s"), *Message);
OnActionInfoUpdated.Broadcast(Message);
return;
} -
システムが
platform_tokenを取得すると、そのトークンを使用して AccelByte のloginWithOtherPlatformAPI を呼び出します。コードは次のようになります。const FOnLoginCompleteDelegate NativeLoginComplete = FOnLoginCompleteDelegate::CreateLambda([=]
(int32 LocalUserNum, bool bWasSuccessful, const FUniqueNetId& UserId, const FString& Error) {
UE_LOG(LogTemp, Warning, TEXT("OnLoginComplete %s : %s"), bWasSuccessful ? TEXT("Success") : TEXT("Fail"), *Error);
FString Message = FString::Printf(TEXT("OnLoginComplete %s : %s"), bWasSuccessful ? TEXT("Success") : TEXT("Fail"), *Error);
OnActionInfoUpdated.Broadcast(Message);
if (bWasSuccessful)
{
auto OculusUserId = OnlineIdentity->GetUniquePlayerId(0);
auto GenAuth = OnlineIdentity->GetAuthToken(LocalPlayer->GetControllerId());
const FString PlatformToken = (TEXT("%s:%s"), OculusUserId, GenAuth);
UE_LOG(LogTemp, Warning, TEXT("PlatformToken : %s"), *PlatformToken);
OnActionInfoUpdated.Broadcast(FString::Printf(TEXT("PlatformToken : %s"), *PlatformToken));
auto ApiClient = AccelByteOnlineSubsystemPtr->GetApiClient(TEXT("YOUR_KEY"));
auto UserApi = ApiClient->GetUserApi().Pin();
UserApi->LoginWithOtherPlatform(EAccelBytePlatformType::Oculus, PlatformToken, OnLoginSuccessDelegate, OnLoginErrorDelegate);
UE_LOG(LogTemp, Warning, TEXT("Request LoginWithOtherPlatform"));
OnActionInfoUpdated.Broadcast(TEXT("Request LoginWithOtherPlatform"));
}
});
OnlineIdentity->AddOnLoginCompleteDelegate_Handle(LocalPlayer->GetControllerId(), NativeLoginComplete);
const bool bWaitForDelegate = OnlineIdentity->Login(LocalPlayer->GetControllerId(), FOnlineAccountCredentials());
if (!bWaitForDelegate)
{
FString Message = TEXT("The online subsystem couldn't login");
UE_LOG(LogTemp, Warning, TEXT("%s"), *Message);
OnActionInfoUpdated.Broadcast(Message);
}注記Meta Quest 認証の
platform_tokenは<oculus_user_id>:<nonce_value>です。このコードで正しいプラットフォーム
EAccelBytePlatformType::Oculusを指定していることを確認してください。UserApi->LoginWithOtherPlatform(EAccelBytePlatformType::Oculus, PlatformToken, OnLoginSuccessDelegate, OnLoginErrorDelegate);
サンプルコードのテスト
起動引数
エディタでプロジェクトを実行して起動するか、コマンドプロンプトまたは Powershell でこの実行コマンドを使用します。
"[[PathToUE5Folder]]\Epic Games\UE_5.0\Engine\Binaries\Win64\UnrealEditor.exe]" "[PathToProjectFolder]\TestingUnreal\ABThirdPartyLogin\ABThirdPartyLogin.uproject" -skipcompile -game
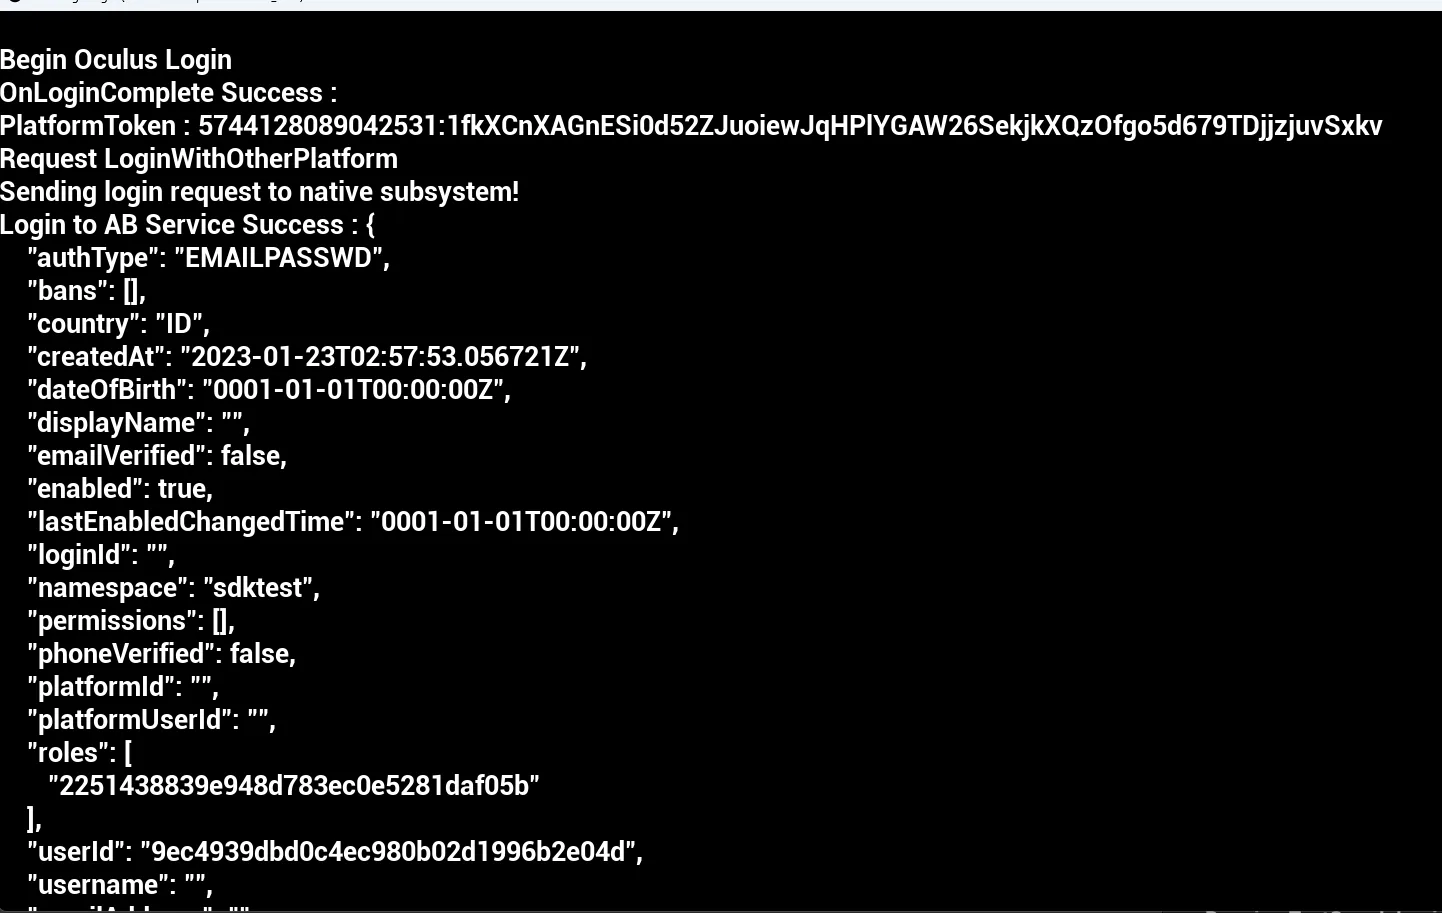
以下の画像は、Meta Quest アカウントを使用してテストアプリへのログインに成功した様子を示しています。
Unity インゲームログイン統合
Meta Quest アカウントを AccelByte SDK のサインインと統合すると、プレイヤーは Meta Quest の認証情報を使用してゲームにログインできます。
Unity の準備と設定
-
Unity プロジェクトに AccelByte Unity SDK を追加します。
-
Unity Asset Store から Unity Oculus Integration Asset を追加します。
-
Unity アセットをインストールし、リストに追加していることを確認してください。
Unity のサンプルコード実装
AccelByte Unity SDK と Oculus Integration Asset を追加し、次の手順に従います。
-
空のスクリプトを作成し、名前を付けます。
-
Editor でスクリプトを開き、ユーザー ID と nonce を取得する前にエンタイトルメントをチェックする、次のコードを追加します。
void Awake()
{
try
{
    Core.Initialize();// getting oculus APP ID
    Entitlements.IsUserEntitledToApplication().OnComplete(EntitlementCallback);// if entitlement pass will automatically return callback
    Users.GetLoggedInUser().OnComplete(getUserCallback);//to generate userId
    Users.GetUserProof().OnComplete(userProofCallback);//to generate UserNonce
}
catch (UnityException e)
{
    Debug.LogError("Platform failed to initialize due to exception.");
    Debug.LogException(e);
    // Immediately quit the application.
    UnityEngine.Application.Quit();
}
}

// Called when the Meta Quest Platform completes the async entitlement check request and a result is available.
void EntitlementCallback(Message msg)
{
if (msg.IsError) // User failed entitlement check
{
    // Implements a default behavior for an entitlement check failure -- log the failure and exit the app.
    Debug.LogError("You are NOT entitled to use this app.");
    UnityEngine.Application.Quit();
}
else // User passed entitlement check
{
    // Log the succeeded entitlement check for debugging.
    Debug.Log("You are entitled to use this app.");
    LoginStatus.text = "You are entitled to use this app, Please Login";
}
}
void getUserCallback(Message<Models.User> msg)
{
if (!msg.IsError)
{
    Models.User user = msg.Data;
    userId = user.ID.ToString();
    Debug.Log(
        $"user : {user} ");
}
else
{
    Models.Error error = msg.GetError();
}
}

void userProofCallback(Message<UserProof> msg)
{
if (!msg.IsError)
{
    UserProof userNonce = msg.Data;
    nonce = userNonce.Value;
    Debug.Log(
        $"userNonce : {userNonce} ");
}
else
{
    Models.Error error = msg.GetError();
}

} -
Oculus Tab > Platform - Edit Setting を開き、App Id フィールドに入力します。
-
スクリプトは続けてこの関数を実行します。
public void OnLoginClick()
{
OculusLoginButton.interactable = false;
LoginStatus.text = "Logging in...";

var apiClient = AccelByteSDK.GetClientRegistry().GetApi();
var user = apiClient.GetUser();

// oculus token
string oculusToken = userId + ":" + nonce;

Result<TokenData, OAuthError> loginResult = null;
user.LoginWithOtherPlatform(PlatformType.Oculus, oculusToken,
    (Result<TokenData, OAuthError> loginResult) =>
    {
        if (loginResult.IsError)
        {
            //If we error, grab the Error Error and Description to print in the Log
            Debug.Log(
                $"Login failed : {loginResult.Error.error} Description : {loginResult.Error.error_description}");
            //Set the Status Text to display the Error if there is any
            LoginStatus.text =
                $"Login failed : {loginResult.Error.error} Description : {loginResult.Error.error_description}";
        }
        else
        {
            Debug.Log($"Login successful : {loginResult.Value.ToJsonString()}");

            LoginStatus.text = $"Success : {loginResult.Value.ToJsonString()} ";
        }

        //Enable interaction with the Button again
        OculusLoginButton.interactable = true;
    });

}注記Meta Quest 認証の
platform_tokenは<oculus_user_id>:<nonce_value>です。 -
この関数は、Meta Quest プラットフォームタイプを指定して AccelByte のエンドポイントにリクエストを送信し、コールバックを返します。
サンプルコードのテスト
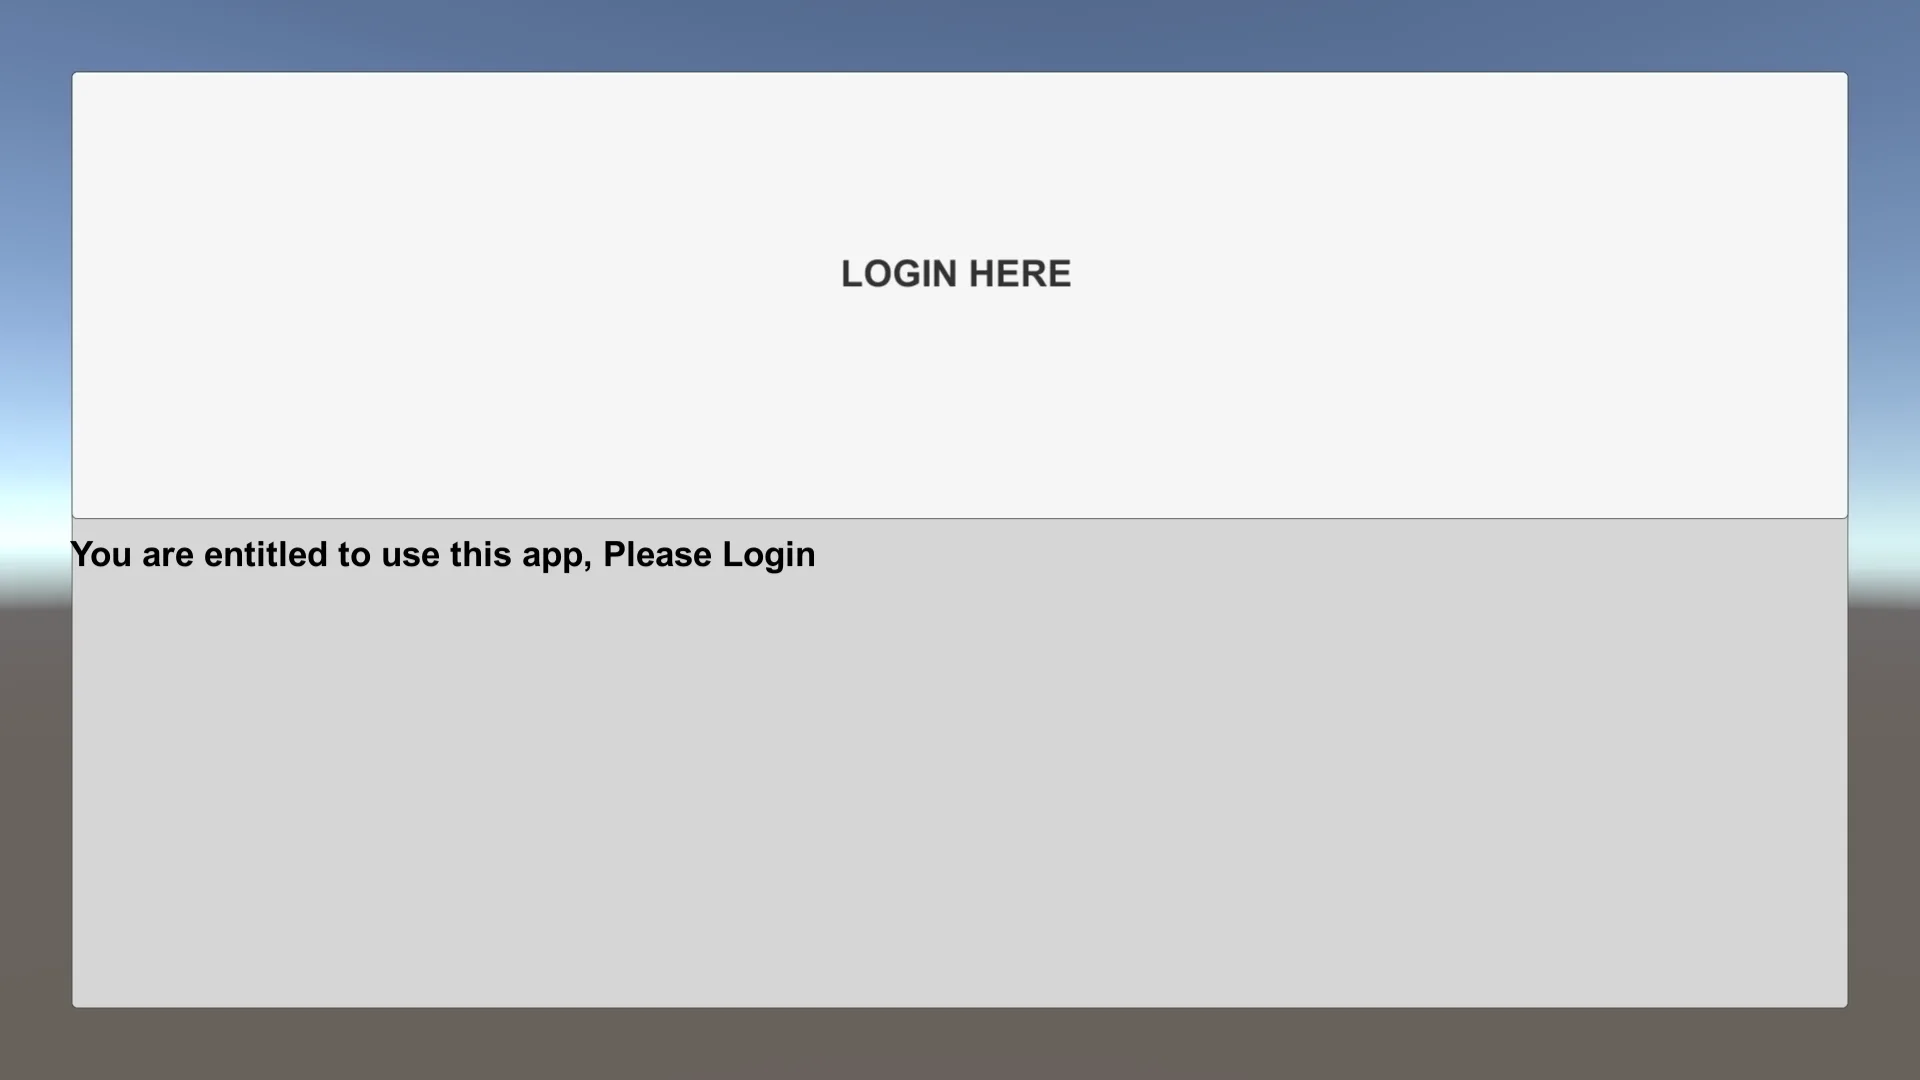
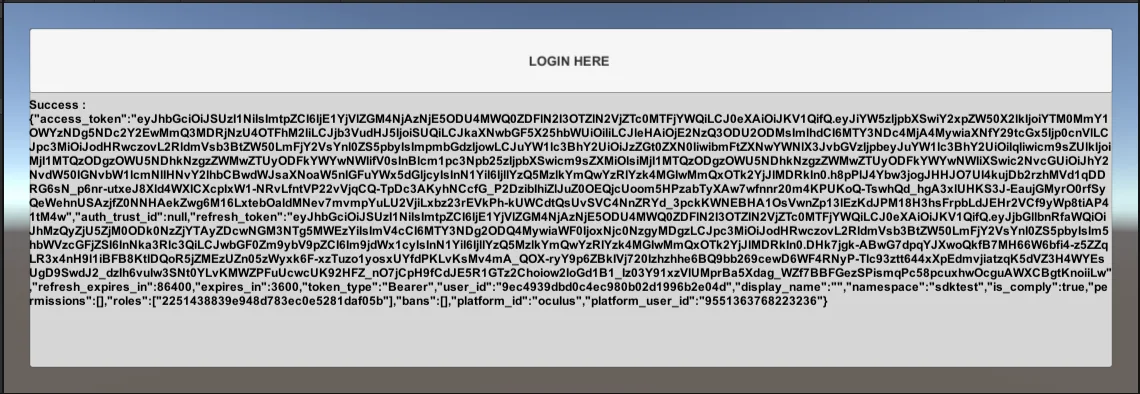
これでプロジェクトをビルドして実行できます。以下の画像は、Meta Quest アカウントを使用したテストアプリでのログイン成功の様子を示しています。
注意
Meta Quest には 2 種類のユーザー ID があります。
- app scoped id: アプリケーションごとに一意な ID で、同じアプリケーションでもデバイスが異なれば異なる値になります。アプリグルーピングを利用することでこれを回避でき、同じアプリグループ内では新しいユーザーも同じ app scoped id を持ちます。デバイス間でユーザーデータを共有したいゲームの場合は、対象のアプリを同じアプリグループに配置してください。
- organization scoped id: 組織ごとに一意な ID で、同じ組織内の異なるアプリが同一ユーザーを識別できるようにします。
AGS のアカウント連携では、この組織内のアプリに関わらず同じ Meta Quest アカウントを識別できるように、organization scoped id を使用します。
また、IAP のような一部の機能には app scoped id を利用します。
このエンドポイントを使用して、AGS ユーザー ID から app scoped id を取得できます。
このエンドポイントを使用して、app scoped id から AGS ユーザーアカウントを取得できます。