アイデンティティプロバイダーとしてGoogleを設定する
注釈:本資料はAI技術を用いて翻訳されています。
Overview
このガイドでは、開発者がGoogleアカウントをAccelByte Gaming Services(AGS)に接続する方法を説明します。ゲームによっては、ここに記載されていないGoogleサービス内の追加機能を設定する必要がある場合があります。Googleサービスの設定に関する詳細については、Googleの担当者に直接お問い合わせいただくか、Google Cloudドキュメントを直接参照することをお勧めします。
このガイドは標準的なGoogleサインインについて説明しています。AndroidゲームでGoogle Play Games Services SDKを使用している場合は、代わりにGoogle Play Gamesをアイデンティティプロバイダーとして設定するを参照してください。
このガイドは一般公開を目的としており、機密性のため限られた情報のみを含んでいます。まず、完全な機密ガイドを参照することをお勧めします。機密ガイドのコピーをリクエストするには、AccelByteのテクニカルプロデューサーにお問い合わせください。
Goals
AGS SDKを使用するゲーム、およびパブリッシャーのWebサイト(AGS Player Portalを使用)で、Google認証方式を有効にします。
Prerequisites
For web login integration
- Google Cloud Consoleアカウント。
- 認証を設定し、権限を管理するためのAGS Admin Portalアカウント。
- Player Portalとランチャー用のパブリッシャーネームスペース。
- Player Portal。
- AGS CLI の手順に従う場合は、AGS CLI をインストールし、これらの機能へのアクセス権を持つアカウントでサインインしてください。詳細については、インストールとサインインを参照してください。例では Bash シェルを使用しています。
ウェブログイン統合は現在AGS Public Cloudでは利用できず、AGS Private Cloudでのみサポートされています。
For in-game Android login integration
- Google Cloud Consoleアカウント。
- Google Play Consoleアカウント。
- Unreal Engineを使用している場合、以下が必要です。
- Unity Engineを使用している場合、以下が必要です。
- Unity Android Environment Setupに従ってください
- AGSのUnity SDKとUnity SDK Googleの最新バージョンを用意してください。
- AGS SDKの最新バージョンがインポートされたUnityまたはUnrealのゲームプロジェクト。
- 認証を設定し、権限を管理するためのAGS Admin Portalアカウント。
- AGSのゲームネームスペース。
- AGS Identity and Access Management(IAM)Clientsについての知識。
- AGS CLI の手順に従う場合は、AGS CLI をインストールし、これらの機能へのアクセス権を持つアカウントでサインインしてください。詳細については、インストールとサインインを参照してください。例では Bash シェルを使用しています。
Set up Google Cloud
Create a Google Cloud Identity
Google Cloud Identity組織を作成します。Set up Cloud Identity as a Google Cloud admin guideに従ってください。
Create a Google Console project
Google Console上で新しいプロジェクトを作成します。Create a Google Cloud project Guideに従ってください。
Set up OAuth consent
OAuth consent screenで、アプリにopenidスコープを追加します。ユーザーの同意に関する詳細については、Configure the OAuth consent screen pageを参照してください。
Create OAuth credentials
WebアプリケーションタイプでOAuth認証情報を作成し、以下のURLをOAuth Authorized redirect URIsに追加します。
https://{BaseURL}https://{BaseURL}/iam/v3/platforms/google/authenticatehttps://{BaseURL}/player/account/linked-accountshttps://{BaseURL}/account/linked-accountshttps://{BaseURL}/account/linked-accounts?platformId=googlehttps://{BaseURL}/iam/v3/public/namespaces/{namespace}/users/me/platforms/google/web/link/establish(アカウントリンクに使用されます)https://{BaseURL}/iam/v3/public/namespaces/{namespace}/users/me/platforms/google/web/reauth/establish(GDPR の再認証プロセスに使用されます)http://127.0.0.1
BaseURLはご自身のドメインアドレスです。例:https://development.accelbyte.io。
詳細については、GoogleのSetting up OAuth 2.0ガイドに従ってください。
Set up the Google login provider in AGS
For web login
GoogleウェブログインはPrivate Cloudのパブリッシャーネームスペースでのみ利用可能です。
- Admin Portal
- AGS CLI
-
AGS Admin Portalで、パブリッシャーネームスペースに移動します。
-
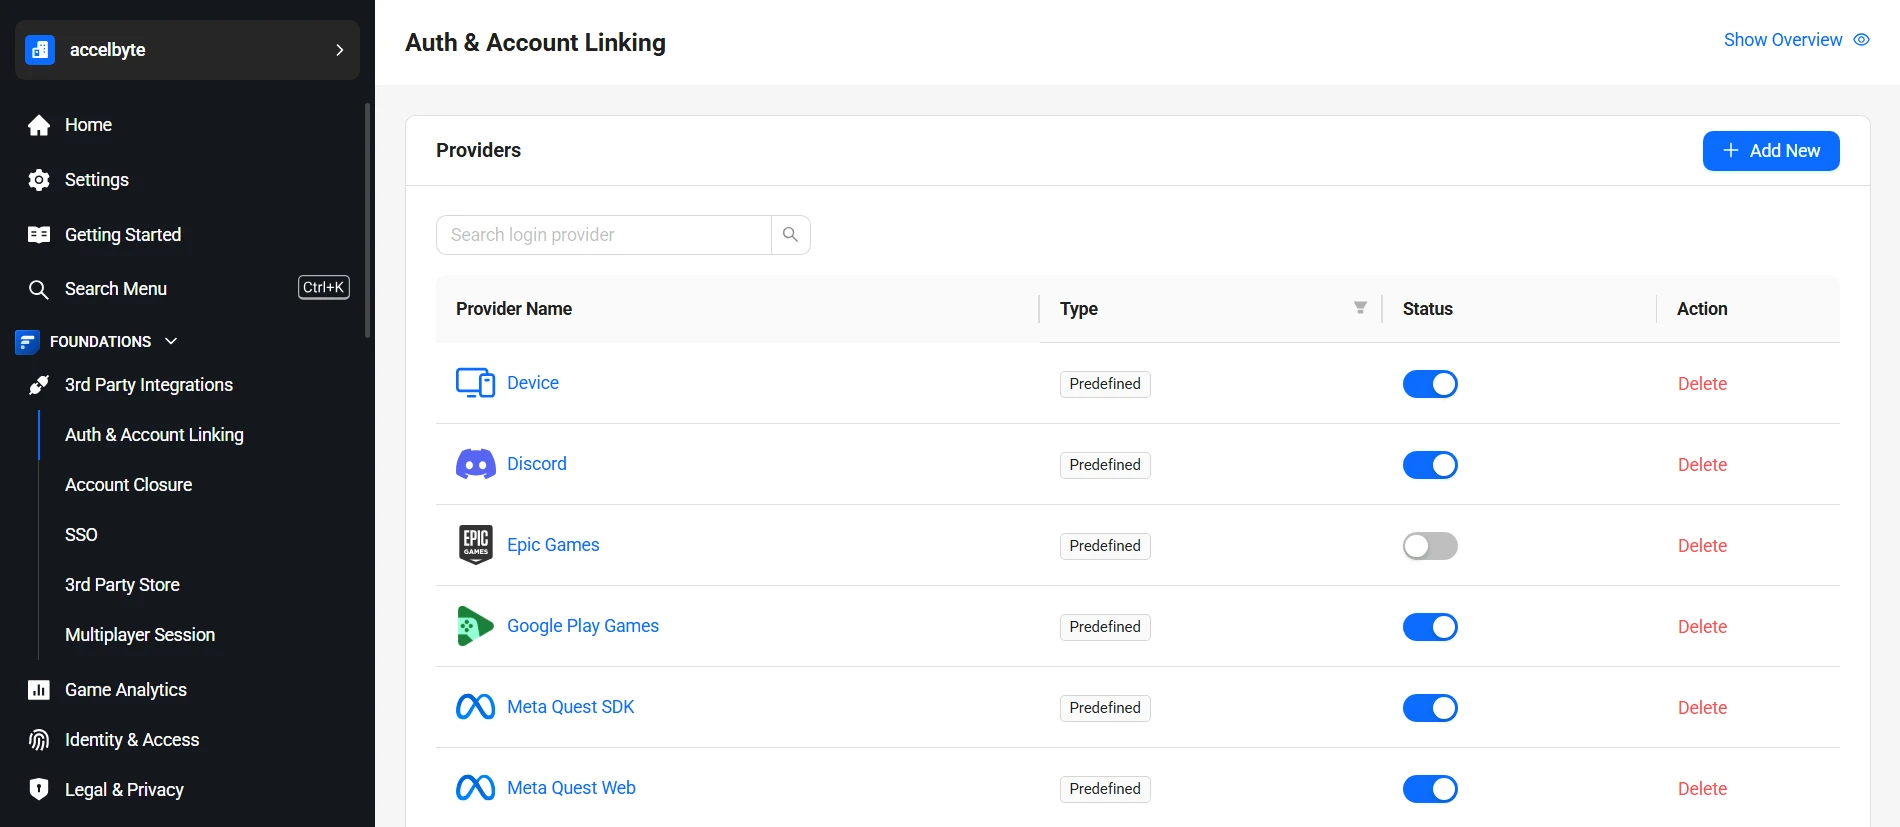
サイドバーメニューで、Foundations > 3rd Party Integrations > Auth & Account Linkingに移動します。
-
Auth & Account Linkingページで、+ Add Newをクリックします。
-
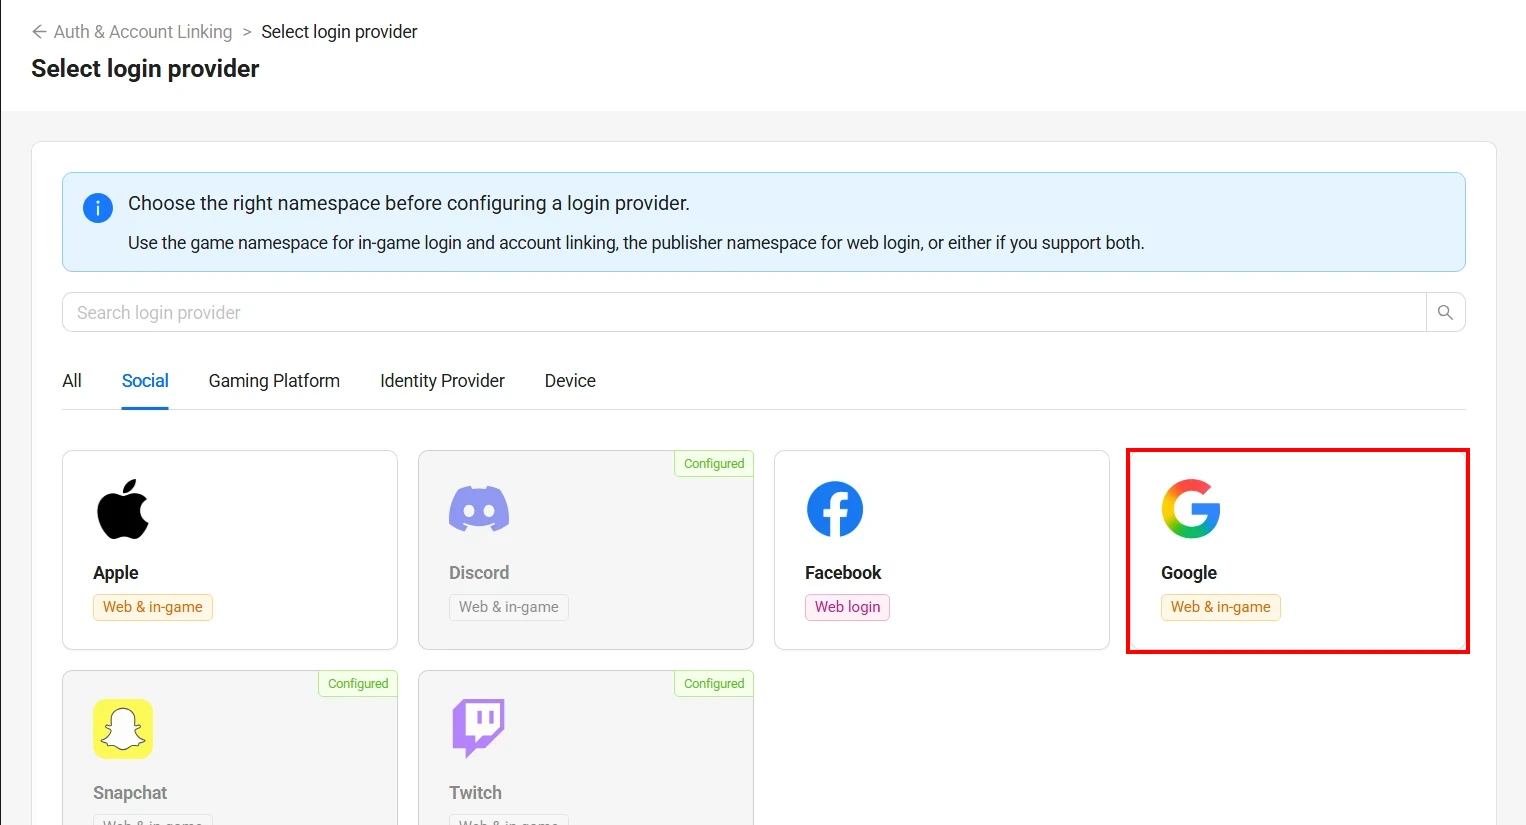
Select login providerページで、Socialタブの下にあるGoogleを見つけてクリックします。
-
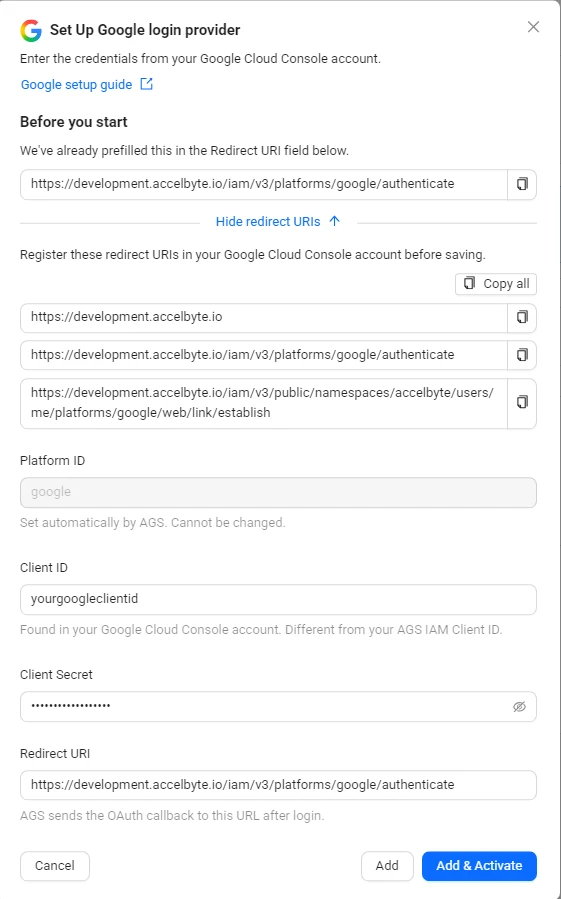
Set up Google login providerフォームが表示されます。
開始する前に、Before you startセクションに表示されているリダイレクトURIをGoogle Cloud Consoleに登録してください。
-
以下のフィールドを入力します。
- Platform ID:
google。自動的に設定されます。変更はできません。 - Client ID: Google Cloud ConsoleのGoogle OAuth Client ID。
- Client secret: Google Cloud ConsoleのGoogle OAuth Client Secret。
- Redirect URI: Google OAuthのAuthorized Redirect URI:
https://<BaseURL>/iam/v3/platforms/google/authenticate。
注記<BaseURL>はご自身のドメインアドレスに置き換えてください。例:https://development.accelbyte.io - Platform ID:
-
Add & Activateをクリックすると、プロバイダーの作成とアクティベートを1つの手順で行えます。アクティベートせずに作成する場合は、Addをクリックします。
-
プロバイダーの設定を記述した JSON ファイルを作成します。ファイル名は任意です。この例では
google.jsonを使用します。{
"ClientId": "<YourGoogleClientId>",
"Secret": "<YourGoogleClientSecret>",
"RedirectUri": "<BaseURL>/iam/v3/platforms/google/authenticate",
"IsActive": true
}ClientIdとSecret: Google Cloud Console の Google OAuth Client ID と Client Secret。RedirectUri: Google OAuth の Authorized Redirect URI。<BaseURL>はご自身のドメインアドレス(例:https://development.accelbyte.io)に置き換えてください。IsActive:trueを指定すると、Add & Activate と同様にプロバイダーを追加してアクティベートします。falseを指定すると、Add と同様にアクティベートせずに追加します。
-
プロバイダーを追加します。
<YourPublisherNamespace>はパブリッシャーネームスペースに置き換えてください。@の後には JSON ファイルのパスを指定します。ags iam platform-credentials create --namespace <YourPublisherNamespace> --platform-id google --json @google.jsonこのファイルにはクライアントシークレットが含まれているため、コマンドの実行後に削除してください。
Edit the Google web login provider
- Admin Portal
- AGS CLI
-
Auth & Account Linkingページで、Googleプロバイダーをクリックします。
-
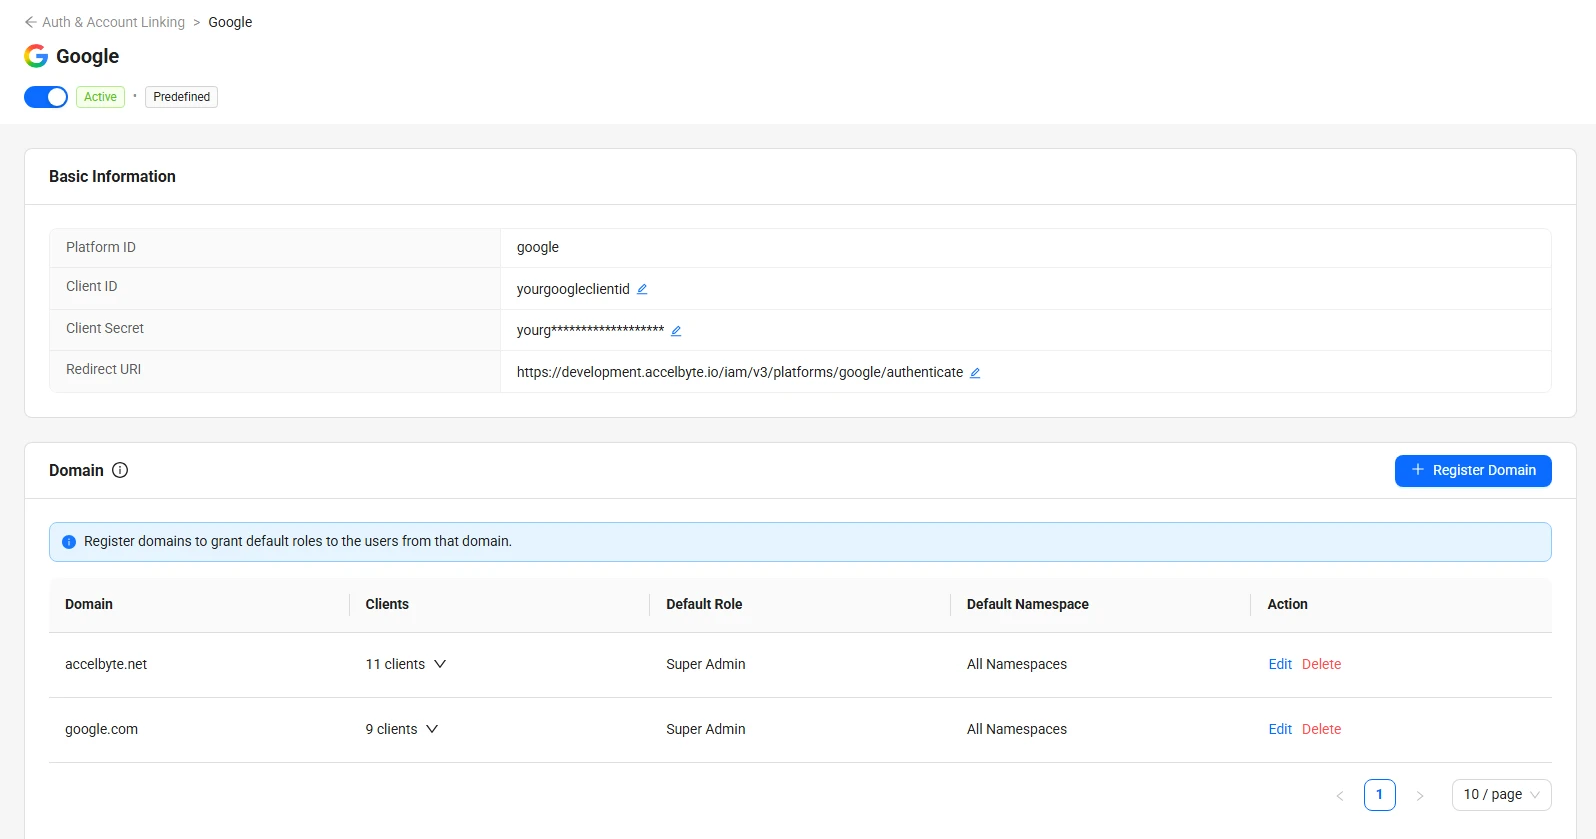
Googleプロバイダーの詳細ページが表示され、Basic InformationセクションとDomainセクションが表示されます。フィールドを更新するには、そのフィールドの横にある編集アイコンをクリックします。
-
ページ上部のStatusトグルを使用して、プロバイダーを有効化または無効化します。
-
プロバイダーの現在の設定を確認します。
ags iam platform-credentials get --namespace <YourPublisherNamespace> --platform-id google -
変更したいフィールドのみを送信します。省略したフィールドは現在の値が維持されます。たとえば、プロバイダーを無効化するには次のようにします。
ags iam platform-credentials update --namespace <YourPublisherNamespace> --platform-id google --json '{"IsActive": false}'有効化するには、
{"IsActive": true}を送信します。クライアントシークレットを変更するには、代わりに{"Secret": "<NewGoogleClientSecret>"}を JSON ファイルに記述して--json @<FileName>で渡し、コマンドの実行後にそのファイルを削除してください。
Test Google web login
-
AGS Player Portal(例:
https://development.accelbyte.io)にアクセスし、Loginをクリックします。 -
Sign up or log in withの下で、Googleアイコンを見つけてクリックします。表示されていない場合はMore login optionsをクリックしてください。
-
Googleの認証情報を使用してログインします。
Activate Google login for a specific domain and role
Googleログイン統合により、特定のGoogleドメインを使用したログインを処理し、特定のロールを直接割り当てることができます。例えば、組織のメンバーがGoogle組織アカウントを使用してAGS Admin Portalにログインできるようにしたい場合、Google組織ドメインを登録できます。
これはパブリッシャーネームスペースでのみ行うことができます。
- Admin Portal
- AGS CLI
-
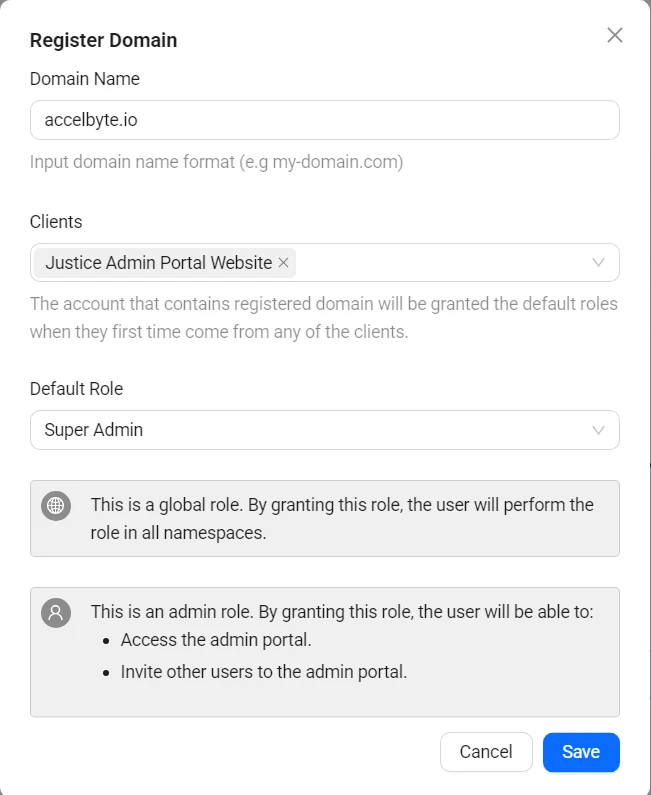
Googleログインプロバイダーの設定で、+ Register Domainをクリックします。
-
以下のフィールドを入力します。
- Domain Name: ご自身のGoogle組織アカウントのドメイン。形式の例:
yourdomain.io。 - Clients: Admin PortalのIAM Client Name。IAM Clientの詳細については、Manage access control for applications guideを参照してください。
- Default Role: Google組織アカウントを使用してAdmin Portalにログインした際に、組織のメンバーに割り当てられるロール。値の例:
Admin Portal。ロールの詳細については、Manage access control for user accounts guideを参照してください。 - Default Namespace: デフォルトロールがグローバルロールでない場合、このロールが適用される対象のネームスペースを指定します。
- Domain Name: ご自身のGoogle組織アカウントのドメイン。形式の例:
-
Saveをクリックします。
-
Admin Portal 用 IAM Client のクライアント ID を確認します。
ags iam clients list --namespace <YourPublisherNamespace> --page-all -
組織のメンバーに割り当てるロールの ID を確認します。すべてのネームスペースに適用されるロールは、
isWildcardがtrueに設定されています。ags iam roles list --page-all --format json -
ドメインの設定を記述した JSON ファイルを作成します。ファイル名は任意です。この例では
google-domain.jsonを使用します。{
"domain": "<YourDomain>",
"affectedClientIDs": ["<AdminPortalClientId>"],
"roleId": "<DefaultRoleId>",
"assignedNamespaces": ["<DefaultNamespace>"]
}domain: ご自身の Google 組織アカウントのドメイン(例:yourdomain.io)。affectedClientIDs: 手順 1 で確認したクライアント ID。roleId: 手順 2 で確認したロール ID。assignedNamespaces: ロールを適用するネームスペース。ロールがすべてのネームスペースに適用される場合は、["*"]を使用します。
-
ドメインを登録します。
<YourPublisherNamespace>はパブリッシャーネームスペースに置き換えてください。ags iam platform-credentials set-domain --namespace <YourPublisherNamespace> --platform-id google --json @google-domain.json
Use a Google Organization Account for the Admin Portal
上記の手順の後、Google組織アカウントを使用してAdmin Portalにログインするには、以下の手順を使用してください。
-
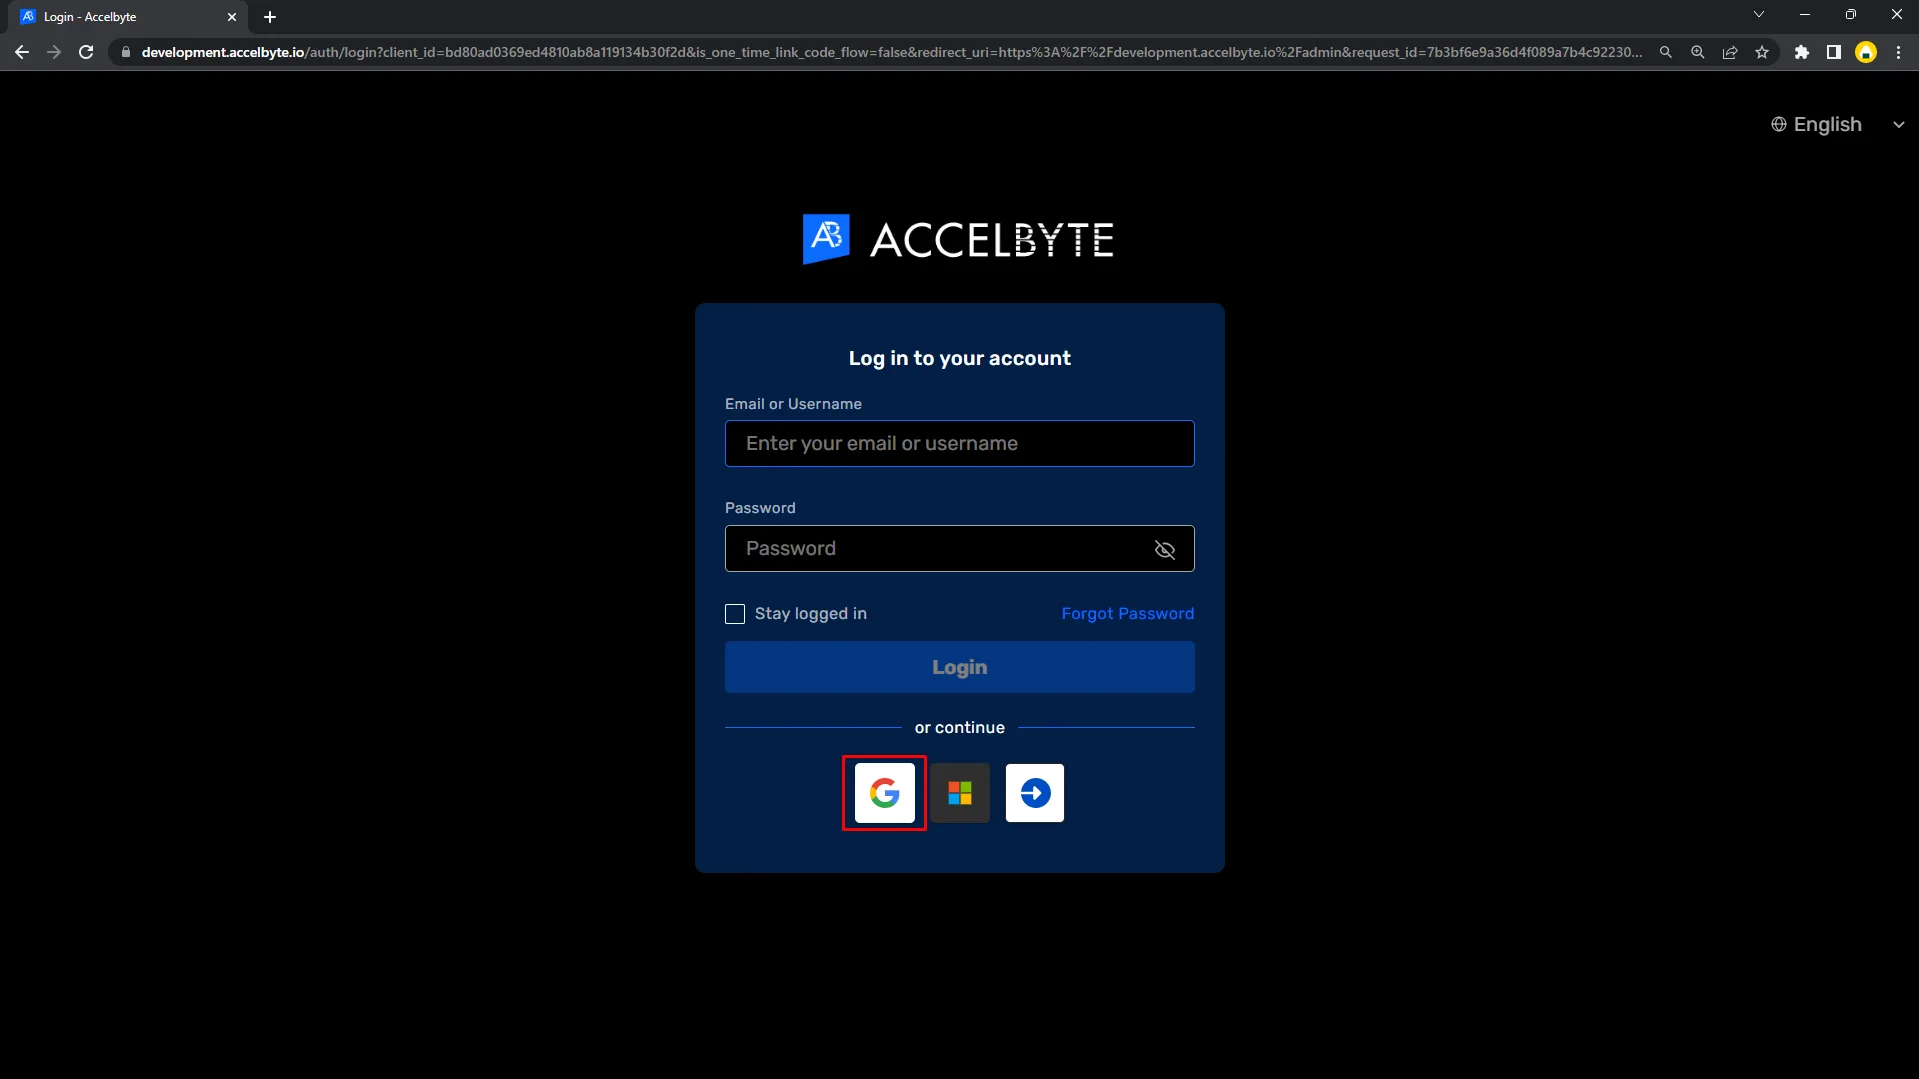
Admin Portalにアクセスし、GoogleアイコンをクリックしてGoogleでログインします。
-
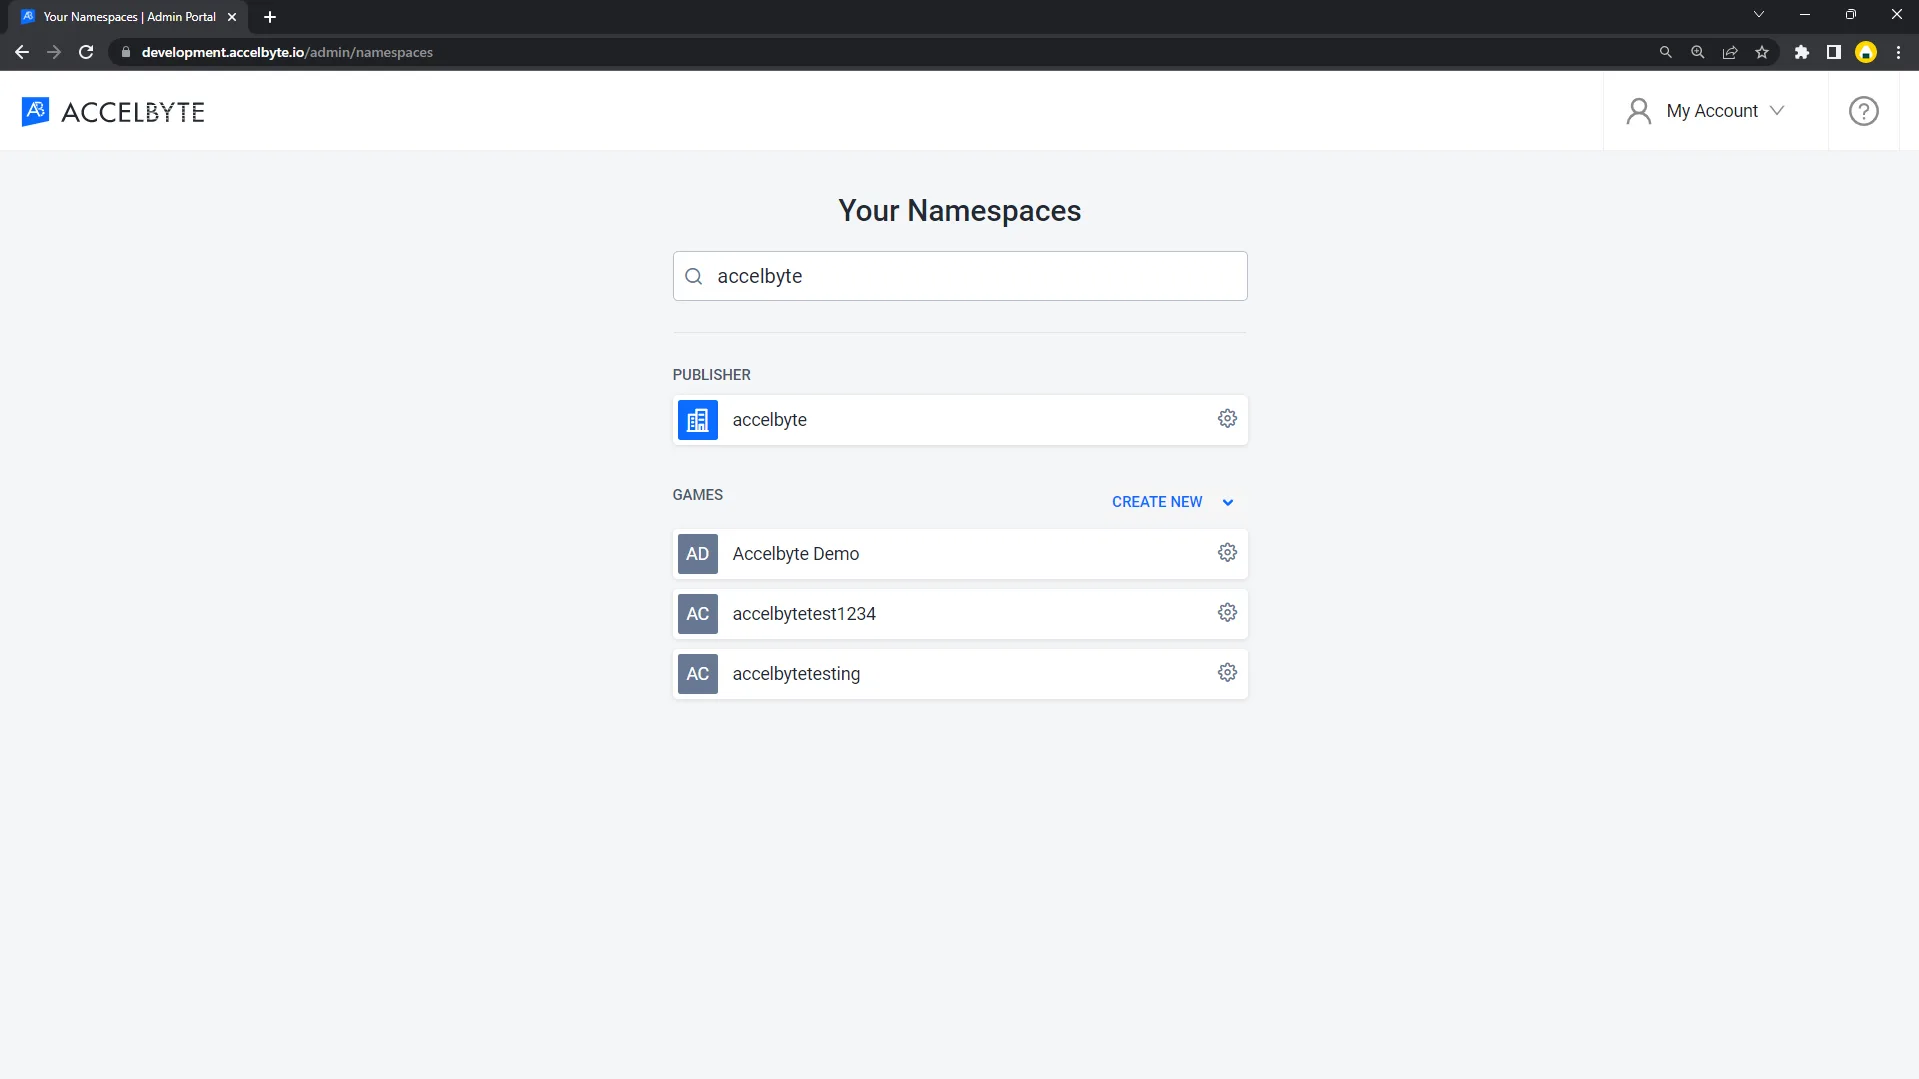
Google組織アカウントの認証情報でログインします。これにより、管理者としてログインします。
For in-game login
- Admin Portal
- AGS CLI
-
AGS Admin Portalで、ゲームネームスペースに移動します。
-
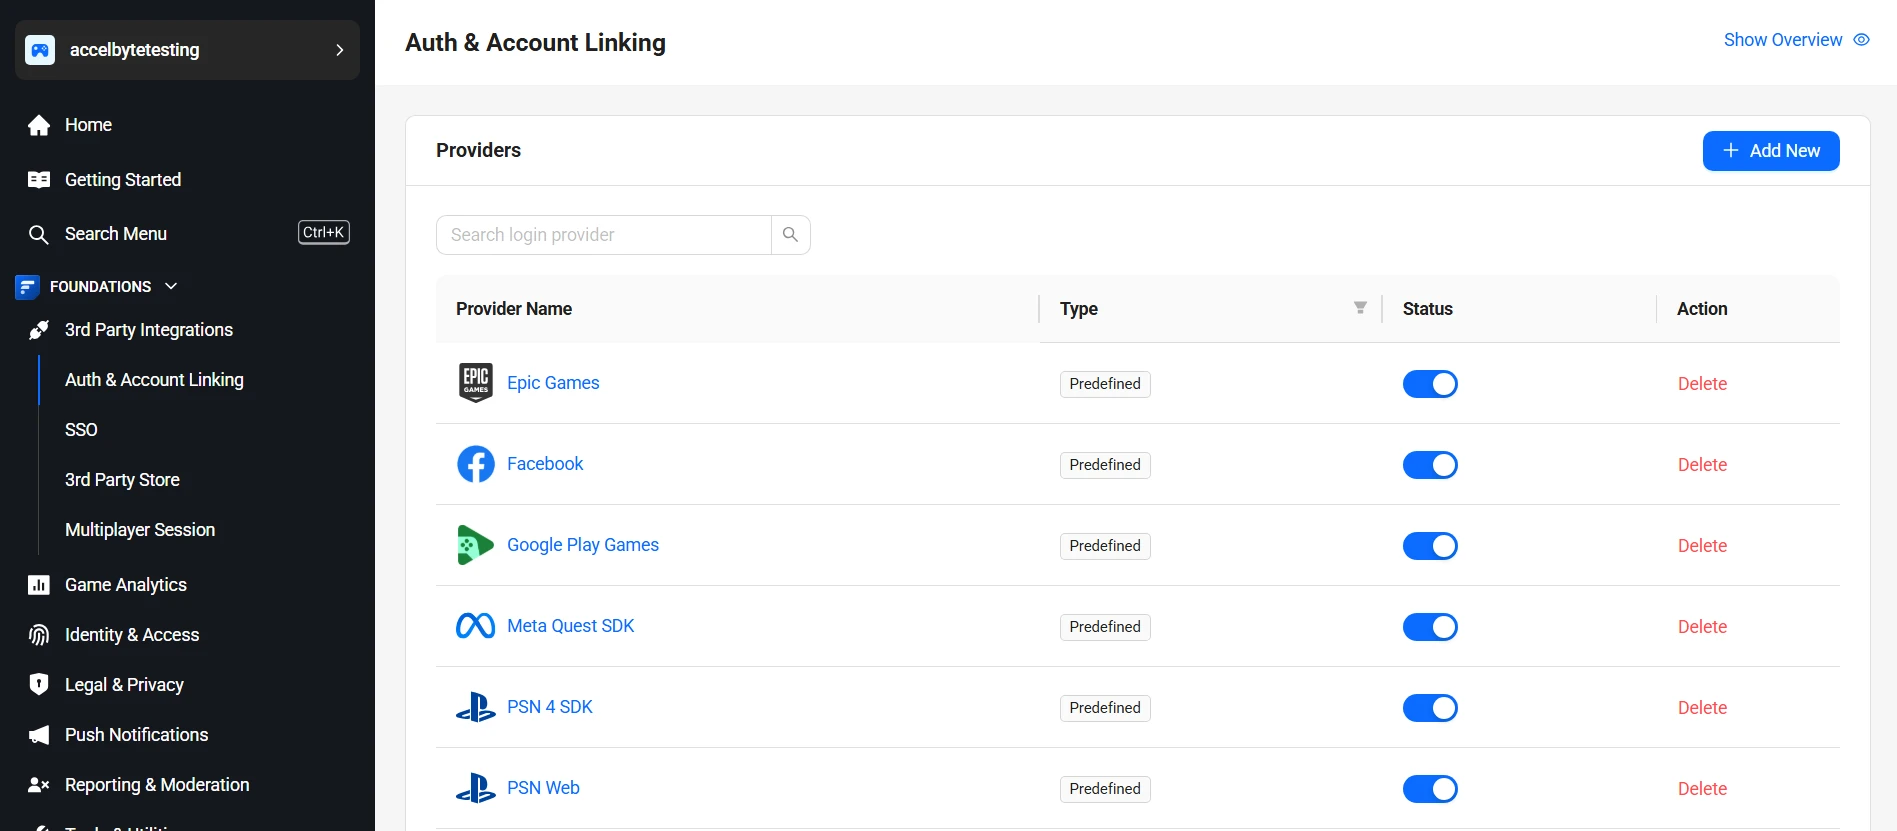
サイドバーメニューで、Foundations > 3rd Party Integrations > Auth & Account Linkingに移動します。
-
Auth & Account Linkingページで、+ Add Newをクリックします。
-
Select login providerページで、Socialタブの下にあるGoogleを見つけてクリックします。
-
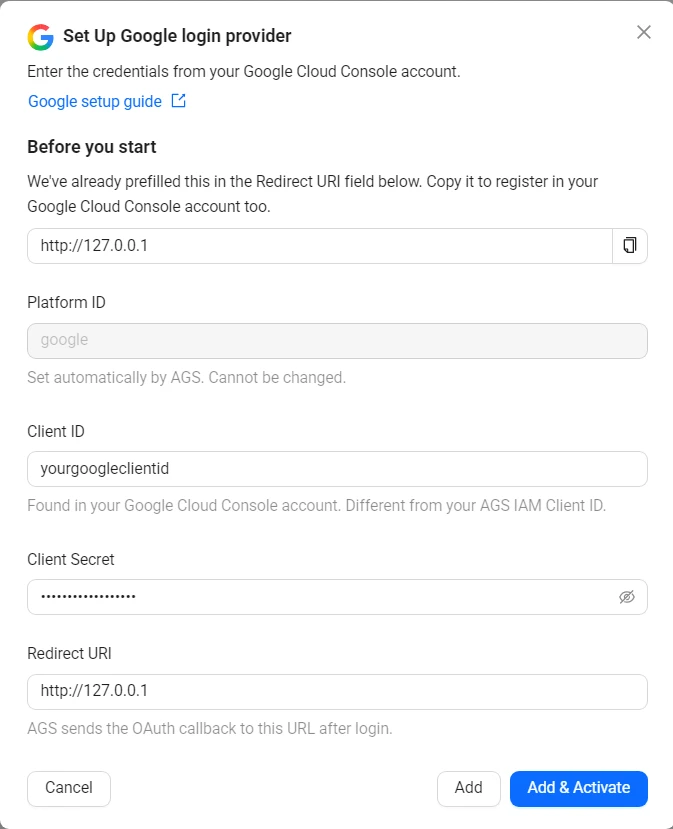
Set up Google login providerフォームが表示されます。
-
以下のフィールドを入力します。
- Platform ID:
google。自動的に設定されます。変更はできません。 - Client ID: Google Cloud ConsoleのGoogle OAuth Client ID。
- Client secret: Google Cloud ConsoleのGoogle OAuth Client Secret。
- Redirect URI: ご自身のlocalhost URI:
http://127.0.0.1
- Platform ID:
-
Add & Activateをクリックすると、プロバイダーの作成とアクティベートを1つの手順で行えます。アクティベートせずに作成する場合は、Addをクリックします。
-
プロバイダーの設定を記述した JSON ファイルを作成します。ファイル名は任意です。この例では
google.jsonを使用します。{
"ClientId": "<YourGoogleClientId>",
"Secret": "<YourGoogleClientSecret>",
"RedirectUri": "http://127.0.0.1",
"IsActive": true
}ClientIdとSecret: Google Cloud Console の Google OAuth Client ID と Client Secret。IsActive:trueを指定すると、Add & Activate と同様にプロバイダーを追加してアクティベートします。falseを指定すると、Add と同様にアクティベートせずに追加します。
-
プロバイダーを追加します。
<YourGameNamespace>はゲームネームスペースに置き換えてください。@の後には JSON ファイルのパスを指定します。ags iam platform-credentials create --namespace <YourGameNamespace> --platform-id google --json @google.jsonこのファイルにはクライアントシークレットが含まれているため、コマンドの実行後に削除してください。
Edit the Google in-game login provider
- Admin Portal
- AGS CLI
-
Auth & Account Linkingページで、Googleプロバイダーをクリックします。
-
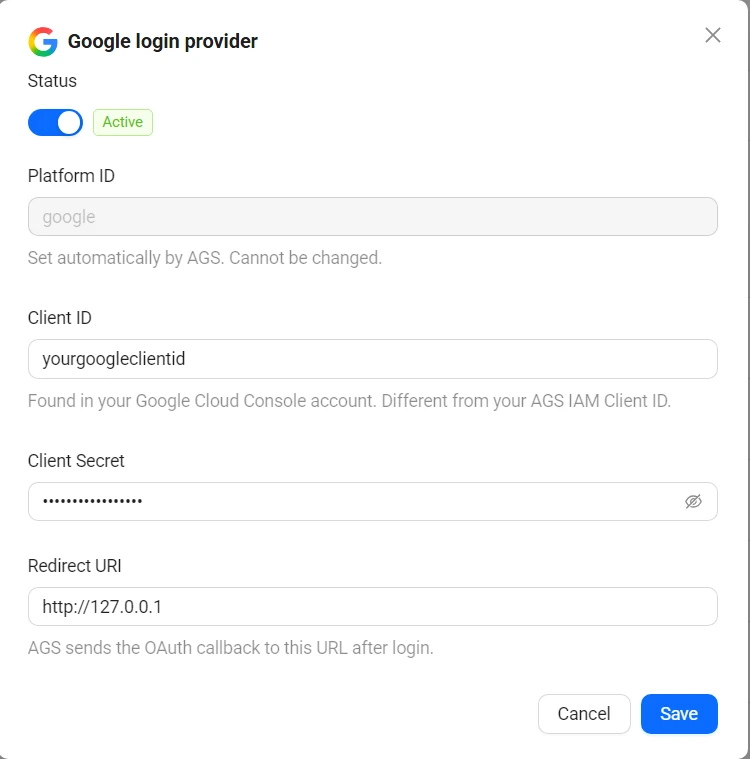
Google login providerダイアログが表示されます。必要に応じてフィールドを更新します。
-
上部のStatusトグルを使用して、プロバイダーを有効化または無効化します。
-
Saveをクリックします。
-
プロバイダーの現在の設定を確認します。
ags iam platform-credentials get --namespace <YourGameNamespace> --platform-id google -
変更したいフィールドのみを送信します。省略したフィールドは現在の値が維持されます。たとえば、プロバイダーを無効化するには次のようにします。
ags iam platform-credentials update --namespace <YourGameNamespace> --platform-id google --json '{"IsActive": false}'有効化するには、
{"IsActive": true}を送信します。クライアントシークレットを変更するには、代わりに{"Secret": "<NewGoogleClientSecret>"}を JSON ファイルに記述して--json @<FileName>で渡し、コマンドの実行後にそのファイルを削除してください。
Create an IAM client for Google
IAM Clientは、対象プラットフォームでリリースしたいゲームクライアントを表すものです。IAM Clientの詳細については、Manage access control for applicationsを参照してください。
In-game login instructions
このドキュメントに従うことで、AGS SDKを使用してゲームのサインインプロセスを統合し、プレイヤーがGoogleアカウントを使用してゲームにログインできるようにできます。プレイヤーがGoogleの認証情報でゲームまたはプラットフォームにログインするためには、ゲームがプレイヤーが使用している認証情報を持つGoogleプラットフォームからのAuthトークンをパブリッシャープラットフォームに渡す必要があります。
各ゲームエンジンでの設定は異なります。利用可能なタブからお使いのゲームエンジンを選択してください。
- Unreal Engine Instructions
- Unity Engine Instructions
In-game login integration (Unreal)
Preparation and configuration (Unreal)
Preparing source code (Unreal)
Googleオンラインサブシステムを使用できるようにするには、専用のUnreal Engineソースコードが必要です。
- Epic GamesのGitHubからUnreal Engineバージョン4.27.2をダウンロードします:Release Unreal Engine 4.27.2 · EpicGames/UnrealEngine (github.com)。
- ソースコードの一部を修正する必要があります。
-
Server Auth Codeを有効にします。
- Unreal Engineインストールディレクトリに移動し、
Engine\Plugins\Online\OnlineSubsystemGoogle\Source\ThirdParty\Android\Java\フォルダにあるGoogleLogin.javaファイルを開きます。このファイルに以下の変更を加えます。
-
public boolean init(String inClientId, String inServerClientId)に移動し、下にスクロールして.requestServerAuthCode(serverClientId)の部分のコメントを解除します。// Configure sign-in to request the user's ID, email address, and basic
// profile. ID and basic profile are included in DEFAULT_SIGN_IN.
GoogleSignInOptions gso = new GoogleSignInOptions.Builder(GoogleSignInOptions.DEFAULT_SIGN_IN)
.requestIdToken(serverClientId)
.requestProfile()
.requestServerAuthCode(serverClientId)
.requestEmail()
.build();
// Build a GoogleSignInClient with the options specified by gso.
mGoogleSignInClient = GoogleSignIn.getClient(activity, gso); -
private String getAuthTokenJsonStr(GoogleSignInAccount acct)に移動し、下にスクロールしてaccess_tokenの値をandroidInternalからacct.getServerAuthCode()に変更します。private String getAuthTokenJsonStr(GoogleSignInAccount acct)
{
if (acct != null)
{
return "{\"access_token\":\""+ acct.getServerAuthCode() + "\"," + //androidInternal\"," +
"\"refresh_token\":\"androidInternal\"," +
"\"id_token\":\""+ acct.getIdToken() + "\"}";
}
return "";
}
- Unreal Engineインストールディレクトリに移動し、
-
RESTful実装を無効にします。
- Unreal Engineインストールディレクトリに移動し、
Engine\Plugins\Online\OnlineSubsystemGoogle\Source\フォルダにあるOnlineSubsystemGoogle.Build.csファイルを開きます。以下の変更を加えます。
-
constructorに移動し、bool bUsesRestfulImpl = false;を追加します。public class OnlineSubsystemGoogle : ModuleRules
{
public OnlineSubsystemGoogle(ReadOnlyTargetRules Target) : base(Target)
{
bool bUsesRestfulImpl = false;
PrivateDefinitions.Add("ONLINESUBSYSTEMGOOGLE_PACKAGE=1");
PCHUsage = ModuleRules.PCHUsageMode.UseExplicitOrSharedPCHs;
PrivateIncludePaths.Add("Private"); -
すべての変更後、C++コードを再コンパイルして、変更内容がAndroidビルドのパッケージ化に含まれるようにします。
-
同じディレクトリで
OnlineSubsystemGoogle.pluginファイルを開きます。 -
そのファイルの
Modulesの下で、WhitelistPlatformsに値Androidを追加します。{
"FileVersion" : 3,
"FriendlyName" : "Online Subsystem Google",
"Version" : 1,
"VersionName" : "1.0",
"Description" : "Access to Google platform",
"Category" : "Online Platform",
"CreatedBy" : "Epic Games, Inc.",
"CreatedByURL" : "http://epicgames.com",
"EnabledByDefault" : false,
"Modules": [
{
"Name": "OnlineSubsystemGoogle",
"Type": "Runtime",
"LoadingPhase" : "Default",
"WhitelistPlatforms" :
[
"Win64","Win32", "Android"
]
}
],
"Plugins": [
{
"Name": "OnlineSubsystem",
"Enabled": true
}
]
}
- Unreal Engineインストールディレクトリに移動し、
-
Creating a project (Unreal)
新しいUnreal Engineプロジェクトを作成した後、いくつかの項目を設定・構成する必要があります。
Enable OnlineSubsystemGoogle plugins and service configurations (Unreal)
-
プロジェクトファイルでプラグインを有効にします。
{
  "FileVersion": 3,
  "EngineAssociation": "{4D293DA0-4F8F-387E-BF30-77B1100DBEBF}",
  "Category": "",
  "Description": "",
  "Modules": [
    {
      "Name": "TestGoogleLogin",
      "Type": "Runtime",
      "LoadingPhase": "Default",
      "AdditionalDependencies": [
        "Engine"
      ]
    }
  ],
  "Plugins": [
    {
      "Name": "AccelByteUe4Sdk",
      "Enabled": true
    },
    {
      "Name": "OnlineSubsystemGoogle",
      "Enabled": true
    }
  ]
} -
<project>/Config/Androidディレクトリで、AndroidEngine.iniファイルを開き、以下の変更を加えます。[OnlineSubsystem]
; For Android, our native service will be Google Play
DefaultPlatformService=GooglePlay
NativePlatformService=Google
[OnlineSubsystemGoogle]
bEnabled=True
ClientId=662680510101-gojaaltsfsg4ei75afnfii3e43ebocgp.apps.googleusercontent.com
ServerClientId=662680510101-gojaaltsfsg4ei75afnfii3e43ebocgp.apps.googleusercontent.com
ClientSecret=GOCSPX-zR_pvAu6EruK-s0yf2v3********
[OnlineSubsystemGoogle.OnlineIdentityGoogle]
+ScopeFields="email"
+ScopeFields="profile"
+ScopeFields="https://www.googleapis.com/auth/userinfo.email"
+ScopeFields="https://www.googleapis.com/auth/userinfo.profile"
[OnlineSubsystemGooglePlay]
bEnabled=True
[OnlineSubsystemGooglePlay.Store]
bSupportsInAppPurchasing=True
bUseStoreV2=False
[/Script/AccelByteUe4Sdk.AccelByteSettings]
ClientId=a342f59f3489476ca02d704c75891a3b
ClientSecret=k@#h,G]R^C61#2d!************
Namespace=sdktest
PublisherNamespace=accelbyte
BaseUrl="https://development.accelbyte.io"注記OnlineSubsystemGoogle ClientIdはGoogle Play Console上のゲームサーバー認証情報から取得され、**AccelByteClientId**はIAM Clientの認証情報から取得されます。 -
プロジェクトのプラグインとモジュール
-
[PROJECT].Build.cs// Copyright Epic Games, Inc. All Rights Reserved.
using UnrealBuildTool;
public class TestGoogleLogin : ModuleRules
{
public TestGoogleLogin(ReadOnlyTargetRules Target) : base(Target)
{
PCHUsage = PCHUsageMode.UseExplicitOrSharedPCHs;
PublicDependencyModuleNames.AddRange(new string[] { "Core", "CoreUObject", "Engine", "InputCore",
"OnlineSubsystem",
"OnlineSubsystemUtils",
"Sockets", "Networking", "InputCore", "AccelByteUe4Sdk", "Json", "JsonUtilities", "Http", "WebSockets"
});
PrivateDependencyModuleNames.AddRange(new string[] { });
// Uncomment if you are using Slate UI
// PrivateDependencyModuleNames.AddRange(new string[] { "Slate", "SlateCore" });
// Uncomment if you are using online features
PrivateDependencyModuleNames.Add("OnlineSubsystem");
// To include OnlineSubsystemSteam, add it to the plugins section in your project file with the Enabled attribute set to true
}
} -
[PROJECT].Target.csファイルと[PROJECT]Editor.Target.csファイル// Copyright Epic Games, Inc. All Rights Reserved.
using UnrealBuildTool;
using System.Collections.Generic;
public class TestGoogleLoginEditorTarget : TargetRules
{
public TestGoogleLoginEditorTarget( TargetInfo Target) : base(Target)
{
Type = TargetType.Editor;
DefaultBuildSettings = BuildSettingsVersion.V2;
ExtraModuleNames.AddRange( new string[] { "TestGoogleLogin", "OnlineSubsystem", "AccelByteUe4Sdk" } );
ProjectDefinitions.Add("ONLINE_SUBSYSTEM_EOS_ENABLE_GOOGLE=1");
}
}// Copyright Epic Games, Inc. All Rights Reserved.
using UnrealBuildTool;
using System.Collections.Generic;
public class TestGoogleLoginTarget : TargetRules
{
public TestGoogleLoginTarget( TargetInfo Target) : base(Target)
{
Type = TargetType.Game;
DefaultBuildSettings = BuildSettingsVersion.V2;
ExtraModuleNames.AddRange( new string[] { "TestGoogleLogin", "OnlineSubsystem", "AccelByteUe4Sdk" } );
ProjectDefinitions.Add("ONLINE_SUBSYSTEM_EOS_ENABLE_GOOGLE=1");
}
}
-
Project settings (Unreal)
Unrealプロジェクトのパッケージング、Androidプラットフォーム、Credential/Licenseを設定します。
Generating keystore (Unreal)
- Signing projects for release guideに従ってください。
C:\Program Files\Android\Android Studio\jre\binディレクトリに移動し、keystore.exeを開きます。- コマンドを実行します:
keytool -genkey -v -keystore ExampleKey.keystore -**alias** MyKey -keyalg RSA -keysize 2048 -validity 10000。 - 生成された
*.keystoreファイルをjustice-unreal-sdk-project - Android\Build\Androidの場所に配置します。
Sample code implementation (Unreal)
- クラスアクターを作成し、そのレベルにGoogleネイティブログインとAGSのAccessサービスを配置できます。以下は例です。
SampleActor.h
// Fill out your copyright notice in the Description page of Project Settings.

##pragma once

##include "CoreMinimal.h"
##include "GameFramework/Actor.h"

##include "Kismet/GameplayStatics.h"
##include "OnlineSubsystem.h"
##include "Interfaces/OnlineIdentityInterface.h"
##include "Interfaces/OnlinePurchaseInterface.h"

##include "Core/AccelByteRegistry.h"
##include "Api/AccelByteUserApi.h"

##include "SampleActor.generated.h"

DECLARE_DYNAMIC_MULTICAST_DELEGATE_OneParam(FActionInfo, FString, Message);

UCLASS()
class TESTGOOGLELOGIN_API ASampleActor : public AActor
{
  GENERATED_BODY()

public:
  // Sets default values for this actor's properties
  ASampleActor();

  UPROPERTY(BlueprintAssignable)
  FActionInfo OnActionInfoUpdated;

  UFUNCTION(BlueprintCallable)
  void ExecBroadcast();

protected:
  // Called when the game starts or when spawned
  virtual void BeginPlay() override;

  FApiClientPtr ApiClient = nullptr;

public:
  // Called every frame
  virtual void Tick(float DeltaTime) override;

};
スニペットで使用されているAccelByteOnlineSubsystemPtrを取得するには、このガイドに従ってください。
SampleActor.cpp
// Fill out your copyright notice in the Description page of Project Settings.

##include "SampleActor.h"

// Sets default values
ASampleActor::ASampleActor()
{
  // Set this actor to call Tick() every frame.  You can turn this off to improve performance if you don't need it.
  PrimaryActorTick.bCanEverTick = true;
  ApiClient = AccelByteOnlineSubsystemPtr->GetApiClient(TEXT("YOUR_KEY"));
}

// Called when the game starts or when spawned
void ASampleActor::BeginPlay()
{
  Super::BeginPlay();

}

void ASampleActor::ExecBroadcast()
{
  OnActionInfoUpdated.Broadcast(TEXT("Begin Sample Actor"));

  const IOnlineSubsystem* OnlineSubsystem = IOnlineSubsystem::GetByPlatform();
  if (OnlineSubsystem == nullptr)
  {
    FString Message = TEXT("Cannot login with no online subsystem set!");
    OnActionInfoUpdated.Broadcast(Message);
    return;
  }

  const IOnlineIdentityPtr OnlineIdentity = OnlineSubsystem->GetIdentityInterface();
  if (!OnlineIdentity.IsValid())
  {
    FString Message = TEXT("Could not retrieve identity interface from native subsystem.");
    OnActionInfoUpdated.Broadcast(Message);
    return;
  }
  APlayerController* MyPlayerController = UGameplayStatics::GetPlayerController(GetWorld(), 0);; // = PlayerControllerWeakPtr.Get();

  const ULocalPlayer* LocalPlayer = Cast<ULocalPlayer>(MyPlayerController->Player);
  if (LocalPlayer == nullptr)
  {
    FString Message = TEXT("Can only login with native platform for local players");
    OnActionInfoUpdated.Broadcast(Message);
    return;
  }

  const FVoidHandler OnLoginSuccessDelegate = FVoidHandler::CreateLambda([=]() {
    OnActionInfoUpdated.Broadcast(TEXT("Login to AB Service Success"));
  });
  const FErrorHandler OnLoginErrorDelegate = FErrorHandler::CreateLambda([=](int32 ErrorCode, const FString& ErrorMessage) {
    FString Message = FString::Printf(TEXT("Error Login to AB Service : %s"), *ErrorMessage);
    OnActionInfoUpdated.Broadcast(Message);
  });

  const FOnLoginCompleteDelegate NativeLoginComplete = FOnLoginCompleteDelegate::CreateLambda([=]
  (int32 LocalUserNum, bool bWasSuccessful, const FUniqueNetId& UserId, const FString& Error) {
    FString Message = FString::Printf(TEXT("OnLoginComplete %s : %s"), bWasSuccessful ? TEXT("Success") : TEXT("Fail"), *Error);
    OnActionInfoUpdated.Broadcast(Message);

    if (bWasSuccessful)
    {
      const FString PlatformToken = OnlineIdentity->GetAuthToken(LocalPlayer->GetControllerId());
      UE_LOG(LogTemp, Warning, TEXT("PlatformToken : %s"), *PlatformToken);
      OnActionInfoUpdated.Broadcast(FString::Printf(TEXT("PlatformToken : %s"), *PlatformToken));

      auto UserApi = ApiClient->GetUserApi().Pin();
      UserApi->LoginWithOtherPlatform(EAccelBytePlatformType::Google, PlatformToken, OnLoginSuccessDelegate, OnLoginErrorDelegate);
      UE_LOG(LogTemp, Warning, TEXT("Request LoginWithOtherPlatform"));
      OnActionInfoUpdated.Broadcast(TEXT("Request LoginWithOtherPlatform"));

    }
  });
  OnlineIdentity->AddOnLoginCompleteDelegate_Handle(LocalPlayer->GetControllerId(), NativeLoginComplete);
  const bool bWaitForDelegate = OnlineIdentity->Login(LocalPlayer->GetControllerId(), FOnlineAccountCredentials());
  if (!bWaitForDelegate)
  {
    FString Message = TEXT("The online subsystem couldn't login");
    OnActionInfoUpdated.Broadcast(Message);
  }

  FString Message = TEXT("Sending login request to native subsystem!");
  OnActionInfoUpdated.Broadcast(Message);
}

// Called every frame
void ASampleActor::Tick(float DeltaTime)
{
  Super::Tick(DeltaTime);

}
Google認証におけるplatform_tokenはAuthトークンです。
- その後、ウィジェットブループリントと合わせて実装・統合します。
Sample code testing (Unreal)
すべての設定、構成、および一部の実装が完了したら、アプリをコンパイルしてAndroidデバイスにデプロイします。その後、GoogleネイティブログインサービスからAGSにログインできます。
- お使いのPCでAndroidデバイスが検出されていることを確認し、ターミナルで以下のコマンドを実行します:
adb devices - プロジェクトをAndroid(ASTC)にパッケージ化します。
- Androidデバイスにアプリをインストールして実行します。
Upload the project to Google Play Console (Unreal)
指定したキーストアを使用して、UnrealプロジェクトをAAB形式でビルドします。まだUnrealプロジェクトへのGoogleログインの設定が完了していない場合は、空のプロジェクトでも構いません。ゲームを公開した後、テストの準備が整います。
まだゲームを公開していない場合、Googleアカウントでゲームをテストできるようにするため、テスターアカウントを追加する必要があります。Set up an open, closed, or internal test guideに従ってください。
In-game login integration (Unity)
AccelByte Unity SDK Google拡張機能を使用すると、Googleアカウントの機能をAGSと統合できます。この拡張機能はGitHubで見つけてダウンロードできます。拡張機能をインストールし、ゲームにGoogleログインを実装するには、GitHub上の拡張機能のインストールガイドに従ってください。
Upload project to Google Play Console (Unity)
指定したキーストアを使用して、UnityプロジェクトをAAB形式でビルドします。Delivering to Google Play guideに従ってください。まだUnityプロジェクトへのGoogleログインの設定が完了していない場合は、空のプロジェクトでも構いません。ゲームを公開した後、テストの準備が整います。
まだゲームを公開していない場合、Googleアカウントでゲームをテストできるようにするため、テスターアカウントを追加する必要があります。これを行うには、Set up an open, closed, or internal test guideに従ってください。