Get started with Extend Event Handler app template
Overview
This article walks you through how to set up an Extend Event Handler app. For this purpose, the Extend Event Handler app template is used. It listens to the AccelByte Gaming Services (AGS) UserLogin and UserThirdPartyLoggedIn events and grants in-game item when a user logs in.
Prerequisites
- C#
- Go
- Java
- Python
-
Windows 11 WSL2/Linux Ubuntu 22.04 or macOS 14+ with the following tools installed:
a. Bash
-
On Windows WSL2 or Linux Ubuntu:
bash --version

GNU bash, version 5.1.16(1)-release (x86_64-pc-linux-gnu)
... -
On macOS:
bash --version

GNU bash, version 3.2.57(1)-release (arm64-apple-darwin23)
...
b. Make
-
On Windows WSL2 or Linux Ubuntu:
To install from the Ubuntu repository, run
sudo apt update && sudo apt install make.make --version
GNU Make 4.3
... -
On macOS:
make --version

GNU Make 3.81
...
c. Docker (Docker Desktop 4.30+/Docker Engine v23.0+)
-
On Linux Ubuntu:
- To install from the Ubuntu repository, run
sudo apt update && sudo apt install docker.io docker-buildx docker-compose-v2. - Add your user to the
dockergroup:sudo usermod -aG docker $USER. - Log out and log back in to allow the changes to take effect.
- To install from the Ubuntu repository, run
-
On Windows or macOS:
Follow Docker's documentation on installing the Docker Desktop on Windows or macOS.
docker version

...
Server: Docker Desktop
   Engine:
   Version:          24.0.5
...
d. .NET 8 SDK
-
On Linux Ubuntu:
To install from the Ubuntu repository, run
sudo apt-get update && sudo apt-get install -y dotnet-sdk-8.0. -
On Windows or macOS:
Follow Microsoft's documentation for installing .NET on Windows or on macOS.
dotnet --version

8.0.119
e. Postman
- Use binary available here
- Use binary available here
-
-
Windows 11 WSL2/Linux Ubuntu 22.04 or macOS 14+ with the following tools installed:
a. Bash
-
On Windows WSL2 or Linux Ubuntu:
bash --version

GNU bash, version 5.1.16(1)-release (x86_64-pc-linux-gnu)
... -
On macOS:
bash --version

GNU bash, version 3.2.57(1)-release (arm64-apple-darwin23)
...
b. Make
-
On Windows WSL2 or Linux Ubuntu:
To install from the Ubuntu repository, run
sudo apt update && sudo apt install make.make --version
GNU Make 4.3
... -
On macOS:
make --version

GNU Make 3.81
...
c. Docker (Docker Desktop 4.30+/Docker Engine v23.0+)
-
On Linux Ubuntu:
- To install from the Ubuntu repository, run
sudo apt update && sudo apt install docker.io docker-buildx docker-compose-v2. - Add your user to the
dockergroup:sudo usermod -aG docker $USER. - Log out and log back in to allow the changes to take effect.
- To install from the Ubuntu repository, run
-
On Windows or macOS:
Follow Docker's documentation on installing the Docker Desktop on Windows or macOS.
docker version

...
Server: Docker Desktop
   Engine:
   Version:          24.0.5
...
d. Go v1.24
- Follow Go's installation guide.
go version

go version go1.24.0 ...
e. Postman
- Use binary available here
- Use binary available here
-
-
Windows 11 WSL2/Linux Ubuntu 22.04 or macOS 14+ with the following tools installed:
a. Bash
-
On Windows WSL2 or Linux Ubuntu:
bash --version

GNU bash, version 5.1.16(1)-release (x86_64-pc-linux-gnu)
... -
On macOS:
bash --version

GNU bash, version 3.2.57(1)-release (arm64-apple-darwin23)
...
b. Make
-
On Windows WSL2 or Linux Ubuntu:
To install from the Ubuntu repository, run
sudo apt update && sudo apt install make.make --version
GNU Make 4.3
... -
On macOS:
make --version

GNU Make 3.81
...
c. Docker (Docker Desktop 4.30+/Docker Engine v23.0+)
-
On Linux Ubuntu:
- To install from the Ubuntu repository, run
sudo apt update && sudo apt install docker.io docker-buildx docker-compose-v2. - Add your user to the
dockergroup:sudo usermod -aG docker $USER. - Log out and log back in to allow the changes to take effect.
- To install from the Ubuntu repository, run
-
On Windows or macOS:
Follow Docker's documentation on installing the Docker Desktop on Windows or macOS.
docker version

...
Server: Docker Desktop
   Engine:
   Version:          24.0.5
...
d. JDK 17
-
On Linux Ubuntu:
To install from the Ubuntu repository, run:
sudo apt update && sudo apt install openjdk-17-jdk. -
On Windows or macOS:
Follow Microsoft's documentation for installing the Microsoft Build for OpenJDK.
java --version

openjdk 17.0.10 2024-01-16
...
e. Postman
- Use binary available here
- Use binary available here
-
-
Windows 11 WSL2/Linux Ubuntu 22.04 or macOS 14+ with the following tools installed:
a. Bash
-
On Windows WSL2 or Linux Ubuntu:
bash --version

GNU bash, version 5.1.16(1)-release (x86_64-pc-linux-gnu)
... -
On macOS:
bash --version

GNU bash, version 3.2.57(1)-release (arm64-apple-darwin23)
...
b. Make
-
On Windows WSL2 or Linux Ubuntu:
To install from the Ubuntu repository, run
sudo apt update && sudo apt install make.make --version
GNU Make 4.3
... -
On macOS:
make --version

GNU Make 3.81
...
c. Docker (Docker Desktop 4.30+/Docker Engine v23.0+)
-
On Linux Ubuntu:
- To install from the Ubuntu repository, run
sudo apt update && sudo apt install docker.io docker-buildx docker-compose-v2. - Add your user to the
dockergroup:sudo usermod -aG docker $USER. - Log out and log back in to allow the changes to take effect.
- To install from the Ubuntu repository, run
-
On Windows or macOS:
Follow Docker's documentation on installing the Docker Desktop on Windows or macOS.
docker version

...
Server: Docker Desktop
   Engine:
   Version:          24.0.5
...
d. Python 3.10
-
On Linux Ubuntu:
To install from the Ubuntu repository, run
sudo apt update && sudo apt install python3 python3-venv. -
On Windows or macOS:
Use the available installer here.
python3 --version

Python 3.10.12
e. Postman
- Use binary available here
- Use the available binary from extend-helper-cli.
-
-
Access to the AGS Admin Portal environment.
- Base URL:
<your environment's domain URL>- Example for AGS Shared Cloud customer:
https://spaceshooter.prod.gamingservices.accelbyte.io - Example for AGS Private Cloud customer:
https://dev.customer.accelbyte.io
- Example for AGS Shared Cloud customer:
- Create a game namespace if you don't have one yet. Take note of the namespace ID.
- Create an OAuth Client with
confidentialclient type containing the following permissions:- For AGS Private Cloud customers:
ADMIN:NAMESPACE:{namespace}:USER:*:FULFILLMENT [CREATE]
- For AGS Shared Cloud customers:
- Platform Store -> Fulfillment (Create)
Keep the
Client IDandClient Secret.
- Platform Store -> Fulfillment (Create)
Keep the
- For AGS Private Cloud customers:
- Base URL:
-
Set up the store and the in-game item to grant.
-
Create and publish a new store in your namespace. You can also use your existing store if any. For more details about creating and publishing stores, see Store and Entitlements.
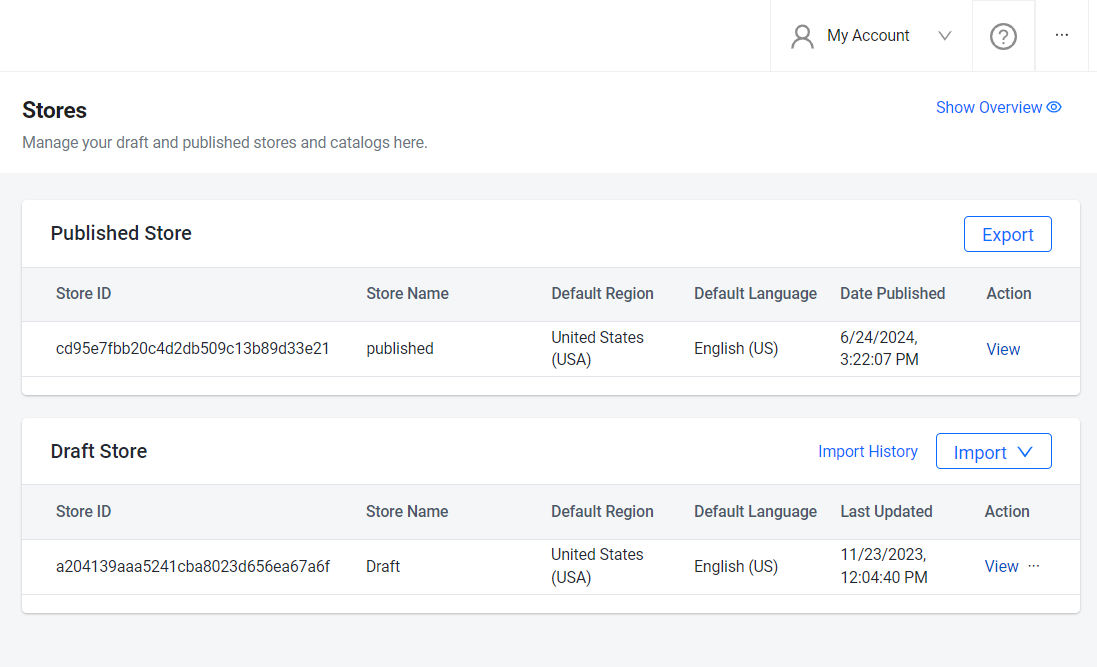
-
After you have created and published your store, take a note of the in-game
Item IDin the published store you want to grant when a user logs in.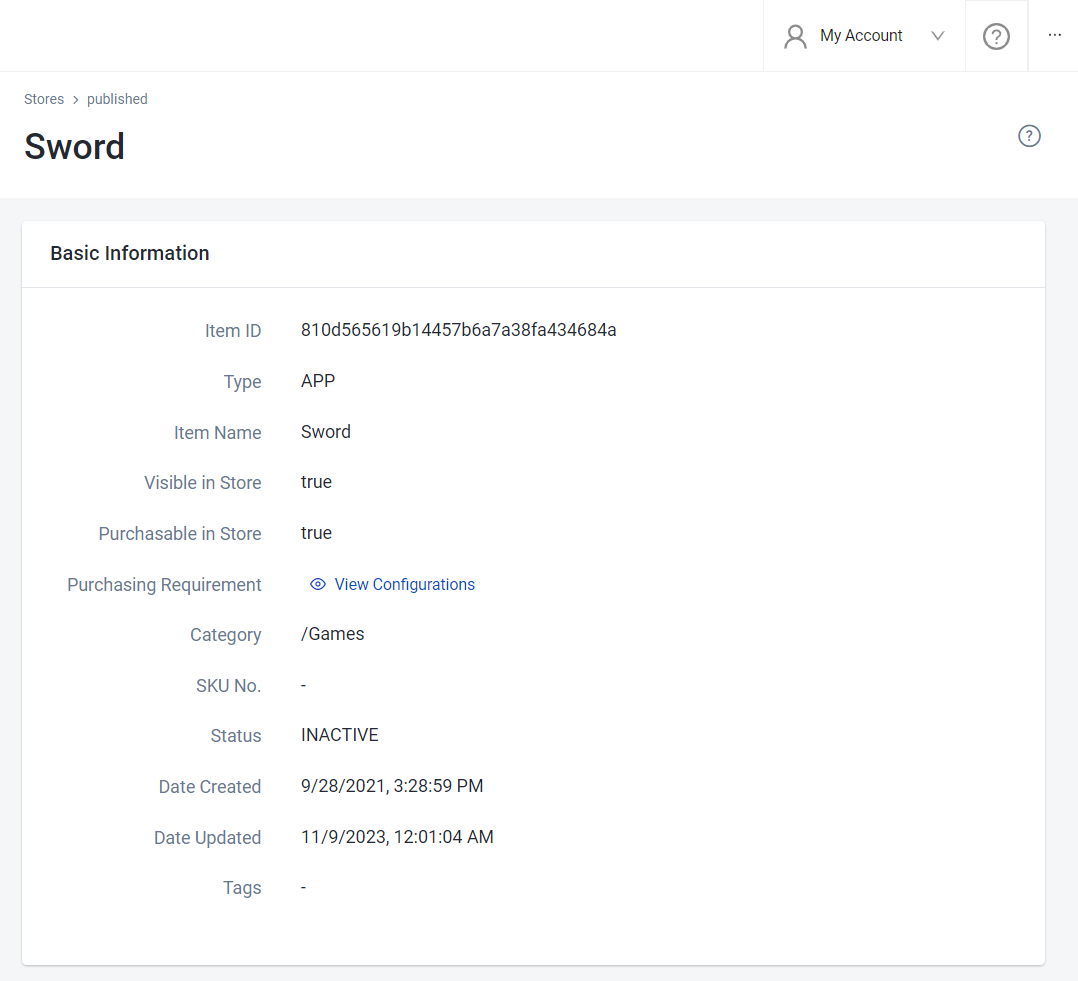
-
Clone the app template
- C#
- Go
- Java
- Python
git clone https://github.com/AccelByte/extend-event-handler-csharp.git
git clone https://github.com/AccelByte/extend-event-handler-go.git
git clone https://github.com/AccelByte/extend-event-handler-java.git
git clone https://github.com/AccelByte/extend-event-handler-python.git
Set up, run, and test an Extend app
This section covers how to set up, build, run, and then test an Extend app.
Set up the Extend app
To be able to run this app, follow these setup steps:
-
Create a docker compose
.envfile by copying the content of the.env.templatefile.noteThe host OS environment variables have higher precedence compared to the
.envfile variables. If the variables in the.envfile do not seem to take effect properly, check if there are host OS environment variables with the same name. For more details, refer to Docker's documentation about the docker compose environment variables precedence. -
Fill in the required environment variables in the
.envfile as shown below:.AB_BASE_URL=https://test.accelbyte.io # Base URL of AGS environment
AB_CLIENT_ID='xxxxxxxxxx' # Client ID from the Prerequisites section
AB_CLIENT_SECRET='xxxxxxxxxx' # Client Secret from the Prerequisites section
AB_NAMESPACE='xxxxxxxxxx' # Namespace ID from the Prerequisites section
ITEM_ID_TO_GRANT='xxxxxxxxxx' # In-game item id from a published store we noted previously
Build the Extend app
To build this app, run the following command:
make build
Run the Extend app
To (build and) run this app in a container, run the following command:
docker compose up --build
Test the Extend app
This app can be tested locally using Postman.
-
Run this app by using the command below.
docker compose up --build -
Open
Postman, create a newgRPC request, and enterlocalhost:6565as the URL.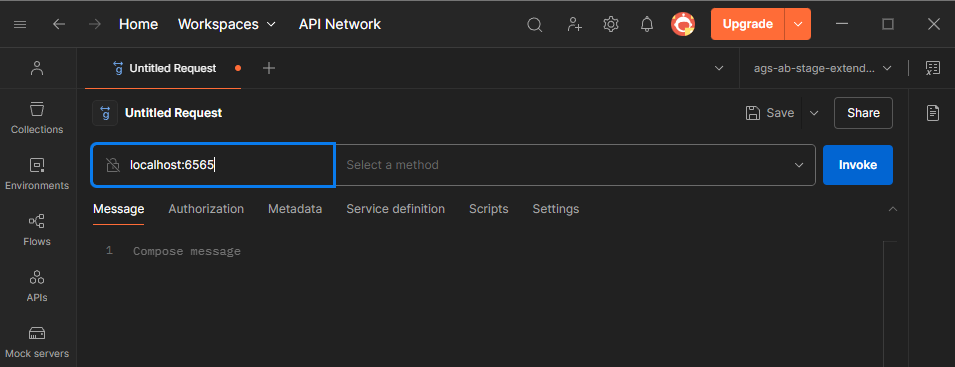
-
Since we are interested in UserLogin event, select
UserAuthenticationUserLoggedInService/OnMessagemethod.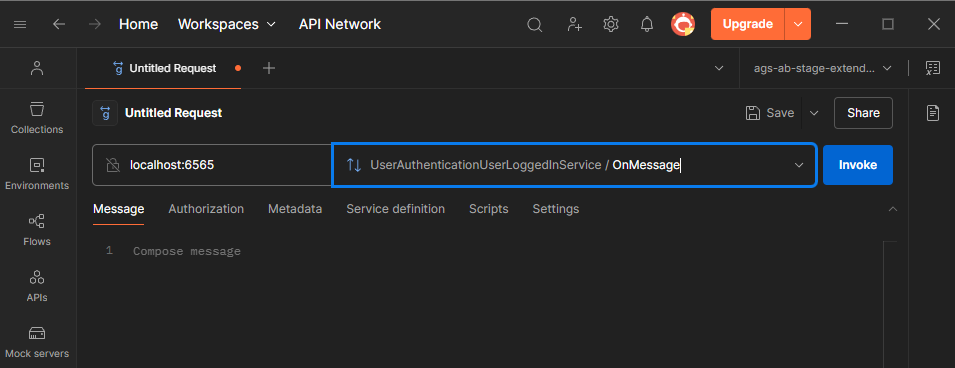
-
Send a UserLogin event to the gRPC server by copying and pasting the sample Kafka event JSON below, replace at least
namespaceanduserIdwith valid values, and then clickInvoke.{
"payload": {
"user_account": {
"user_id": "string",
"email_address": "string",
"country": "string",
"namespace": "string"
},
"user_authentication": {
"platform_id": "string",
"refresh": true
}
},
"id": "string",
"version": 0,
"name": "string",
"namespace": "string",
"parent_namespace": "string",
"timestamp": "2019-08-24T14:15:22Z",
"client_id": "string",
"user_id": "string",
"trace_id": "string",
"session_id": "string"
} -
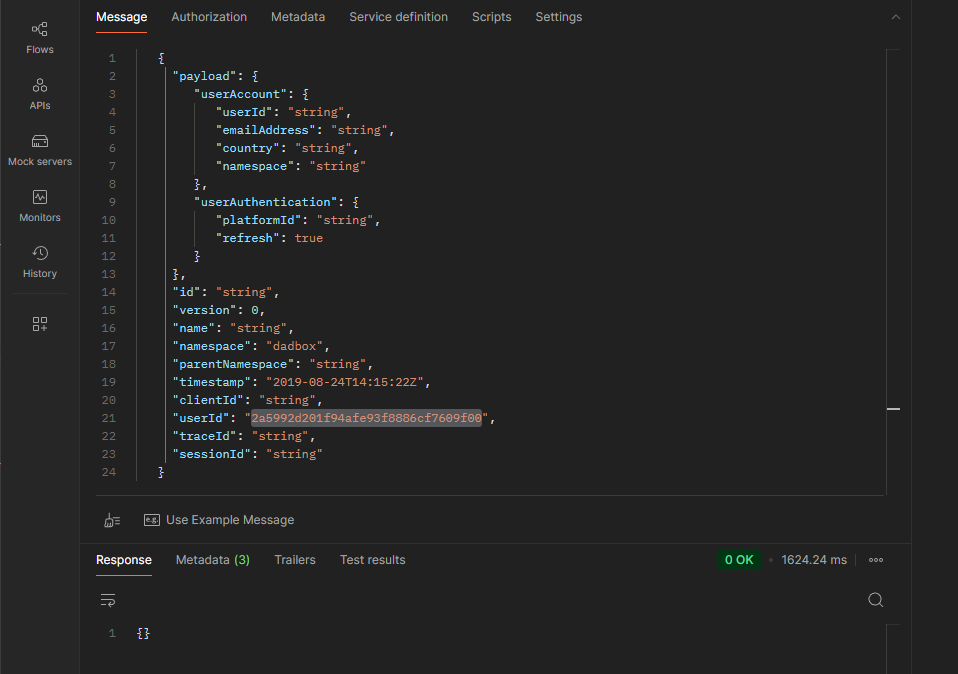
If successful, the response will appear as shown below, and you will also be able to see the in-game item granted to the user you are using for this test.
-
To do the same with UserThirdPartyLoggedIn event, select
UserAuthenticationUserThirdPartyLoggedInService/OnMessageand use the sample Kafka event JSON below. Valid values for at leastnamespaceanduserIdare also required.{
"payload": {
"userAccount": {
"userId": "string",
"emailAddress": "string",
"userName": "string",
"country": "string",
"namespace": "string",
"platformId": "string",
"displayName": "string"
},
"userAuthentication": {
"platformId": "string",
"refresh": true,
"platformUserId": "string",
"simultaneousPlatformId": "string",
"simultaneousPlatformUserId": "string"
},
"loginLocation": {
"country": "string",
"state": "string",
"city": "string"
}
},
"id": "string",
"version": 0,
"name": "string",
"namespace": "string",
"parentNamespace": "string",
"timestamp": "2019-08-24T14:15:22Z",
"clientId": "string",
"userId": "string",
"traceId": "string",
"sessionId": "string"
}
Deploy in AGS
Create the Extend app
-
In the AGS Admin Portal, go to the
namespacewhere wish to create your Extend Event Handler app. -
On the sidebar menu, hover over Extend and click Event Handler. Click Create New to create a new Extend Event Handler app.
-
On the app creation page, type in the App Name and the Description. You can adjust the resources setting if necessary. Then, click Create.
Upload the Extend app
-
Set up an IAM client for extend-helper-cli. Create an IAM client with client type
confidentialand assign the required permissions listed below. Keep a copy of theClient IDandClient Secret.- For AGS Private Cloud customers:
ADMIN:NAMESPACE:{namespace}:EXTEND:REPOCREDENTIALS[READ]ADMIN:NAMESPACE:{namespace}:EXTEND:APP[READ]
- For AGS Shared Cloud customers:
- Extend > Extend app image repository access (Read)
- Extend > App (Read)
- For AGS Private Cloud customers:
-
Export the required environment variables, then build and upload the Extend app container image to AGS using extend-helper-cli.
- Ensure
<project-dir>points to your Extend app project directory - The values for
<namespace>and<app-name>can be found on theApp Detailpage of your Extend app - Use an appropriate image tag e.g.
v0.0.1
- Linux
- Windows (WSL2)
- macOS
# Your AGS environment base URL, e.g., https://spaceshooter.prod.gamingservices.accelbyte.io, https://dev.accelbyte.io, etc.
export AB_BASE_URL='https://xxxxxxxxxx'
# Client ID of OAuth Client for extend-helper-cli (from step 1)
export AB_CLIENT_ID='xxxxxxxxxx'
# Client Secret of OAuth Client for extend-helper-cli (from step 1)
export AB_CLIENT_SECRET='xxxxxxxxxx'

./extend-helper-cli-linux_amd64 image-upload --login --work-dir <project-dir> --namespace <namespace> --app <app-name> --image-tag v0.0.1
# Your AGS environment base URL, e.g., https://spaceshooter.prod.gamingservices.accelbyte.io, https://dev.accelbyte.io, etc.
export AB_BASE_URL='https://xxxxxxxxxx'
# Client ID of OAuth Client for extend-helper-cli (from step 1)
export AB_CLIENT_ID='xxxxxxxxxx'
# Client Secret of OAuth Client for extend-helper-cli (from step 1)
export AB_CLIENT_SECRET='xxxxxxxxxx'
./extend-helper-cli-linux_amd64 image-upload --login --work-dir <project-dir> --namespace <namespace> --app <app-name> --image-tag v0.0.1# Your AGS environment base URL, e.g., https://spaceshooter.prod.gamingservices.accelbyte.io, https://dev.accelbyte.io, etc.
export AB_BASE_URL='https://xxxxxxxxxx'
# Client ID of OAuth Client for extend-helper-cli (from step 1)
export AB_CLIENT_ID='xxxxxxxxxx'
# Client Secret of OAuth Client for extend-helper-cli (from step 1)
export AB_CLIENT_SECRET='xxxxxxxxxx'
./extend-helper-cli-darwin_amd64 image-upload --login --work-dir <project-dir> --namespace <namespace> --app <app-name> --image-tag v0.0.1important- We recommend running the above commands in a separate terminal and from a different working directory than the Extend app project. This helps prevent the extend-helper-cli from inadvertently using environment variables intended for the Extend app.
- If you encounter the following error, see Troubleshooting: Docker login fails for resolution steps.
Error saving credentials: error storing credentials - err: exit status 1, out: `error storing credentials - err: exit status 1, out: `The stub received bad data.`
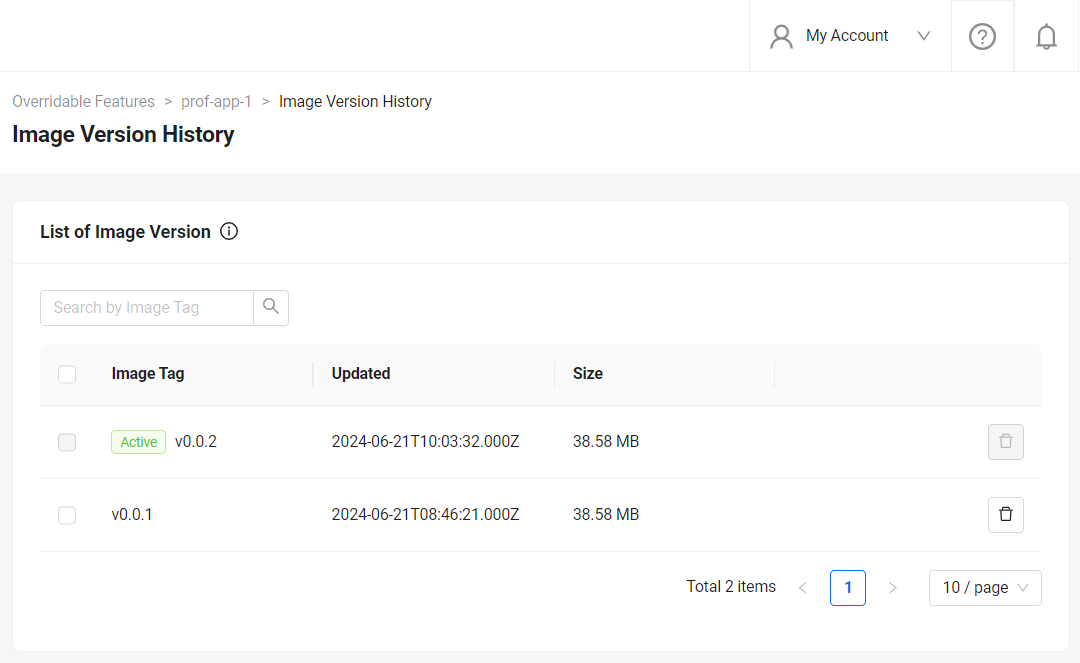
If your images are successfully uploaded, you will see an image with version v0.0.1 on the Image Version History page.
- Ensure
Configure the Extend app
Before deploying the Extend app that you uploaded, you must configure the environment variables required by the Extend app. In the app's details page, set the following environment variables with the same values that you used to run and test the Extend app locally.
AB_CLIENT_IDAB_CLIENT_SECRETITEM_ID_TO_GRANT
Deploy the Extend app
To deploy the Extend app, click Deploy Latest Image. Wait until the app status updates to RUNNING, which indicates that your Extend app is successfully deployed.
Test the deployed Extend app
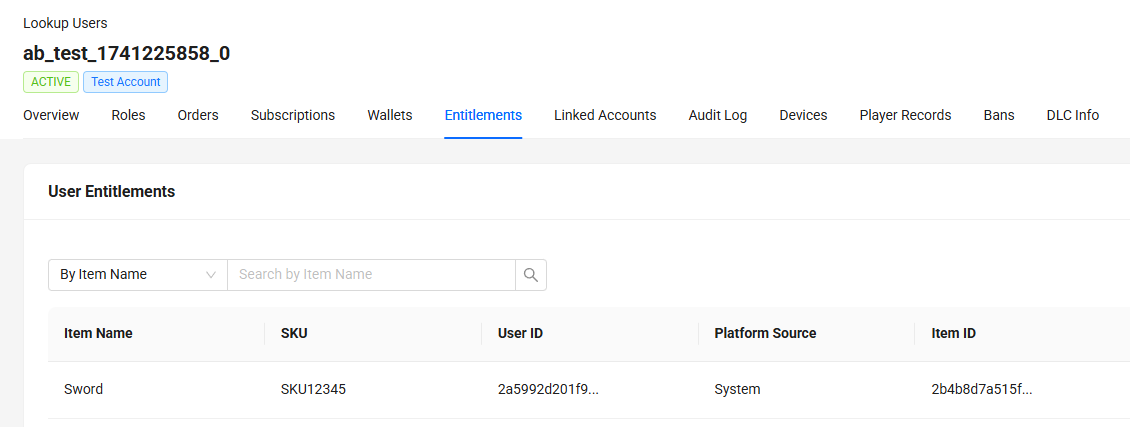
Create a new user in your namespace and login using that user. Check if the Item ID has been granted in that user's entitlement page in Admin Portal.
Next steps
- Before starting your app development, we recommend checking out the Manage message processing and idempotency article to get a deeper understanding on how you can use the Event Handler app to handle message processing and idempotency.
- Proceed to modify this template project and create your own event handler. See Listen and handle different AGS events.