OIDC をアイデンティティプロバイダーとして設定する
注釈:本資料はAI技術を用いて翻訳されています。
概要
本ガイドでは、OpenID Connect (OIDC) をAccelByte Gaming Services (AGS) と統合する方法について説明します。AGSでは、Authorization Code、ID Token、Access Tokenの3つのOIDC認証タイプをサポートしています。
ゲームによっては、本ガイドに記載されていない追加のアイデンティティプロバイダー機能を設定する必要がある場合があります。OIDCサービスの設定に関する詳細については、ご利用のアイデンティティプロバイダーのドキュメントをご参照ください。
本ガイドは一般公開用であり、機密保持の観点から一部の情報が省略されています。完全な機密ガイドを先にご確認されることをお勧めします。機密ガイドのコピーをご希望の場合は、AccelByteテクニカルプロデューサーまでお問い合わせください。
目標
- AccelByteのGame SDKを使用して、ゲームでOIDC認証を有効にする
- AGSのPlayer Portalを使用して、パブリッシャーウェブサイトでOIDC認証を有効にする
前提条件
ウェブログイン統合
- OIDCをサポートするアイデンティティプロバイダー
- 認証設定と権限管理のためのAccelByte Admin Portalアカウント
- Player PortalおよびLauncher用のパブリッシャーNamespace
- Player Portal
ウェブログイン統合は現在AGS Shared Cloudでは利用できず、AGS Private Cloudでのみサポートされています。
ゲーム内ログイン統合
- OIDCをサポートするアイデンティティプロバイダー
- 認証設定と権限管理のためのAGS Admin Portalアカウント
- ゲームNamespace
- AccelByteのGame SDKをインポート済みのUnityまたはUnrealゲームプロジェクト
- 最新バージョンのAccelByte Unity SDKまたはUnreal SDK
- AGS Identity and Access Management (IAM) Clientsの基礎知識
Authorization Codeタイプ
Authorization Codeタイプは、標準のAuthorization Code Flowを使用した認証と、JSON Web Key Set (JWKS) を介したIDトークンの検証の両方をサポートします。Authorization CodeはWebフローベースの認証方式です。システムがアイデンティティプロバイダーのログインページにリダイレクトし、認証後にアクセス権を持ってAccelByteポータルに戻ります。
IdPの設定
以下の手順に従って、ゲームでアイデンティティプロバイダー (IdP) のOIDCログインを設定します。これにより、プレイヤーは自身のアカウントを使用してAdmin Portal、Player Portal、Launcherにサインインできるようになります。
ここでは、Okta OIDCを例としてOIDC Player PortalおよびAdmin Portalのログイン設定を説明します。Authorization CodeタイプでアイデンティティプロバイダーのOIDCをAGSと統合するには、以下の項目が必要です:
- JWKS URL
- Issuer
- Client ID
- Client Secret
- Authorization Request URL
- Token Endpoint URL
本ガイドではOktaをアイデンティティプロバイダーの例として使用しますが、OIDCをサポートする他のIdPも利用可能です。
Oktaアプリケーションの作成
OktaのCreate OIDC app integrationsガイドに従って、OktaアカウントでOktaアプリケーションを作成します。
この手順で生成したクライアントIDとクライアントシークレットは控えておいてください。Webログインの設定時に必要になります。
Okta OIDC設定の取得
以下のURLを使用してアプリのopenid-configurationを開きます: https://<YOUR_OKTA_URL>.okta.com/oauth2/default/.well-known/openid-configuration
OIDC Authorization Codeタイプのログインを設定するには、以下の項目をコピーする必要があります:
- JWKS URL
- Issuer
- Authorization Request URL
- Token Endpoint URL
Webログインの設定
Player PortalおよびAdmin PortalでOIDCログインを設定し、プレイヤーがIdPアカウントを使用してPlayer Portalにサインインできるようにするには、以下の手順に従います:
-
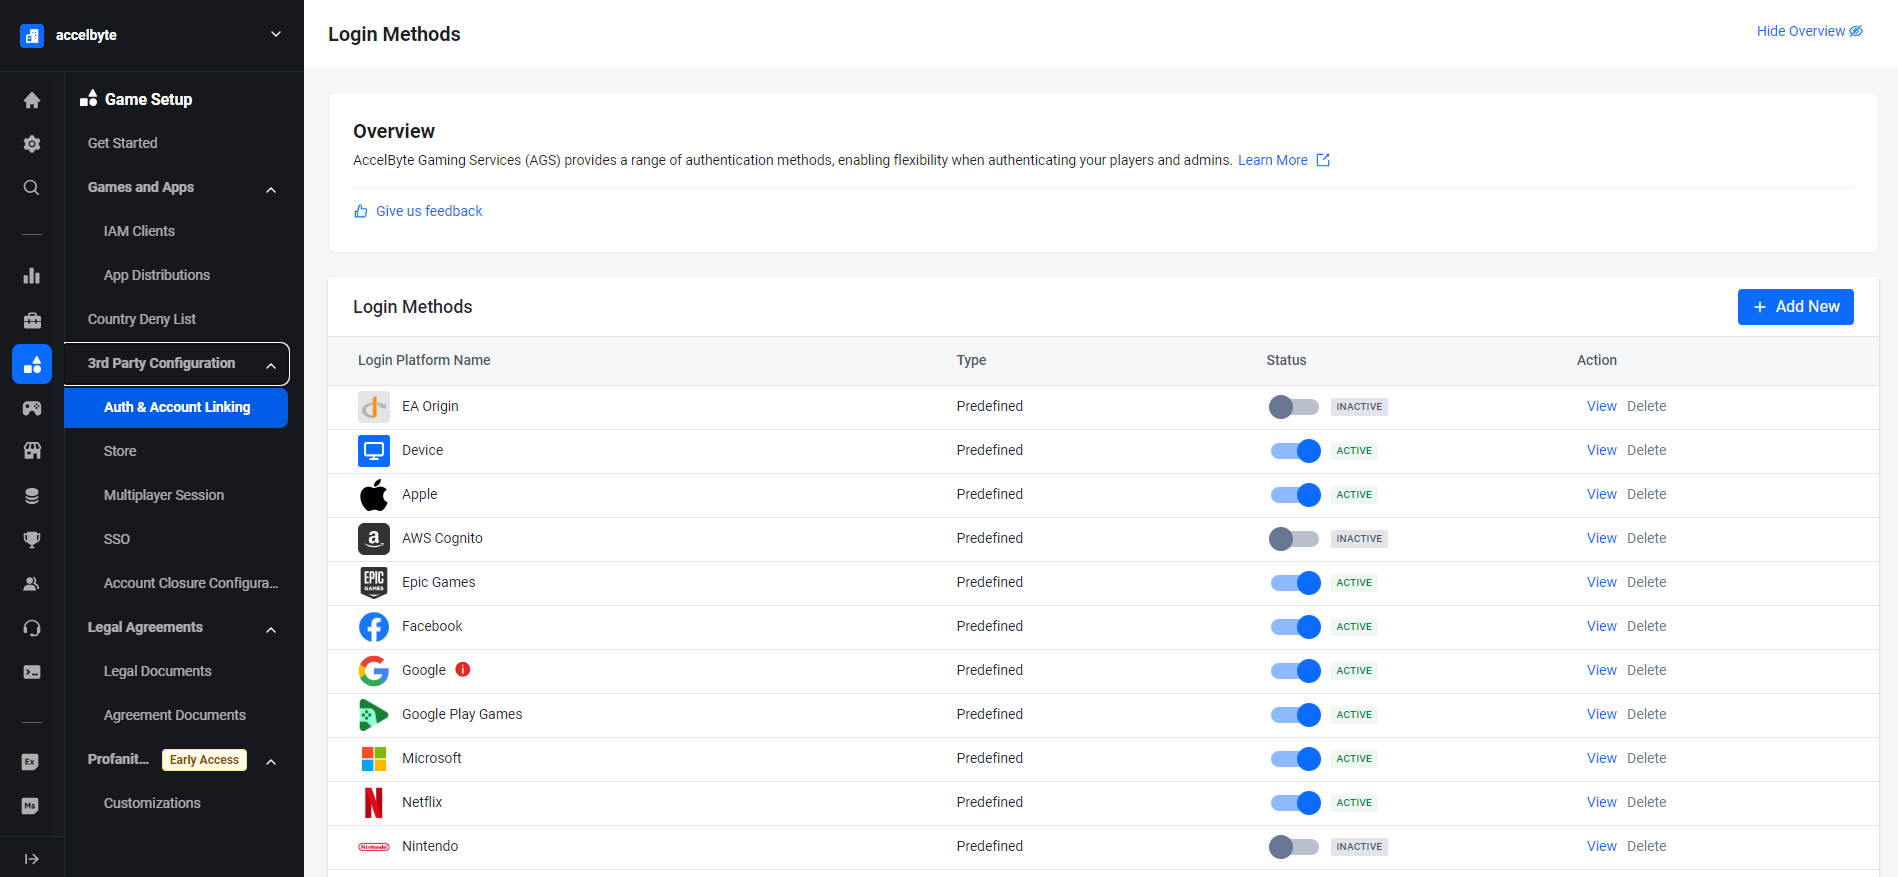
AGS Admin portalで、パブリッシャーnamespaceに移動します。
-
サイドバーメニューで、Game Setup > 3rd Party Configuration > Auth & Account Linkingに移動します。
-
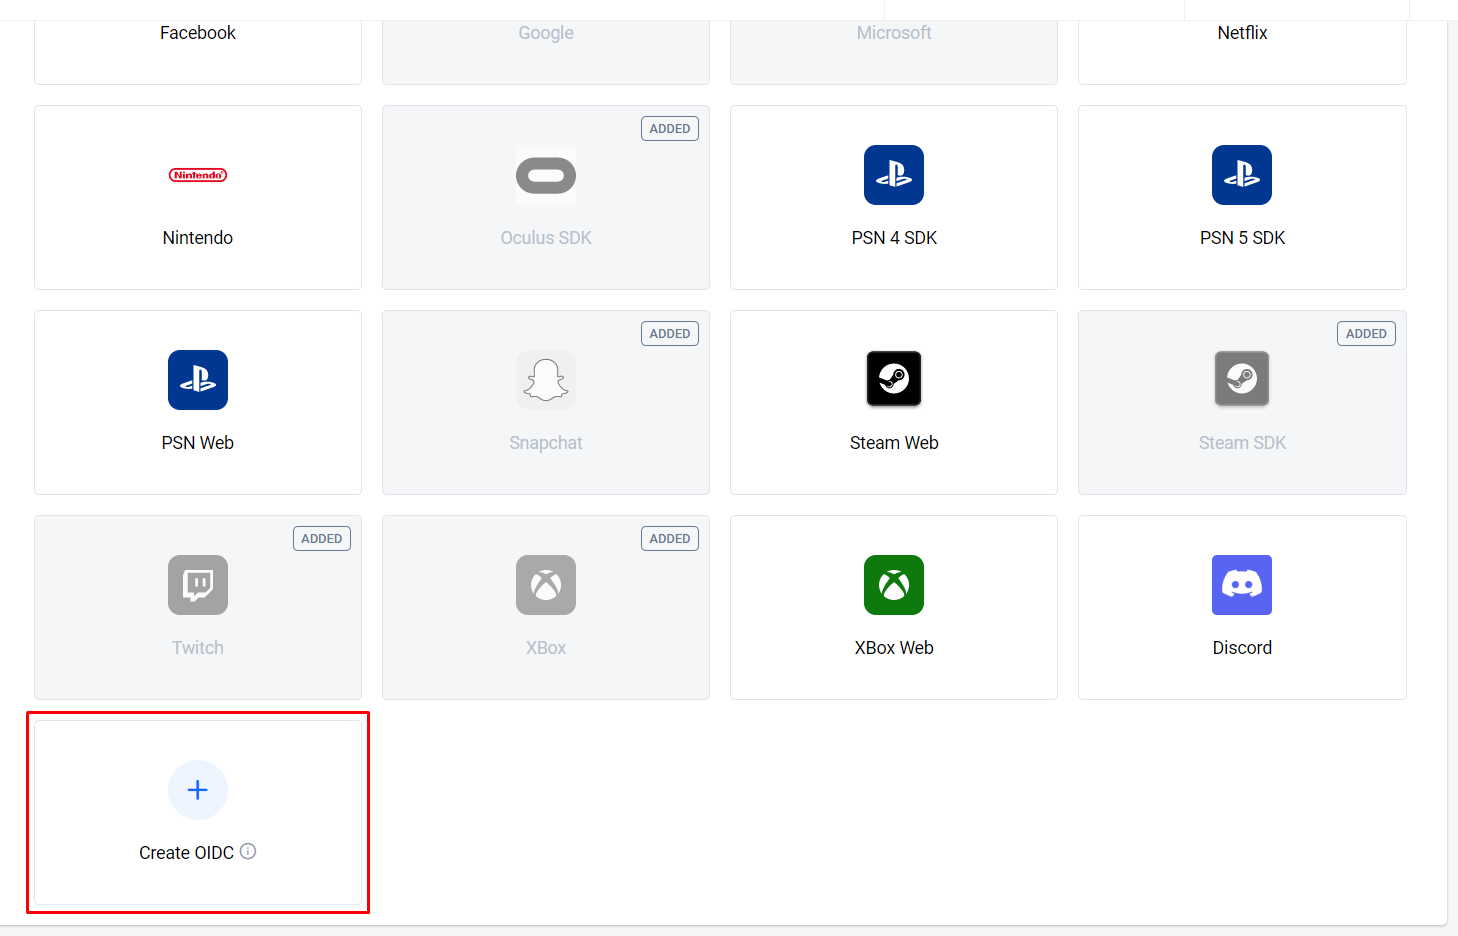
Login Methodsページで、+ Add Newボタンをクリックします。
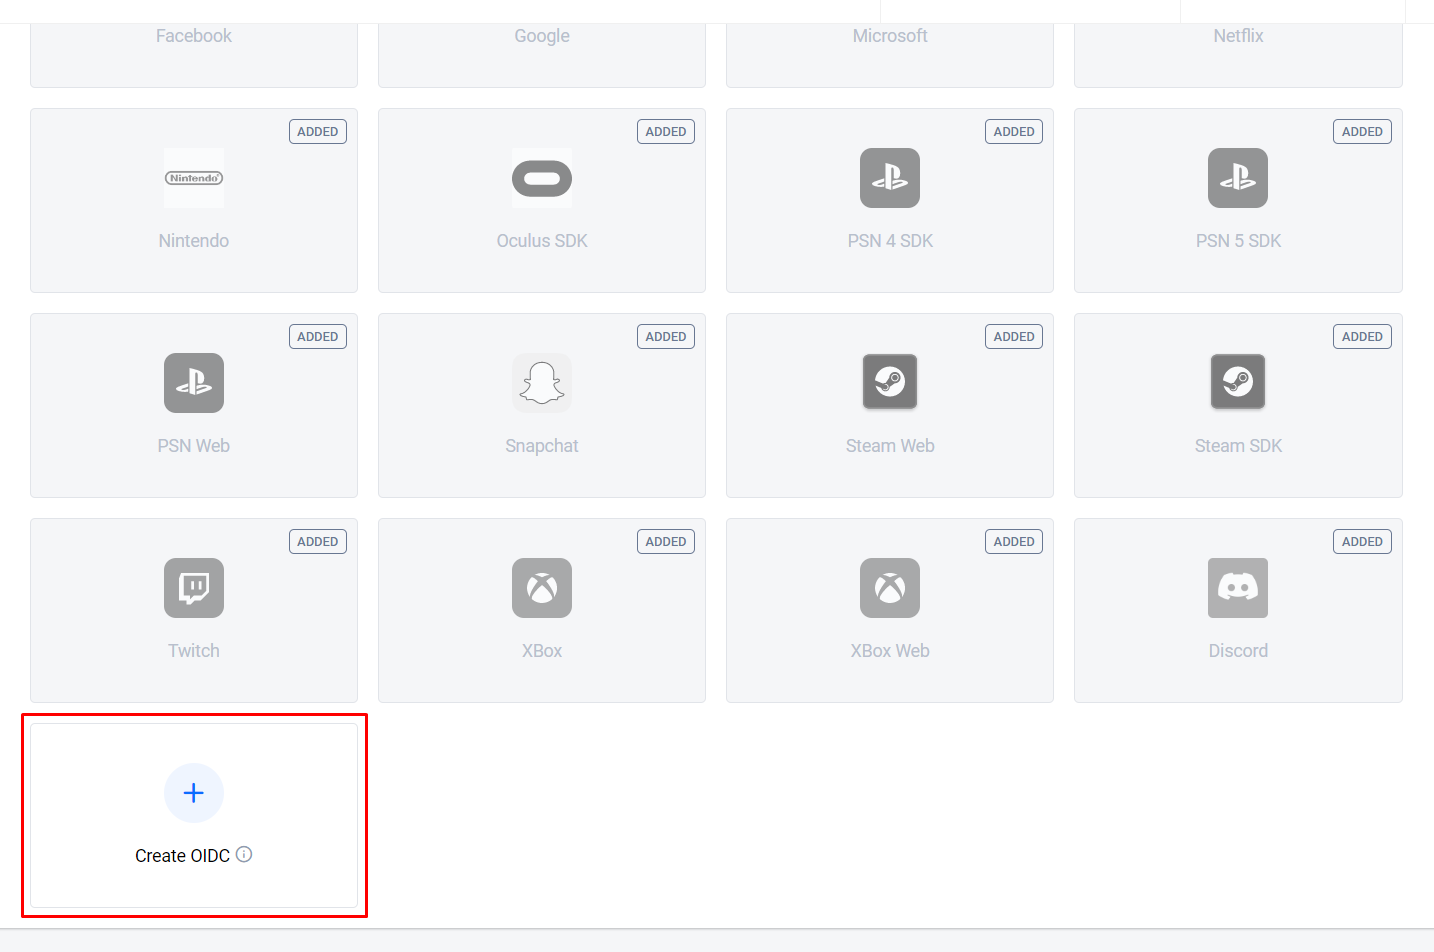
-
ログイン方法オプションの下部で、+ Create OIDCをクリックします。
-
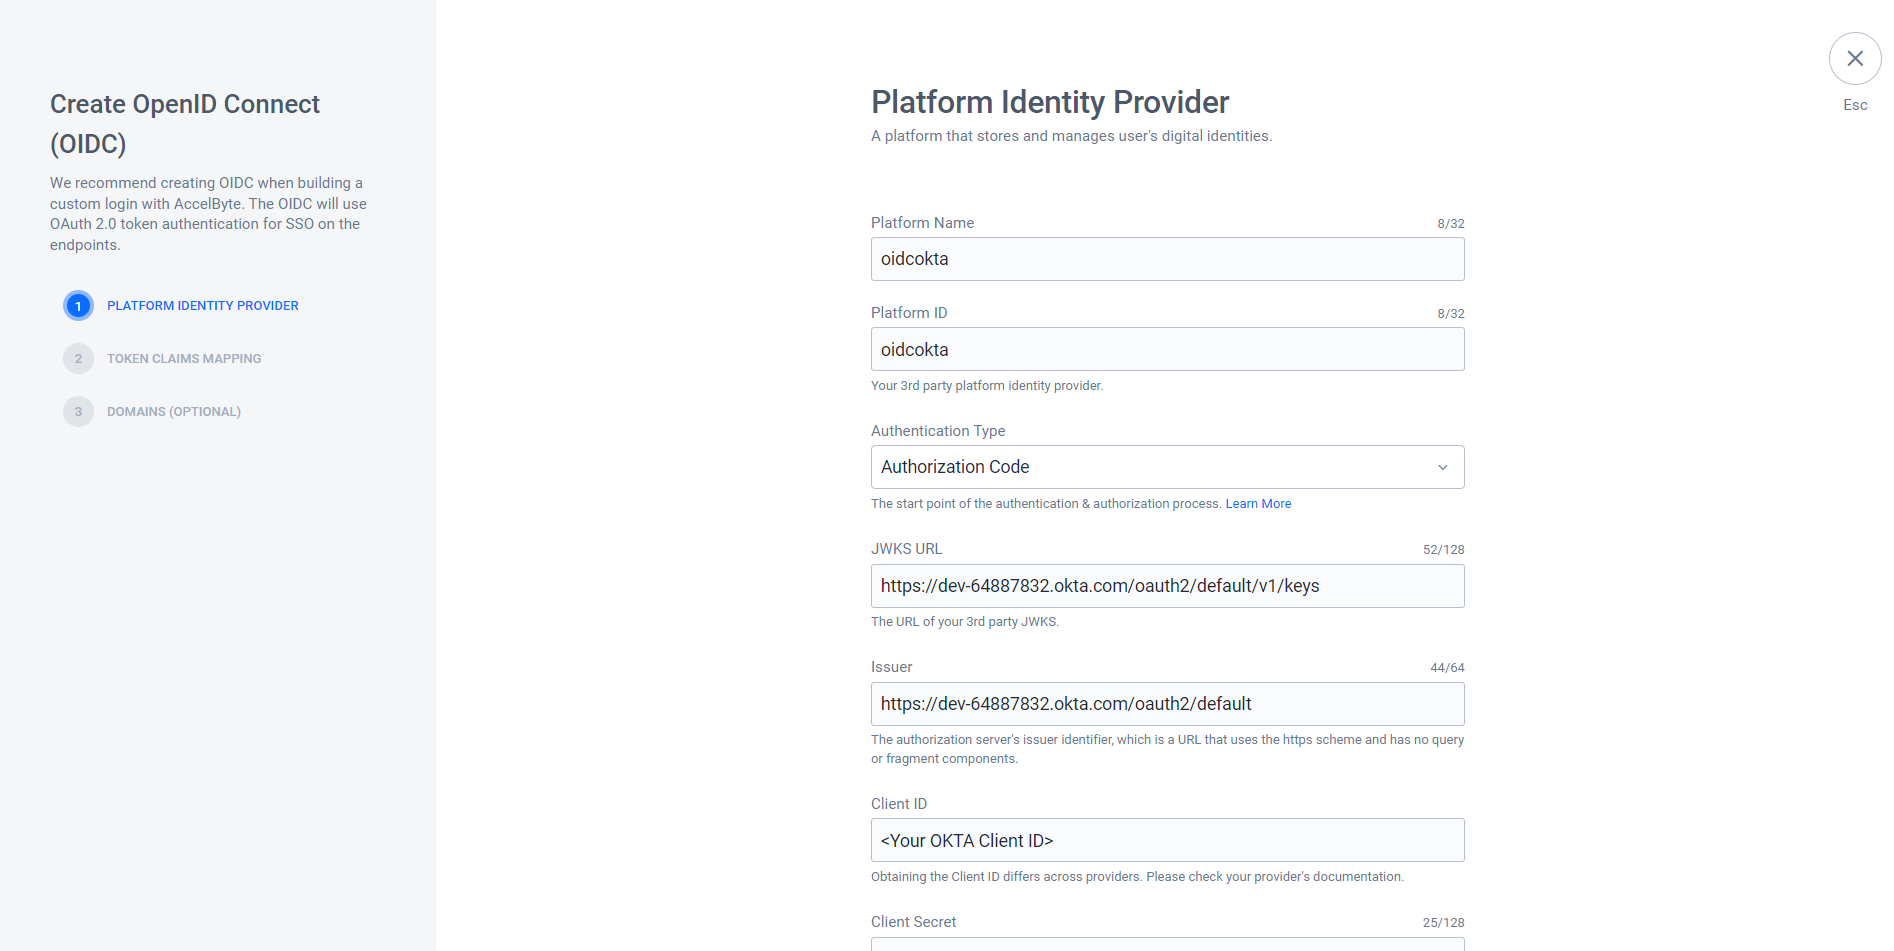
Create OpenID Connect (OIDC)フォームが表示されます。必要な情報を入力します。この例ではAuthorization Codeタイプを使用します。
- Platform Name: 分かりやすい名前を入力します。例:
oidcokta - Platform ID: Oktaアプリで
Valid RedirectURIとして使用するプラットフォームIDを入力します。例:oidcokta - Authentication type: Authorization Codeを選択します
- JWKS URL: Okta
openid設定URLのjwks_urlを使用します - Issuer: Okta
openid設定URLのissuerを使用します - Client ID: Oktaアプリケーション作成時に取得したOkta Client IDを使用します
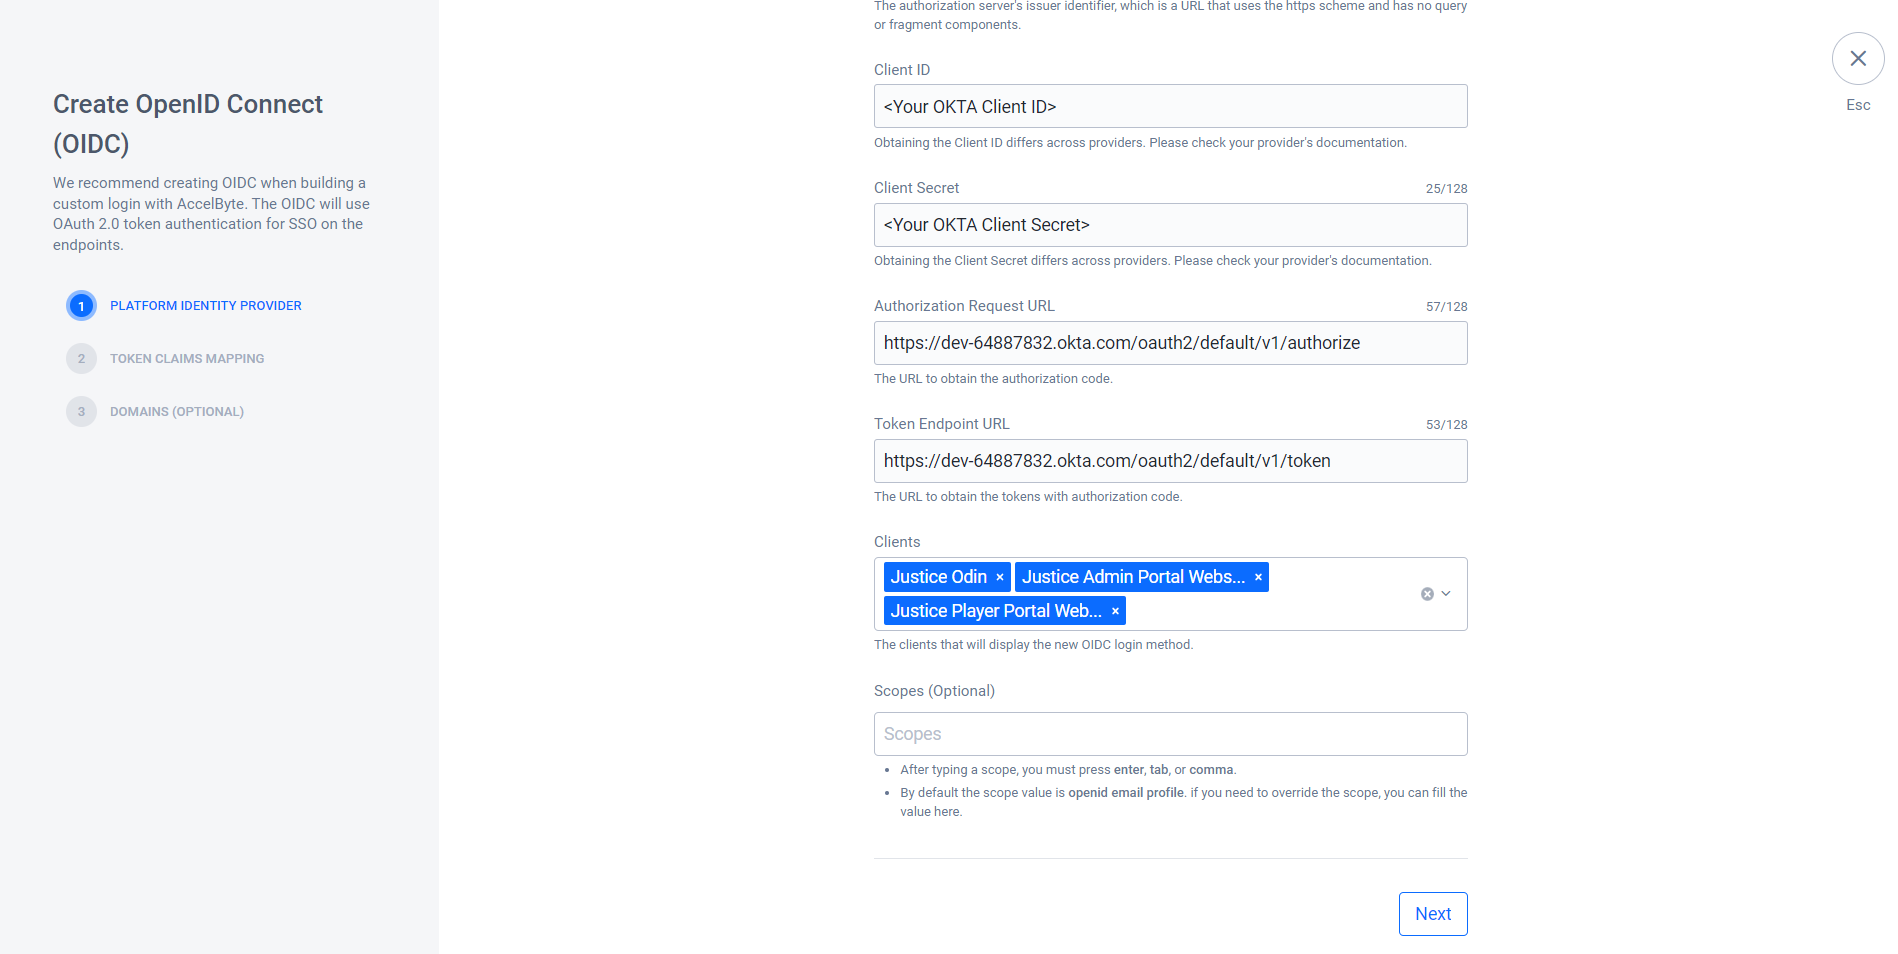
- Client Secret: Oktaアプリケーション作成時に取得したOkta Client Secretを使用します
- Authorization Request URL: Okta
openid設定URLのauthorization_endpointを使用します - Token Endpoint URL: Okta
openid設定URLのtoken_endpointを使用します - Clients: 用途に応じて、Player Portal、Launcher、Admin Portal、ゲーム内ログインでOIDCログインを使用するクライアントを設定できます。例えば、OIDCログインをPlayer PortalとAdmin Portalに統合する場合は、Player Portal Website IAM ClientとAdmin Portal Website IAM Clientをここに追加します
- Scopes (Optional): デフォルトではopenid email profileに設定されています
- Platform Name: 分かりやすい名前を入力します。例:
-
Nextをクリックします。
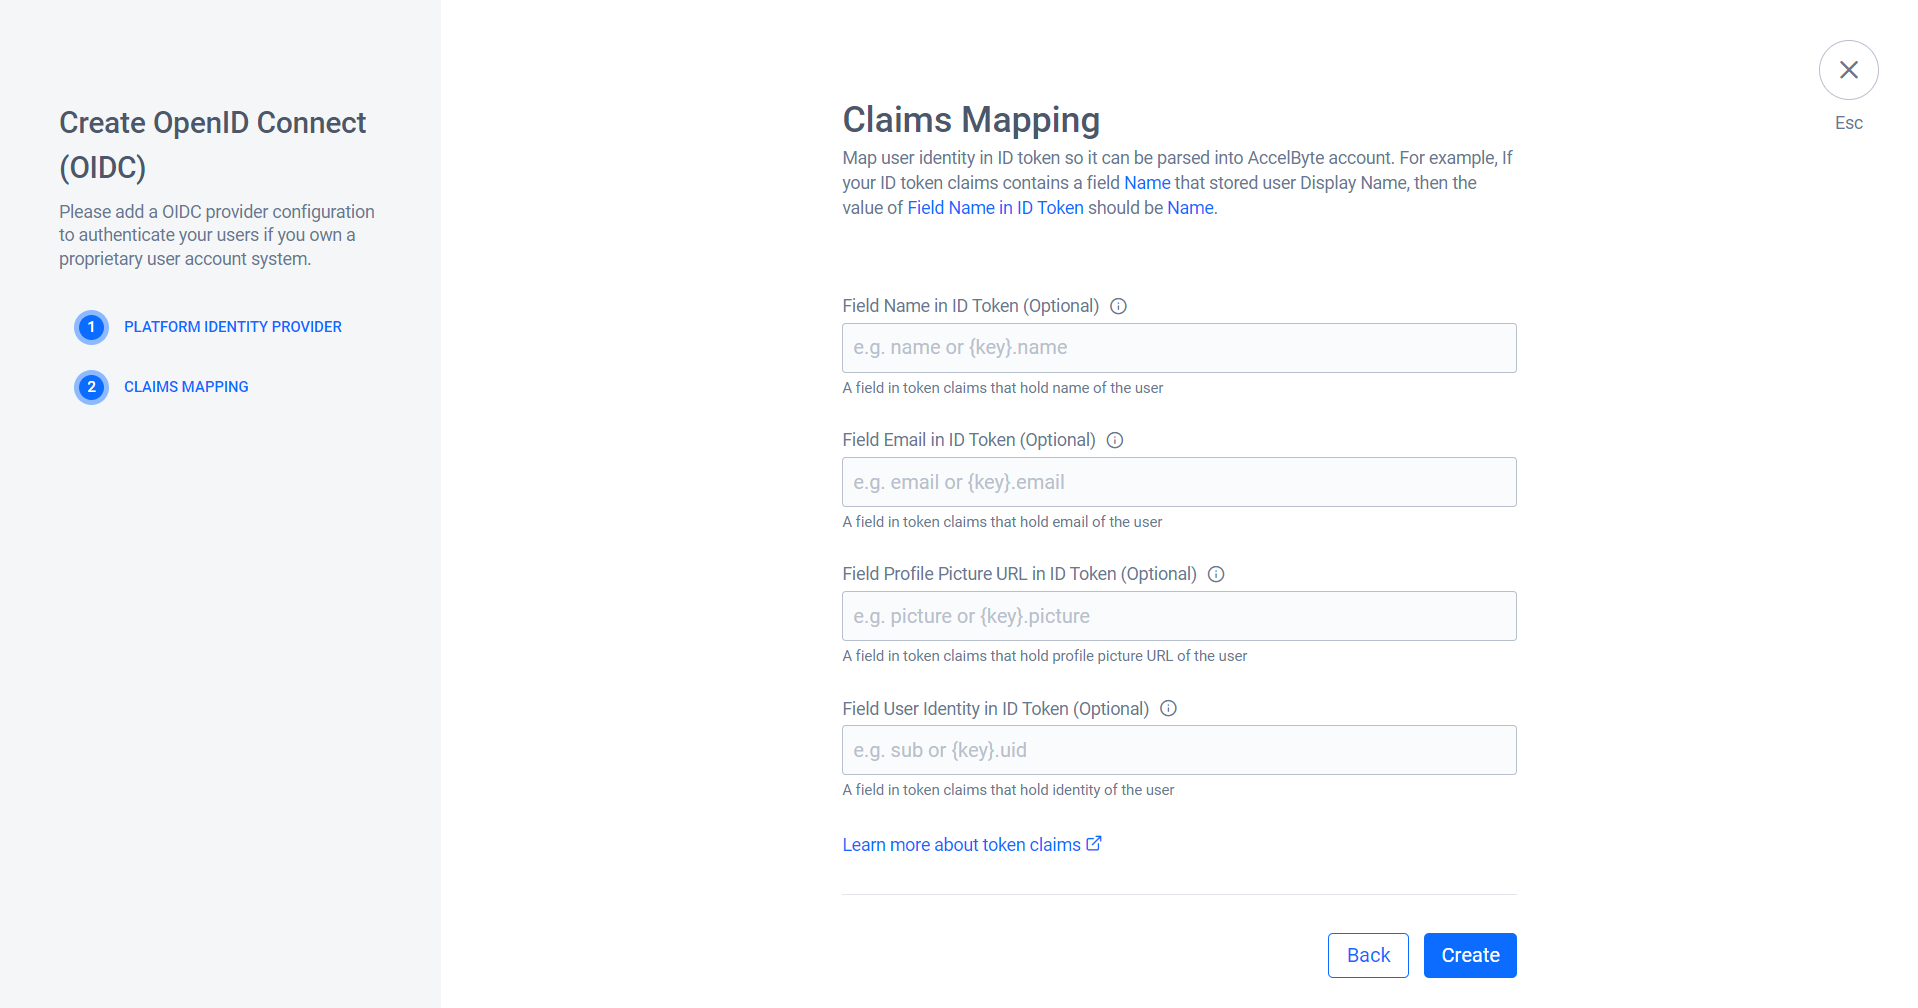
-
Token Claims Mappingフォームで、IDトークン内のユーザーIDをマッピングし、システムがAccelByteアカウントに解析できるようにします。
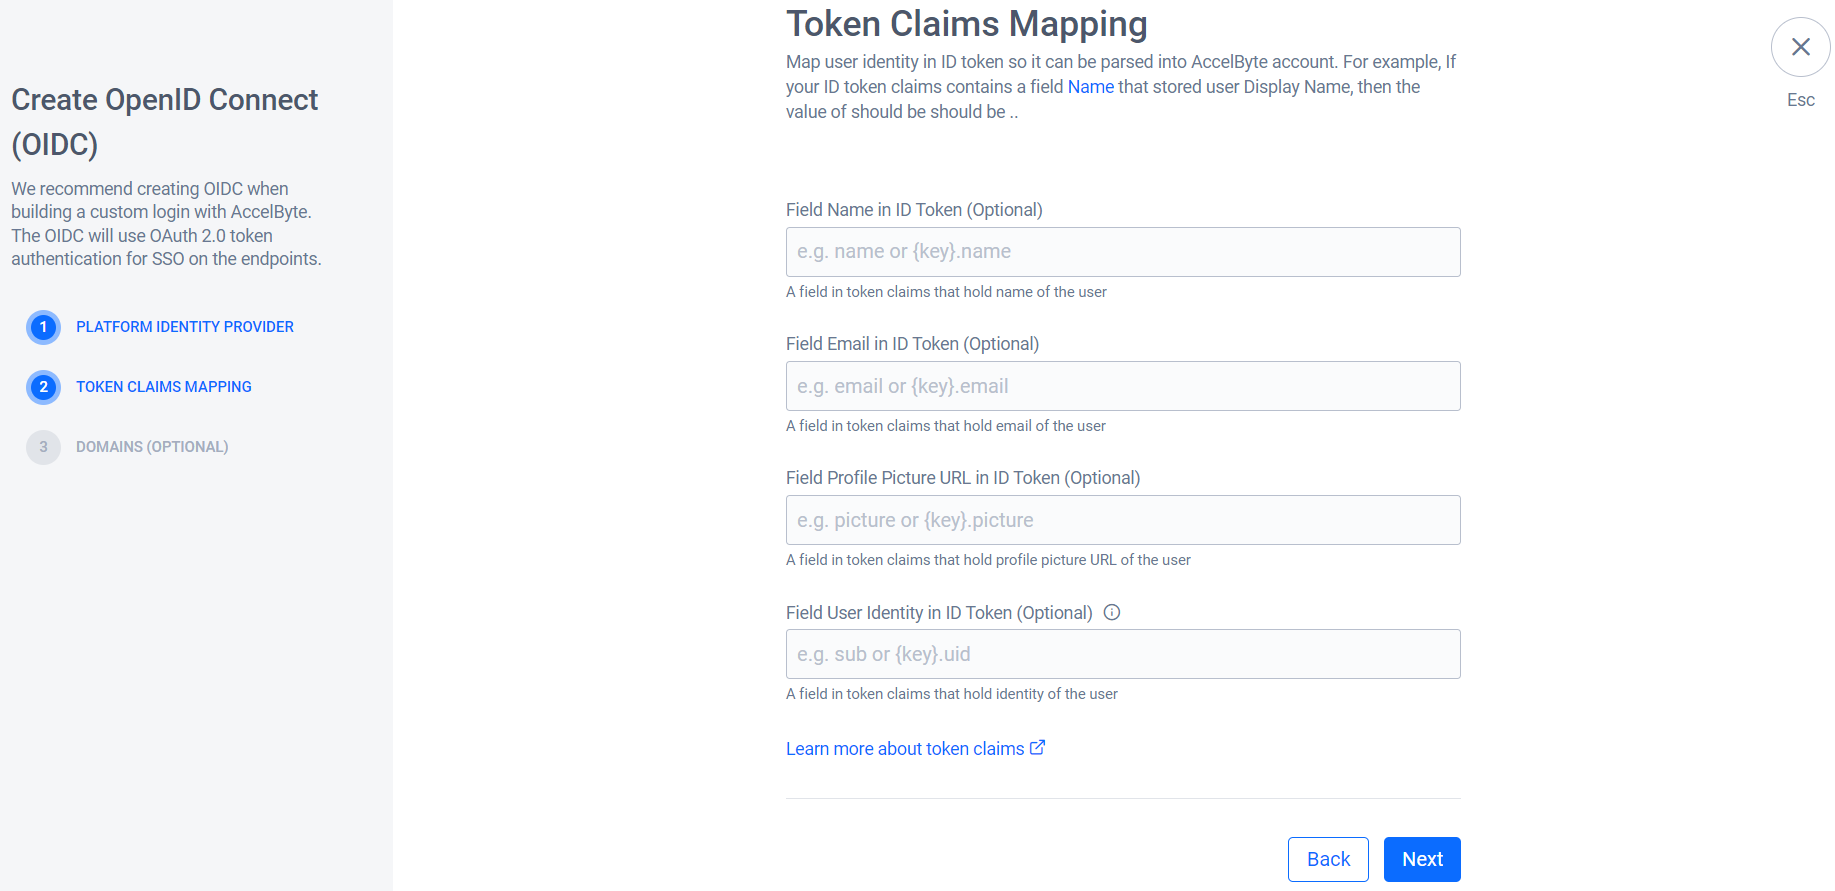
-
Nextをクリックします。
-
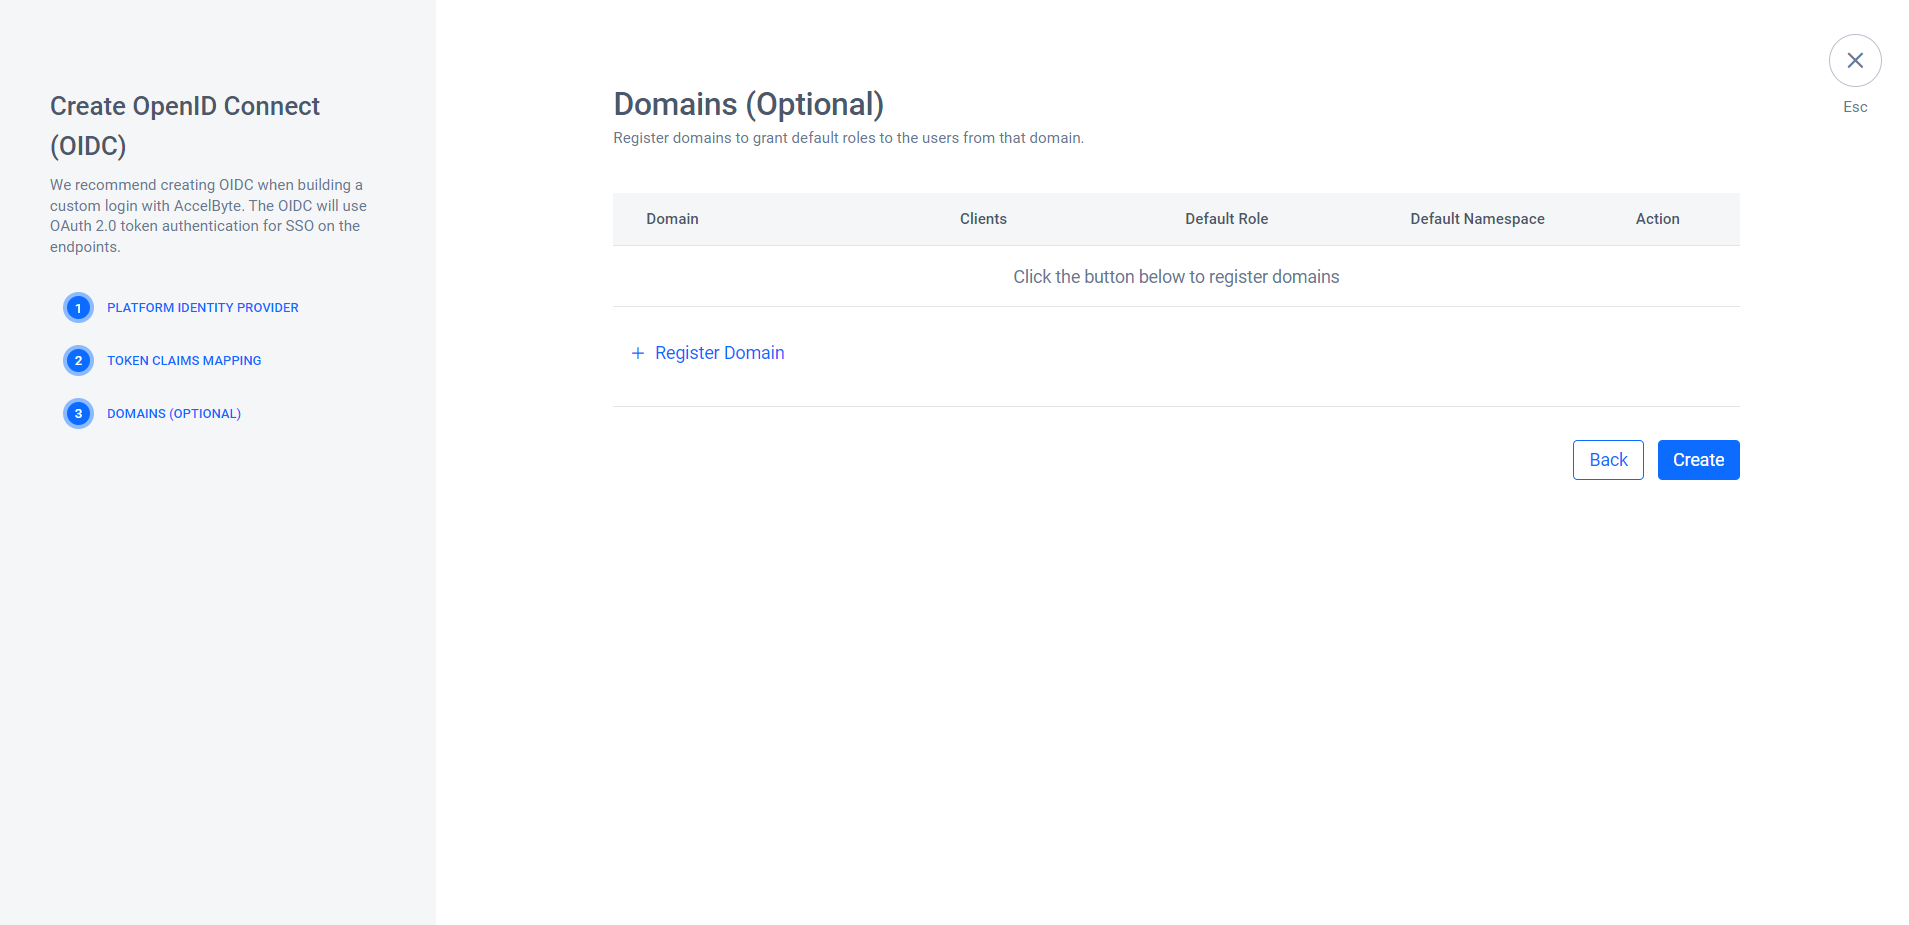
(オプション) Domainsセクションで、ドメインを登録してユーザーにロールを割り当てることができます。
注記Register Domainは、特定のドメインのユーザーにロールを自動的に割り当てたい場合に便利です。例えば、Admin PortalへのログインにOIDCを使用し、
<your-domain>ドメインのユーザーがOIDCでログインした際に管理者ロールを自動的に付与したい場合に使用します。-
この手順をスキップするには、Createをクリックします。
-
ドメインを登録するには、+ Register Domainをクリックします。次に、Register Domainフォームで次のフィールドに入力します。フィールドに入力したら、Saveをクリックし、次にCreateをクリックします。
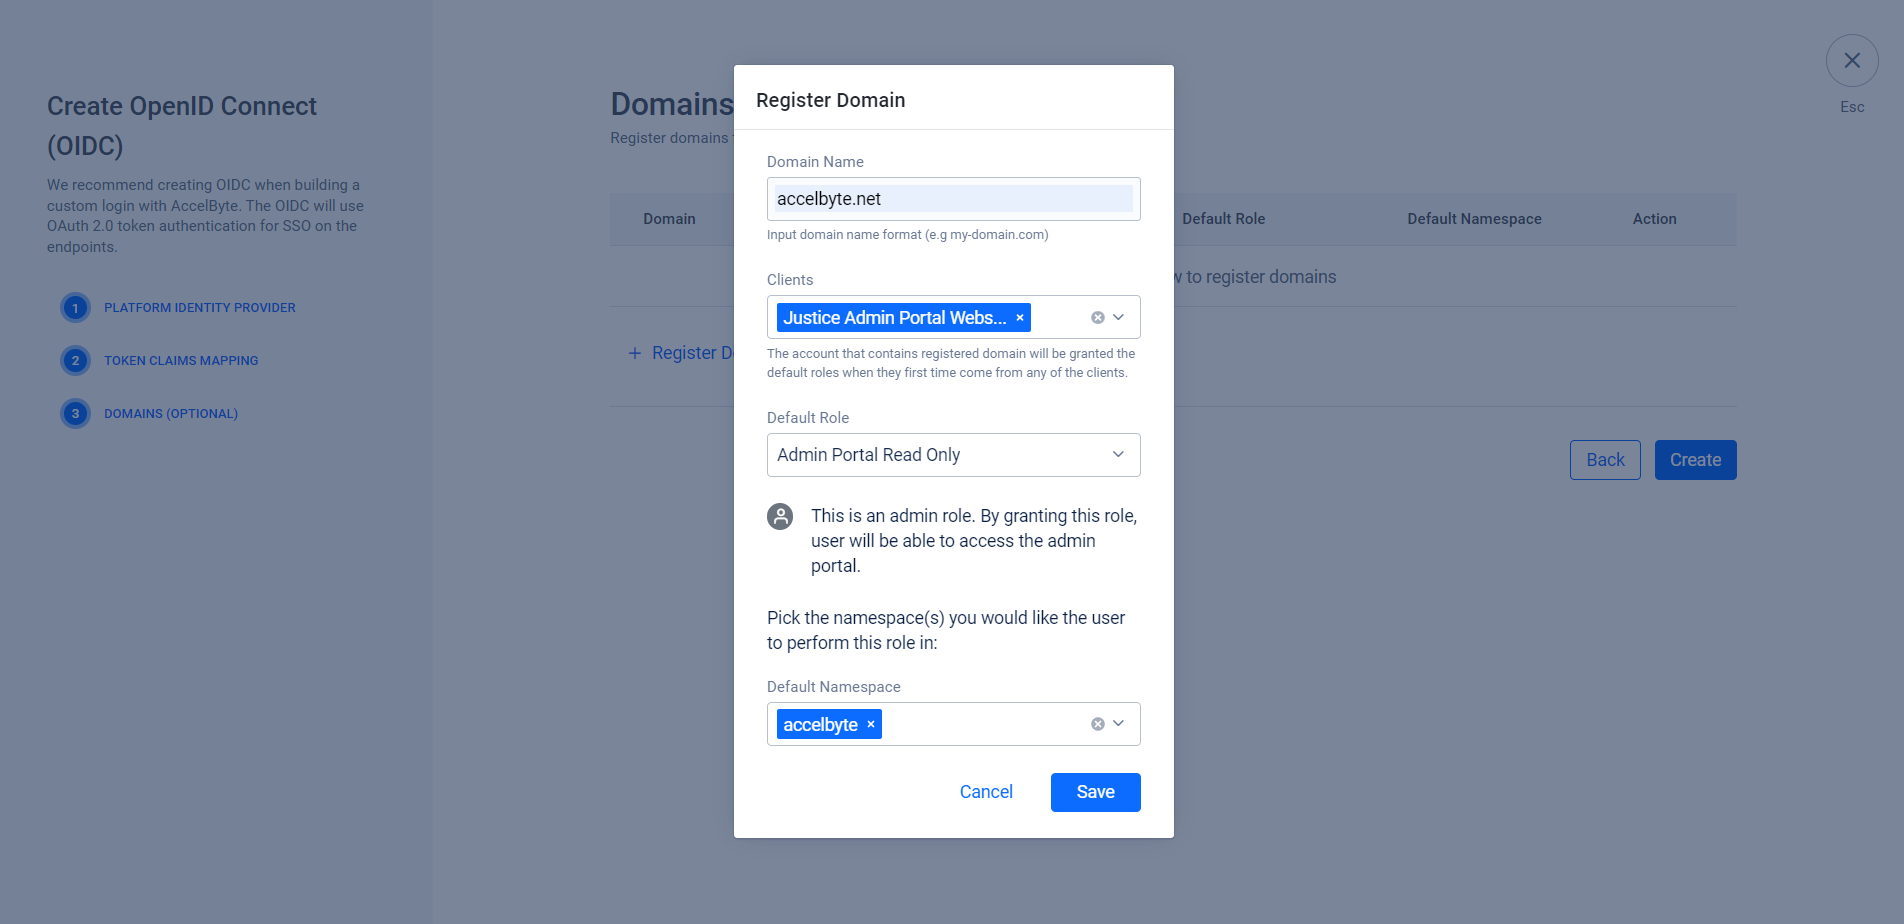
- Domain Name: ドメインの名前を入力します。この例では、
accelbyte.netを使用します。 - Clients: システムは、ユーザーが初めてクライアントにログインしたときにデフォルトのロールを付与します。この例では、ユーザーがAdmin PortalでOIDCを使用してログインしたときにAdminロールを付与したいので、Admin Portal Website IAM Clientに設定します。
- Default Role: ユーザーに付与したいロール。
- Default Namespace: デフォルトのロールがグローバルロールでない場合は、ターゲットのNamespaceを指定します。
- Domain Name: ドメインの名前を入力します。この例では、
-
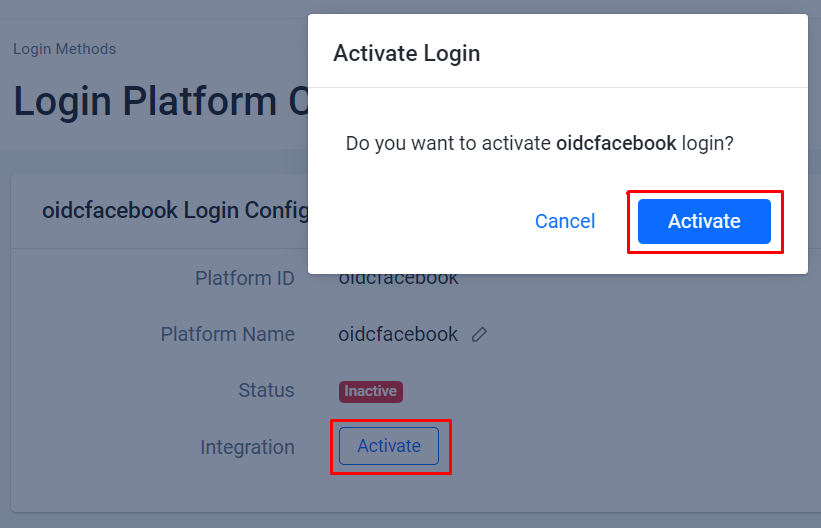
-
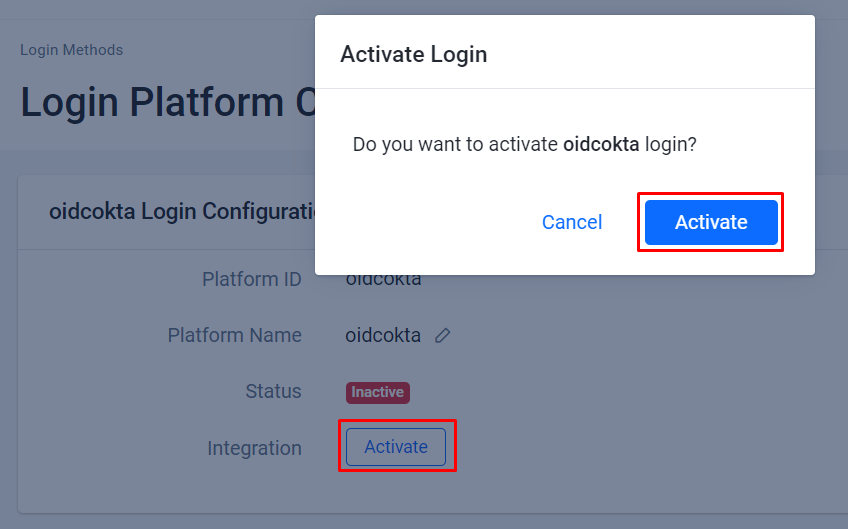
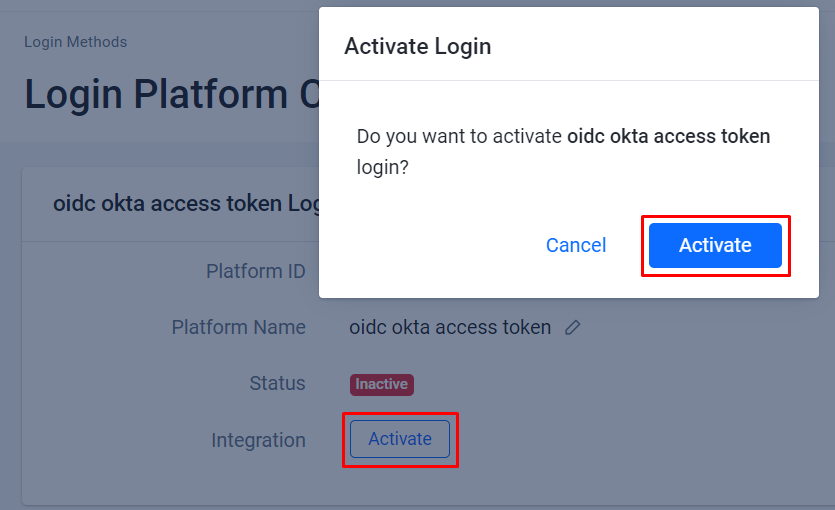
システムは、作成したOIDCの詳細ページにリダイレクトします。ActivateをクリックしてOIDCをアクティベートします。
OIDCを使用したPlayer Portalからのユーザーログイン
Publisher NamespaceでOIDCログイン方法を設定し、Player Portal Website ClientをOIDCクライアントとして設定していることを確認してください。
-
Player Portalに移動し、Loginをクリックします。
-
More Login Optionsをクリックします。
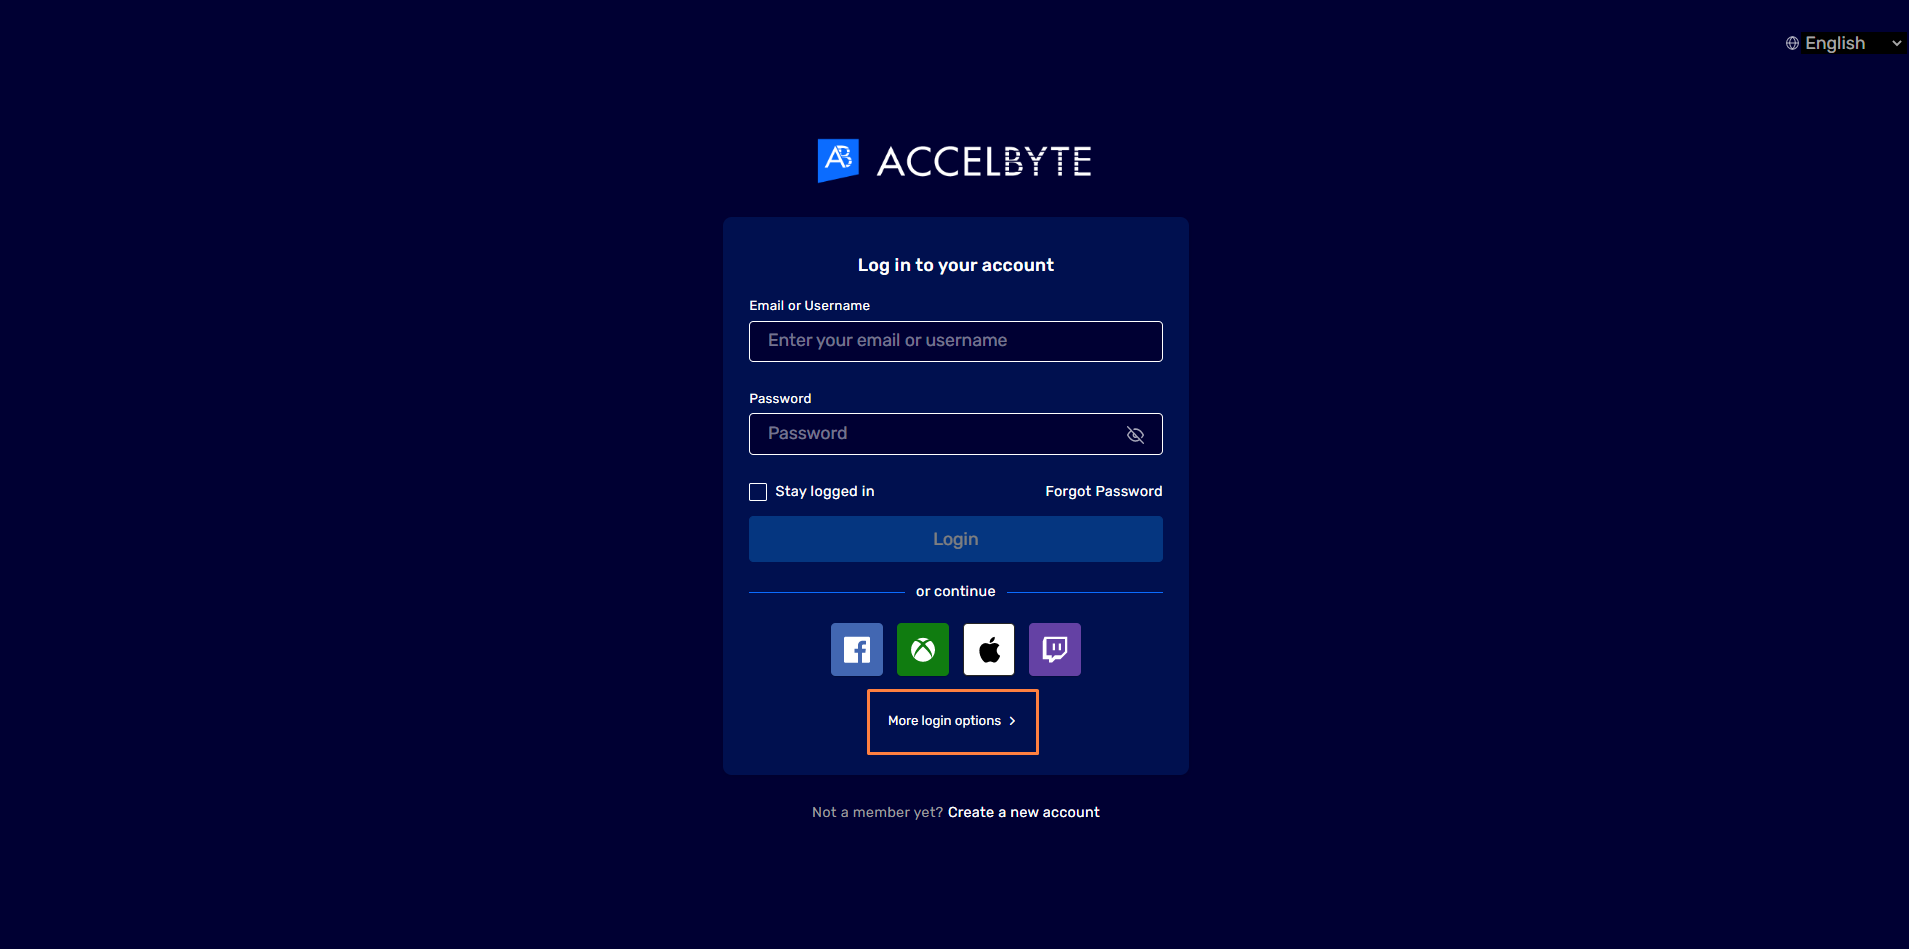
-
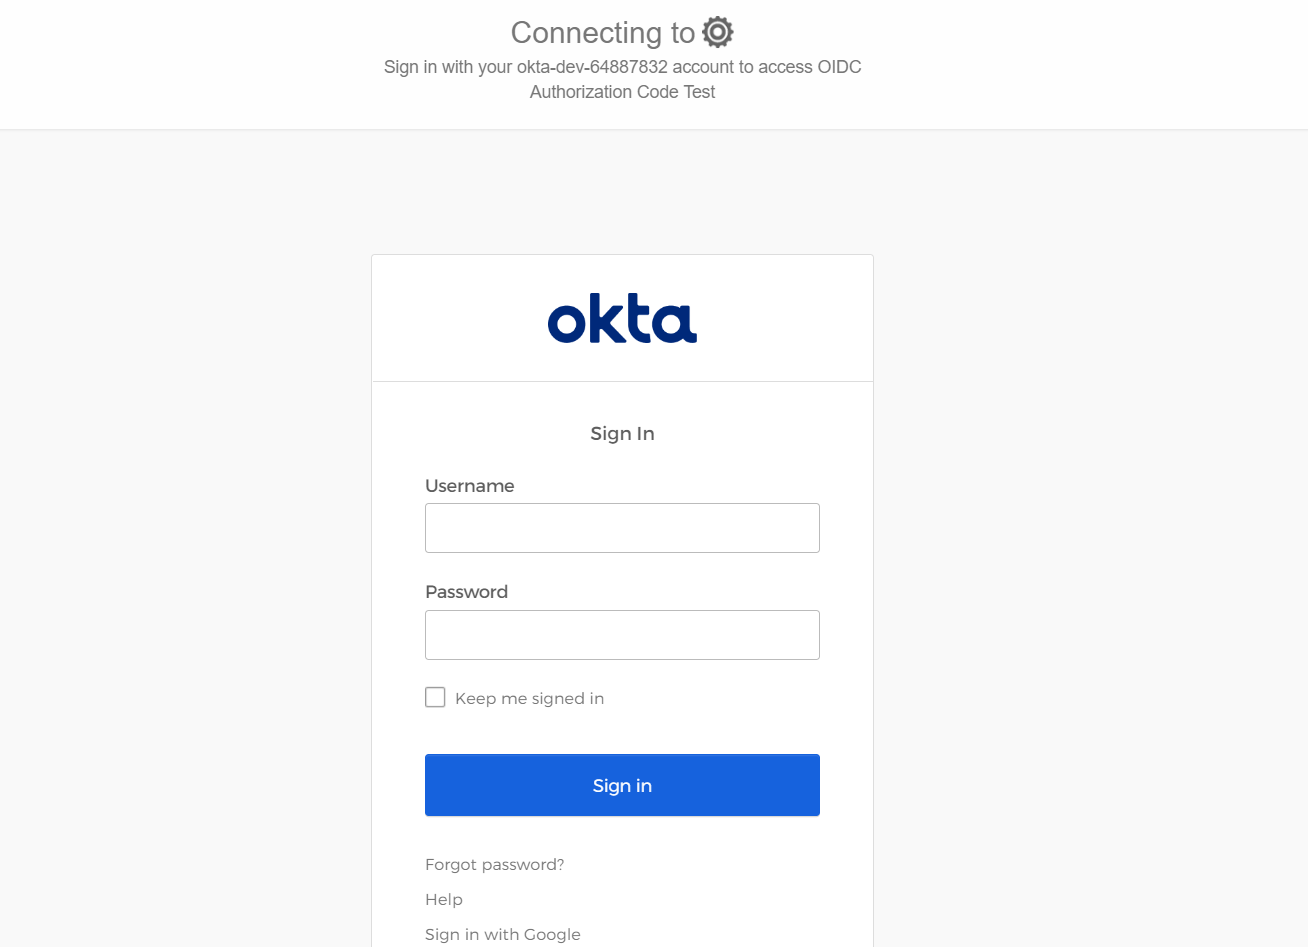
設定したOIDCのログインオプションをクリックします。この例では、Oktaを使用します。
-
システムはOktaログインページにリダイレクトします。認証情報を入力してログインします。
 注記
注記ログインに成功すると、システムはプレイヤーにOIDCアカウントを既存のAccelByteアカウントにリンクするか、新しいAccelByteアカウントを作成するよう求めます。さらに、プレイヤーがヘッドレスアカウントを使用してPlayer Portalに直接ログインできるようにプラットフォームを設定できます(つまり、登録フォームは不要です)。
OIDCを使用したAdmin Portalからのユーザーログイン
Publisher NamespaceでOIDCログイン方法を設定し、Admin Portal Website ClientをOIDCクライアントとして設定していることを確認してください。
Admin Portalにアクセスするには、ユーザーにAdmin Roleを添付する必要があります。ただし、OIDCログイン方法としてドメインを既に登録し、それに管理者ロールを添付している場合、システムはドメインに関連付けられた認証済みOIDCユーザーにその管理者ロールを自動的に付与します。
-
Admin Portalに移動します。システムはログインページにリダイレクトします。OIDCロゴをクリックします。複数ある場合は、ボタンにカーソルを合わせて正しいOIDCログインを使用していることを確認します。
-
システムはOktaログインページにリダイレクトします。認証情報を使用してログインします。
-
システムはAdmin Portalにリダイレクトします。
ポータルへのアクセスは、ロールに基づいています。例えば、割り当てられたロールがAccelByte namespaceのAdmin Portal Read Onlyの場合、そのロールが許可する機能にのみアクセスできます。

IDトークンタイプ
IDトークンタイプは、JWKSを介したIDトークンの検証による認証をサポートします。IDトークンはゲーム内フローベースの認証用です。アイデンティティプロバイダーからIDトークンを生成する必要があります。これをAccelByteアクセストークンと交換できます。
IdPの設定
次の手順に従って、ゲームでアイデンティティプロバイダー(IdP) OIDCログインを設定します。これにより、プレイヤーはアカウントを使用してゲームにサインインできるようになります。
IDトークンを取得するには、IdPからの認証を処理する必要があります。IdP OIDCをAGSと統合するには、次の項目が必要です:
- JWKS URL
- Issuer
- Client ID
例として、FacebookをIdPとして使用します。OIDCをサポートする別のIdPを使用することもできます。
Facebookアプリケーションの作成
FacebookのCreate an Appガイドに従って、Facebook Developer AccountでFacebookアプリケーションを作成します。
アプリにFacebookログイン製品を追加する
Facebook Login for the Web with the JavaScript SDKガイドに従って、アプリにFacebook Login製品を追加します。
ゲーム内ログインの設定
次の手順に従って、ゲーム内でOIDCログインを設定します。例としてFacebook OIDCを使用します。これにより、プレイヤーはアイデンティティプロバイダーアカウントを使用してゲームにサインインできるようになります。
-
AGS Admin portalで、ゲームnamespaceに移動します。
-
サイドバーメニューで、Game Setup > 3rd Party Configuration > Auth & Account Linkingに移動します。
-
Login Methodsページで、+ Add Newボタンをクリックします。

-
ログイン方法オプションの下部で、+ Create OIDCをクリックします。
-
Create OpenID Connect (OIDC)フォームで、必要なフィールドに入力します。この例では、認証タイプとしてID Tokenを使用します。
- Platform Name: ログイン方法の名前を入力します。例:
oidcfacebook。 - Platform ID: ログイン方法のIDを入力します。例:
oidcfacebook。 - Authentication type: ID Tokenを選択します。
- JWKS URL: この例ではFacebook OIDCを使用するため、https://www.facebook.com/.well-known/oauth/openid/jwks/を使用します。
- Issuer: この例ではFacebook OIDCを使用するため、
[https://www.facebook.com](https://www.facebook.com)を使用します。
-
システムは、作成したOIDCの詳細ページにリダイレクトします。ActivateをクリックしてOIDCをアクティベートします。
アクセストークンタイプ
アクセストークンタイプは、UserInfo APIエンドポイントを介してアクセストークンを検証することで認証をサポートします。アクセストークンタイプは、IdPがIDトークンを提供できないが、アクセストークンで使用できるUser Infoエンドポイントがある場合のカスタムニーズ用です。
IdPの設定
次の手順に従って、ゲームでIdP OIDCログインを設定します。これにより、プレイヤーはアカウントを使用してゲームにサインインできるようになります。
アクセストークンタイプを使用するには、IdP OIDCをAGSと統合するために次の項目が必要です:
- User Info Endpoint URL
- User Info Endpoint HTTPメソッド
例として、OktaをIdPとして使用します。OIDCをサポートする別のIdPを使用することもできます。
Oktaアプリケーションの作成
OktaのCreate OIDC app integrationsガイドに従って、Oktaアプリケーションを作成します。
次のURLを使用して、OKTAアプリケーションのサインインリダイレクトURIを設定します:
<BaseURL>/iam/v3/platforms/<PlatformId>/authenticate<BaseURL>/iam/v3/public/namespaces/<namespace>/users/me/platforms/<platformId>/web/link/establish
BaseURLはドメインアドレスです。例:https://development.accelbyte.io。Namespaceはパブリッシャーまたはスタジオのnamespaceです。例:accelbyte。PlatformIdは、AGS Admin Portalで設定するOIDCPlatformIdです。
ゲーム内ログインの設定
ゲーム内OIDCログインを設定し、プレイヤーがIdPアカウントを使用してサインインできるようにするには、次の手順に従います。
-
AGS Admin portalで、ゲームnamespaceに移動します。
-
サイドバーメニューで、Game Setup > 3rd Party Configuration > Auth & Account Linkingに移動します。
-
Login Methodsページで、+ Add Newボタンをクリックします。
-
ログイン方法オプションの下部で、+ Create OIDCをクリックします。
-
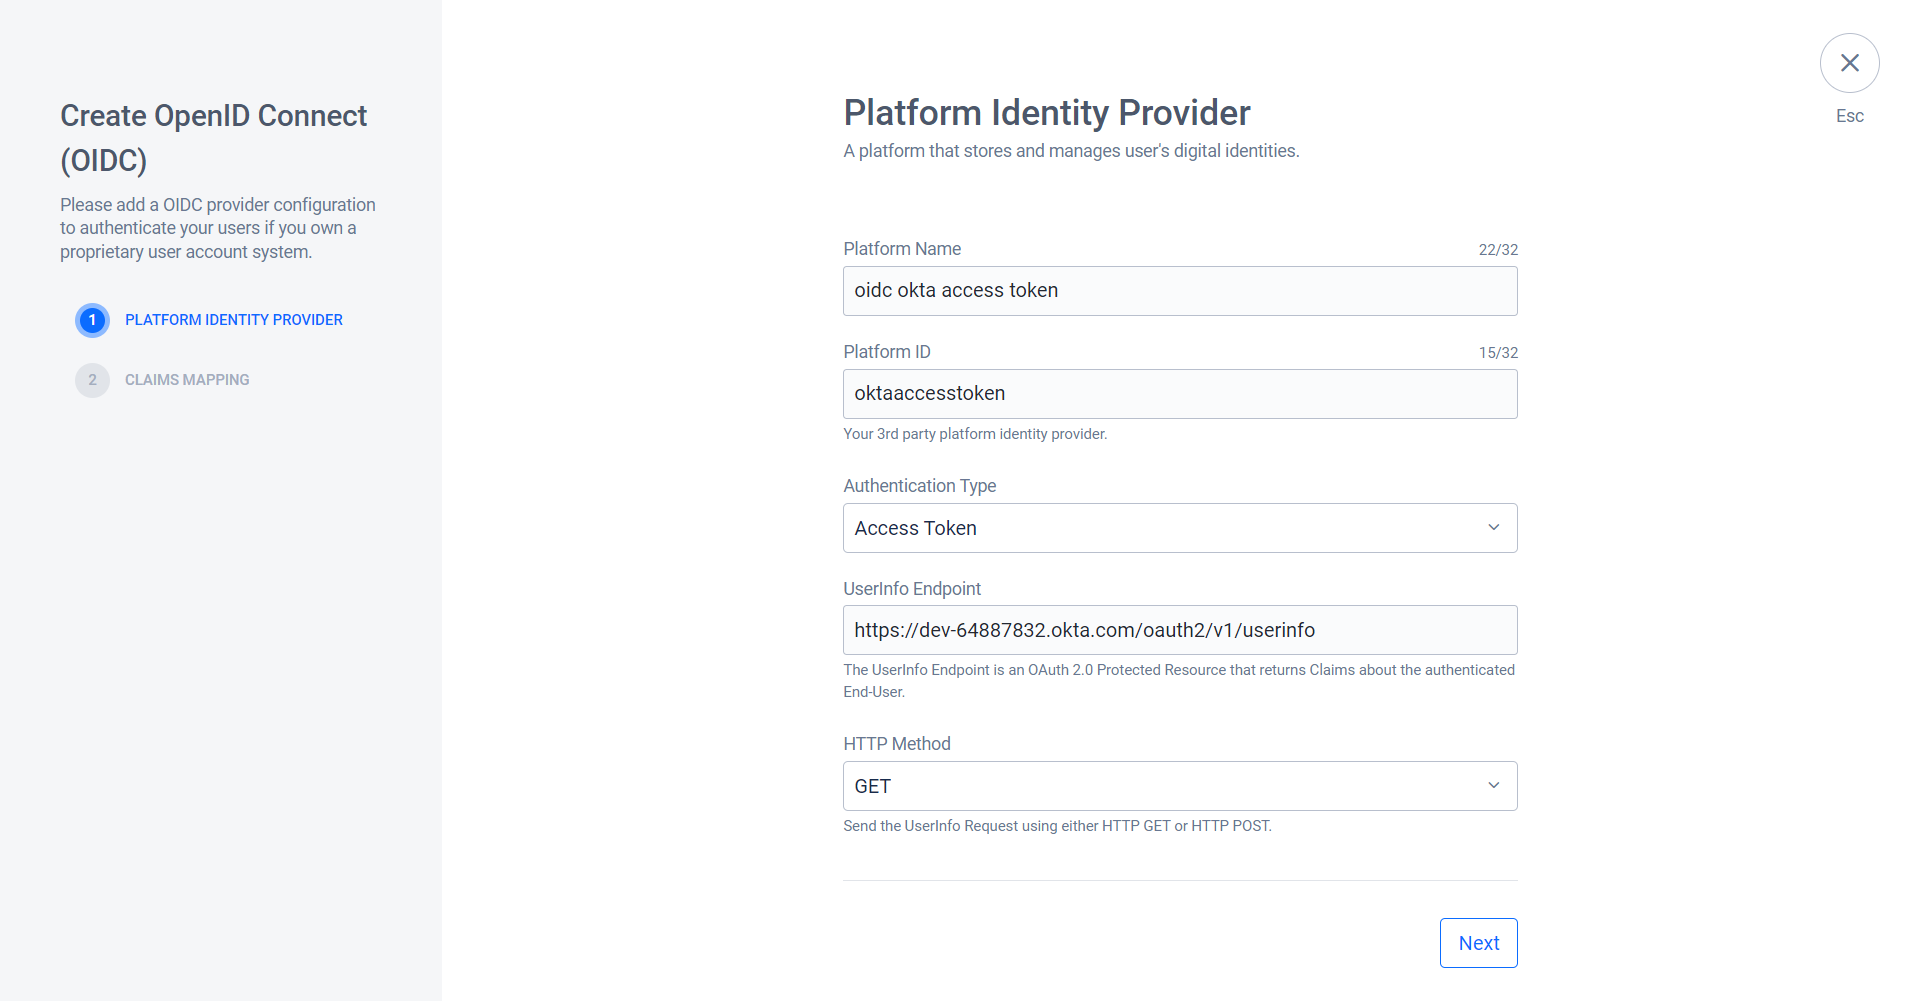
Create OpenID Connect (OIDC)フォームで、必要な情報を入力します。この例(Okta)では、認証タイプとしてAccess Tokenを使用します。
- Platform Name: OIDCの名前を入力します。例:
oidc okta access token。 - Platform ID: OIDCのIDを入力します。
oktaaccesstoken。 - Authentication type: Access Tokenを選択します。
- UserInfo Endpoint: Oktaアプリケーションのuser infoエンドポイントを使用します。例:
https://YOUR_OKTA_URL.okta.com/oauth2/v1/userinfo。 - HTTP Method: IdPが使用する対応するHTTPメソッドを入力します。例:
GET。
- Platform Name: OIDCの名前を入力します。例:
-
Nextをクリックします。
-
User Infoエンドポイントレスポンス内のユーザーアイデンティティをマッピングして、システムがそれをAccelByteアカウントに解析できるようにします。
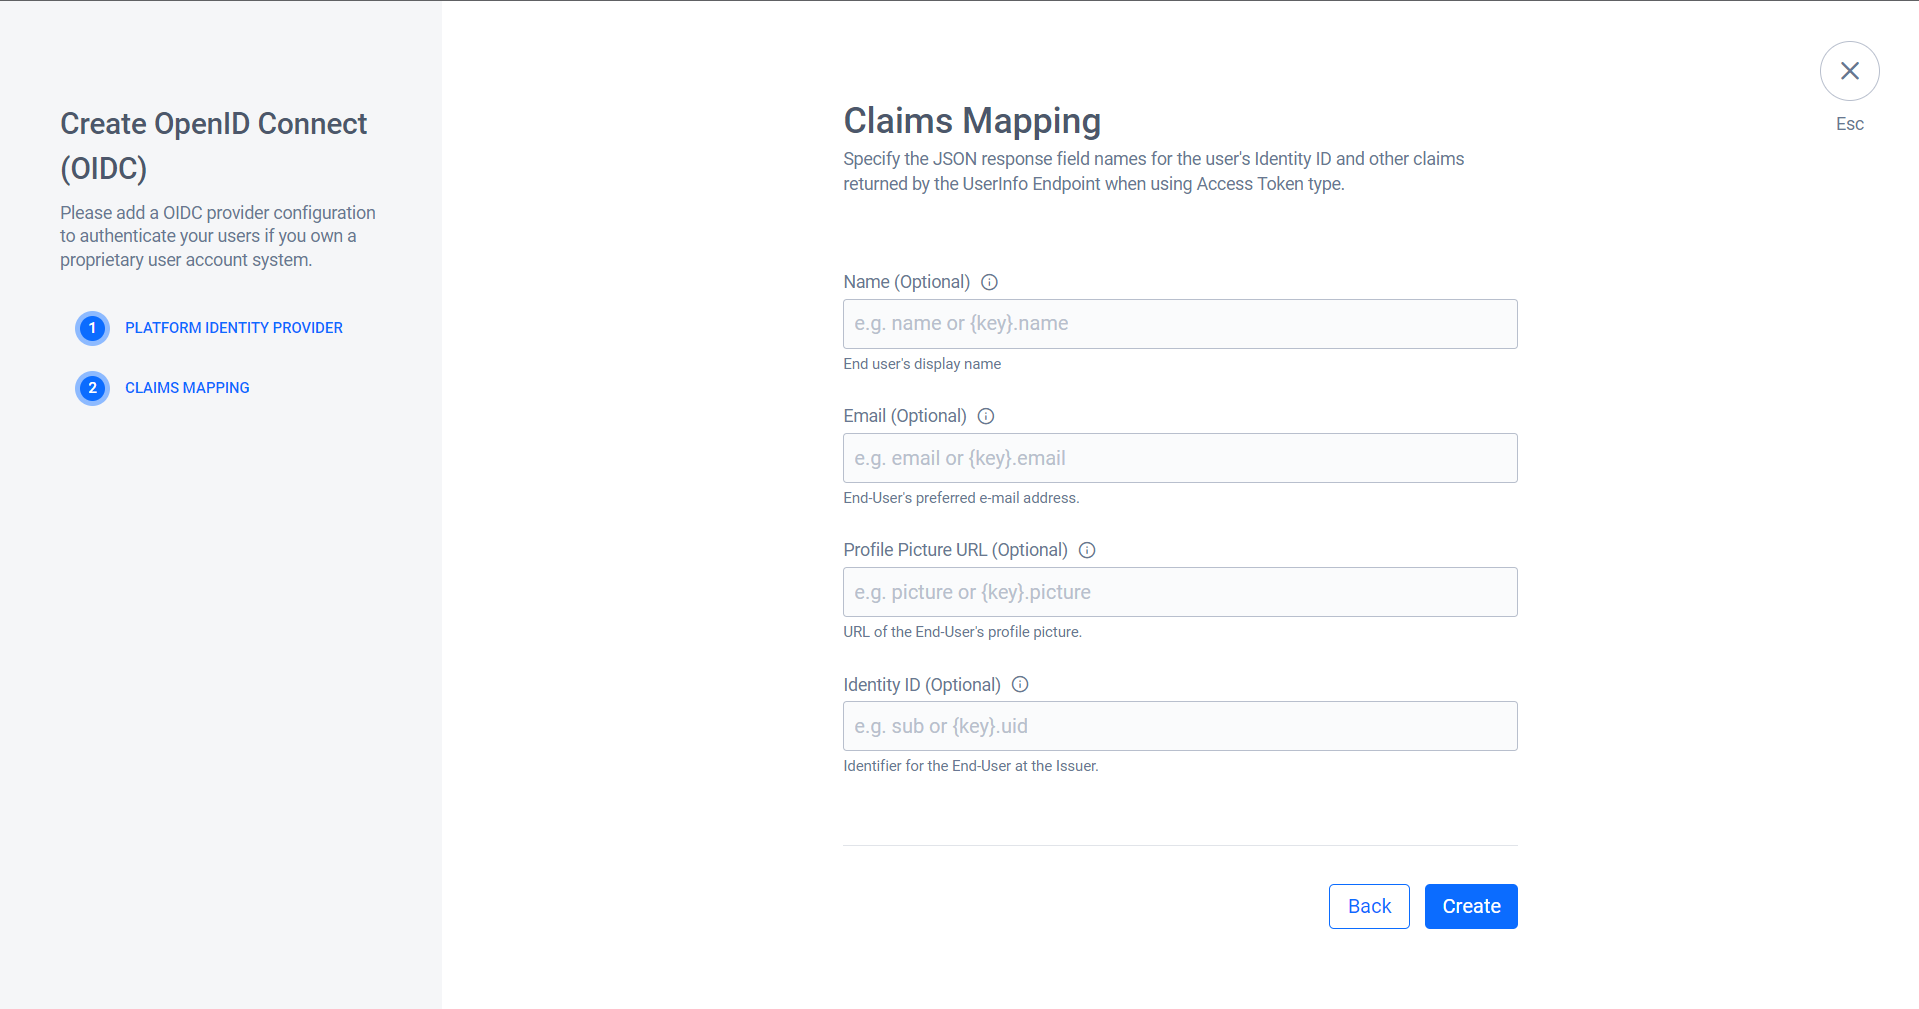
-
システムは、作成したOIDCの詳細ページにリダイレクトします。ActivateをクリックしてOIDCをアクティベートします。
OIDC用のIAMクライアントの作成
IAMクライアントは、ターゲットプラットフォームでリリースしたいゲームクライアントの表現です。
特定のSDKプラットフォーム(例: Xbox、Steam、Playstation)のゲーム用にIAM Clientを既に持っている場合は、新しいIAM Clientを作成する必要はありません。IdPはゲームを構築するプラットフォームではないため、既存のIAM Clientを使用できます。IAM Clientの詳細については、Manage Access control for applicationsの記事を参照してください。
ゲーム内ログイン
各ゲームエンジンの設定は異なります。ゲームエンジンに適用される手順に従ってください。
- Unreal Engine
- Unity Engine
Unreal Engineゲーム内ログイン統合
ゲームをAccelByte SDKとシームレスに統合してゲーム内サインインを実現し、プレイヤーがOIDC認証情報を使用してゲームにアクセスできるようにするために、Unreal Engine 4のIdPサポートによりアプローチが取られます。実装にはWebログインが必要です。
Unreal Engineの準備と設定
依存関係の追加
まず、build.csファイルにAccelbyteUe4Sdkパブリック依存関係モジュールを組み込みます。このリンクにより、AccelByte SDK PluginをUnreal Engineプロジェクトに統合できます。
public ABThirdPartyLogin(ReadOnlyTargetRules Target) : base(Target)
{
PCHUsage = PCHUsageMode.UseExplicitOrSharedPCHs;

PublicDependencyModuleNames.AddRange(new string[] { "Core", "CoreUObject", "Engine", "InputCore" , "AccelByteUe4Sdk", "HTTP"});
}
Unreal Engineは外部ブラウザからのURIリダイレクトをサポートしていないため、Unreal内でゲーム内ブラウザを利用する必要があります。これには、次のようにbuild.csファイルにプライベート依存関係モジュールを追加する必要があります:
PrivateDependencyModuleNames.AddRange(new string[] { "Slate", "SlateCore", "UMG", "WebBrowser", "WebBrowserWidget" });
<YourProject>.Target.csにAccelbyteUe4Sdkを追加します。
public ABThirdPartyLoginTarget( TargetInfo Target) : base(Target)
{
    Type = TargetType.Game;
    DefaultBuildSettings = BuildSettingsVersion.V2;
    ExtraModuleNames.AddRange( new string[] { "ABThirdPartyLogin", "AccelByteUe4Sdk" } );
}
そして<YourProjectEditor>.Target.cs
public ABThirdPartyLoginEditorTarget( TargetInfo Target) : base(Target)
{
    Type = TargetType.Editor;
    DefaultBuildSettings = BuildSettingsVersion.V2;
    ExtraModuleNames.AddRange( new string[] { "ABThirdPartyLogin", "AccelByteUe4Sdk" } );
}
OIDCログイン用のUEプロジェクト設定
DefaultEngine.iniファイルにAccelByte認証情報を追加します。
[/Script/AccelByteUe4Sdk.AccelByteSettings]
ClientId=<Your Client_Id>
ClientSecret=<Your Client_Secret>
Namespace=<Your Namespace>
PublisherNamespace=<Your Publisher Namespace>
RedirectURI="http://127.0.0.1"
BaseUrl="https://prod.gamingservices.accelbyte.io"
IamServerUrl="https://prod.gamingservices.accelbyte.io/iam"
PlatformServerUrl="https://prod.gamingservices.accelbyte.io/platform"
サンプルコード実装
次のステップは、提供されているサンプルコードを使用してゲームのOIDC認証方法を実装することです。まず、C++クラスを作成します。例えば、次のコードはアクターclass.LoginActor.hを使用します。
#pragma once

#include "CoreMinimal.h"
#include "GameFramework/Actor.h"
#include "SWebBrowser.h"
#include "HttpModule.h"
#include "Core/AccelByteRegistry.h"
#include "Api/AccelByteUserApi.h"
#include "Core/AccelByteApiClient.h"
#include "Core/AccelByteMultiRegistry.h"
#include "Core/AccelByteMultiRegistry.h"
#include "Core/AccelByteError.h"

#include "LoginActor.generated.h"

DECLARE_DYNAMIC_MULTICAST_DELEGATE_OneParam(FActionInfo, FString, Message);

UCLASS()
class ABTHIRDPARTYTEST_API ALoginActor : public AActor
{
    GENERATED_BODY()

    public:
    // Sets default values for this actor's properties
    ALoginActor();
    UPROPERTY(BlueprintAssignable)
    FActionInfo OnActionInfoUpdated;

    private:
    TSharedPtr<SWebBrowser> SlateBrowserWidget;
    FHttpModule* HttpModule;

    protected:
    UPROPERTY(VisibleAnywhere, BlueprintReadOnly, Category = "OIDC Settings")
    FString ClientID;

    UPROPERTY(VisibleAnywhere, BlueprintReadOnly, Category = "OIDC Settings")
    FString ClientSecret;

    UPROPERTY(VisibleAnywhere, BlueprintReadOnly, Category = "OIDC Settings")
    FString RedirectURI;

    UPROPERTY(VisibleAnywhere, BlueprintReadOnly, Category = "OIDC Settings")
    FString AuthorizationUrl;

    UPROPERTY(VisibleAnywhere, BlueprintReadOnly, Category = "OIDC Settings")
    FString TokenUrl;

    UPROPERTY(VisibleAnywhere, BlueprintReadOnly, Category = "OIDC Settings")
    FString ServerURL;

    UPROPERTY(EditAnywhere, BlueprintReadOnly, Category = "OIDC Settings")
    FString ResponseType;

    UPROPERTY(EditAnywhere, BlueprintReadOnly, Category = "OIDC Settings")
    FString OIDCScope;

    UPROPERTY(VisibleAnywhere, BlueprintReadOnly, Category = "OIDC Status")
    FString LoginStatus;

    UPROPERTY(VisibleAnywhere, BlueprintReadOnly, Category = "OIDC Status")
    bool bIsLoggedIn;

    UPROPERTY(VisibleAnywhere, BlueprintReadOnly, Category = "OIDC Status")
    FString AccessToken;

    UPROPERTY(VisibleAnywhere, BlueprintReadOnly, Category = "OIDC Status")
    FString IdToken;

    public:
    UFUNCTION(BlueprintCallable, Category = "OIDC")
    void ExecBroadcast();

    void HandleUrlChanged(const FText& Text);

    void OnAccessTokenReceived(FHttpRequestPtr Request, FHttpResponsePtr Response, bool bWasSuccessful);
    void ParseAndHandleTokens(const FString& ResponseBody);
    void LoginWithOtherPlatformId(const FString& PlatformId, const FString& Token, const FVoidHandler& OnSuccessDelegate);

    protected:
    // Called when the game starts or when spawned
    virtual void BeginPlay() override;

    public:
    // Called every frame
    virtual void Tick(float DeltaTime) override;
};
IDトークンまたはアクセストークンの取得
アプリケーションでIDトークンまたはアクセストークンを取得することは、2つのシナリオに分かれます: Authorization Codeを使用してトークンを取得する方法と、IDトークンを直接処理する方法です。
Authorization Codeを使用してトークンを取得する
アプリケーションがIDトークンまたはアクセストークンを取得するための最初のステップとしてAuthorization Codeを必要とし、Implicit (Hybrid) Grant Typeをサポートしていない場合は、次の手順に従います。
- 初期化と設定: アプリケーションが必要な認証情報、URL、スコープで適切に設定されていることを確認します。
- Webベースの認証:
response_type、client_id、redirect_uri、scopeなどの必要なパラメータを含むAuthorization URLを構築して認証プロセスを開始します。Webブラウザウィジェットを起動して、ユーザーに認証ページを表示します。 - URL変更の処理: WebブラウザウィジェットでURL変更をキャプチャするURL変更ハンドラーを実装します。URLにAuthorization Codeパラメータが含まれているかどうかを検出します。
- トークン交換: Authorization Codeが検出された場合、コードをアクセストークンおよび場合によってはIDトークンと交換するリクエストを構築します。必要なフォームデータ(例:
code、client_id、client_secret、redirect_uri、grant_type)を含むPOSTリクエストをToken URLに送信します。 - トークンの解析と処理: トークンリクエストからのJSONレスポンスを解析します。レスポンスに
access_tokenフィールドが含まれている場合は、アクセストークンとIDトークン(該当する場合)を抽出します。これらのトークンを必要に応じてさらなる操作に使用します。 - AGSへのログイン: トークンが取得された場合、
LoginWithOtherPlatformIdメソッドを使用してAGSへのログインを試みます。成功およびエラーシナリオを適切に処理します。 - クリーンアップ: 必要に応じてWebブラウザウィジェットを非表示または閉じます。
IDトークンを直接処理する
レスポンスURLに直接Platform ID Tokenフラグメントが含まれている状況では、次の手順に従います:
- 初期化と設定: アプリケーションが必要な認証情報、URL、スコープで適切に設定されていることを確認します。
- Webベースの認証: パラメータを含むAuthorization URLを構築して認証プロセスを開始します。Webブラウザウィジェットを起動します。
- URL変更の処理: URLに
ID Tokenフラグメントが含まれているかどうかを検出します。 - トークンの処理:
ID Tokenフラグメントが検出された場合、トークンを文字列として直接処理します。トークンから必要な情報を解析します。 - AGSへのログイン:
LoginWithOtherPlatformIdメソッドを使用してAGSへのログインを試みます。成功およびエラーシナリオを処理します。 - クリーンアップ: Webブラウザウィジェットを非表示または閉じます。
これらの手順に従い、提供されているコードスニペットを利用することで、特定の要件に基づいてアプリケーションでIDトークンまたはアクセストークンを効率的に取得できます。
コード例
スニペットで使用されるAccelByteOnlineSubsystemPtrを取得するには、このガイドに従ってください。
LoginActor.cpp
ALoginActor::ALoginActor()
{
    // Set this actor to call Tick() every frame.
    PrimaryActorTick.bCanEverTick = false;
    HttpModule = &FHttpModule::Get();

    // Initialize variables with your desired values.
    ClientID = TEXT("Your_IdentityProvider_ClientId");
    ClientSecret = TEXT("Your_IdentityProvider_ClientSecret");// Used to exchange the authorization_code into idtoken or access token using /oauth2/default/v1/token endpoint.
    RedirectURI = TEXT("http://localhost:8080/login/callback");
    AuthorizationUrl = TEXT("https://{Your_Identity Provider_BaseUrl}/oauth2/default/v1/authorize");
    TokenUrl = TEXT("https://{Your_Identity Provider_BaseUrl}/oauth2/default/v1/token");
    OIDCScope = TEXT("openid profile email phone address");
}

// Called when the game starts or when spawned.
void ALoginActor::BeginPlay()
{
    Super::BeginPlay();
}

void ALoginActor::ExecBroadcast()
{
    // Please be advised that this can be different. Sync it with your own requested form data.
    FString AuthorizationURL = AuthorizationUrl + "?response_type=" + ResponseType + "&client_id=" + ClientID +
    "&redirect_uri=" + RedirectURI + "&scope=" + OIDCScope + "&state=foo" + "&nonce=nonce";
    OnActionInfoUpdated.Broadcast(FString::Printf(TEXT("Trying To Login First")));
    TSharedRef<SVerticalBox> MainContent = SNew(SVerticalBox)
    + SVerticalBox::Slot()
    [
        // WebBrowserWidget will launch in-game browser.
        SAssignNew(SlateBrowserWidget, SWebBrowser)
        .InitialURL(AuthorizationURL)
        .ShowControls(false)
        .ShowAddressBar(false)
        .ShowErrorMessage(true)
        .SupportsTransparency(false)
        .SupportsThumbMouseButtonNavigation(false)
        .ShowInitialThrobber(true)
        .PopupMenuMethod(TOptional<EPopupMethod>())
        .ViewportSize(FVector2D::ZeroVector)
        .OnUrlChanged_Lambda([this](const FText& Text)
        {
        FString UrlString = Text.ToString();
        UE_LOG(LogTemp, Warning, TEXT("WebBrowser URL changed: %s"), *UrlString);
        FText FullUrlText = FText::FromString(UrlString); // Assuming UrlString is the full URL
        HandleUrlChanged(FullUrlText);
    })];

    if (GEngine && GEngine->GameViewport)
    {
        GEngine->GameViewport->AddViewportWidgetContent(SlateBrowserWidget.ToSharedRef());
    }
}

void ALoginActor::HandleUrlChanged(const FText& Text)
{
    UE_LOG(LogTemp, Warning, TEXT("The link has changed: %s"), *Text.ToString());
    FString UrlString = Text.ToString();

    // Check if the URL contains a query parameter or a fragment.
    FString AuthorizationCode;
    FString PlatformIdToken;

    if (UrlString.Contains(TEXT("?code=")))
    {
        AuthorizationCode = FPlatformHttp::UrlDecode(UrlString.RightChop(UrlString.Find(TEXT("?code=")) + 6));
    }
    else if (UrlString.Contains(TEXT("#id_token=")))
    {
        PlatformIdToken = FPlatformHttp::UrlDecode(UrlString.RightChop(UrlString.Find(TEXT("#id_token=")) + 10));
    }

    // Process the authorization code or ID token.
    if (!AuthorizationCode.IsEmpty())
    {
        // Build the request form data.
        FString FormData = TEXT("code=") + AuthorizationCode
        + TEXT("&client_id=") + ClientID
        + TEXT("&client_secret=") + ClientSecret
        + TEXT("&redirect_uri=") + RedirectURI
        + TEXT("&grant_type=authorization_code");

        // Make a POST request to exchange the authorization code for an access token or ID Token.
        TSharedRef<IHttpRequest> HttpRequest = HttpModule->CreateRequest();
        HttpRequest->SetURL(TokenUrl);
        HttpRequest->SetVerb(TEXT("POST"));
        HttpRequest->SetHeader(TEXT("Content-Type"), TEXT("application/x-www-form-urlencoded"));
        HttpRequest->SetContentAsString(FormData);
        HttpRequest->OnProcessRequestComplete().BindUObject(this, &ALoginActor::OnAccessTokenReceived);
        HttpRequest->ProcessRequest();

        // Hide or close the SWebBrowser widget.
        if (SlateBrowserWidget.IsValid())
        {
            SlateBrowserWidget->SetVisibility(EVisibility::Collapsed);
        }
    }
    else if (!PlatformIdToken.IsEmpty())
    {
        OnActionInfoUpdated.Broadcast(FString::Printf(TEXT("Platform ID Token : %s"), *PlatformIdToken));

        // Call the common handling function for tokens.
        ParseAndHandleTokens(PlatformIdToken);

        // Hide or close the SWebBrowser widget.
        if (SlateBrowserWidget.IsValid())
        {
            SlateBrowserWidget->SetVisibility(EVisibility::Collapsed);
        }
    }
}

void ALoginActor::OnAccessTokenReceived(FHttpRequestPtr Request, FHttpResponsePtr Response, bool bWasSuccessful)
{
    if (bWasSuccessful && Response.IsValid())
    {
        FString ResponseBody = Response->GetContentAsString();
        // Parse the JSON response and handle tokens.
        ParseAndHandleTokens(ResponseBody);
    }
}

//Manage these field as member of the class to make this accessible by each function in ALoginActor class
auto ApiClient = AccelByteOnlineSubsystemPtr->GetApiClient(TEXT("YOUR_KEY"));

void ALoginActor::ParseAndHandleTokens(const FString& ResponseBody)
{
    // Remove any line breaks and extra spaces from the response body.
    FString CleanedResponseBody = ResponseBody.Replace(TEXT("\n"), TEXT("")).Replace(TEXT(" "), TEXT(""));
    UE_LOG(LogTemp, Warning, TEXT("Response Body: %s"), *ResponseBody);
    const FVoidHandler OnLoginSuccessDelegate = FVoidHandler::CreateLambda([=]()
    {
        FAccountUserData AccountUserData = ApiClient->CredentialsRef->GetAccountUserData();
        FString AccountUserDataString;
        FJsonObjectConverter::UStructToJsonObjectString(AccountUserData, AccountUserDataString);
        FString Message = FString::Printf(TEXT("Login to AB Service Success : %s"), *AccountUserDataString);
        OnActionInfoUpdated.Broadcast(Message);
        UE_LOG(LogTemp, Warning, TEXT("Login to AB Service Success: %s"), *AccountUserDataString);
    });
    if (CleanedResponseBody.Contains(TEXT("access_token")))
    {
        TSharedPtr<FJsonObject> JsonObject;
        TSharedRef<TJsonReader<>> Reader = TJsonReaderFactory<>::Create(CleanedResponseBody);
        if (FJsonSerializer::Deserialize(Reader, JsonObject))
        {
            AccessToken = JsonObject->GetStringField(TEXT("access_token"));
            IdToken = JsonObject->GetStringField(TEXT("id_token"));

            // Use the access token and ID token as needed.
            UE_LOG(LogTemp, Warning, TEXT("Access Token: %s"), *AccessToken);
            UE_LOG(LogTemp, Warning, TEXT("ID Token: %s"), *IdToken);
            OnActionInfoUpdated.Broadcast(FString::Printf(TEXT("Platform Access Token : %s"), *AccessToken));
            OnActionInfoUpdated.Broadcast(FString::Printf(TEXT("Platform ID Token : %s"), *IdToken));
            // Try to login into AGS Endpoint
            if (!AccessToken.IsEmpty() || !IdToken.IsEmpty())
            {
                LoginWithOtherPlatformId("oidctest", IdToken, OnLoginSuccessDelegate);
            }
        }
        else
        {
            FString ErrorMsg = Reader->GetErrorMessage();
            UE_LOG(LogTemp, Error, TEXT("Failed to parse JSON response. Error: %s"), *ErrorMsg);
        }
    }
    else if (!CleanedResponseBody.IsEmpty()) // Check if the response body is not empty.
    {
        // Handle ID token directly as a string.
        IdToken = CleanedResponseBody;

        // Use the ID token as needed.
        UE_LOG(LogTemp, Warning, TEXT("ID Token: %s"), *IdToken);
        OnActionInfoUpdated.Broadcast(FString::Printf(TEXT("Platform ID Token : %s"), *IdToken));

        // Try to log in to AGS Endpoint.
        LoginWithOtherPlatformId("oidctest", IdToken, OnLoginSuccessDelegate);
    }
}

void ALoginActor::LoginWithOtherPlatformId(const FString& PlatformId, const FString& Token, const FVoidHandler& OnSuccessDelegate)
{
    OnActionInfoUpdated.Broadcast(FString::Printf(TEXT("Login to AGS")));

    FAccountUserData AccountUserData = ApiClient->CredentialsRef->GetAccountUserData();

    auto UserApi = ApiClient->GetUserApi().Pin();
    UserApi->LoginWithOtherPlatformId(PlatformId, Token, OnSuccessDelegate, LoginTestFErrorOAuthHandler);

    UE_LOG(LogTemp, Warning, TEXT("Request LoginWithOtherPlatform"));
    OnActionInfoUpdated.Broadcast(TEXT("Request LoginWithOtherPlatform"));
}

// Called every frame
void ALoginActor::Tick(float DeltaTime)
{
    Super::Tick(DeltaTime);
}
提供されているコードは、例示とガイドとしてのみ機能します。トークンを取得するプロセスに関する洞察を提供しますが、実際の実装には追加の考慮事項と制限が含まれる可能性があることを認識することが不可欠です。厳密なエラー処理を確保し、ベストセキュリティプラクティスに従い、アプリケーションの特定の要件に合わせた堅牢な認証およびトークン取得システムを確立するために包括的なテストを実施してください。
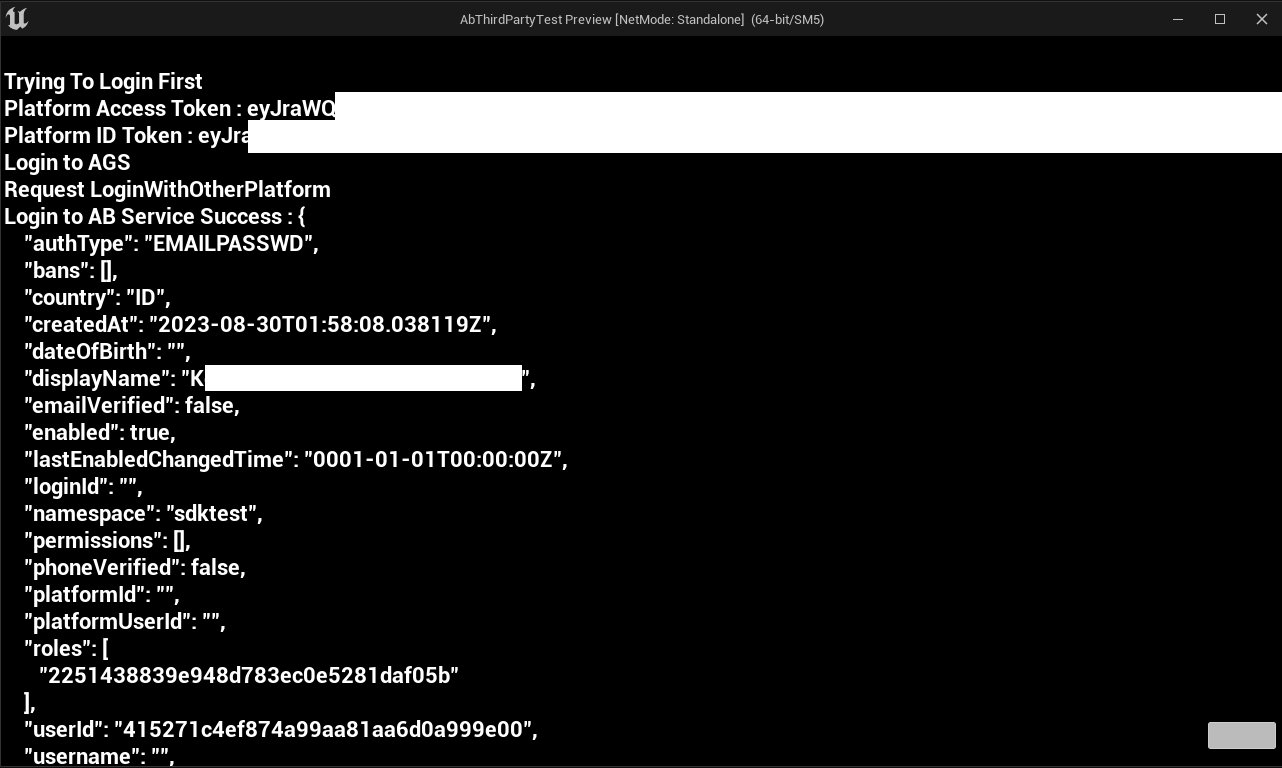
サンプルコードログインログ
PIE: Server logged in
PIE: Play in editor total start time 0.317 seconds.
LogViewport: Scene viewport resized to 1282x730, mode Windowed.
LogAccelByte: Warning: [Compatibility] Version mismatch: Expected "group" version "2.11.0"-"2.11.0", found "2.18.1"
LogTemp: Warning: The link has changed: https://dev-23268164.okta.com/oauth2/default/v1/authorize?response_type=code&client_id=0oaaomiaanDOioaIe5d7&redirect_uri=http://localhost:8080/login/callback&scope=openid%20profile%20email%20phone%20address&state=foo
LogTemp: Warning: The link has changed: https://dev-23268164.okta.com/oauth2/default/v1/authorize?response_type=code&client_id=0oaaomiaanDOioaIe5d7&redirect_uri=http://localhost:8080/login/callback&scope=openid%20profile%20email%20phone%20address&state=foo
LogTemp: Warning: The link has changed: https://dev-23268164.okta.com/signin/refresh-auth-state/00JnYaV0WU7hlAu9AXJSC-GtLmPAUwtfEpBP_SHCxO
LogTemp: Warning: The link has changed: https://dev-23268164.okta.com/
LogTemp: Warning: The link has changed: http://localhost:8080/login/callback?code=cnV2E9gIfouXrtaQ9rG347W2o9q7yZ3COO5H3-EfTYI&state=foo
LogTemp: Warning: Access token response: {"token_type":"Bearer","expires_in":3600,"access_token":"xxxxxx","scope":"openid profile address phone email","id_token":"xxxxxx"}
LogTemp: Warning: Access Token: xxxxxx
LogTemp: Warning: ID Token: xxxxxx
LogTemp: Warning: Request LoginWithOtherPlatform
LogTemp: Warning: Login to AB Service Success: {
    "authType": "EMAILPASSWD",
    "bans": [],
    "country": "ID",
    "createdAt": "2023-08-30T01:58:08.038119Z",
    "dateOfBirth": "",
    "displayName": "Ken",
    "emailVerified": false,
    "enabled": true,
    "lastEnabledChangedTime": "0001-01-01T00:00:00Z",
    "loginId": "",
    "namespace": "sdktest",
    "permissions": [],
    "phoneVerified": false,
    "platformId": "",
    "platformUserId": "",
    "roles": [
        "2251438839e948d783ec0e5281daf05b"
    ],
    "userId": "415271c4ef874a99aa81aa6d0a999e00",
    "username": "",
    "emailAddress": "",
    "avatarUrl": "",
    "deletionDate": "",
    "deletionStatus": false,
    "lastDateOfBirthChangedTime": "0001.01.01-00.00.00",
    "namespaceRoles": [
        {
            "namespace": "*",
            "roleId": "2251438839e948d783ec0e5281daf05b"
        }
    ],
    "newEmailAddress": "",
    "oldEmailAddress": "",
    "phoneNumber": "",
    "platformAvatarUrl": "",
    "platformDisplayName": ""
}
サンプルコードテスト
提供されているコードは、Unreal EngineエディタでOktaを使用して正常にテストされています。Oktaログインのサインインボタンをクリックすると、自動的にログインされます。
Unityゲーム内ログイン統合
OIDCをAccelByte SDKと統合してサインインすることで、プレイヤーがOIDC認証情報を使用してゲームにログインできるようにすることができます。
準備と設定
AGS用のUnityプロジェクト設定
AccelByte SDKがプロジェクトで適切に実行される前に、AccelByte Admin Portalで以前に作成した値を入力し、以下の手順に従う必要があります:
-
JSONファイルを作成し、ファイル名として
AccelByteSDKConfig.jsonを使用します。 -
AccelByteSDKConfig.jsonファイルをコピーし、UnityプロジェクトのAssets/Resourceディレクトリに追加します。 -
ゲームの情報を使用して
AccelByteSDKConfig.jsonファイルに入力します。JSONファイルの例を次に示します:{
"Default": {
"Namespace": "<Your Game Namespace>",
"UsePlayerPrefs": true,//It will use Player Preferences
"EnableDebugLog": true,//Enable Debug Logging
"DebugLogFilter": "Log",//Type of Debug Log
"BaseUrl": "https://prod.gamingservices.accelbyte.io",
"RedirectUri": "http://127.0.0.1",
"AppId": "<Your AppId>",
"PublisherNamespace": "<Your Publisher Namespace>"
}
} -
JSONファイルを作成し、ファイル名として
AccelByteServerSDKConfig.jsonを使用します。次に、UnityプロジェクトのAssets/Resourceディレクトリに追加します。 -
AccelByteServerSDKConfig.jsonファイルで、ゲームサーバーを設定するために次のコードを追加します。JSONファイルの例を次に示します:{
"Default": {
"Namespace": "<Your Game Namespace>",
"BaseUrl": "https://prod.gamingservices.accelbyte.io",
"RedirectUri": "http://127.0.0.1"
}
} -
2つのJSONファイルを作成し、次のファイル名を使用します:
AccelByteSDKOAuthConfig.jsonAccelByteServerSDKOAuthConfig.json
次に、両方のファイルをUnityプロジェクトの
Assets/Resourcesディレクトリに追加します。これらのJSONファイルの内容は次のようになります:{
"Default": {
"ClientId": "<Your IAM Client ID>",
"ClientSecret": "<Your IAM Client Secret>"
}
}
サンプルコード実装
次のステップでは、サンプルコードを使用してゲームのOIDC認証方法を実装する方法について説明します。
OIDC APIを呼び出すためのカスタムSDKを作成する必要があります。例を次に示します:
public class OidcAuthCodeLoginHandler : MonoBehaviour
{
    [SerializeField] Button OidcAuthCodeLoginButton;
    [SerializeField] Text LoginStatus;
    [SerializeField] private string clientId = "<YOUR_CLIENT_ID>";
    [SerializeField] private string clientSecret = "<YOUR_CLIENT_SECRET>";
    [SerializeField] private string redirectUri = "<YOUR_REDIRECT_URI>";
    [SerializeField] private string authorizationUrl = "<YOUR_OIDC_AUTH_URL>";
    [SerializeField] private string tokenUrl = "YOUR_OIDC_TOKEN_URL";
    string[] scopes = { "<YOUR_OIDC_SCOPE>" };
    // AccelByte's Multi Registry references
    private ApiClient apiClient;
    private User user;
    private string serverURL = "<YOUR_SERVER_URL>"; // Replace with your server URL.
    private HttpListener listener;

    private void OnEnable()
    {
        LoginStatus.text = "Please Login";
        OidcAuthCodeLoginButton.onClick.AddListener(() =>
        {
            LoginStatus.text = "Attempting Login";
            StartLogin();
        });
    }
    public void StartLogin()
    {
        string authorizationURL = $"{authorizationUrl}?response_type=code&client_id={clientId}&redirect_uri={redirectUri}&scope={string.Join(" ", scopes)}&state=foo";
        // Start the local server
        StartServer();
        // Open the authorization URL in the default browser or WebView.
        Application.OpenURL(authorizationURL);
        // Wait for the response URL from the local server.
        StartCoroutine(WaitForResponseURL());
    }
    private void StartServer()
    {
        listener = new HttpListener();
        listener.Prefixes.Add(serverURL + "/");
        listener.Start();

        // Start a new thread to handle incoming HTTP requests.
        ThreadPool.QueueUserWorkItem(HandleRequests);
    }
    private string authorizationCode;
    private void HandleRequests(object state)
    {
        while (listener.IsListening)
        {
            try
            {
                HttpListenerContext context = listener.GetContext();
                string responseURL = context.Request.Url.ToString();
                // Check if the response URL contains the authorization code.
                if (responseURL.Contains("code="))
                {
                    // Extract the authorization code from the response URL.
                    authorizationCode = ExtractAuthorizationCode(responseURL);
                    if (authorizationCode != null)
                    {
                        // Continue with your authentication flow using the authorization code
                        // Send a response to the browser indicating success
                        byte[] responseBytes = System.Text.Encoding.UTF8.GetBytes("Authorization code received");
                        context.Response.OutputStream.Write(responseBytes, 0, responseBytes.Length);
                        context.Response.OutputStream.Close();
                        // Stop the local server
                        listener.Stop();
                        listener.Close();
                        // Call ExchangeAuthorizationCode on the main Unity thread
                        UnityMainThreadDispatcher.Instance().Enqueue(ExchangeAuthorizationCode());
                        break;
                    }
                }
            }
            catch (Exception e)
            {
                Debug.LogError("Error handling request: " + e.Message);
            }
        }
    }
    private IEnumerator WaitForResponseURL()
    {
        while (true)
        {
            yield return new WaitForSeconds(1f); // Adjust the wait time as needed

            // Send a request to the local server to check if the response URL has been received.
            using (UnityWebRequest webRequest = UnityWebRequest.Get(serverURL))
            {
                yield return webRequest.SendWebRequest();

                if (!webRequest.isNetworkError && !webRequest.isHttpError)
                {
                    // Response received, break the loop.
                    Debug.Log("Response URL received: " + webRequest.downloadHandler.text);
                    break;
                }
            }
        }
    }
    private string ExtractAuthorizationCode(string responseURL)
    {
        // Extract the code parameter from the response URL
        Uri uri = new Uri(responseURL);
        string query = uri.Query;

        int codeIndex = query.IndexOf("code=");
        int stateIndex = query.IndexOf("&state=");

        if (codeIndex >= 0)
        {
            if (stateIndex > codeIndex)
            {
                // Extract the authorization code without the state parameter.
                string authorizationCode = query.Substring(codeIndex + 5, stateIndex - (codeIndex + 5));
                Debug.Log(authorizationCode);
                return authorizationCode;
            }
            else
            {
                // State parameter not found; extract the authorization code until the end.
                string authorizationCode = query.Substring(codeIndex + 5);
                Debug.Log(authorizationCode);
                return authorizationCode;
            }
        }

        return null;
    }

    private IEnumerator ExchangeAuthorizationCode()
    {
        WWWForm form = new WWWForm();
        form.AddField("code", authorizationCode);
        form.AddField("client_id", clientId);
        form.AddField("client_secret", clientSecret);
        form.AddField("redirect_uri", redirectUri);
        form.AddField("grant_type", "authorization_code");

        using (UnityWebRequest www = UnityWebRequest.Post(tokenUrl, form))
        {
            yield return www.SendWebRequest();

            if (www.result == UnityWebRequest.Result.Success)
            {
                string responseJson = www.downloadHandler.text;
                string accessToken = ExtractAccessToken(responseJson);
                LoginStatus.text = "Got Access Token" + accessToken;

                var apiClient = AccelByteSDK.GetClientRegistry().GetApi();
                var user = apiClient.GetUser();

                Result<TokenData, OAuthError> loginResult = null;
                user.LoginWithOtherPlatform(PlatformType.Oidcokta, accessToken, (Result<TokenData, OAuthError> loginResult) =>
                {
                    if (loginResult.IsError)
                    {
                        // If it results in error, grab the Error Error and Description to print in the Log.
                        Debug.Log($"Login failed : {loginResult.Error.error} Description : {loginResult.Error.error_description}");
                        // Set the Status Text to display the Error, if any.
                        LoginStatus.text = $"Login failed : {loginResult.Error.error} Description : {loginResult.Error.error_description}";
                    }
                    else
                    {
                        Debug.Log($"Login successful : {loginResult.Value.ToJsonString()}");
                        LoginStatus.text = $"Success Login With oidc : {loginResult.Value.ToJsonString()} ";
                    }
                    // Enable interaction with the button again.
                    OidcAuthCodeLoginButton.interactable = true;
                });
            }
            else
            {
                Debug.Log($"Token request error: {www.error}");
            }
        }
    }

    private string ExtractAccessToken(string responseJson)
    {
        // Parse the JSON response to extract the access token.
        AccessTokenResponse accessTokenResponse = JsonUtility.FromJson<AccessTokenResponse>(responseJson);
        // Extract the access token from the parsed response
        string accessToken = accessTokenResponse.access_token;

        return accessToken;
    }

    [System.Serializable]
    public class AccessTokenResponse
    {
        public string access_token;
        public int expires_in;
        public string token_type;
    }
}
以下のコードはLoginWithOtherPlatformを処理します。これは、GetAuthSessionTicketメソッドからの認証トークンによってサードパーティプラットフォームログインを処理するAccelByte SDKの部分です。
var apiClient = AccelByteSDK.GetClientRegistry().GetApi();
var user = apiClient.GetUser();
Result<TokenData, OAuthError> loginResult = null;
user.LoginWithOtherPlatform(PlatformType.Oidcokta, accessToken, (Result<TokenData, OAuthError> loginResult) =>
{
    if (loginResult.IsError)
    {
        // If it results in error, grab the Error Error and Description to print in the
        Debug.Log($"Login failed : {loginResult.Error.error} Description : {loginResult.Error.error_description}");
        // Set the Status Text to display the Error if there is any
        LoginStatus.text = $"Login failed : {loginResult.Error.error} Description : {loginResult.Error.error_description}";
    }
    else
    {
        Debug.Log($"Login successful : {loginResult.Value.ToJsonString()}");
        LoginStatus.text = $"Success Login With oidc : {loginResult.Value.ToJsonString()} ";
    }
    // Enable interaction with the button again.
    OidcAuthCodeLoginButton.interactable = true;
});
OIDC認証のplatform_tokenは、IdPからのアクセストークンです。
Login Handler Scriptをプロジェクトに追加した後、コンパイルできます。
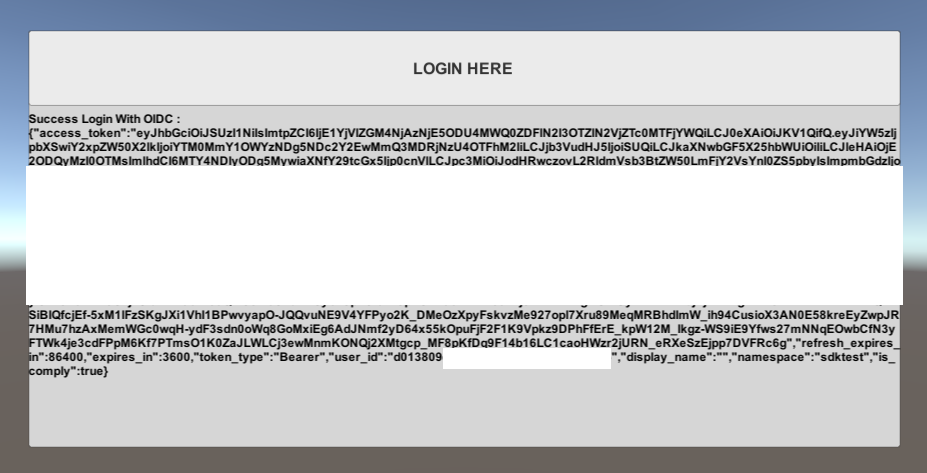
サンプルコードテスト
プロジェクトをビルドして実行できます。以下のスクリーンショットは、コードが機能し、OIDCとテストアプリを使用してログインできることを示しています。
Extend SDKログイン
Extend SDKを介してOIDCを統合し、OIDC認証情報を使用してサインインできます。
- C# Extend SDK
- Go Extend SDK
- Java Extend SDK
- Python Extend SDK
// OIDC provider credentials
public class ProviderSpecification
{
    [JsonPropertyName("name")]
    public string Name { get; set; } = String.Empty;

    [JsonPropertyName("key")]
    public string Key { get; set; } = String.Empty;

    [JsonPropertyName("discovery_url")]
    public string DiscoveryUrl { get; set; } = String.Empty;

    [JsonPropertyName("client_id")]
    public string ClientId { get; set; } = String.Empty;

    [JsonPropertyName("client_secret")]
    public string ClientSecret { get; set; } = String.Empty;

    [JsonPropertyName("scope")]
    public string Scope { get; set; } = String.Empty;
}

// Discovery data from provider
public class DiscoveryData
{
    [JsonPropertyName("issuer")]
    public string Issuer { get; set; } = String.Empty;

    [JsonPropertyName("jwks_uri")]
    public string JWKSUri { get; set; } = String.Empty;

    [JsonPropertyName("authorization_endpoint")]
    public string AuthEndpoint { get; set; } = String.Empty;

    [JsonPropertyName("token_endpoint")]
    public string TokenEndpoint { get; set; } = String.Empty;

    [JsonPropertyName("registration_endpoint")]
    public string RegistrationEndpoint { get; set; } = String.Empty;

    [JsonPropertyName("introspection_endpoint")]
    public string IntrospectionEndpoint { get; set; } = String.Empty;

    [JsonPropertyName("userinfo_endpoint")]
    public string UserInfoEndpoint { get; set; } = String.Empty;

    [JsonPropertyName("scopes_supported")]
    public List<string> SupportedScopes { get; set; } = new List<string>();

    [JsonPropertyName("grant_types_supported")]
    public List<string> SupportedGrantTypes { get; set; } = new List<string>();

    [JsonPropertyName("claims_supported")]
    public List<string> SupportedClaims { get; set; } = new List<string>();

    public static DiscoveryData Retrieve(HttpClient httpClient, string discoveryUrl)
    {
        HttpRequestMessage req = new HttpRequestMessage(HttpMethod.Get, discoveryUrl);

        HttpResponseMessage response = httpClient.Send(req);
        string jsonString = response.Content.ReadAsStream().ReadToString();
        return JsonSerializer.Deserialize<DiscoveryData>(jsonString)!;
    }
}

// Method to get authorization token from provider
public OAuthTokens GetAuthorizedToken(ProviderSpecification spec, string authorizationToken)
{
    DiscoveryData dData = DiscoveryData.Retrieve(DefaultHttpClient.Http, spec.DiscoveryUrl);

    HttpRequestMessage req = new HttpRequestMessage(HttpMethod.Post, dData.TokenEndpoint);
    req.Content = new FormUrlEncodedContent(new Dictionary<string, string>()
    {
        {"grant_type", "authorization_code" },
        {"client_id", spec.ClientId },
        {"client_secret", spec.ClientSecret },
        {"redirect_uri", "http://localhost:9090/callback" },
        {"code", authorizationToken }
    });

    HttpResponseMessage response = DefaultHttpClient.Http.Send(req);
    string jsonString = response.Content.ReadAsStream().ReadToString();

    return JsonSerializer.Deserialize<OAuthTokens>(jsonString)!;
}

using IAccelByteSdk sdk = AccelByteSdk.Builder
        .UseDefaultHttpClient()
        .UseDefaultConfigRepository()
        .UseDefaultTokenRepository()
        .UseDefaultCredentialRepository()
        .Build();

var abPlatformId = "<ab platform id>"
var authCode = "<authorization code from provider>";

var spec = new ProviderSpecification(); //specify or load provider credentials
OAuthTokens tokens = GetAuthorizedToken(spec, authCode);

try
{
    string output = String.Empty;
    sdk.LoginPlatform(abPlatformId, tokens.ID, (otr) =>
      {
          output = JsonSerializer.Serialize(otr);
      });

    // Do something when login succeeds
}
catch (Exception x)
{
    // Do something when login fails
}
func main() {
	mux := http.NewServeMux()

	// proceed
	mux.HandleFunc("/", func(w http.ResponseWriter, r *http.Request) {
		http.ServeFile(w, r, "./templates/index.html")
	})

	// config
	mux.HandleFunc("/config", func(w http.ResponseWriter, r *http.Request) {
		if r.Method == "GET" {
			oidcConfig := struct {
				Scope        string `json:"scope"`
				PlatformId   string `json:"platform_id"`
				DiscoveryUrl string `json:"discovery_url"`
				ClientSecret string `json:"client_secret"`
				ClientId     string `json:"client_id"`
			}{"openid profile email", platformId, discoveryUrl,  os.Getenv("CLIENT_SECRET"),  os.Getenv("CLIENT_ID")}

			data, err := json.Marshal(oidcConfig)
			if err != nil {
				http.Error(w, err.Error(), http.StatusInternalServerError)

				return
			}

			w.Header().Set("Content-Type", "application/json")
			w.WriteHeader(http.StatusCreated)
			_, err = w.Write(data)
			if err != nil {
				return
			}
		}
	})

	// callback
	mux.HandleFunc("/callback", func(w http.ResponseWriter, r *http.Request) {
		form := url.Values{}
		form.Add("grant_type", "authorization_code")
		form.Add("client_id", os.Getenv("CLIENT_ID"))
		form.Add("client_secret", os.Getenv("CLIENT_SECRET"))
		form.Add("redirect_uri", "http://localhost")
		form.Add("code", r.URL.Query().Get("code"))

		post, errPost := http.PostForm("url", form)
		if errPost != nil {
			return
		}
		bodyBytes, err := io.ReadAll(post.Body)
		if err != nil {
			log.Fatal(err)
		}
		response := token{}
		errUnmarshal := json.Unmarshal(bodyBytes, &response)
		if errUnmarshal != nil {
			return
		}

		// Login Platform from AGS
		loginPlatform(*response.IDToken)

		// Try to call AGS after login success
		getCountryLocation()

		w.WriteHeader(http.StatusOK)
		w.Header().Set("Content-Type", "application/text")
		_, err = w.Write([]byte("Success Login"))
		if err != nil {
			return
		}
	})

	log.Printf("listening on http://%s/", "127.0.0.1:8080")
	log.Fatal(http.ListenAndServe("127.0.0.1:8080", mux))
}

// Login platform using Go Extend SDK wrapper
func loginPlatform(platformToken string) {
	input := &o_auth2_0.PlatformTokenGrantV3Params{
		ClientID:       &clientIDPhantAuth,
		CreateHeadless: &createHeadless,
		PlatformID:     platformId,
		PlatformToken:  &platformToken,
	}
	err := oauth.LoginPlatform(input)
	if err != nil {
		log.Fatal("failed login platform")

		return
	} else {
		log.Printf("successful login")
	}
}

// Get country location using Go Extend SDK wrapper
func getCountryLocation() {
	// Try to call AGS service
}

type token struct {
	AccessToken  *string `json:"access_token"`
	IDToken      *string `json:"id_token"`
	RefreshToken *string `json:"refresh_token"`
	TokenType    *string `json:"token_type"`
}
// OIDC provider credentials
@Builder
public class ProviderSpecification {
    @JsonProperty("name")
    public String name;
    @JsonProperty("key")
    public String key;
    @JsonProperty("discovery_url")
    public String discoveryUrl;
    @JsonProperty("client_id")
    public String clientId;
    @JsonProperty("client_secret")
    public String clientSecret;
    @JsonProperty("scope")
    public String scope;
}

// Discovery data from provider
@Builder
public class DiscoveryData {
    @JsonProperty("issuer")
    public String issuer;
    @JsonProperty("jwks_uri")
    public String jwksUri;
    @JsonProperty("authorization_endpoint")
    public String authEndpoint;
    @JsonProperty("token_endpoint")
    public String TokenEndpoint;
    @JsonProperty("registration_endpoint")
    public String registrationEndpoint;
    @JsonProperty("introspection_endpoint")
    public String introspectionEndpoint;
    @JsonProperty("userinfo_endpoint")
    public String userInfoEndpoint;
    @JsonProperty("scopes_supported")
    public List<String> supportedScopes;
    @JsonProperty("grant_types_supported")
    public List<String> supportedGrantTypes;
    @JsonProperty("claims_supported")
    public List<String> SupportedClaims = new ArrayList<>();
}

public static DiscoveryData retrieveDiscoveryData(HttpClient httpClient, String discoveryUrl) throws Exception {
    HttpRequest request = HttpRequest.newBuilder().uri(URI.create(discoveryUrl)).build();
    HttpResponse<String> httpResponse;
    try {
      httpResponse = httpClient.send(request, HttpResponse.BodyHandlers.ofString());
    } catch (Exception e) {
      // Do something when failed
      throw new Exception("Encountered an exception when downloading");
    }
    if (httpResponse.statusCode() >= HttpURLConnection.HTTP_OK && httpResponse.statusCode() >= HttpURLConnection.HTTP_MULT_CHOICE) {
        ObjectMapper objectMapper = new ObjectMapper();
        DiscoveryData data = objectMapper.readValue(httpResponse.body(), DiscoveryData.class);
        return data;
    } else {
        throw new Exception("Encountered unexpected http status: " + httpResponse.statusCode());
    }
}

public static HttpRequest.BodyPublisher encodeContentToFormUrl(Map<Object, Object> data) throws UnsupportedEncodingException {
    StringJoiner sj = new StringJoiner("&");
    for (Map.Entry<Object, Object> entry : data.entrySet()) {
        sj.add(URLEncoder.encode(entry.getKey().toString(), StandardCharsets.UTF_8.toString()) + "=" +
                URLEncoder.encode(entry.getValue().toString(), StandardCharsets.UTF_8.toString()));
    }
    return HttpRequest.BodyPublishers.ofString(sj.toString());
}

// Method to get authorization token from provider
public Map<String, String> getAuthorizedToken(ProviderSpecification spec, String authorizationToken) throws Exception {
    HttpClient httpClient = HttpClient.newHttpClient();
    DiscoveryData dData = retrieveDiscoveryData(httpClient, spec.discoveryUrl);

    Map<Object, Object> data = new HashMap<>();
    data.put("grant_type", "authorization_code");
    data.put("client_id", spec.clientId);
    data.put("client_secret", spec.clientSecret);
    data.put("redirect_uri", "http://localhost:9090/callback");
    data.put("code", authorizationToken);

    HttpRequest request = HttpRequest.newBuilder()
        .uri(URI.create(dData.TokenEndpoint))
        .header("Content-Type", "application/x-www-form-urlencoded")
        .POST(encodeContentToFormUrl(data))
        .build();
    HttpResponse<String> httpResponse;
    try {
        httpResponse = httpClient.send(request, HttpResponse.BodyHandlers.ofString());
    } catch (Exception e) {
        // Do something when failed
        throw new Exception("Encountered error when fetching the authorized token");
    }

    if (httpResponse.statusCode() >= HttpURLConnection.HTTP_OK && httpResponse.statusCode() >= HttpURLConnection.HTTP_MULT_CHOICE)
    {
        ObjectMapper objectMapper = new ObjectMapper();
        return objectMapper.readValue(httpResponse.body(), new TypeReference<HashMap<String,String>>() {});
    } else {
        throw new Exception("Encountered unexpected http return status: " + httpResponse.statusCode());
    }
}

...

final AccelByteSDK sdk = new AccelByteSDK(httpClient, tokenRepository, configRepository);

var abPlatformId = "<ab platform id>";
var authCode = "<authorization code from provider>";
var spec = new ProviderSpecification(...); //specify or load provider credentials

Map<String, String> authToken = getAuthorizedToken(spec, authCode);
final String idToken = authToken.get("id_token");

if (!sdk.loginPlatform(abPlatformId, idToken))
{
    throw new Exception("Login platform failed!");
}

// Do something when login succeeds
import accelbyte_py_sdk.services.auth as auth_service
from accelbyte_py_sdk.core import get_http_client
from accelbyte_py_sdk.core import AccelByteSDK
from accelbyte_py_sdk.core import MyConfigRepository

host = "https://example.com"

response = get_http_client().get(
    url="{host}/user/{username}/token/{tokenType}".format(host=host, username="YourUsername", tokenType="authorization")
)
code = response.text

response = get_http_client().post(
    url="{host}/auth/token".format(host=host),
    data={
        "grant_type": "authorization_code",
        "client_id": "YourClientId",
        "client_secret": "YourClientSecret",
        "redirect_uri": "http://localhost/callback",
        "code": code,
    }
)
token = response.json()

sdk = AccelByteSDK()
sdk.initialize(
    options={
        "config": MyConfigRepository(
            base_url="https://****.accelbyte.io",
            client_id="********************************",
            client_secret="********************************",
            namespace="********",
        )
    }
)

result, error = auth_service.login_platform(
    platform_id="YourAbPlatformId",
    platform_token=token["id_token"],
    sdk=sdk,
)
if error:
    exit(error)