Set up and sell DLCs
Introduction
The In-app Purchase integrations in AccelByte Gaming Services (AGS) enables you to sync player purchases from third-party platforms (e.g., PlayStation, Xbox, etc.). To achieve this, items sold on a third-party platform need to be correctly mapped to items created in AGS.
This article walks you through how to:
- Add DLCs in AGS
- Map items from third-party platforms to DLCs in AGS
We recommend checking out the DLC Management Guidelines section first for best practices in managing DLCs in AGS.
Prerequisites
The items you intend to add to DLCs must be:
- Properly configured in your third-party platform.
- Already existing in your AGS Store. To create store items, refer to the Create store items article.
Add DLCs
After configuring the items you want to include in DLCs in your third-party platform and creating them in your AGS Store, you can proceed to adding DLCs in the AGS Admin Portal. You can add DLCs in the AGS Admin Portal in two ways: manually or by using a JSON file.
Manually add a DLC
-
Go to your game namespace.
-
On the Admin Portal sidebar, select Commerce > In-App Purchase > DLC Settings.
-
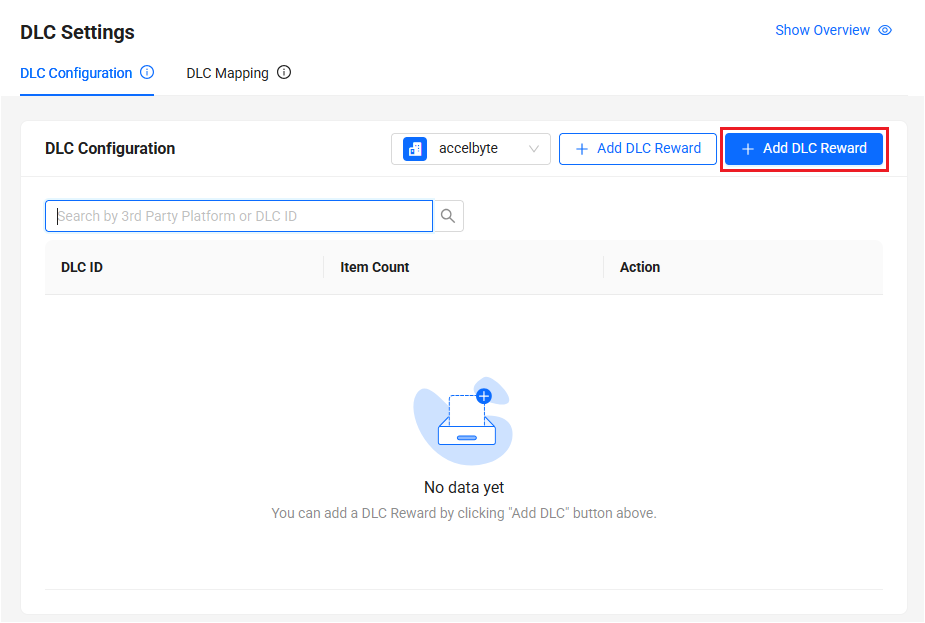
On the DLC Settings page, open the DLC Configuration tab and click on the + Add DLC Reward button. The Add DLC Reward form appears.
-
On the form, fill in the required information:
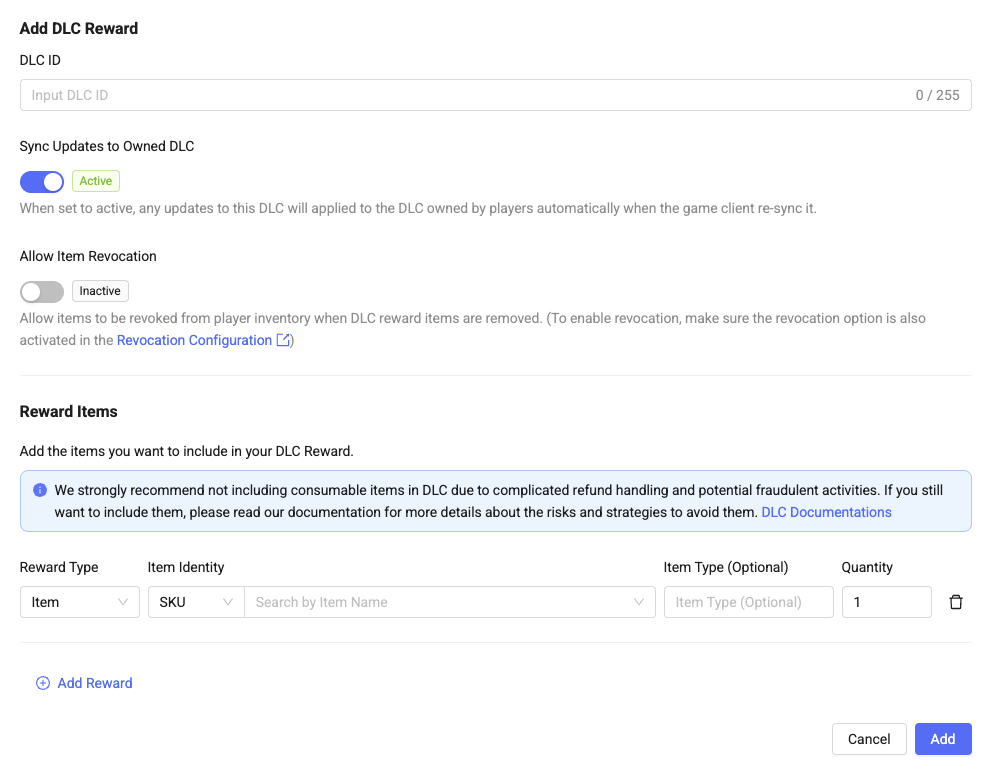
- Fill in the DLC ID.
- Configure the Sync Updates to Owned DLC
- Active: Any updates to the DLC will be applied to the DLC owned by players when the game client performs a re-sync. If the game client does not re-sync, the updates will not be applied.
- Inactive: Any updates to the DLC will not be applied to the DLC owned by the players, even if the game client performs a re-sync.
- Configure Allow Item Revocation
- After enabling Sync Updates to Owned DLC, Toggle Allow Item Revocation becomes visible and configurable.
- Allow Item Revocation will remain disabled if Sync Updates to Owned DLC is disabled.
- Enabling Allow Item Revocation activates additional features based on the Revocation configuration. Therefore, it is crucial to also set up the Revocation Configuration. For more information, please see: Configure revocation rules.
- Choose Item or Currency as the Reward Type.
- Choose SKU or ID as the Item Identity. You can search for an item using its name.
- Choose COINS, INGAMEITEM, BUNDLE, CODE, SEASON, or MEDIA as the Item Type.
- Fill in an amount for the Quantity.
- Click on the Add button to save the DLC.
Add DLCs using a JSON file
-
Go to your game namespace.
-
On the sidebar, select Commerce > In-App Purchase > DLC Settings.
-
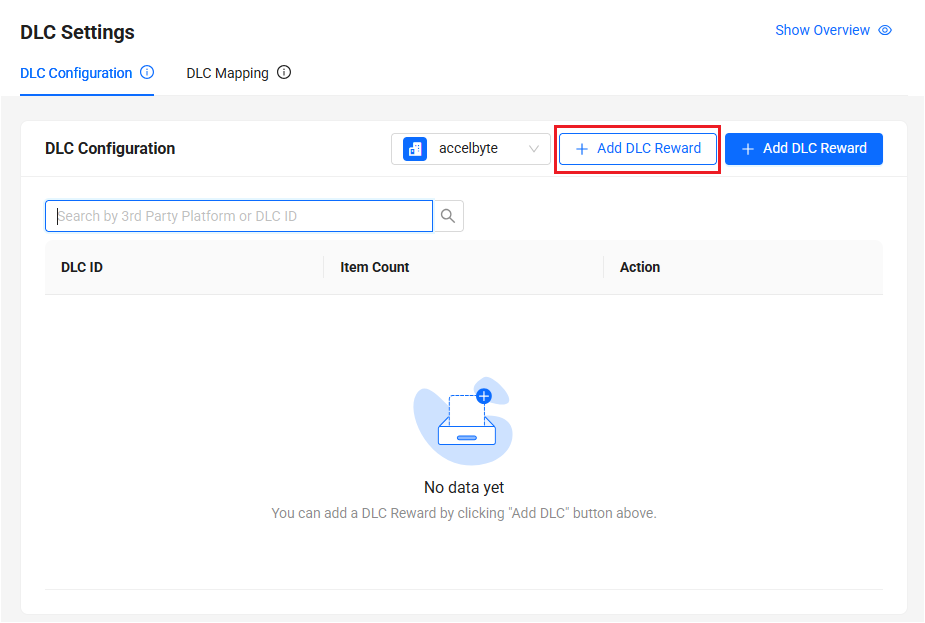
On the DLC Settings page, open the DLC Configuration tab and click on the left + Add DLC Reward button. A JSON template appears.
noteIf there is an existing DLC configured already, click on the JSON Options button. Then, click Edit to modify the existing DLC JSON file or Delete to replace it with a new one.
-
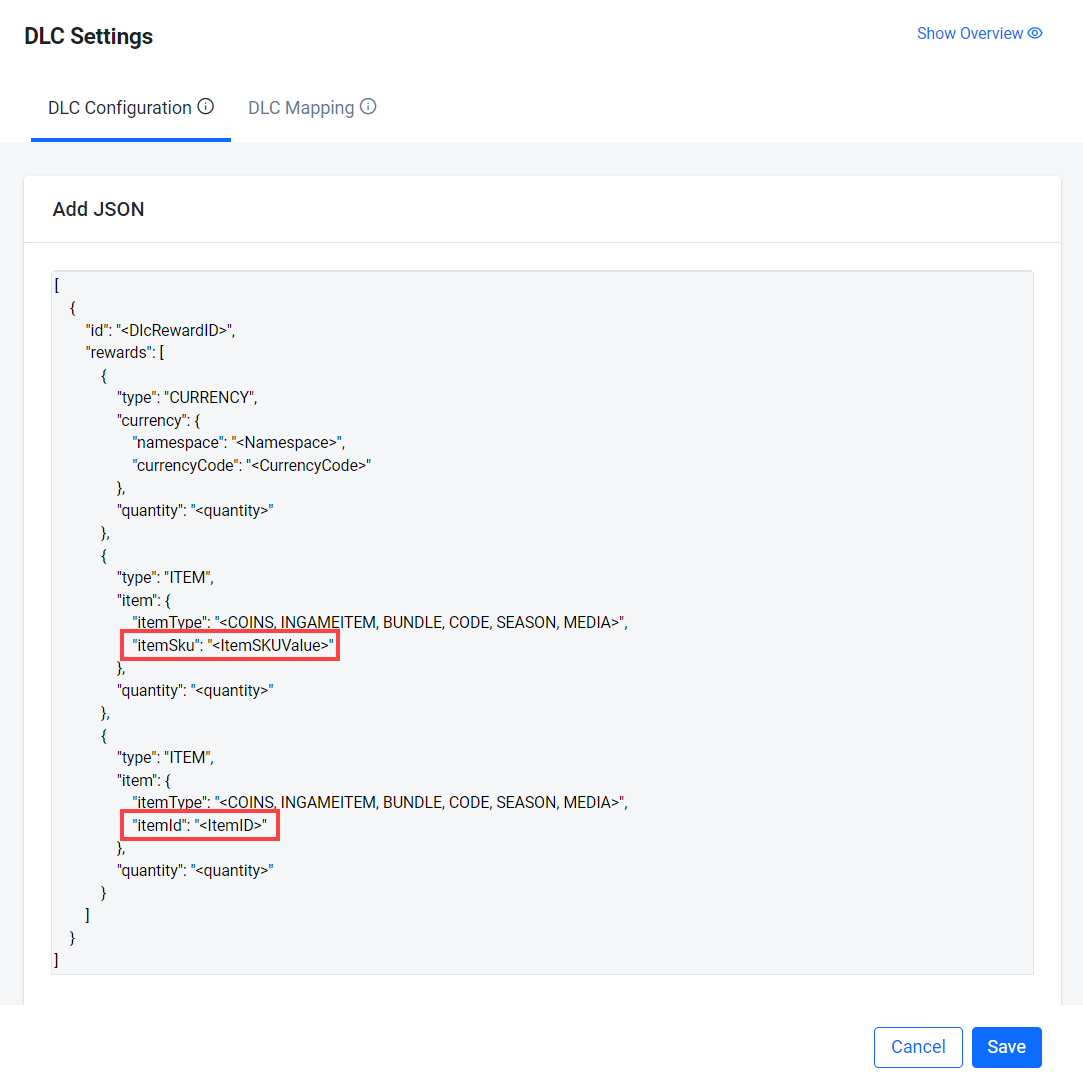
Follow the template to configure your JSON file.
Important Notes & Recommendations
- We strongly advise against removing DLC items that players have purchased, as this can raise significant legal, regulatory, and trust-related concerns.
- Such actions may violate consumer protection laws in several regions, including the EU, South Korea, and Japan, where digital content is often protected under strict guidelines.
- Even in markets with more flexible regulations, removing paid content without clear prior notice, justification, or compensation risks damaging player trust and may result in backlash or legal disputes.
- Avoid including consumable items in the DLC configuration.
- Including consumable items will introduce complexity, especially when Allow Item Revocation is enabled.
- However, if you choose to include consumable items, we recommend either:
- Disabling Allow Item Revocation,
- Or, avoiding changes to the DLC configuration to prevent additional items from being revoked from players.
- If configuring DLC rewards includes consumable items and Allow Item Revocation is enabled, we recommend against enabling Inventory integration with Ecommerce.
- Item revocation is currently not supported for Inventory Integration with E-commerce, particularly for stackable consumables. This is because any reward deletion in the DLC configuration will not be reflected in the players' inventory in some cases.
- Even though non-stackable consumables are supported and may function with the above configuration, we do not recommend using it.
Map DLCs in AGS to third-party platforms
After completing the DLC configuration, you can proceed to the DLC Mapping tab to map the DLC you created to the corresponding items in your third-party platform. You can map DLCs in AGS in two ways: manually or by using a JSON file.
Manually add DLC Mapping
-
Go to your game namespace.
-
On the sidebar, select Commerce > In-App Purchase > DLC Settings.
-
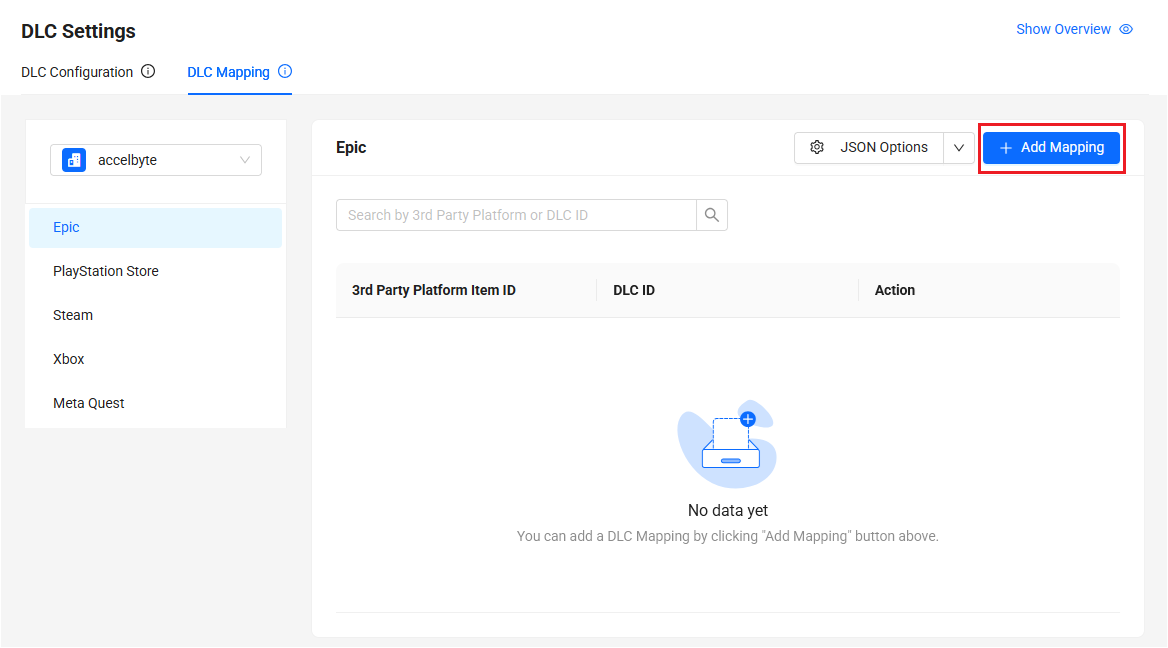
In the DLC Mapping tab, click on the platform with the DLC that you want to map. Then, click on the Add Mapping button. The Add DLC Mapping form appears.
-
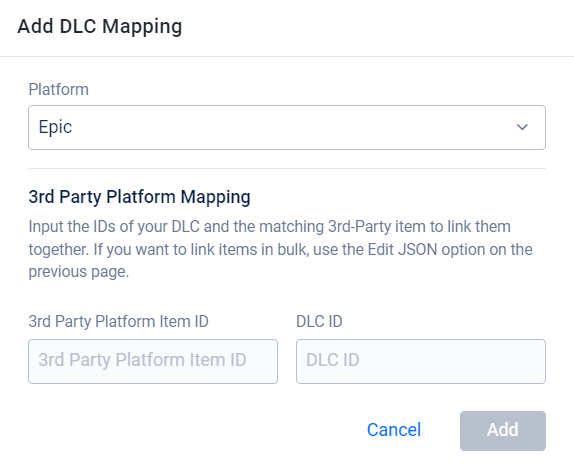
Fill in the required information on the form:
- Fill in the 3rd Party Platform Item ID.
- Fill in the DLC ID.
Add DLC Mapping using JSON file
-
Go to your game namespace.
-
On the sidebar, select Commerce > In-App Purchase > DLC Settings.
-
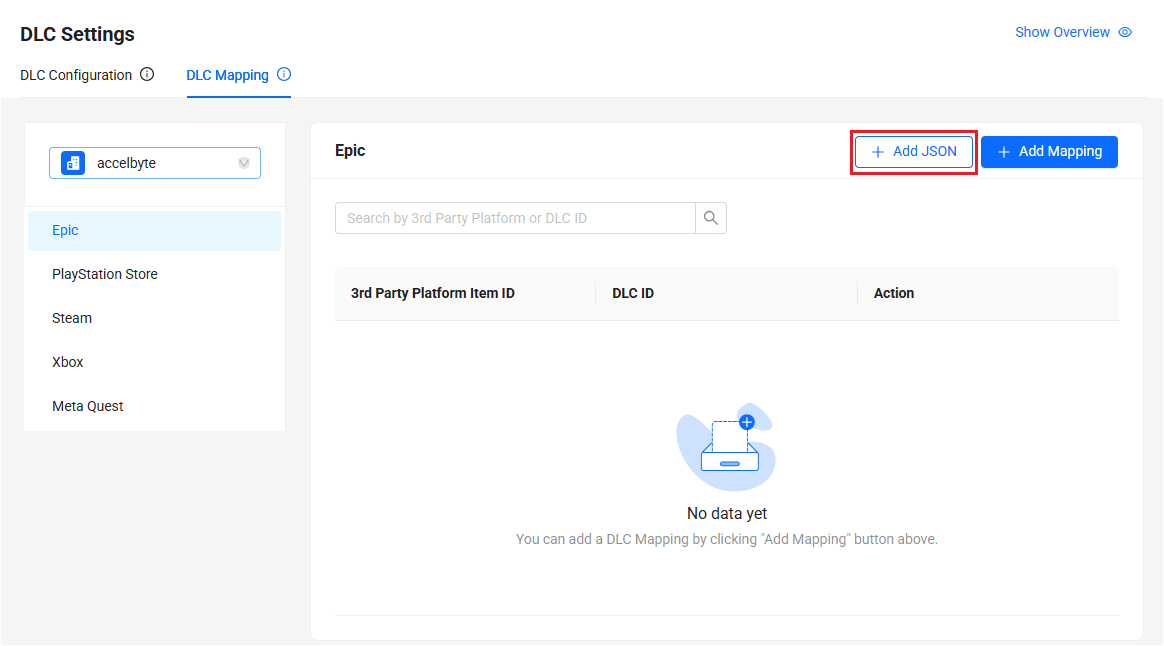
In the DLC Mapping tab, click on the platform with the DLC that you want to map. Then, click on the + Add JSON button. A JSON template appears.
noteIf there is an existing DLC mapping already in the platform, click on the JSON Options button. Then, click Edit to modify the existing DLC JSON file or Delete to replace it with a new one.
-
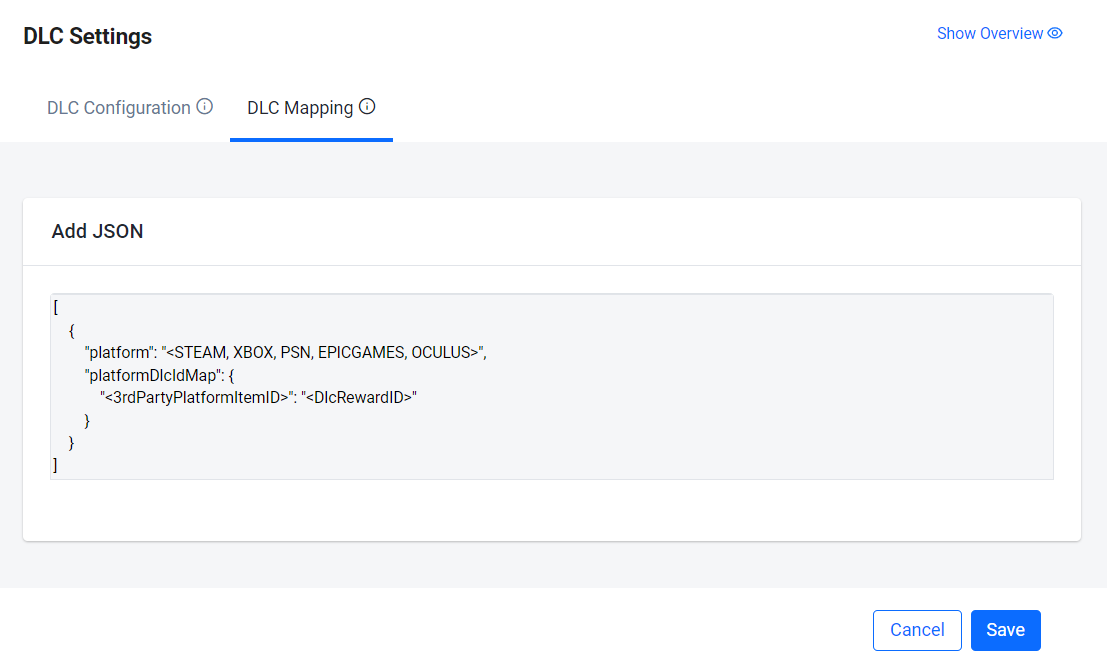
Follow the template to configure your JSON file.
 caution
For Meta Quest, use 'OCULUS' instead of 'METAQUEST', as the backend still relies on the previous name.
DLC management guidelines
It is recommended to avoid including virtual currencies and other consumable items in DLCs for several reasons, including but not limited to the following:
-
Complicated refund handling: Including virtual currencies or consumable items in DLC rewards may complicate the refund process as these items are often immediately consumed, partially consumed, or traded within the game. This creates difficulties in tracking and revoking the benefits gained from these items upon a refund request.
-
Potential fraudulent activities: Players might exploit the refund policy by purchasing DLCs containing virtual currencies or consumable items, using these items, and then requesting a refund, thus obtaining without cost.
If you still want to use virtual currency in DLCs, your revocation strategy must allow negative balances. This prevents exploitation by ensuring that if a player spends all their currency and then gets a refund, their balance can go negative. For example, if a player buys 100 VC, spends it all, and then receives a refund, their balance might go to -100. This approach helps manage refunds and maintain the game's economic balance. For more information, see Configure revocation rules.
DLC Config Versioning
Managing DLC configuration changes is critical for maintaining system traceability. This section will walk you through how to view DLC configuration history, compare changes between versions, and restore previous configurations when needed. Whether you’re troubleshooting an issue or reviewing recent changes, these tools help ensure that configuration changes are trackable and restorable.
View DLC configuration history
- Go to your game namespace.
- On the Admin Portal sidebar, select Commerce > In-App Purchase > DLC Settings.
- Navigate to the specific DLC configuration you'd like to view the history for, hover over the More icon under the Action column, and select Version History.
- You will be redirected to the Version History page, where you can view a list of all configuration versions, along with their timestamps and changes.
- To see more details about a specific version, click Detail next to the version you want to inspect.
- A popup modal will be displayed, showing the full configuration details for that version.
Compare DLC configuration changes
- In the Version History page, click the Compare Version button.
- Select two versions you want to compare.
- Click Show Comparison to proceed.
- The comparison between the selected versions will then be displayed.
Restore version
- In the Version History page, navigate to the desired version in the list.
- Click the Restore button.
- The selected version will be restored immediately.